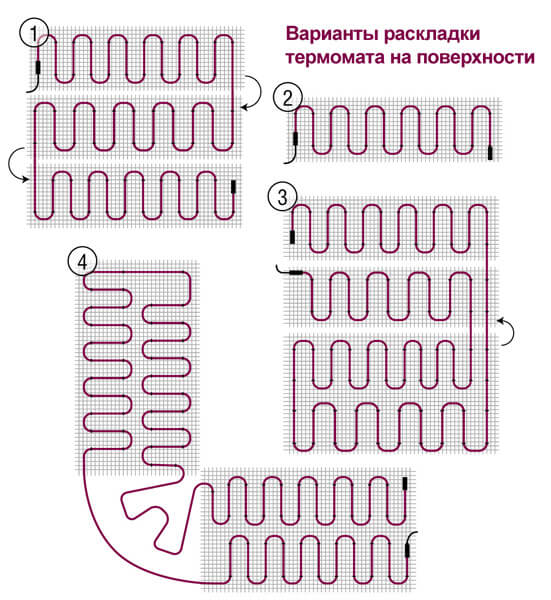
Open area heating control options
- The simplest option: a self-regulating heating cable is plugged directly into a socket or shield and switched on manually when needed. The self-regulating cable can be used with all thermostats.
- A simple resistive cable option: heating a walkway or porch can be done with a resistive cable through a conventional underfloor heating sensor to protect the heating cable from overheating.
- With the use of a thermostat and sensors: the heating system is controlled by a thermostat according to the indications of air temperature and precipitation sensors.
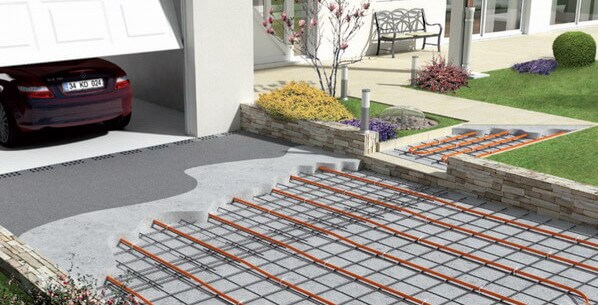
Options for layout and combination of control options are possible. This is justified in cases where, for example, a power consumption limit is set (as sometimes happens in cottage settlements). You can make the main entrance and path a resistive device controlled from a weather station so that they are always ice-free. And the rest of the areas that do not have enough power to heat at the same time, heat with a self-regulating cable, which will be turned on manually when the main section is turned off.
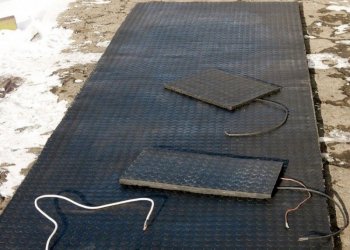
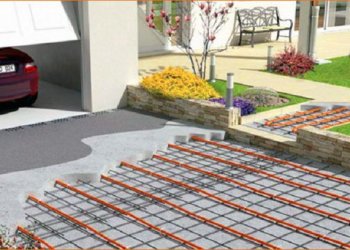
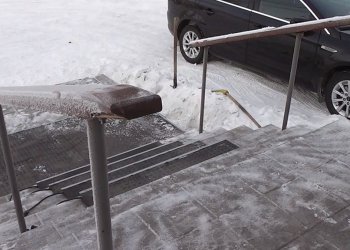
On the left is a resistive cable - the entrance to the garage, on the right is a self-regulating - additional parking for guests
Calculation of power for heating open areas
It is necessary to bring 300-350 watts per square meter of heated surface. The output power depends on the thickness of the layer between the heating cable and the surface.
For example, you need to heat a track 0.8 m wide and 3 m long, it turns out 2.4 m2 2.4 * 300 \u003d 720 W
Self-regulating cable Lavita GWS 40-2CR with a rated power of 40 W / m should be taken 18 meters (720/40 = 18). The resistive cable comes in sets with a fixed length and power, and you need to choose the nearest larger one. On the example of the proven TXLP/2/28 DEFROST SNOW (TWIN) two-wire resistive heating cable ready for laying, we select the 890 W (31.78 m) section.
An important nuance when heating porch steps of standard width (30 cm) with a self-regulating cable: it is better to take GWS 30-2CR with a rated power of 30 watts, and put it in 3 threads with an interval of 10 cm. It turns out just 300 W per m2. Whereas 2 threads of Lavita GWS 40-2CR may not be enough, and 3 threads are too much.
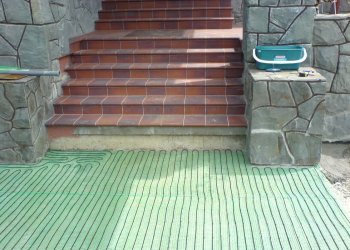
Self-regulating heating cable laid on steps in slotted grooves
Heating cable mounting options
- on a plastic mesh spread over the entire heated surface
- on mounting tapes, pre-fixed with dowels
- into slotted grooves, you can pre-fix with a load and a small amount of mortar
The distance between the threads of the heating cable is calculated, and the cable is fixed with clamps to the grid or with the tongues of the mounting tape.
We fix the self-regulating heating cable Lavita GWS 40-2CR with clamps
Fixing the resistive cable on the grid with clamps
DIY styling technology
As we said earlier, you can make a warm floor on the street yourself if you know the technical aspects and nuances of installation. The design of the snowmelt system is not complicated. It includes the heating cable itself, a thermostat, humidity and precipitation sensors, a signal cable (for connecting sensors), and protective automation. As for the heating power, then, as a rule, for the street, the calculation is reduced to 250-300 W / m2. In this regard, it is recommended to choose a conductor with a power of about 28 W/m.
Before proceeding with the installation of a warm floor, you need to carefully level the surface. After that, according to the manufacturer's recommendations, you must lay the heating conductor and connect it to the network, sensors, and protective automation. Further, depending on the situation, a concrete screed is poured, on which, after hardening, it is recommended to pour a layer of sand.At the very last moment, you need to move on to paving natural stone, tiles or other suitable material.
You can also do without a screed, simply pouring a 3-4 cm thick sand cushion over the warm floor. If you still need to fill in the screed, be sure to fix the heating cable outside with mounting tape before that, as shown in the photo below.
The installation locations of the sensors are discussed in the attached instructions from the manufacturer. The thermostat itself must be installed in a room protected from precipitation and low temperatures. It is recommended to install the thermostat in the corridor.

When laying an electric floor heating on the street, be sure to consider an important point - the paving elements should not affect the cable. If you miss this moment, the site cable heating system may be damaged in the future. Its repair will be extremely problematic and, of course, costly. One more nuance should also be noted here - if you decide to lay a warm floor on a sand cushion, make sure that there are no stones and other debris in the sand, because. under load, stones can damage the conductor.
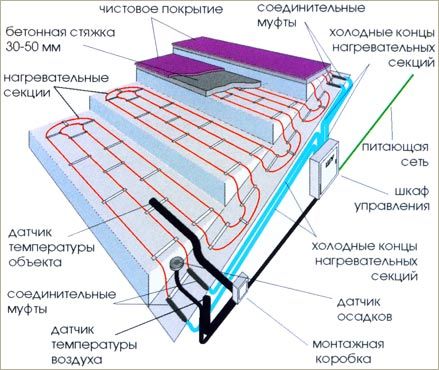
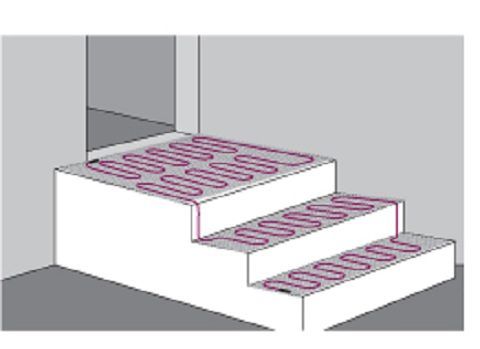
If you need to make electric heating of steps on the porch, the cable is laid according to the selected scheme with the same pitch over the entire area. After that, a concrete screed is poured, on top of which paving of stone, tile or even marble is performed. By the way, in this case, an alternative heater can be a thermomat or tape. You can clearly see what the heating of steps on the street is like in the diagrams and photos below:
We also recommend watching the video installation instructions:
How to make snowmelt on steps
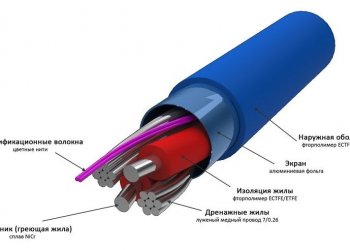
Outdoor heating cable
That's the whole technology of laying a warm floor on the street with your own hands. As you can see, the installation of an outdoor heating system for paths and steps is quite laborious. We still recommend giving such a thing to specialists, many of whom will do everything inexpensively and quickly. Only in this case, the site heating will be economical, safe and durable!
It will be useful to read:
- How to make fence lighting
- How to lay a cable underground
- How to install solar panels for your home
prices in St. Petersburg from RIM
The Tomsk manufacturing plant "RIM" is pleased to offer you modern innovative equipment for the installation of efficient heating systems of varying complexity: a fireproof infrared warm floor based on thin heating mats and a constantan flexible heating cable.
The warm fireproof floor is made using durable Japanese-made Toray carbon fiber, which has a huge temperature margin and ensures fireproof construction throughout the entire service life.
Such a floor is actively used for heating residential buildings, public institutions, non-residential premises of various configurations and purposes.
The heating cable is a two-core heating wire made of a thermostable constantan alloy, which provides uniform, rapid heating to a predetermined temperature level with energy savings. The heating cable is used for heating plastic and metal pipes of different diameters, roofs and gutters, access steps and porches, soil in greenhouses, runways. The use of a heating cable increases the level of safety in the cold season, prolongs the playing season on the football fields.
The heating cable for steps has a cut-off design, which allows you to purchase any length of cable from 1 meter (but not less than 2 meters). This makes it easier to install the cable, as there is no need to carry a heavy coil.
On the official website of the RIM manufacturing plant, you can buy a heating cable for outdoors and indoors online.A detailed electronic catalog with a complete list of equipment manufactured by the plant allows you to independently select a heating cable for porch steps and place an order in a matter of minutes.
In the section "Where to buy?" a list of partner companies is presented that sells the products of the RIM plant in various cities and towns in Russia and abroad - you can purchase a heating cable for the porch in your city (Moscow, St. Petersburg, Novosibirsk, etc.) and save time on delivery.
Best price heating cable for step heating
The price of the heating cable for the porch and steps presented on the manufacturer's website is devoid of trade margins, which allows you to purchase the necessary footage of equipment and save financial resources. The prices of a heating cable for heating a porch in partner companies (in Moscow, St. Petersburg and other cities) may differ from the manufacturer's prices.
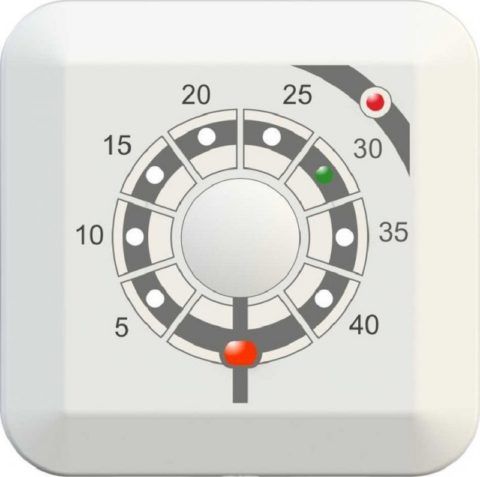
For more efficient operation of the heating cable used to heat the porch on the street, it is necessary to use an accurate thermostat that allows you to set and maintain the required temperature regime throughout the entire period of operation.
Outdoor area heating Devi
Heating of outdoor areas from Devi
It is difficult to find a person who has not encountered slippery steps or sidewalks in winter. The methods that many have used for centuries - salt, sand or reagents - are not only obsolete, they require a lot of effort, money and time. With the development of modern technologies, it has become much easier to deal with icing of outdoor areas or steps - special heating systems are used for this.
Features of heating outdoor areas
The main purpose of heating outdoor areas or steps is to prevent the formation of a cover of snow or ice. This way you can keep people moving. Most often, such a system is based on a Devi heating cable or a special heating mat from the same manufacturer, which is laid under the surface during the construction process. An obligatory element of such a system is a control device for heating elements. The main task of the automation system is to control and regulate the heating temperature depending on weather conditions.
Working principle of Devi heating system
Everyone who has encountered "warm floors" knows that the basis of such a system is an electric cable. The heating of the sites is carried out according to the same principle - the heat generated by the cable is retained by the surface. Therefore, the cable is embedded in the base, on which paving slabs or the surface of the steps will then be located.
But in order to properly heat the outdoor area using Devi systems, you need to choose the right heating cable
At the same time, it is important to take into account not only the speed with which the surface will be heated, and it is directly related to the power consumption, but also the possibility of saving. Not everyone can afford to pay fairly large amounts of electricity bills for street heating
The capacity of the Devi cable used for outdoor use is less than for indoor systems. Given that the cable is laid in a zigzag, its power can also be adjusted. As practice shows, the cable power is selected individually, taking into account all the features of the application, and is 0.2-0.3 kW / sq.m. But the data are averaged, in each case an individual calculation is made.
Scope of heating systems Devi
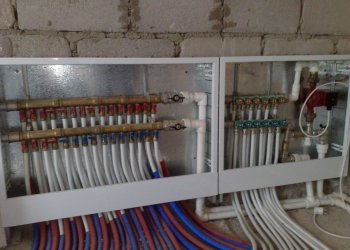
In order for the heating systems for outdoor areas to be as effective as possible, it is worth knowing some features of their application. The cable or mats for heating are spread on a flat surface and fixed with a special reinforcing mesh, on which a layer of concrete or other building mixture is laid.Controlling the Devi heating system is quite simple - power cabinets and control panels controlled by a microprocessor are used for this. Such a cabinet is assembled from ready-made elements, with the help of which it is possible to adjust the control to the conditions of the object.
Ways to heat the outdoor porch
It is advisable to choose and think over any of the options described below at the stage of designing a house, or at least attaching a porch to it. Because heating the porch on the street will require an increase in the power of the introductory electrical cable, combining the system with intra-house communications, connecting to them, etc.
Upgrading an existing porch is more difficult, but also possible. How to make a warm porch to the house correctly, will tell and show the video in this article.
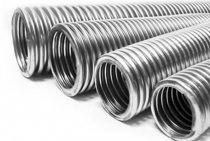
Water heating
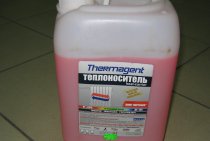
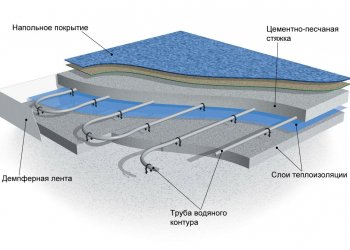
Water heating of outdoor areas involves laying thin tubes filled with non-freezing liquid along them, followed by pouring the surface with concrete.
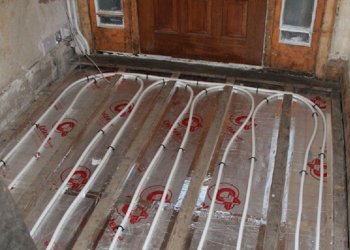
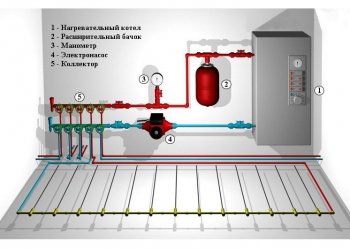
Having chosen such a heating system, you will have to take care of buying a pump and a heating boiler. Or about replacing it with a more powerful one, if the water heating of the house already exists and is in operation. Plus, it will be necessary to constantly monitor the volume of fluid and pressure in the system.
In general, water heating of porch steps is the most expensive in terms of materials and installation. It makes sense to choose it only if water heating is also planned in the house itself, moreover, from a gas boiler.
infrared heating
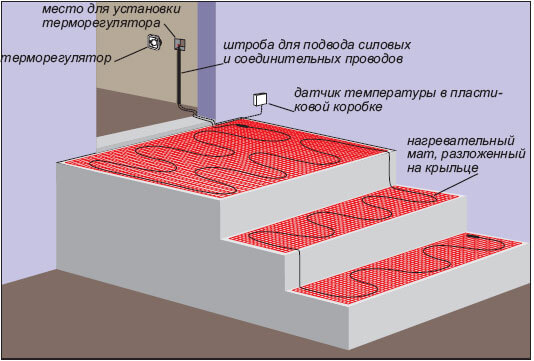
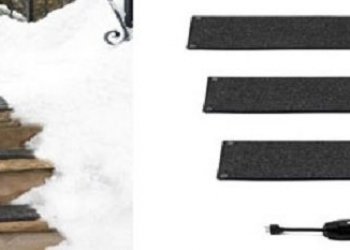
In order to quickly and without serious physical effort to get an insulated porch, you can lay thermomats on it. These are rubber mats, plates or sections of various shapes with an infrared heater inside. You can buy them ready-made, or order the production according to your size.
All sections are interconnected with special connectors with their own hands, without the use of any tools. Each element is equipped with two cables with such connectors - one works for the input, the second for the output. They can be placed in boxes or left to lie along the edges of the steps.
The benefits of this option include:
- Installation speed;
- Relative cheapness (about 7000 rubles/sq.m.);
- Economical operation;
- Ease of dismantling for the warm season.
There is also a drawback: rough black coatings hide beautiful steps under them, depriving the porch of external attractiveness. But they can be kept in reserve to be used in emergency situations for a short time.
heating cable
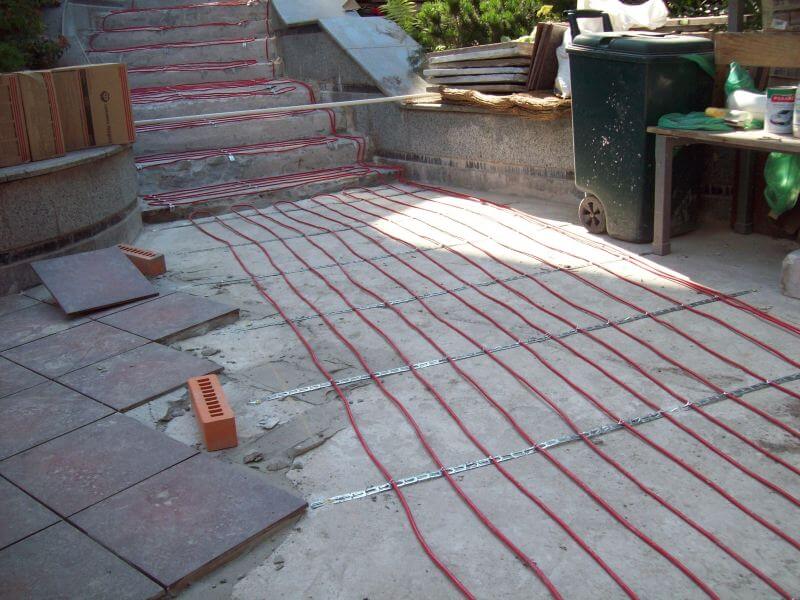
According to experts, this is the best way to make warm steps on the porch. And not only steps: the heating cable can be laid both on the platform in front of the porch, and on the path leading to it, and at the entrance to the garage. The main thing is that there is a power source somewhere nearby.

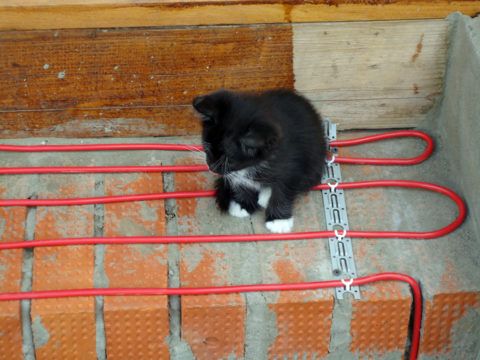
As you can see, the cable is laid on the heated surface with a snake, with a step between turns from 4 to 10 cm, and is fixed with metal plates.
The installation instructions look like this:
| Schematic image | Description |
A heating cable is laid on horizontal surfaces in a continuous wavy line.
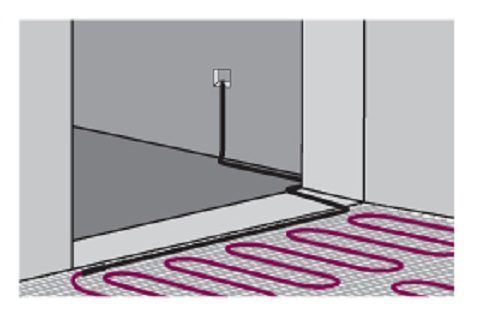
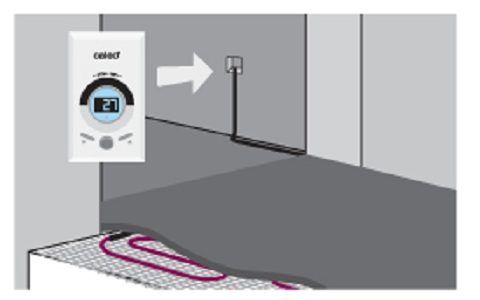
The end is brought out of the porch and connected to the mains through a thermostat. After that, its performance is checked.
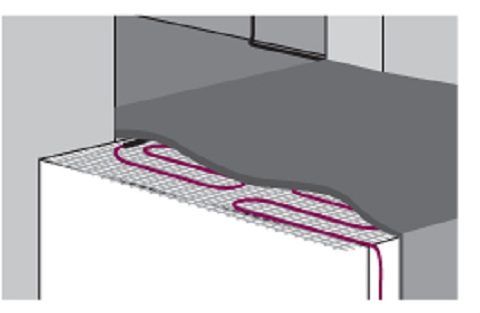
After checking the resistance, a screed is poured over the cable, fixing it in a given position and protecting it from mechanical damage. Care must be taken to ensure that the screed is free of voids.
After pouring the solution, you need to wait for it to dry completely, and then once again make sure that the system is working.
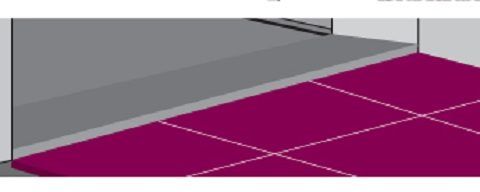
If everything is in order, you can clad the heated porch with porcelain stoneware, clinker tiles or other material.
When deciding how to insulate the porch, you can choose two options for adjusting and controlling the system - manual and automatic.
Manual control means that you yourself will turn the system on and off as needed.This will have to be done after snowfalls and at outdoor air temperatures from zero to minus 7-10 degrees - it is in this temperature range that ice forms. In severe frosts, if the porch was initially dry, it is not necessary to heat it, since snow does not fall at this temperature.
Control in automatic mode is carried out using an anti-icing system, which includes thermostats, temperature and humidity sensors, junction boxes, protective and start-distributing fittings.
The heating part of the system can consist of a resistive (with constant power) or self-regulating (with varying power) cable.
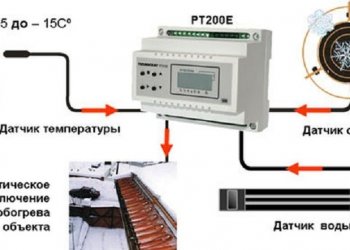
Automatic control is much more convenient than manual control. It allows you not to constantly monitor the weather, temperature and humidity. All indicators from the environment are transmitted by sensors to the thermostat, which regulates the heating power, turns the heating system on or off.
The easiest way is to buy a ready-made kit, and mount it according to the instructions, and not select all the adjustment and control elements yourself.
Heating of steps of a porch and ladders by means of a heating cable
Heating of outdoor stairs and porches
For guaranteed protection against frost on street steps, it is required to provide a heating power of 250 - 300 W / m2.
As a rule, powerful ELEKTRA heating cables are used - single-core or twin-core, with a power density of 20 W/r.m.
For this apply:
Which cable to choose for installation: single-core or two-core? It is convenient to lay a two-core cable when heating steps, but a single-core cable can also be used on platforms. When there is no possibility of increasing the height of the step, grooves (strobes) are cut out under the cable, and the cable is already laid in them.
Examples of calculating the power for heating the porch.
Heating of the entrance group with ELEKTRA VCD 25 heating cable.
Initial data:
- number of heated steps 4 pcs.
- step length 1200 mm.
- step width 300 mm.
- step height 150mm.
- dimensions of the heated area 1200 x 1200 mm.
- specific heating power 300 W./m2
To ensure a heating power of 300 W/m2 using a VCD 25 heating cable, the installation spacing should be: 25 (W/m.p.) / 300 (W/m2) = 0.083 m.=83 mm.
On one step, measuring 1200 x 300 (1.2m x 0.3m), it is necessary to lay a heating cable with a length: L = (300 (W / m2) \ 25 (W / m.p.)) x 0, 3 x 1.2 = 4.3 meters. Accordingly, on four steps, this length will become 4.3 x 4 = 17.3 meters. Let's add 0.15 m to the height of the steps: 0.15 x 4 = 0.6 m. The length of the heating cable located on the site is: L = (300 (W./m2) \ 25 (W./m. p.)) x 1.2 x 1.2 = 17.3 meters. The total cable length is 17.3 + 0.6 + 17.3 = 35 m. We choose the Elektra VCD 25 / 890 heating cable. Given that the step overhang is usually 20 - 30 mm. and the thickness of the facing of the riser can reach 25 mm., the first row of cable is laid at a distance of no more than 4 cm from the edge of the step.
Porch heating with VC 20 single core cable.
With a heating power of 300 W/m2, using the VC 20 heating cable, the laying spacing should be: 20 (W/m.p.) / 300 (W/m2) = 0.066 m.=66 mm.
The length of the cable for heating a step with a size of 1200 x 300 (1.2m x 0.3m) is: L = (300 (W / m2) \ 20 (W / mp)) x 0.3 x 1 ,2 = 5.4 meters. Accordingly, on four steps, this length will become 5.4 x 4 = 21.6 meters. Let's add 0.15 m to the height of the steps: 0.15 x 4 = 0.6 m. The length of the heating cable located on the site is: L = (300 (W./m2) \ 20 (W./m. p.)) x 1.2 x 1.2 = 21.6 meters. The total cable length is 21.6 + 0.6 + 21.6 = 43.8 m. We choose the Elektra VC 20 / 930 heating cable, 46 meters long. We will lay the rest of the cable 2.2 meters in front of the stairs. Remember about the overhang of the step in 20 - 30 mm. and the thickness of the facing of the riser is 25 mm., the first row of cable is laid at a distance of no more than 4 cm from the edge of the step.
Features of mounting the heating of the porch or stairs
When laying heating cables, the following rules must be observed:
- the pitch of the VC 20 cable must be at least 50 mm.
- the pitch of the VCD 25 cable must be at least 60 mm.
- the pitch of the TuffTec 30 cable must be at least 70 mm.
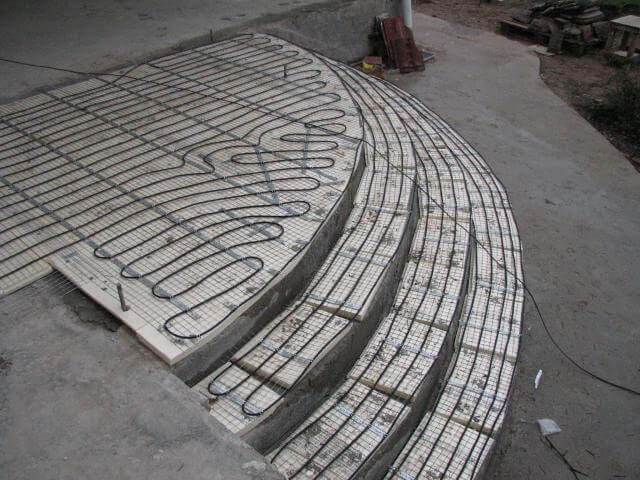
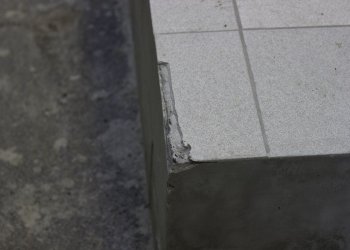
Due to the fact that the side parts of the steps are not heated, the extreme turns of the cable should be placed as close as possible to the edge of the step.If the cast steps need to be leveled, as in the photo, then the cable is laid on top of the steps, fixed with a mounting tape and filled with a leveling solution. For this, it is better to use cement-based dry mixes designed for leveling surfaces.
Porch heating can be controlled using the ETOG thermostat with a temperature and humidity sensor, or with the ETR controller working with a temperature sensor.
Do-it-yourself heating of the steps of the porch we select a cable
Heating of steps is capable to provide convenience of use of a ladder in any weather. With him, blizzards and frosts are not terrible. The stairs will always be clean from snow and ice. Installation of heating steps can be done by hand.
Ways to heat the steps
In order not to experience inconvenience in the harsh Russian winter, they use heating of steps, porches and paths. This approach to the improvement of the territory ensures not only the safety of movement, but also creates an atmosphere of order and cleanliness. A residential or public building equipped with a heating system for street structures of the entrance group looks well-groomed and cozy.
There are several ways to heat the device:
- heating cable laying;
- installation of a circuit with a coolant;
- using infrared lamps and heating elements.
When choosing a variant of a heating device for street structures, several factors must be taken into account:
- climatic conditions of the region of residence;
- dimensions of the structure or territory where the installation is planned to be carried out;
- type of structure coating (concrete, stone, wood, asphalt).
For regions with severe winters, the best choice would be to install a heating circuit powered by a heating system. Laying the cable in this case will not help get rid of icing and snow drifts. This method is optimal for the middle lane and southern regions. For Moscow and the region, even laying three cable lines at one stage will not be enough.
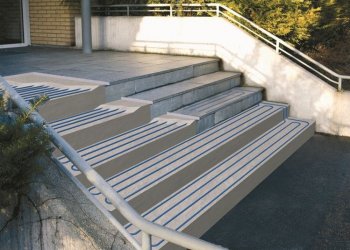
When planning the installation of a heating system, it must be taken into account that in most cases it will be necessary to purchase anti-slip coatings. This is due to the fact that when the snow melts, a liquid will inevitably form, which can cause slipping and injury. Special coatings are required for stairs made of porcelain stoneware and natural or artificial stone.
Mounting the stair heating system with a heating cable
This option for landscaping street areas is often used by owners of cottages and country houses. In order to mount the cable system, you will need the following materials and tools:
- heating cable with a power of at least 28 W / m;
- level;
- screwdriver;
- tester;
- soil temperature sensor;
- air temperature sensor;
- humidity sensor;
- control equipment.
It is more convenient and easier to perform installation during the construction of a staircase, porch, bridge or walkway. In this case, the cable is laid directly on a concrete base, which is subsequently covered with a facing material. First of all, it is necessary to perform the required calculation of the power of the system. You can look at the following metrics:
- for driveways and sidewalks - 250 W/m2;
- for outdoor steps without thermal insulation - 300-375 W / m2;
- for external steps with thermal insulation - 200-300 W / m2.
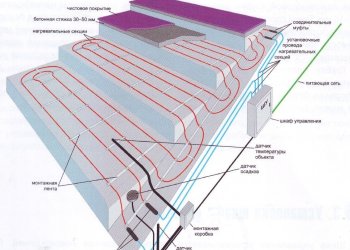
The cable system consists of 3 main elements:
- heating network;
- distribution network;
- control systems.
Video about heating stairs:
Stages of work:
Clean concrete or stone surfaces. If necessary, a set of leveling works is performed (using a cement-sand mortar, a self-leveling screed or sandy filling 3-4 cm thick). Lay the cable (zigzag)
It is important that the rows of cable are located at the same distance from each other.Connect a system of sensors, in choosing a place for them, they are guided by the manufacturer's instructions
Connect the control group. Fill the area with self-leveling screed or concrete. Perform finishing work.
Electric heating is beneficial in many respects: it is easy to use, fireproof, does not require repair and replacement of the main elements of the system.
But it also has its drawback: dependence on the power grid. It should be taken into account the fact that with the round-the-clock operation of the cable system, the cost of paying for electricity will increase significantly.
Video about the location of the pipes on the stairs:
The device of the circuit powered by water heating is similar to the installation of a warm floor. When choosing this option for heating outdoor areas, significant costs will be required for the purchase of materials (pipes, fittings, sensors). Most often, metal-plastic pipes are chosen. The circuit is laid on a concrete base, connected to the heating system and covered with a layer of concrete.
Infrared heating does not require laborious work using sand and cement. Heating elements are installed above the surface that is planned to be protected from frost and precipitation.
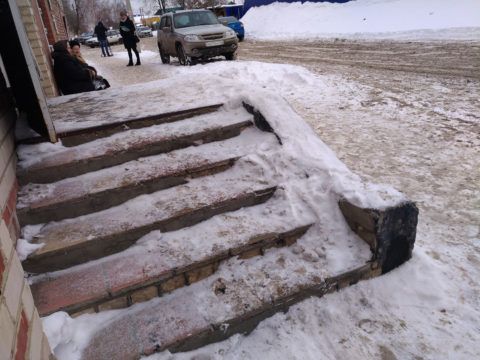
Why you need to heat the porch
Ice or a layer of trampled snow on the porch not only interferes with normal movement on it, but also leads to traumatic situations.
To get rid of them, they use two familiar methods - chemical and mechanical:
- Chemical treatment consists in sprinkling the surface with salt, or other reagents that cause snow to melt.
- The mechanical method is the usual cleaning using shovels, crowbars, ice axes and hard brooms.
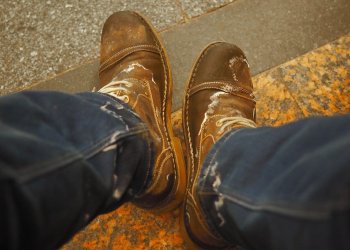
Everyone imagines what these methods lead to. These are shoes damaged by reagents, and the destruction of the lining of the steps, and, as a result, the need to restore it. And the price of materials and work, in this case, is considerable.
But heating the porch and steps during snowfalls and frosts does not allow an ice crust to form at all, instantly melting the precipitation and preventing them from freezing.
It turns out that once having spent money on warming the porch of the house, we will get several advantages:
- First of all - safe movement on the stairs in any weather;
- No need to keep the porch clean and clean it in time;
- Reducing the cost of its repair.
Of course, no heating method is free, and during operation you will have to pay additional bills for electricity or another source of energy. But the safety and health of loved ones are worth it.