The principle of operation of a candle heater
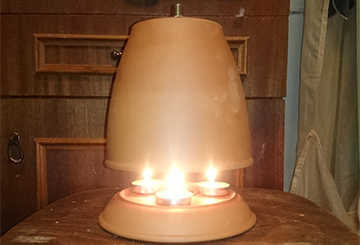 At first glance, it seems that a flower pot has been turned over and fixed over the candle.
In fact, the device consists of several ceramic pots inserted one into the other, like nesting dolls, and dressed on a metal rod.
A large number of nuts and washers of various diameters, also strung on the rod, is also an important part of the system.
Such a "fungus" above the candle is needed to capture, accumulate and give the room heat from the candle flame. The fact is that usually all the energy of fire rises and does not significantly affect the temperature in the house. When using Kandle Heeter, the flame heats up the central rod and rows of nuts. Gradually, the heat is transferred to the ceramics and then to the air in the room.
Ceramics, or fired clay, is not accidentally chosen as a material, since it perfectly accumulates heat and distributes it throughout the volume.
Do not leave the micro-oven unattended - after all, it is a small but open flame!
Idea 2 Mini-heater from a can
Another original model of a homemade electric heater, which is suitable for local heating in a garage or room. All you need to build is:
- coffee can;
- transformer 220/12 Volt;
- diode bridge;
- cooler;
- nichrome wire;
- textolite, with an area approximately the same as the diameter of the can;
- drill with a thin drill;
- soldering iron;
- cord for connecting to the network;
- push button switch.
This instruction is even simpler and you can make an electric heater from a jar with your own hands in 1-2 hours. To begin with, you need to remove the foil from the textolite and cut out the middle in it, as shown in the photo below:
After that, using a drill, you need to make holes diagonally. By the way, for this you can make a homemade mini drill according to our instructions. We fix the nichrome wire into the holes, after which we solder the wires.
We connect a transformer, a diode bridge, a cooler, a nichrome wire and a switch into one circuit.
We mount the fan in a jar using glue, after which we fasten the textolite as shown in the photo:
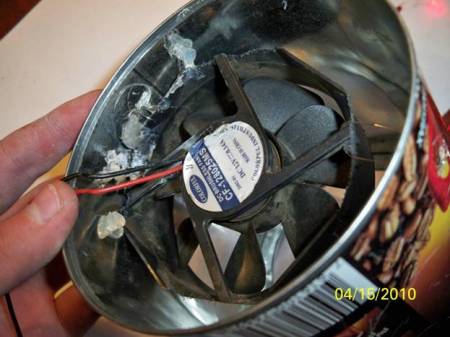
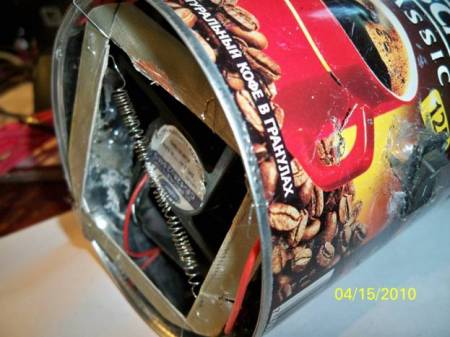
We put all the elements of a home-made electric heater in the jar, drill holes in the lid and check the operation of the device!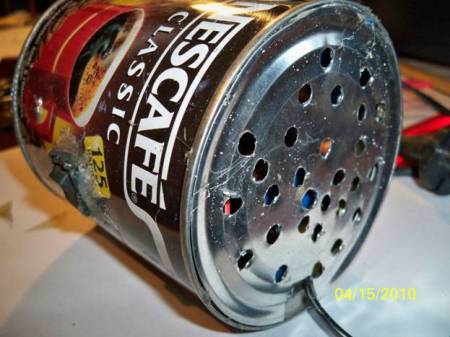
Application area
An elementary design based on "penny" materials will serve for a long time with careful handling. The heater does not require any conditions for storage, service life, maintenance or replacement of spare parts. Simple, like everything ingenious, it will become a support in the forest overnight stays or during a power outage, as well as in extreme conditions.
- In places where there is no electricity: tents, dugouts, shelters, a car caught in a snowstorm.
- In places where electricity is available: small but pleasant savings on heating costs.
- If you assemble a well-thought-out frame, then you can hang a small container (pot, mug) above the candle and heat water.
Here is such a simple and reliable assistant turned out. It will become not only a warm place in your interior, but also an interesting decorative decoration.
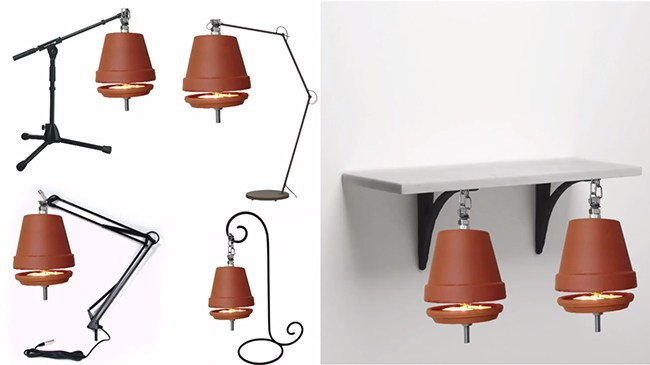
We assemble a heat lamp with our own hands
What you need:
- Pots ceramic (flower) trapezoidal with an outer diameter of the bottom 50, 100 and 150 mm, 1 pc. In this case, the smaller pot should be about 25 mm lower than the large one.
- Threaded stud with a diameter of 6-12 mm. It must pass through the holes of each pot. If necessary, drill the holes to the desired diameter with a drill on the tile.
- Washers for a hairpin with an outer diameter equal to the inner diameter of the bottom of the smallest pot - 20 pcs. Nuts 7-8 pcs.
- Frame, hanger or stand of any shape that meets the technical requirements (conditions) described below.
- Optionally - fireplace sealant or non-combustible (paronite) gaskets.

Operating procedure
one.We install the stud in the hole of the largest pot and screw the nut on the outside.
2. We put several washers on the stud inside the pot, fix it with nuts if necessary.
3. Install the middle pot on the hairpin.

Attention! The outer edges of the smaller pots should be inside the dome of the larger ones at a depth of 20-25 mm. 4
We fix the middle pot with washers and nuts
4. We fix the middle pot with washers and nuts.
5. We expose and fix a small pot.

6. The edges of all three domes should go inward in steps of 20-25 mm. We adjust the landing depth by adding washers and nuts.
7. If the distance from one bottom to the other is noticeably large, fill it with washers apart - this will give a greater thermal conductivity of the rod.
8. We install the structure above the candle so that the pin shaft is located strictly above the flame at a height of 30-50 mm.

9. Further adjustment is made empirically based on observations.
Use of gaskets and sealants. Praising ceramics, we tactfully bypassed its most inconvenient drawback - fragility (causticity). Even a solid brick crumbles when it falls on concrete, what to say, and flower pots
When assembling the lamp, you should very carefully tighten the nuts - it is worth pulling a little and the wall will burst. There is also a risk of accidental splitting during operation or while being carried.
The hard metal of the stud crumbles the ceramic and can crack it. To soften their contact, use sealant or non-flammable gaskets.
Application area
candle heater
suitable for emergencies. For example, when there is a power outage or when at least one room needs to be heated in a cold building.
If you install such heating elements in each room, this will raise the overall temperature in the house by several degrees. A nice bonus for saving boiler power.
Some Internet users have already tried out a candle heater as a stove, and according to their experience, the device has successfully completed the mission. The power of the appliance is enough to cook scrambled eggs and warm up the soup.
During the first operation of the device, you should wait until the remaining moisture evaporates from the clay. This takes approximately 4 hours.
When the device is not in use, it is better to wrap it polyethylene film
otherwise the clay will collect moisture.
Even if you are sure that your heating is reliable and you do not need additional funds, you should pay attention to a candle heater, if only because:
- Available and cheap materials are used for its production.
- The device can also work outdoors.
- A non-standard device can be imagined as part of a fashionable interior.
- The design is simple, which allows you to make a heater at home
Energy
Surprisingly, there is not so little energy in the candle, while most of it disappears and only a smaller part goes to lighting.
How much heat can you expect?
- Wax candle weighing 120 gr. gives out approximately 1.1 - 3 mJ.
- For an hour it is 55 - 150 kJ.
- Those. mini radiator power: from 15.3 to 42.5 watts.
A paraffin candle gives better results.
Candle heater as an interior detail
Of course, one such device will not replace powerful heaters and cannot be counted on as an alternative to heating.
Rather, it is an opportunity to keep warm in extreme conditions, or a decorative thing that will make life a little (2-3 degrees) warmer.
In addition, it is not often that we turn on powerful electric heaters for 20 hours in a row - this is an expensive pleasure. Burning one candle a day is much easier.
Do not use a simple candle without a glass cup. She melts too quickly.
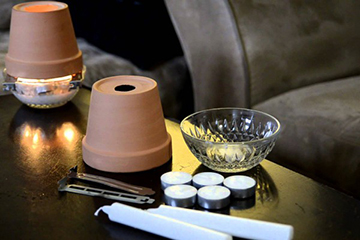
Heater Assembly
For assembly we need:
- three clay pots of different diameters;
- 8 washers for M10 thread;
- bolt M10 100 mm;
- 8 nuts with M10 thread;
- clay pallet;
- metal stand (grid) to ensure air circulation;
- heating element - candles.
The assembly of the device is carried out according to the principle of nesting dolls, that is, you need to select them so that they fit into each other, and there is a gap between them. Insert a bolt into the drainage hole of the pot, after putting a washer on it.
Then it is necessary to put a washer on the bolt from the inside of the pot and secure it with a nut. Next, tighten another nut with a washer to ensure clearance, and fix the second pot on the bolt in the same way as the first, so that the distance between its wall and the wall of the first pot is the same throughout the diameter.
We fix the third pot in the same way as the second. As programmers say: “Run the procedure in a loop” until the pots run out. It turns out a matryoshka from pots. Next, you need to make an impromptu radiator for better heat concentration. To do this, sequentially fasten two nuts, put two washers on them and secure them with the last nut.
Requirements for a homemade device
There are many options for home-made heating devices powered by electricity, batteries, kerosene, gas. The types and designs of home-made devices vary, but the requirements for them constantly remain unchanged:
- safety;
- profitability;
- ease of manufacture and ease of use;
- work productivity.
Safety involves thoughtful protection against electric shock and fire prevention;
- use the device on a fireproof stand;
- ensure the density of contacts and isolation of joints;
- do not use open spirals, close them with protective covers;
- prevent network overloads, equip it with a fuse;
- do not leave a working device unattended;
- place the device away from flammable objects.
The concept of an economical heater means that it contributes to cost savings during operation. If the purchase of components for the product will cost more than the purchase of a finished factory sample, there is no saving. But the costs can pay off in the future if a cheaper energy source is used when using the device. In any case, you need to make a profitable heater.
Simplicity and convenience are important requirements for a homemade device. If the love for the manufacture of complex structures by individual craftsmen can be justified, then the complex procedure for turning on, turning off or maintaining the device in working order will greatly complicate life, so making such a heater for the house is irrational.
The productivity of the device is expressed by the efficiency factor. The higher the efficiency, the more economical the device and the more expedient it is to make it yourself.
You need to be careful and not leave the man-made creation unattended (this can be a fire hazard)
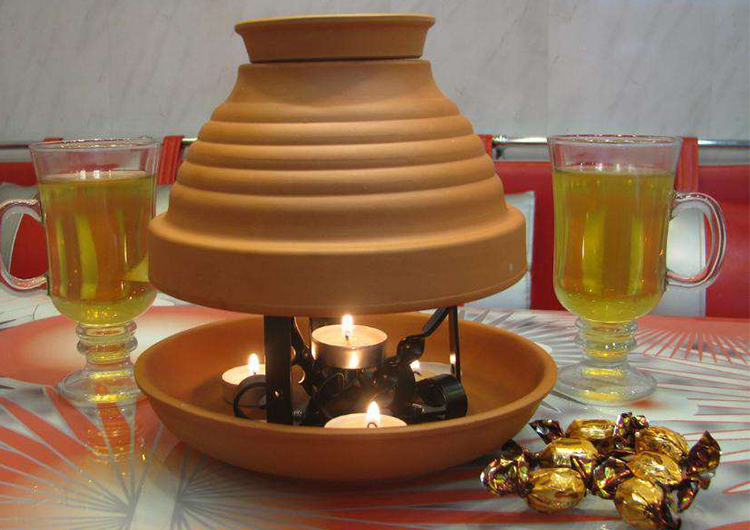
DIY candle heater
materials
To make a cap you will need:
- Three ceramic flower pots of such diameters that they fit easily into each other (smaller pots should not protrude from the largest one). For example, 5, 10 and 15 cm. Preference is for pots with a hole in the bottom.
- Threaded metal rod, 6-12 mm in diameter.
- Nuts - approx. 8 pcs.
- Washers - 20 pcs.
- Ceramic candle holder.
Step Instruction
The holes in the pots (if necessary) are drilled to the diameter of the rod.
- A rod is inserted into the largest pot and fastened from the outside with a nut.
- Inside the pot, several washers are strung on the rod.
- The second largest pot is put on, fixed with washers and nuts.
- The third pot is put on and also fixed with metal elements.
- The cap is attached over the candle. The flame must be strictly under the metal core.
All work must be carried out very carefully, since ceramics are very fragile and can crack if the nuts are tightened. You can use non-flammable sealant in places where clay contacts metal - this will reduce the risk of cracks and chips
You can use non-flammable sealant in places where clay contacts metal - this will reduce the risk of cracks and chips.
Support
In principle, any non-combustible object of suitable size can serve as a support. For example, three bricks. However, if you try, you can arrange everything more civilized. You will need:
- Three flat metal corners, which are used to strengthen window frames (One face of each corner should be equal to the radius of the candlestick, the other = the height of the candle jar in the candlestick + 2-3 cm.)
- Durable harness, wire or cord.
- Welding machine.
- Drill.
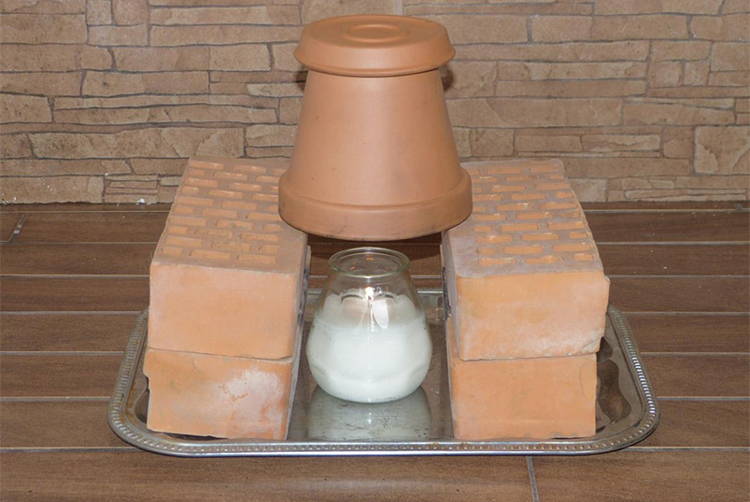
The simplest brick support
Support manufacturing instructions:
First, you need to weld metal corners at 120 ° to each other. The smaller ends face inward and are welded in the center, the longer ends look up.
Small diameter holes are made in the upper part of the long ends
It is important that they are at an equal distance from the top.
A wire is threaded into the holes so that a triangle is formed. A cap is placed on this cord support.
If your oil heater breaks down, do not rush to buy a new one or carry it on a belt. Perhaps the damage is minor and you can handle it yourself. : the main breakdowns and methods for their elimination.
Read about the effect of infrared radiation on human health.
And here you will find out why convector heaters are the most popular and whether it is worth buying such a device. Overview of models and reviews of owners.
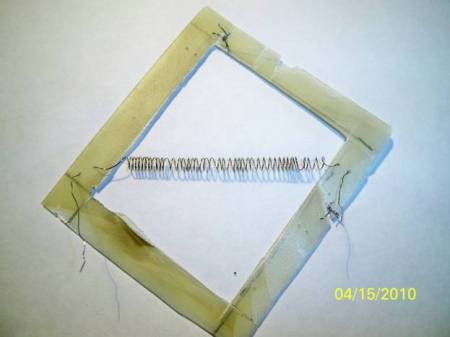
Idea 1 Compact model for local heating
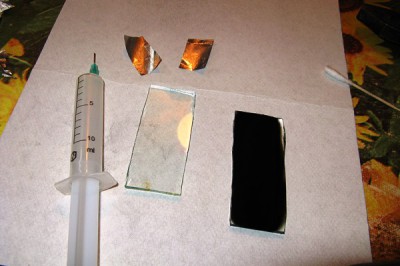
The easiest way to make an electric heater is this one. To get started, prepare the following materials:
- 2 identical rectangular glasses, each with an area of \u200b\u200babout 25 cm2 (for example, 4 * 6 cm in size);
- a piece of aluminum foil, the width of which is not greater than the width of the glasses;
- cable for connecting an electric heater (copper, two-wire, with a plug);
- paraffin candle;
- epoxy adhesive;
- sharp scissors;
- pliers;
- wooden block;
- sealant;
- several ear sticks;
- clean rag.
As you can see, the materials for assembling a homemade electric heater are not at all scarce, and most importantly, everything can be at hand. So, you can make a small electric heater with your own hands according to the following step-by-step instructions:
- Thoroughly wipe the glass with a cloth from dirt and dust.
- Using pliers, gently grab the glass by the edge and burn one of the sides with a candle. The soot should evenly cover the entire surface. Similarly, you need to burn one of the sides of the second glass. In order for carbon deposits to settle on the surface better, it is recommended to cool the glass before assembling the electric heater.
- After the glass blanks have cooled, carefully clean the edges with the help of ear sticks no more than 5 mm around the entire perimeter.
- Cut out two strips of foil, exactly the same width as the smoked area on the glass.
- Apply glue to the glass over the entire burnt surface (it is conductive).
- Lay the pieces of foil as shown in the photo below. Then apply glue to the other half and connect them.
- Then seal all connections.
- Using a tester, independently measure the resistance of a homemade heater. After that, calculate its power using the formula: P \u003d I2 * R. We talked about how to use a multimeter in the corresponding article. If the power does not exceed the allowable values, proceed to the completion of the assembly. If the power is too high, you need to redo the heating element - make the layer of soot thicker (the resistance will become less).
- Glue the ends of the foil to one side.
- Make a stand out of a bar by installing contact pads connected to an electrical cord on it.
Using this technology, you can make an electric mini heater with your own hands.The maximum heating temperature will be about 40o, which will be quite enough for local heating. However, such a home-made product will, of course, not be enough to heat a room, so below we will provide more efficient options for home-made electric heaters.
Principle of operation
The heater works quite simply. You need to turn the structure upside down and put it on the grate. Next, we put a metal stand on a ceramic tray with candles that will serve as heating elements. Light them up and wait until the heat is distributed over the surface of the heater. The structure will heat up the most in the area of the metal rod.
Is there an eternal heating device that will never break? How can the heat of an open flame be utilized in a living room? How to assemble a free room heater lamp with your own hands? Read about all this in this article.
Simple natural materials in one form or another continue their "life and work" as components of modern formulations. So, ordinary clay has gone from free and publicly available raw materials for the construction of the first houses to a nano-component of the insulating paint composition (liquid ceramic insulation). In its raw form, it was coated with walls for insulation, then they began to mold and burn it - dishes and bricks turned out. With the development of steelmaking, they learned to swell clay - this is how expanded clay and a whole section of science appeared - "The use of expanded ceramic materials." In the end, it was formed into balls with a diameter of 0.02 mm with a technical vacuum inside. And everywhere clay was in demand due to its main property: when fired (ceramics), it effectively accumulates heat. This once again proves that everything that a person needs for life has already been invented by nature.
How does a perpetual heater work?
Despite its small size, the flame of a candle has the usual burning temperature of 100 ° C. The temperature in the room should be approximately +24 °C. The difference is 76 °C. Where does she go?
When an ordinary candle burns, the following happens:
- air heated by combustion rises to the ceiling;
- under the ceiling, it mixes with the topmost layer.
Due to the large temperature difference (76 degrees), the surrounding air does not have time to mix with the exhaust gases of combustion, and they intensively rise to the ceiling. A column of hot air is formed, as it were, which dissipates at the top. We will utilize this heat with the help of a “trap” made of ceramic domes.
Use and storage
 After the clay radiator is finished, it can be “turned on” for the first time, but be prepared for the fact that the first 3-4 hours, the heat will not flow sufficiently.
This is because the last moisture has yet to evaporate from the pots.
It is better to store a candle heater in a plastic film so that the ceramics are not saturated with moisture.
Conclusion. In America, such mini-heaters are successfully sold for $ 25 per unit. But in general, mini-radiators are just entering the life of modern people.
Maybe the inhabitants of megacities will love it, because fire is a thing that you can admire endlessly. Perhaps hunters and fishermen will take Kandle Heeter with them to warm their hands a little. And perhaps someday such a baby will save a person who got into a snowstorm by car from frostbite.
Unlike conventional heating radiators, which heat the air, an infrared heater heats the surface of objects. Many people choose because it does not take up space and heats the room well. Before deciding to buy, learn about the advantages and disadvantages of the device on our website.
How to design a roof anti-icing system, read in
Many have probably heard about the heater from flower pots.On the Internet, you can find many articles on the assembly and use of such a device. These articles promise that such a simple device can replace electric heaters, as it heats up to 200 ° C. Its assembly is simple and does not take much time. For a large space, such a heater is not suitable, but for small rooms, for example, a tent, a greenhouse or a greenhouse, it can be used. The heater will help out on a fishing or camping trip, where it is not possible to use electrical appliances.
Related videos
Imagine a heat source that keeps you warm but doesn't waste your money and never breaks down. Sounds like science fiction, but Californian inventor Doyle Doss made his dreams come true and invented a candle-powered heater. Anyone can repeat the discovery of an American.
At first glance, the device may seem like a strange candlestick made from an inverted clay pot, but do not rush to judge by appearance: the whole essence is hidden inside.
A large number of nuts with washers are strung on an iron base. Peculiar hats help to collect and give off heat from the candle. Usually, the energy from a small flame goes up and has almost no effect on the surrounding temperature. A cap over the fire is needed to transfer energy into the air, using the entire area of the ceramic pot.
Burnt clay not only perfectly collects heat, but also retains soot, preventing it from reaching the ceiling. A simple design is approximately 23 cm in height and 18 cm in diameter. Operating time of one candle - about 20 hours
.
What can a heater be made of?
So, to build a "miracle micro-stove" we need:
- flame
- fired clay (ceramic)
- metal
The scope of ceramics is limited only by the imagination of the engineer. In this case, we are only interested in publicly available cheap materials, in particular, dishes. It is not for nothing that in the old days they used clay pots in the oven - they keep heat for a long time. The range of household ceramic products is huge these days, but we will focus on ordinary flower pots. Inconspicuous in appearance, they will help us solve the problem of auxiliary heating.
The second component of the heater is the heat source. The first thing that comes to mind for indoor use is an ordinary candle. Of course, there are a wide variety of types of gas and kerosene burners, but cheapness and availability come first for us. In addition, the candle does not have an expiration date and can be stored in the cold.
The third component is a record holder in thermal conductivity and an outsider in terms of heat capacity - metal. Its ability to quickly heat up and give off heat (low heat capacity) will play into our hands when creating a thermal lamp.
What will be the use of a pot heater
At first glance, the design is extremely clear, but does not inspire confidence. You should immediately make a reservation - do not rush to cut out steam heating radiators - our lamp will be an "apprentice", but not a "master". The use of such devices in each room will reduce the overall temperature of the boiler supply by several degrees for free - and this is the result!
Let's carry out a primitive heat engineering calculation based on publicly available data and logic:
- A wax candle weighing 120 grams (diameter 30 mm) contains about 3 MJ of energy.
- The approximate burning time of such a candle is 20 hours.
- During this time, it releases approximately 140 kJ of energy, which is about 42.5 watts.
- Paraffin candles give a greater effect of the release of thermal energy.

By choosing the most efficient candle, we can achieve 50-55 W of thermal energy at the output, and this is already 10% of the power of an electric heater of 500 W.
Attention! Fire hazard. Heating element - open flame
The lamp must not be left unattended.