The wall behind the stove Option to protect a wooden house from accidental fire
The wall behind the stove (more precisely, its protection) is a very important issue of fire safety. This issue is especially relevant if the house is wooden. And not in vain! After all, a negligent attitude to such a place as a “stove wall” can lead to disastrous consequences.
To neutralize the hazardous effects from the main heater in the building on the walls close to it, various methods and building technologies are used. Starting from the use of protective mastics and impregnations, which are used to treat a wooden surface, and ending with the arrangement of so-called "fireproof shields".
In the first case, the wall near the stove retains its original appearance. Those. the wooden house remains internally. This option will be useful when you want to keep the image of wood in the interior. But there is one major drawback here. Wood shrinks over time, deforms and even cracks. And this leads to the fact that “weak spots” are formed. And to neutralize the possible danger of a fire on the wall behind the stove, periodic treatment of the wooden surface with protective agents is required.
The second option is more durable and more reliable. He assumes that the insulation of the walls from the furnace is carried out by arranging a refractory shield. Let's take a closer look at this option with an example.
The easiest way is to mount a sheet of metal to the wall of a wooden house from the side of the stove. Yes - simple and fast. But such an approach will obviously harm the interior of the house! Decorative wall decoration behind the stove in this case will be difficult. And, besides, the efficiency of such a design will not be the highest.
There are many options for arranging the shield. And here is one of them. The wall near the stove is lined with non-combustible thermal insulation to reduce the effect of hot air on the wood, and is covered with non-combustible sheet material from above to prevent the surface from igniting when a coal or spark hits it. It is usually used as a sheet of metal (not the best option), refractory GVL, LSU, etc.
So, we figured out the materials. Next, consider an example of how the wall near the stove is isolated from harmful effects.
First of all, the wall behind the stove is prepared for work. We remove sawdust and other rubbish that is on it. This, of course, is not necessary, but it will not be superfluous.
Next, a metal profile and self-tapping screws are used. With their help, we equip the frame of the future "thermal shield".
When the frame is ready, we install stone wool heat-insulating plates into it ...

 ... and sew it up with LSU sheets.


 This is how the wall is isolated from the furnace by arranging a “fireproof shield”. This design also meets the requirements of fire safety and is suitable for further decorative finishing. Most often, ceramic tiles are used for this. As a result, the wall near the stove will be fireproof and beautiful (after applying a decorative coating).
31,528 total views, 9 views today
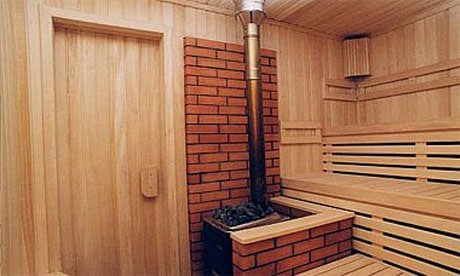
Installation of a bath stove with an external firebox in a bath made of non-combustible material
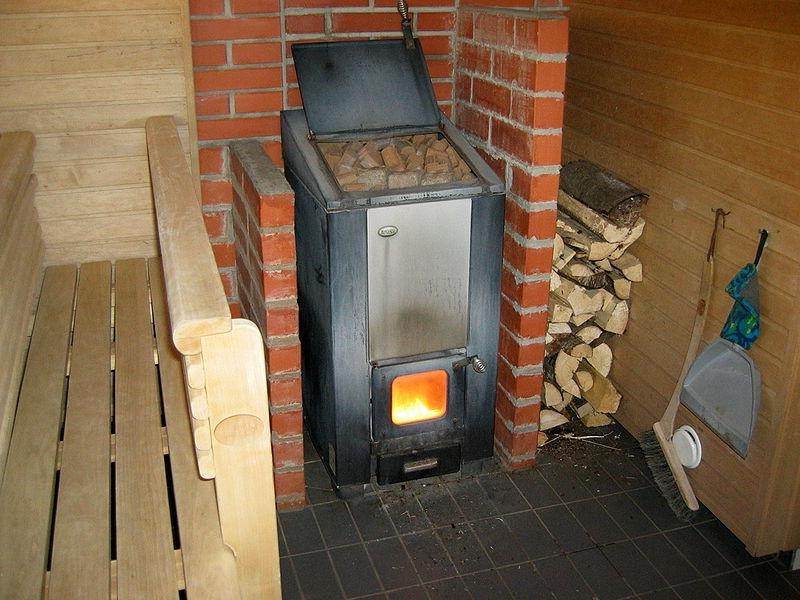
The simplest situation is when you do not have to replace part of the wall. However, if the walls of the steam room are sheathed with wood, then this sheathing will have to be removed on part of the wall. The base - stone or concrete - does not belong to combustible materials, therefore the hole that will be made in it depends solely on the parameters of the remote channel of a particular furnace.

The expansion of the metal during heating is the reason for making the opening a centimeter or two wider than the dimensions of the channel itself. The empty space between it and the wall is filled with refractory, and not only basalt wool, but also asbestos cord will fit.
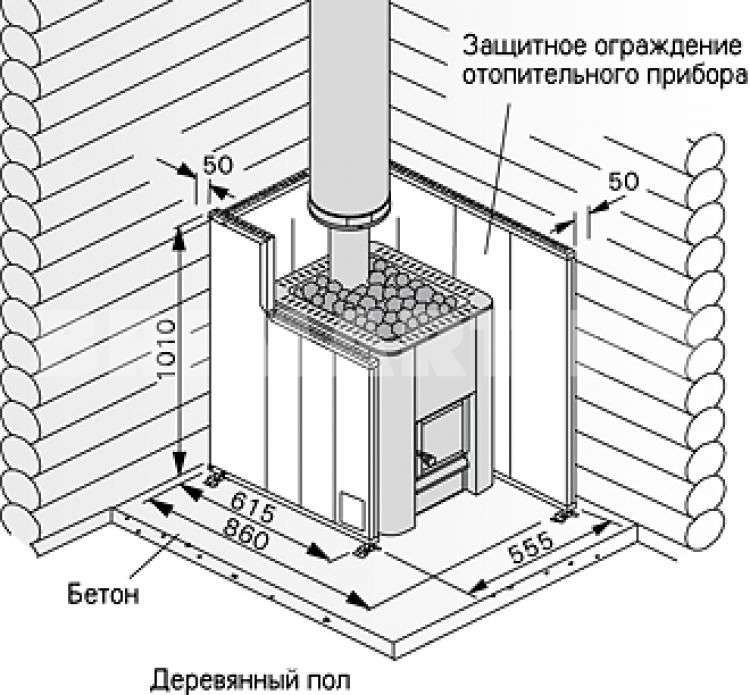
We have already mentioned the finishing of non-combustible walls with wood (lining, false timber, etc.). The minimum distance to which it should be removed is 25 cm. But make half a meter and you will not lose. And in height - 25 cm above the edge of the stove.

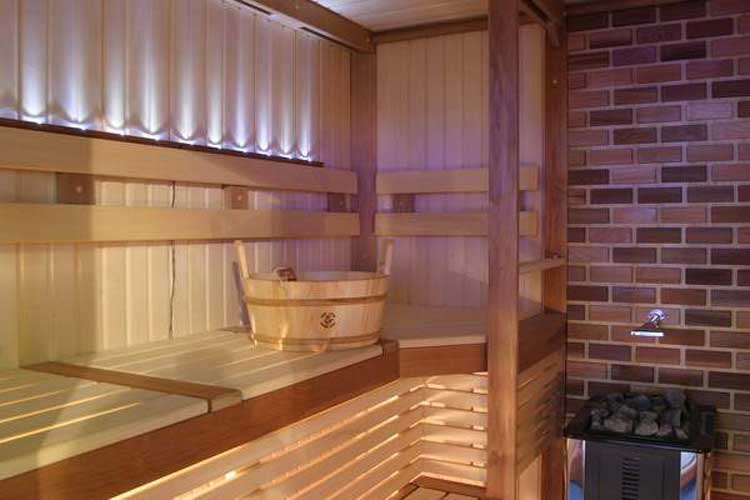
In the photo, the gang stands on a shelf with one edge, holds on to the stove with a handle, and the distance to unprotected combustible materials should be at least half a meter. The one behind the stove is a sheet of metal, perhaps on top of the refractory, but you need to leave a gap between the wall and the refractory (ceramic bushings for this). The size of this sheet is a bit small - if we take the diameter of the chimney as 12 cm, then the sheet extends beyond the stove upwards and sideways by no more than 20 cm. Still five). In general, the design is "on the verge". We also note that without passing through the wall, the insulation can really be like this - a refractory sheet. sheet metal and all.
The edges of the lining are closed with a platband. A bare wall inside the steam room can be decorated with tiles, the kind that tolerates heat well, or with natural stone - do not forget that the stove is very close to the wall. Plaster is good too. A portal is usually made in an adjacent room.
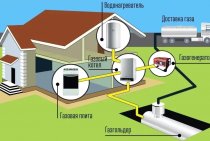
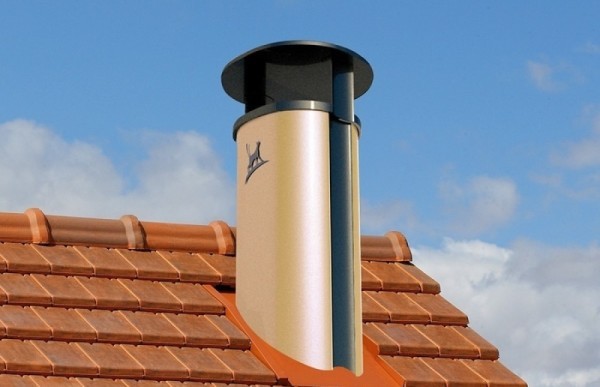
Purpose and functions of the chimney
Before we begin to learn how to build a passage through the ceiling for the chimney, it does not hurt to get to know the main “hero” better, for whom, in fact, these works are being carried out. So, you already understood that the chimney is important and necessary. Why? How does it function? Thanks to this miracle pipe, already clean air, separated from gases, enters the furnace.
And where do the harmful compounds that appear as a result of burning firewood go? They go through the pipe into the sky. Moreover, without any motors, levers, current or intervention of human hands, but in a simple way - under the influence of traction of natural origin. Here is such a magical device that seems extremely simple, but to achieve this natural simplicity, you will have to work hard. Ready?
The chimney in the bath is like an engine in a car, one of the important components
Immutable rules
What are the requirements for the chimney and its passage through the ceiling of the bath?
So, remember the important list:
- the most suitable pipe length is 5 meters;
- the prefabricated structure should not contain protrusions (the main reference point is the vertical position);
- the optimal indicator of elevation above the roof level is up to 1.5 meters (otherwise extensions will be required);
- the distance between the pipe and the floors should be at least 13 cm with a passage cut and 30 cm without it;
- in the structures of the roof or ceiling, it is impossible to dock smoke elements;
- contact of the pipe with communications (water supply, ventilation, wiring, sewerage) is unacceptable.
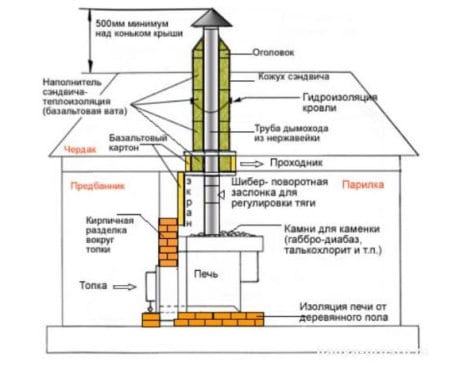
This is how the heating system of the bath is arranged
Work plan
Now that you are familiar with the design and the basic requirements for it, you can learn how to build a chimney passage through the ceiling. Master the step-by-step case of work:
- Cutting and marking the surface.
- Box installation.
- Sheet setting.
- Arrangement (insulation) of the opening.
This, as you understand, is a theory that needs to be put into practice, and this is what we will do.

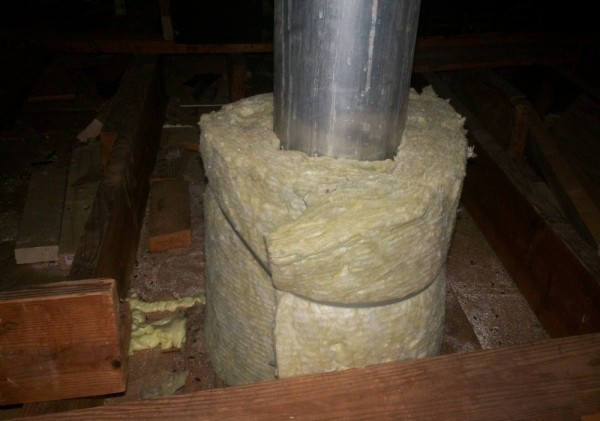
This is what the installed chimney looks like from the attic
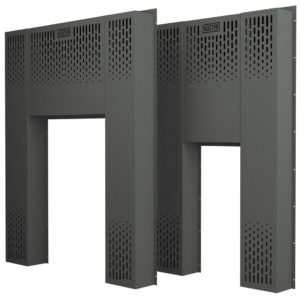
Protective screens near or around the oven
Such a system will need to be performed when installing a potbelly stove in the corner of the room. You can mount or lay out of brick several screens installed at a short distance from each other. In this case:
- the first screen protects a person from touching the iron furnace and getting burned. It is customary to make it from refractory or fireclay bricks;
- to protect walls made of combustible material, a second layer of protection is provided. It can be laid out of brick or covered with a sheet steel barrier with a mirrored front surface. In this case, heat waves will be reflected from the mirror and spread faster around the room;
- if the foundation is insufficient in size or it is impossible to manufacture it, it will be necessary to lay a protective screen made of durable refractory material on the wooden floor. It can be a sheet of steel or a decorative layer of heat-resistant clinker tiles or porcelain stoneware. The surface will first have to be covered with a layer of thermal insulation.
Installation of metal screens
This is the easiest way to make surface protection. It is better to use sheets with a polished front surface. Before fastening, the wall surface at the desired level along the height of the screen is covered with a layer of thermal insulation. Thus, we protect the surface of the walls from heat.
You can lay a layer of thermal insulation or fix the metal on self-tapping screws with inserted ceramic gaskets. But it is better to fix the screen on the strips treated with a layer of protection or a metal profile. In this option, the air gap will not allow heat to pass freely to the walls, reliable insulation of the stove from the wooden wall is ensured.
A special gap is made in the lower part of the wall for the passage of cold air, ventilation of the wall and screen. When arranging the wall with a layer of thermal insulation, a number of longitudinal guides are installed on the surface. The space between them is filled with a layer of mineral wool or other material. Then sheets of metal are installed, screwed to the crate with screws.
In this design, the gap in the lower part can not be left. The air will not be able to calmly pass, but the wall will be reliably protected from high temperatures. To protect the floor of the house, a plate made of non-combustible durable material can be used.
brick screens
This protection option is usually installed near the furnace. Thus, it is possible to protect not only the wall, but also a person from burns. By installing a brick wall, you can reduce the distance from the stove to the wall. For laying, it is better to use ceramic or refractory bricks.
The work is carried out in several stages:
- you will need to make a small foundation or remove the boards from the floor along the marking lines for laying the screen and, having drilled holes in the concrete of the base of the building, insert metal rods to fasten the bottom of the wall and the foundation;
- having leveled the floor surface, lay out a layer of mortar and lay the first row of bricks, it is required to place the bricks in the same plane without distortions. It depends on how even your entire wall will stand. Do not forget to make small ventilation slots, for this you can move a few bricks from the bottom row.
- checking the level and pulling the twine for laying each subsequent row, all the bricks are laid on a mortar of clay and sand. Having raised the wall to the required height, the top is sealed with a layer of mortar or covered with a board. So you can make a shelf for decorative ornaments and all kinds of little things.
The brick is laid out no higher than the top of the furnace at a distance of at least 40-100 mm from it.
With the help of protective screens of both types, it is possible to reduce the distance from the furnace to 500 mm.
Examples of installing brick protective screens in the photo:
Materials for laying stoves and chimneys.
When laying ovens use the following materials:
-
- for main masonry furnace walls, hearths, chimneys and channels in the walls — burnt solid red brick first class (GOST 530-71);
- for lining (internal lining) - apply refractory refractory brick;
- for facing the portal (external) - tiles, roofing and rolling steel, asbestos plywood;
- for smoke circulation sections, fireproof insulation and cladding - should be used solid bricks, asbestos cardboard, asbestos-cement heat-insulating boards, synthetic-based inorganic mineral wool products (mats, semi-rigid slabs), construction felt, soaked in clay solution.
NOTE: Application of mineral products on a bituminous bond for flame retardant insulation NOT ALLOWED.
Brick take away the correct form, the same size, without cracks, inclusions of stones and dutik, normal firing.
NOTE: Brick from demolition of buildings or old furnaces, subject to its careful selection and cleaning from the solution, can be used for masonry pipes, cuts and lower parts stoves and hearths.
ATTENTION! Brick from the dismantling of furnaces, impregnated with flue gas condensate, is FORBIDDEN to be used for re-laying hearths. In the production of furnace works, the following solutions are used:
In the production of furnace works apply the following solutions:
-
- for masonry ovens and cookers from ordinary brick - clay-sand;
- for laying of refractory bricks - refractory clay with sand;
- for refractory brickwork refractory clay with fireclay powder;
- for masonry chimneys, ventilation and smoke channels within the walls of buildings lime-sand or lime-cement;
- for masonry chimneys above the attic floor — lime-cement, and on top of the roof - cement.
Quantitative ratio of components clay-sand mortar, depends on the fat content of the clay, and should ensure the drying of the solution without noticeable change in its volume and without cracking.
ATTENTION! Preparation of the solution is carried out at least DAYS before the start of work. When laying ordinary bricks, plastic clay is used, mostly red, not contaminated with random impurities.
Before use in the solution, the clay is soaked and rubbed through a mesh with holes of 3-4 mm.
When laying ordinary bricks, use plastic clay, predominantly red, not contaminated with random impurities. Before use in the solution, the clay is soaked and rubbed through a mesh with holes. 3-4 mm.
For cooking solution is usually applied mountain sand, without foreign impurities and plant residues, fine-grained sifted through a sieve with holes 1.0-1.5mm.
Water to prepare the solution must be clean. Using sea water cement rate should be increased by 10-15%.
Table 5: Compositions of clay solutions.
| Solution grade | Solution type | Additive type | The composition of the solution, (clay dough + additive + sand), in volume parts | |
| in dry climate | in moderately humid climate | |||
| Clay mortar: | ||||
| 10 | 2 | 1- on oily clay | without additive | 1+0+4 |
| 10 | 2 | 2- on clay of medium fat content | without additive | 1+0+3 |
| 10 | 2 | 3- on lean clay or loam | without additive | 1+0+2,5 |
| 4 | 4 | Clay with black binders | black binders (tar, bitumen, pitch) | 1+(0,05…0,1)+(2,5…4) |
Note:
- Clay solutions used in summer conditions for finishing work, mainly in a dry climate with normal indoor air humidity.
- Quantity sand in clay solutions with black binders depends on the fat content of the clay.
- Using hard black binders pre-prepare the clay emulsion with black binders in a heated state.
NOTE: Masonry mortars must be used before the start of setting. "Rejuvenation" (dilution with water) of "seized" solutions is FORBIDDEN.
For insulation materials with low thermal conductivity are used: ordinary clay brick, felt, as well as asbestos in the form of sheets and cord.
Felt, usually made in thickness 5 mm, poorly conducts heat and serves as a good heat-insulating material. He smolders with his acrid suffocating odor signals a fire. For greater fire resistance felt before laying in place impregnated with a liquid clay solution.
Installing a stove in a bath with a remote firebox fire safety rules
Regardless of which type of oven is installed, there are a number of requirements that must be met.In particular, we are talking about ensuring that surfaces heated to high temperatures (up to several hundred degrees) do not come into contact with combustible materials.
The main source of danger in the bath is the stove. From it you need to protect both the floor and the ceiling. The walls, by the way, can not be protected if the stove is placed at a sufficient distance from them.
And even if you are busy installing a furnace in a bath with an external firebox, the first thing to do is to protect its base. It doesn’t matter if you put it on the foundation or directly on a wooden floor - in any case, you need to lay a sheet of refractory material (asbestos or basalt cardboard, for example) under the stove, on top of which put a sheet of metal.
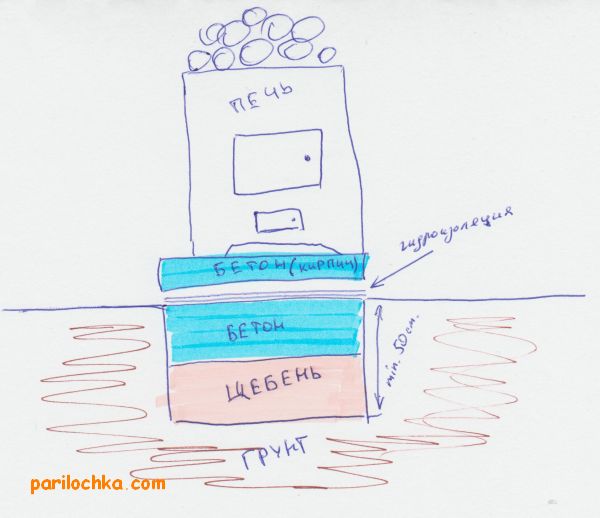
Scheme of the base for a massive furnace (see more about the foundations of furnaces).
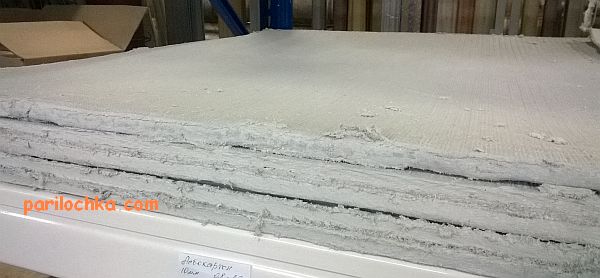
Asbestos cardboard for laying under a not very heavy stove (see more about installing stoves).
Another universal point of fire protection is the correct wiring of the chimney through the ceiling and roof ceilings.
Ceiling passage box
The walls remain. Since in this case we are talking about installing a furnace with a remote furnace, the main “problem” will be the passage of the fuel channel directly through the wall, and the distance between the wall and the furnace will be minimal - about 5 cm on average. And this means that one sheathing of the wall with refractories will not do here.
Therefore, we will analyze two options: installing a stove in a bath with an external firebox, when the walls are combustible (that is, wooden) and non-combustible (brick, made of block concrete). The material is also a criterion for dividing furnaces into separate types; in accordance with this classification, metal and brick furnaces are distinguished. Some experts refer to a separate category of cast-iron stoves. In addition, there are other types of ovens:
Sheathing the walls of the bath with non-combustible insulating materials
To prevent the walls from overheating, you can use materials with the properties of increased thermal insulation and inertness to high temperatures. Two types of materials are used:
- reflective;
- fireproof with lining.
The first type includes materials for wall sheathing, consisting of thermal insulation with fireproof properties and a metal coating in the form of a sheet.
Wall insulation with reflective sheathing

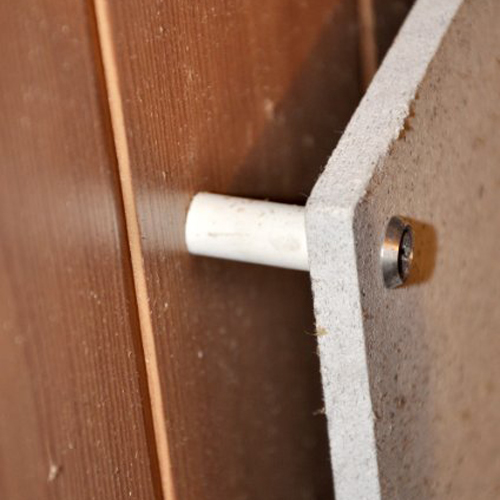
Protective cake with reflective materials do so. First, the thermal insulation is fixed with ceramic bushings directly to the wooden walls, then it is sewn up with a stainless steel sheet.
Advice! It is better not to use galvanized metal, since when heated, it is possible to release heavy metals harmful to the human body.
Stainless steel with a polished surface reflects the heat flow into the steam room, reduces heat loss. In this case, reflected heat is more useful than direct heat. For thermal insulation use:
- basalt cardboard or cotton wool, the only material with increased hygroscopicity, non-combustible, environmentally friendly;
- asbestos cardboard, which reliably protects against the occurrence of a flame, characterized by long service life;
- minerite, an artificial material made specifically for this purpose.
The protective sheathing assumes the presence of ventilation gaps of 2 cm from the wall to the insulation, 2 cm from the insulation to the steel sheet. If it is necessary to install the stove as close as possible to the wall, make a double sheathing of non-combustible insulation, with the help of ceramic bushings withstand gaps of 2-3 cm and sew up with a steel sheet.
Insulation with cladding
Measures to protect the walls with cladding are necessary in order to preserve the interior decoration of the room. They are more expensive, but no one has canceled the aesthetic advantages of the bath.It is based on tiling, which is laid on a refractory lining of GKLO, non-deformable gypsum-based cardboard with fiberglass, mineralite, non-combustible cement-fiber material, moisture resistant and resistant to biochemical attack, LSU, material made of fiberglass bonded with magnesia additives, resistant to impact high temperatures, high humidity. Heat-resistant glue is used for installation.
Advice! Use heat-resistant reinforced Terracotta glue, made from chamotte dust bound with kaolin additives, designed for tiling stoves, fireplaces, all heated surfaces.
The recommended facing materials are quite diverse, the best of them are:
- terracotta tiles, it is made from special firing clay, which gives increased heat resistance and durability;
- clinker, more dense clay tiles with a surface of various colors, similar to facing bricks;
- tiled tiles, also made of clay, with an original embossed surface;
- porcelain stoneware made from a mixture of clays, kaolins, quartz sand, feldspars by high-temperature firing under pressure of 400-500 kg / cm², with imitation of stone, wood, durable artificial material;
- talc chloride, a rock mineral consisting of talc, magnesite and chlorite, is an environmentally friendly natural material that absolutely does not absorb moisture, has an attractive appearance, does not crumble, and is not afraid of high temperatures.

Advice! Use talc chloride to finish the steam room, this mineral has a healing effect on the human body, regulates blood pressure, stimulates cerebral circulation, expels viruses and microbes, due to the release of vitamin D when heated.
All of the listed tiles are a protection element that rearranges the cake, the basis of which is a refractory material. As well as a screen, the sheet material is installed on ceramic bushings with a gap of 2-3 cm from the wall. The minimum distance to the heat source from the tiles should be 20cm.
Protection with cladding decorates the room, creates a positive mood, improves the efficiency of procedures. And most importantly, properly installed insulation prevents the occurrence of overheating of wooden walls, their ignition. Light steam!
Practical Lessons
And now about each action in detail.
Some pioneers in the construction of a bath are wondering: how to determine the place where the pipe passes? So that there is no subsequent frustration, remember: this place is determined at the stage of drafting the steam room.
When marking, it is important to determine the vertical axis of the pipe. The beginning of the layout is the outlet pipe coming from the furnace
The axis starting from this structural element, resting on the ceiling, is the center of the clearance that you have to make. If the steam room is with an attic, then the axis extends to the very roof.
And do not forget about the rule: the distance from the chimney to the ceiling is at least 13 cm.

Your photo tip for installing a pipe for a bath
What should be the dimensions of the ceiling cutting for the chimney? Many people think that these parameters depend on the materials from which the chimney is made.
This is not so, only one thing is important that the structure does not touch the ceiling, but is not too far from it, since it will be difficult to close the gap, moreover, heat, which is so necessary in the steam room, can subsequently escape through it
You probably already remember about the gap of 13 cm, now learn one more indicator - the thickness of the heat-insulating sandwich should not exceed 5 cm. Are you afraid that the insulation will slip out and fall down? Do not worry, an iron sheet that you attach from below will serve as insurance against such situations.
This is how the finished structure should look from the inside
Many people confuse the purpose of the insulation layer, thinking that it is done for beauty, so that it is cozy inside. Not only that, its main mission is to protect the steam room from fire and cold. Fiberglass, asbestos, mineral or basalt wool are ideal as materials.
However, it is not enough to insulate the hole, you need to additionally create a heat-reflecting screen around the chimney, which we have already mentioned in passing above. A piece of polished stainless steel will perfectly cope with the role of the screen, ideally with a mirror finish. Creating the greatest possible reflective effect for infrared waves is your goal when installing an iron surface.
To reduce the opening, a ceiling-passage assembly is constructed, providing a kind of air gap, which serves as additional insurance against heat leakage from the steam room.
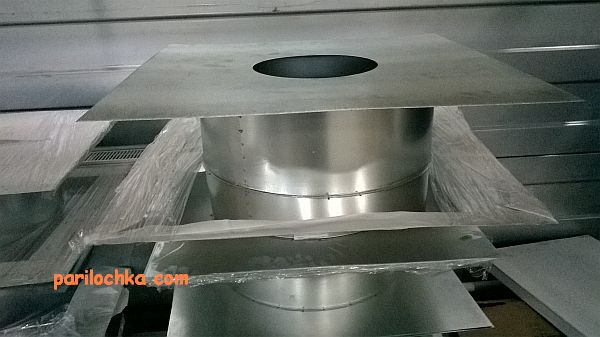
Construction assembly details
You already know the wisdom of the process, let's assemble the device? So, cutting the bath consists of:
- iron sheet;
- boxes;
- collar.
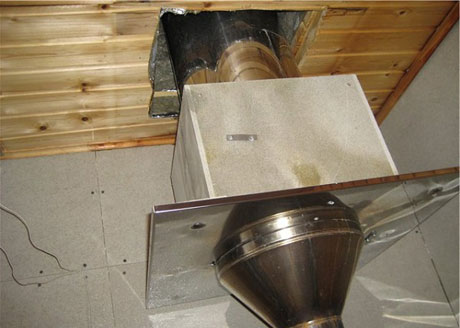
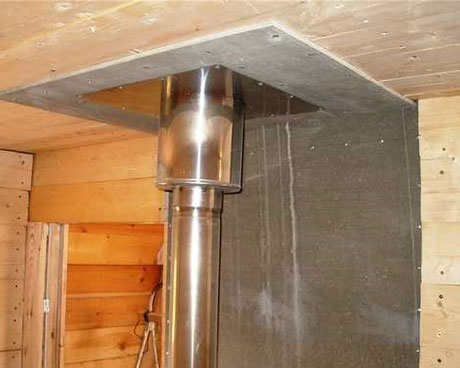
The box is a kind of shell that protects the tree from fire.
A galvanized box with parameters 40x40 cm is installed from the side of the attic. And from the inside of the bath, an iron sheet is attached to it, reaching 50x50 cm in size. The pipe at the lining is covered with a clamp in order to avoid stress on the stove. And only after that, a heater is placed in the hollow part of the body - usually the surface is covered with insulation and covered with expanded clay. Then you can mount the final fragment - part of the pipe going through the roof to the street.
Application of protective screens
Screens are shields made of brick or metal, covering the walls from intense thermal radiation. Similar protection is used when installing metal furnaces.
- Metal screens are made from steel or cast iron sheets, these
casings surround the heat source with a distance of 3-5 cm.
Advice! When purchasing a metal stove for a bath, you should give preference to a model equipped with a metal casing. Its cost is not much higher, but the issues of wall insulation are removed.
Additional front or front shielding, which is located on the walls, depending on the location of the furnace, will not interfere. Protection guarantees wood from overheating, reducing t ° by 100 degrees or more, and provides an opportunity to save space in the steam room. The oven protected by a casing can be installed at a distance of 50-55 cm from the wall.
Screen installation is simple. The casing, equipped with legs, is attached to the floor with side or front screens - with galvanized nails or self-tapping screws.
- Brick screens are masonry, which sew up the oven with
all sides, the same casing, only made of brick. Another way is laying half a brick between the firebox and a wall of solid fireclay bricks laid on a solution of clay and cement. The width of the wall should be 120mm, although there is an opinion that it is permissible to put 60mm bricks in a quarter, but it should be remembered that in this case the thermal insulation index is reduced by exactly half. In height, it is recommended to raise the masonry 20-30 cm above the surface of the firebox, but if you raise it to the ceiling, it will not be worse.
The screen should be placed at a distance of 10-15cm from the wall, 5-15cm from the stove, that is, the space saving is 30-40cm
Important! In the lower part of the masonry, functional holes for heat transfer should be made. Protective screens are effective, they reduce the temperature to a level acceptable when using high-temperature fuel units
The same function is performed by wall cladding made of non-combustible materials.
Protective screens are effective, they reduce the temperature to a level acceptable when using high-temperature fuel units. The same function is performed by wall cladding made of non-combustible materials.
Products used
The following materials can be used for chimney insulation:
- mineral wool;
- glass wool;
- brick;
- slag slabs or heat-resistant cement mortar.
Chimney insulation depends on the material from which it is made. If the pipe is steel, then construction wool is used. The design consists of 2 parts (the length does not exceed 1.5 m), which simplifies the compaction of the insulation material. The size of the casing should be 12 cm larger than the diameter of the pipe.
Pre-put on the first part of the structure. Then the insulation is evenly applied. Install the second part of the chimney. The building is being insulated. The pipe is installed with a slight slope. The resulting gap is covered with cement mortar.
The steel chimney consists of 2 pipes of different sizes. A protective cover is placed on a pipe with a smaller size (chimney). A heat-insulating layer is laid between the pipes. A pipe of a smaller diameter is placed in a structure with a larger diameter. The gap formed between the pipes is filled with construction wool.
A brick chimney is insulated using the following technology:
- applying the base;
- installation of reinforced mesh;
- sealing cavities and cracks with mortar;
- applying plaster in several layers (their thickness should not exceed 5-7 cm);
- complete thermal insulation;
- mineral wool is cut taking into account the size of the chimney;
- fixing the heat insulator with metal tape or wire;
- lining the pipe with ceramic or asbestos plates;
- surface plastering.
This method of thermal insulation allows:
- reduce heat loss by 2 times;
- seal the chimney;
- prevent the formation of condensate and the destruction of the chimney;
- improve quality and safety.
Furnace insulation is a necessary procedure for a high temperature furnace used for home heating.
CLAIM
1. A heating and cooking complex, including a heating shield volume arranged according to the principle of a gas bell, from the floor to the ceiling, divided into parts that can communicate with each other and with fireboxes, containing volumes that can work on the principle of a gas bell, some are permanent, and others periodically, separate volumes of furnaces equipped with grates and covered with cooking stoves, volumes of cooking chambers that can be isolated from rooms / pits, a flue and other gas control unit containing volumes of a single chimney, gas collectors in front of the pipe inlets and valves that control the operation of the volumes of the valve, door, characterized in that it is made symmetrically with respect to a vertical plane passing through one of the lines of the base plan, parallel to any of its sides, with separated volumes for the movement of flue gases and cooking, a volume for cooking divided into independent parts, with a heating shield, which is a multi-tiered multi-bell system, the tiers of which are separated by the volume of the cooking chambers, and are connected to each other and to the furnaces by channels, adjacent bells of the tiers are interconnected by holes, with the volumes of the upper and lower parts of the flame channels, branch pipes of the inlets to the chimney, performing the function of gas bells at times, fireboxes interconnected by the volumes of the heating shield, structurally providing autonomous heating, with the installation of hobs above the upper edges of the high burnouts, with the device in the walls of the fireboxes separating them from the smoke channels with the possibility of their volumes performing the functions of dryers, thermoses, hot water tanks, with single-level collectors of the gas control unit in the form of volumes of branch pipes connected to the upper tier of the heating shield with holes, with valves that provide the ability to completely stop the flow of flue gases from the furnaces into any of the tiers of the heating shield directly, as well as simultaneous access to all tiers and the possibility of their removal from the heating shield both through any of the pipes, and through all at the same time.
2.The heating and cooking complex according to claim 1, characterized in that it is made with hollow fire-prevention partitions with an interior partition, moreover, the cavity of the partitions through holes made with the possibility of overlapping communicates with the rooms near the floor and ceiling, and in their middle part - with the volume of the cooking chamber or chambers.
3. Heating and cooking complex according to claim 1 or 2, characterized in that it contains one or more beds.
4. Heating and cooking complex according to claim 1, or 2, or 3, characterized in that the volume of any furnace with a cooking chamber above it is made closed or open - a fireplace.
5. Fire-prevention cutting of the heating and cooking complex according to claim 2 with an interior partition, characterized in that it is made hollow, and the cutting cavity through the holes made with the possibility of overlapping communicates with the rooms near the floor and ceiling, and in its middle part - with the volume of the cooking chamber or chambers.
6. The method of redistribution of heat between the heated heating and cooking complex according to any one of paragraphs. 1-4 by adjacent rooms, which consists in redistributing the amount of flue gas heat between the parts of the complex that open into the premises, due to the redistribution of flue gas volumes simultaneously moving in the heating and cooking complex.
7. The method of redistributing heat between the heated heating and cooking complex according to any of claims 2-5 adjacent rooms, which consists in the fact that the heat perceived during the heating of the firebox by the fire cut of the heating and cooking complex with an interior partition, a cooking chamber, is distributed by opening or closing the openings that communicate the cavity - the channel of the fire-prevention cutting with the corresponding rooms and the corresponding cooking chambers.
8. The use of a gas bell as a flue gas mixer in a heating and cooking complex according to any one of claims 1-5.