The main or additional sources of heat for a country house
Electric floor heating can be performed directly on a dilapidated floor: on ceramic tiles or parquet.
In this case, it is most ergonomic to use heating mats. They allow you to easily improve the thermal comfort in a room that is already in use, without a large increase in the level of the floor and creating an additional load on the ceiling.
When planning the laying of electric floor heating in a dilapidated building, be sure to remember that it can only justify itself as the main source of heat in buildings with good thermal insulation. If the total heat loss through the outer walls, floor and roof is huge, in other words, exceeds the thermal standards, floor heating alone will not be enough to heat the room to the required temperature.
In this case, electric underfloor heating can only serve as an addition to the second type of heating, for example, a system with radiators. Here we are not talking about reducing electricity consumption, but about the temperature of the floor. It cannot be greater than the defined values. In other words, the floor must provide no more than a pleasant warmth, neutral from a physiological point of view.
It is customary to calculate that in rooms such as the living room or kitchen, the floor temperature should be a maximum of 29 ° C, and in the bathroom - 34 ° C. In the areas under the windows, along the outer walls, the floor temperature may be higher and be 35°C. But this is not uncommonly not enough to compensate for heat losses at home and ensure a comfortable indoor temperature during frosts reaching -15-20 ° С (calculated temperature, taken depending on the region of the state).
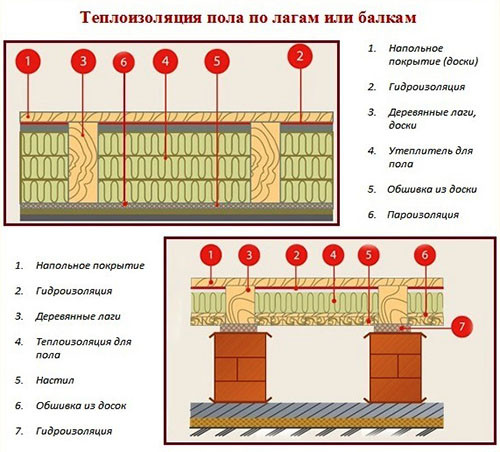
Ways to insulate a wooden floor
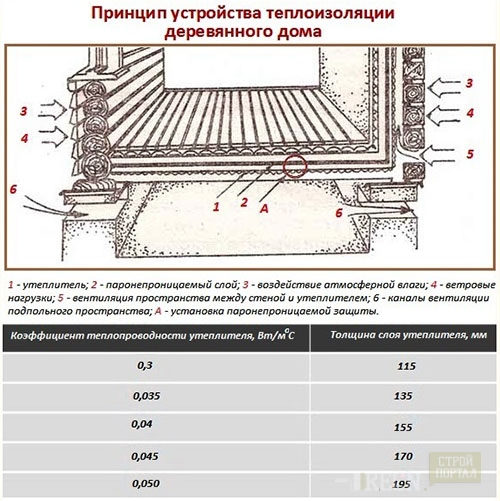
SNiP 02/23/2003 clearly defines the standard values of heat transfer resistance and the requirements for heat engineering calculations, which should be followed when choosing the thickness of the insulation. Many inexperienced self-taught builders mistakenly believe that the thicker the insulation, the better. If the insulation is too thin, then the house will be cold, if it is too thick, you will waste money in vain
That is why it is important to choose the right layer thickness depending on the material of thermal insulation and the material from which the walls are made. Also, the climatic conditions of the area in which the house is located play an important role.
All these nuances are described in detail and taken into account in SNiP.
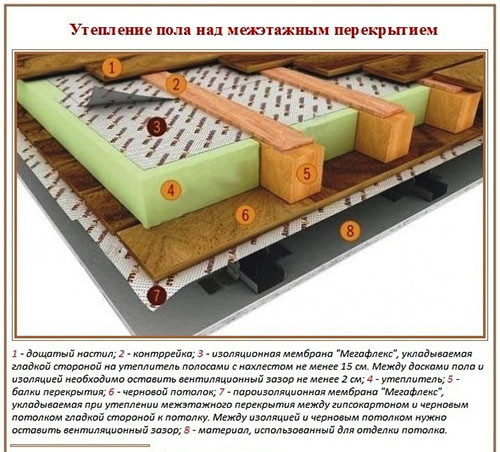
If you do not go into the intricacies of heat engineering laws, experts advise building floors over a cold basement with a 12 cm thick insulation for the middle lane, 20 cm for the northern regions, and insulate the interfloor floors with an 8 cm layer.
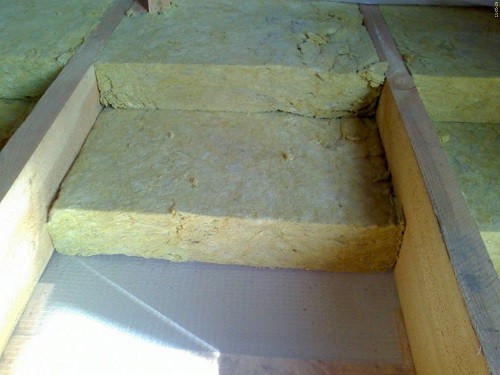
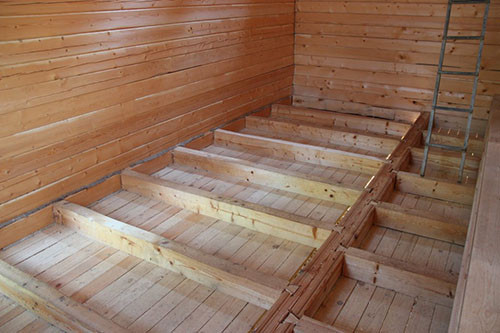
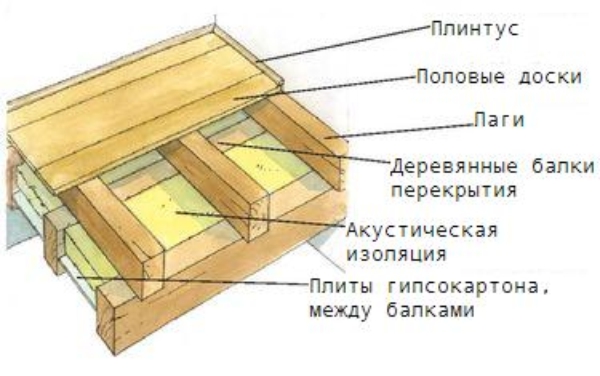
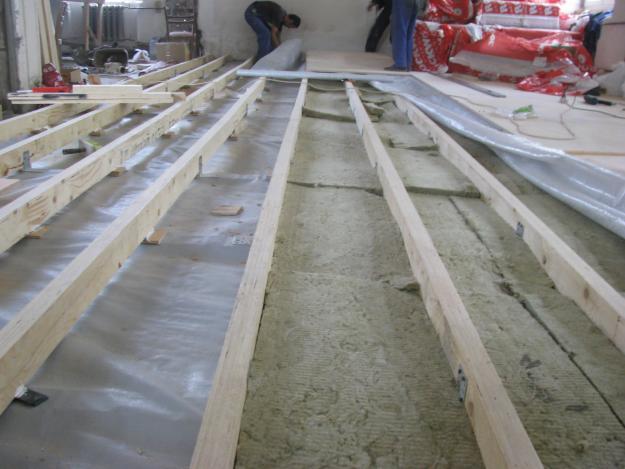
It is much more convenient to insulate wooden floors in a house than walls or ceilings, if only because their design involves the use of a log and a subfloor. Expanded clay, shavings can be poured into the space between the lags, the plates can be carefully and tightly laid or blown out with foam. Thus, insulation with any material occurs according to the general principle - it is placed between the lags and covered with a finishing floor (in some cases, additional hydro- or vapor barrier is necessary).
Insulation of floors with a low underground
In houses with a limited subfloor size, it is impossible to place the heat-insulating material in the usual way - between the joists. To do this, you will have to dismantle the entire flooring, so if this is just your case, get ready for laborious work.
Work sequence:
This method describes how to insulate the floor in the country house if construction has already been completed, but it is best to take care of thermal insulation at the time of designing the house.
Floor insulation above a high cellar
The nature of the actions in this case is no different from the previous one, except that you do not need to increase the height of the log, dismantle the finished floor covering and the work steps should be done in the opposite order. The only caveat is that bulk materials - expanded clay or sawdust - cannot be used for insulation in this way.
Progress:
How to insulate the floor, everyone decides for himself, but this must be done in any case. Underfloor heating in the country house will keep heat in the winter and give coolness in the summer, reduce heating and electricity costs, and become the key to the health and comfort of residents.
General principles for arranging wood floors
If you are going to lay floors made of natural material in a country house, plan work for the end of spring
This is important because during this period the tree absorbs less moisture. If the assembly of floors in a cottage or house cannot be rescheduled for the recommended time and work must be done in the summer, choose a dry, hot period, without heavy rains and growth.
Whatever way the floors are arranged, it is extremely important to pay maximum attention to the quality of the lumber. The tree must be treated with special means from rotting, moisture, insects, as well as a flame retardant composition
Installation of a warm floor
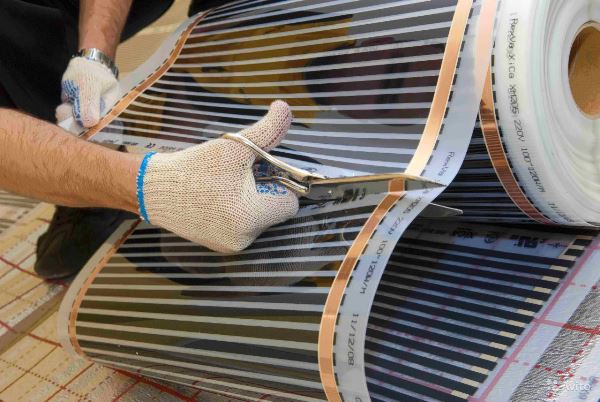
The simplest for self-installation of a warm floor is a thermal film, the laying of which does not require much time and effort. During the work you will need the following:
- heat reflective material;
- thermostat;
- electric power cable;
- electrical tape (mounting tape);
- rivets and pliers;
- mounting grid (if you plan to make a screed).
Scheme of a warm water floor.
The thermal film is placed, stepping back from the walls 50-70 cm around the perimeter. A very important point: furniture cannot be placed on it and a plinth is not installed on top of it. The strips of thermal film are fixed with clamps parallel to each other and insulated with adhesive tape. It is not necessary to do a screed, you can immediately put a coating. However, if you plan to lay a soft surface, such as carpet or linoleum, then it is worth giving the base additional rigidity, enclosing sheets of plywood or MDF.
Cable heating systems require additional skill and certain skills when laying. The following materials are required for installation:
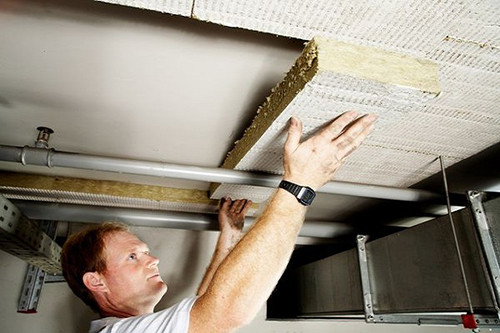
- thermal insulation, which can be rigid foam with a density of at least 20 kg / m, polyurethane or solid mineral wool;
- polyethylene film;
- metal mesh for fastening the heating cable, it provides insulation of the cable from the surface of the thermal insulation;
- cable ties or soft knitting wire for fixing the cable to the metal mesh;
- mounting tape (used instead of a metal mesh);
- heating cables;
- thermostat.
Before proceeding with the installation of a warm floor, it is necessary to develop a project and prepare the base, it must be flat and clean. On the prepared surface, it is necessary to lay out a layer of thermal insulation, plastic film and metal mesh. Be sure to follow this sequence.
In accordance with the design of the heated floor, the heating cable is attached to the metal mesh. You can fix it with cable ties or soft tie wire. you can also use a special mounting tape if the thermal insulation will be filled with a special solution (for fixing the heating cable).
When you have finished installing the cable, you can proceed to the next step - mounting the temperature sensor. Then the entire surface is poured with sand-concrete mortar, the thickness of which must be at least 50 mm. You can also use a self-leveling (self-levelling) mortar. In any case, the cable from beginning to end must be completely "immersed" in the solution.After the screed is completely dry, you can start laying the final coating.
Installation of water heating is technically more complicated. In the process of installing a water heated floor, the following steps can be distinguished:
- Development of a project, which involves dividing the area of the premises into sections, the area of \u200b\u200bwhich does not exceed 40 sq.m.
- Laying insulating material on the prepared surface (required in order to avoid heat loss).
- Installation of reinforcing mesh and laying pipe contours.
- Crimping work of the heating system.
- Pouring concrete.
- Final finish.
If you doubt your own abilities, it is better to seek the help of professionals. This way you save money and avoid disappointment.
Heating control
Like any heating device, an underfloor heating system must be equipped with a thermostat that will provide thermal comfort and minimize operating costs, and allow you not to worry about turning on the system in advance. There is a wide choice of different thermostats on the market - from simple ones equipped with floor and air sensors, which only maintain the set temperature, to complex devices equipped with a processor. The latter allow you to set a work program for days or seven days, calculate the cost of heating, and provide access to a given temperature for a certain time period.
In most cases, the thermostat is installed in a heated room at a height of approximately 1.5 m from the floor. Thermostats for heating wet rooms are usually located outside. If a couple of thermostats are installed in the house, they can be combined into a network in which one of them will manage the work of the second. The operation of such a network can be controlled using a computer or cell phone.
Some companies already offer corresponding communication modules.
Underfloor heating power depending on the installation location
System type
Recommended Heating Power (W/mg)
Large heating power (W/m1)
Bright heating in new buildings
70-120
150
bright heating,
recovery
100-150
150
Accumulative heating
125-175
175
Heating in edge areas
1 200-250
250
Wood floor heating
80-100
100
Heating of wooden floors on logs
60-80
80
Installation of the cable of the underfloor heating system
The cable is laid on a layer of thermal insulation (expanded polystyrene or mineral wool), covered with moisture-proof insulation (film) and a thin layer of cement mass. The film protects the thermal insulation from the penetration of liquid from the solution. If the cable is laid in wet rooms (in the bathroom or in the kitchen), moisture-proof insulation must be placed under the top layer of the floor.
The thickness of the thermal insulation layer depends on the base and on the type of rooms underneath:
- a narrow layer (3-5 cm) is laid in the floors above heated rooms;
- a thicker layer (7-10 cm) - in the floors above basements or unheated rooms;
- the thickest layer of insulation (more than 10 cm) is needed for floors on the ground, floors with open space under the floor, floors above a bay window or loggia.
In addition, the design of the floor matters: the higher the thermal insulation features of the flooring material, the thicker the layer of thermal insulation must be laid. Heating cables are fixed on a tape or mounting mesh at the required intervals, and then covered with a layer of cement mortar with the addition of a plasticizer or a layer of gypsum or cement screed.
Attention! In floor heating systems installed in wooden floors on logs, heating cables are laid brightly on thermal insulation and mortar
are not covered. An air gap of 3-5 cm is left between the heating wooden coating and the body elements.
Underfloor heating on concrete base
For the liquid floor line and for the cable sections, a fastening system must be provided. The best option is a reinforced mesh. It is necessary if the system is subsequently closed with a screed or tile adhesive.
To the grid, the floor highway is reinforced with tapes with reverse teeth. Staples, a stapler, mounting tapes with locks are used as fasteners.
- The ends of the liquid line are connected to the distribution manifold. Pipes are led from it to the heat exchanger, which is located in the furnace. The cable is connected to the thermostat.
- For cable and carbon mats, fasteners are not needed. They are produced in rolls. Rolls are rolled out over a heated area. If it is necessary to turn the cable mat, then the mesh is cut. The conductor remains intact. The system is rotated at any angle. To rotate the carbon mats, cut the connecting wire. The integrity of the rods is not violated.
- The thermal film is cut along the dotted lines, forming sheets of a certain length. The distance between the sheets should be 1 cm. To the base of the tape, strengthen it with tape.
- Mats and sheets of thermal film are connected in a parallel way.
- A temperature sensor is placed on the surface of the electric floor. They form a niche for him.
- Conduct the connection of electrical wires from the "warm floor" and the temperature sensor to the regulator.

Underfloor heating water type
 The design of this system is simple: the heat comes from the water that passes through the pipes located in the screed. Such a system includes:
- pipes;
- thermal insulation;
- fixing materials,
- components for expansion joints,
- collector with fittings for connecting pipes to the heating system.
This system uses metal-plastic and polyethylene pipes. It is worth laying them in the same way as an electric cable - with a snake. The distance between the turns should be no more than 30 centimeters. Installation of water heated floors is much more complicated than electric ones. The step by step instructions are:
- The beginning of the installation of this system will be the installation of a manifold and a unit in the form of a block that will combine a pump and a mixer. It is the node that will ensure that the temperature you have chosen is maintained. The block is responsible for the distribution of water along the turns. The whole structure is attached to the manifold cabinet.
- The next step is to prepare the floor, it is worth clearing it of debris and checking the evenness of the surface.
- Thermal insulation tape is laid around the perimeter.
- Then it is worth laying a vapor barrier to protect the system from moisture from below.
- Further, for quick laying of pipes, the floors are lined with polystyrene foam plates. The plates are overlapped, for this they have special grooves.
- When laying according to the pipe scheme, be sure to observe the distance between the turns. To fix the bend, a spring jig is used.
- When the design of the contours is completed, the ends of the pipes must be connected to distribution manifolds, servos are installed. They make it possible to regulate the operation of the entire structure using a room thermostat.
- Before starting the system, it will need to be checked for leaks, only after that you can make a concrete screed. The floor can be put into operation no earlier than after 28 days.
Summing up, I would like to note that for summer cottages a warm floor of an electric type is better suited. If you want to make a water-type structure, you must be prepared for the fact that at the end of the summer season you will have to drain the water from the pipes. Another advantage of an electric floor is that it is more economical than others. Now you know what a warm floor is, and which option is best suited for your suburban area. You can safely proceed with its installation, and let it be warm in your house.
heating mat
Fiberglass heating mats, which are equipped with a heating cable system, are also popular among consumers.The advantage of such products lies in the ease of installation, because their installation does not require such a time-consuming procedure as additional concrete pouring. The system is fixed in a layer of adhesive composition designed to fix the tiles. Due to this, the final layer of the screed does not exceed three centimeters.
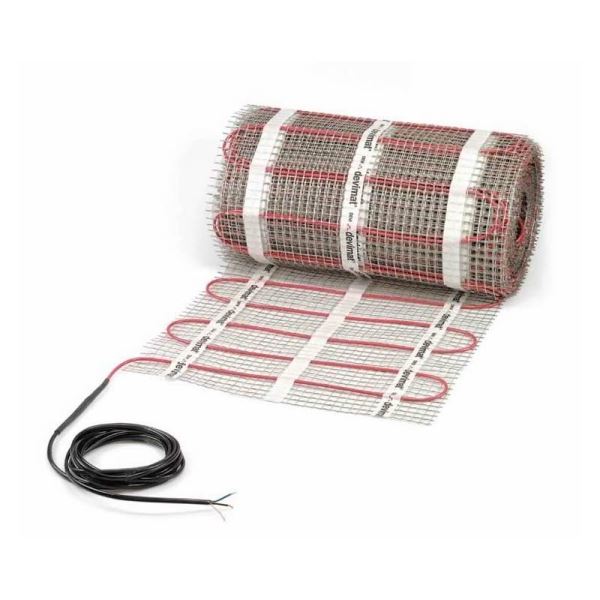
Heating mat
On sale, the devices are presented in rolls, which facilitates the installation of the system. The technical characteristics of such products are exactly the same as in the case of prefabricated heating cable systems.
Varieties of underfloor heating and their features
There are several heating options:
- water;
- electric;
- infrared.
Underfloor heating is a simple and effective solution. For its installation, heating elements are laid in a concrete screed. As a rule, polyethylene and metal-plastic pipes (less often copper) are used. Hot water flows through them.
Unfortunately, this type of heated floor cannot be used in apartment buildings, as this violates the general heating system. Of course, if you wish, you can try to get permission, coordinate the project with utilities. A water heated floor is an excellent solution for a private house, it does not require approval, it is safe, durable and economically attractive. However, it requires maintenance (filter replacement, etc.)
Electric heated floors are installed in a similar way, only a shielded heating cable with temperature sensors acts as the main element. There are different options here: heating cable, film material and special heating rods, depending on whether you are ready to raise the level of the floor. The heating cable is laid under a screed 5 cm high. When using a thin warm floor, namely mats, a screed is not required.
Scheme of the riser of the underfloor heating system.
You can use single-core or twin-core heating sections, which are suitable for heating a wide variety of premises (residential, office and industrial). With the help of a thermostat, you can control the climate by setting the optimum temperature. In addition, you can monitor the consumption of electricity. Electric underfloor heating is more expensive than water.
Infrared underfloor heating (ITP) is very popular. A significant difference of this type is the use of infrared radiation with a length of 5-20 microns. This option is economical in terms of energy consumption.
Do-it-yourself installation features
If you undertake to install an electric floor system in a country house or in a country house with your own hands, then first you must carefully study the installation instructions that come with the products and contain all the necessary information regarding installation, operational use and general safety.
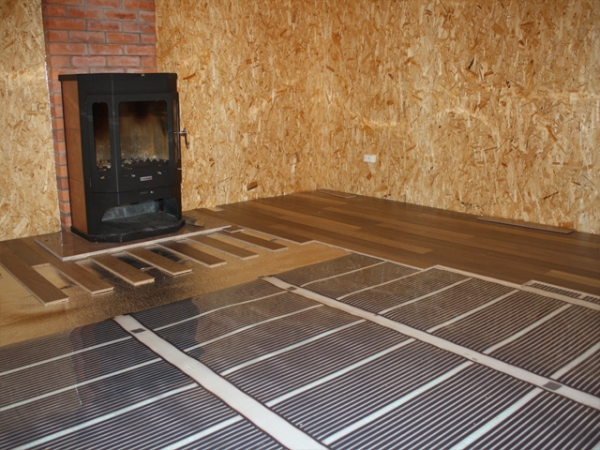
Film layout
A list of several rules will avoid such problems:
- Be sure to calculate the area that needs heating, and rationally select the system.
- You can not lay the cable under pieces of furniture that do not have high legs, and the infrared film must be placed only in an open space free from furniture.
- The base must be carefully leveled and dried.
- Under no circumstances should the cable be shortened or lengthened, cut or otherwise manipulated.
- Turning on the system is allowed only after the screed layer has completely hardened and dried. This usually takes from 28 days to a month, at least.
If you plan to use tile products as flooring, then it is best to choose a device based on cables, since this option is the most budgetary and suitable for this case.
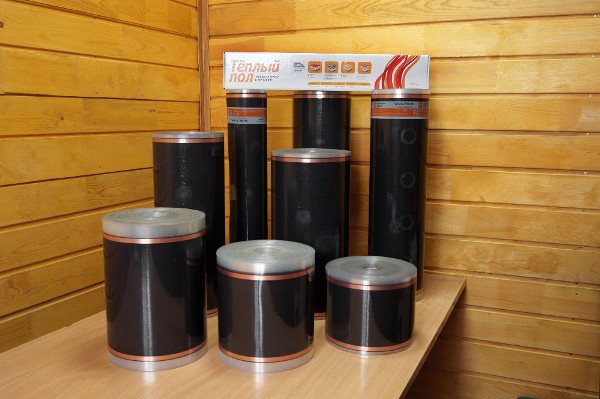
Film product range
First of all, you should prepare a place to place the temperature controller, form a groove where the electrical wiring will be hidden, the temperature sensor tubes. In this zone, the output of the mounting ends will also be located.
After that, the base is leveled, cleaned of dust and debris and covered with a primer layer. Then the heat-insulating material is laid, and the corresponding sections of the mounting tape are glued according to the laying scheme.
cutting material
Key points to remember:
It is necessary to check the electrical resistance in the network.
The cable during installation should be stretched, but without much effort.
The minimum allowable bend must be taken into account.
On straight sections, special couplings must be used.
Do not allow the intersection or contact of the turns of the cable.
Next, the temperature controller is installed and connected to the electrical network. When installing the temperature sensor, a corrugated tube is used, which, for the convenience of carrying out repair work, must be placed between the turns of the cable.
After all connections are made, the system is checked for damage, resistance measurements are taken on the sections and the sensor and compared with the numbers in the documents. When the screed is completely dry, the device can be turned on.
Installation of mats
Execution of the system from heating mats is a less time-consuming process than laying the cable.
First, the mats must be laid out on the floor for an estimate. They are laid with wires down. After that, go carefully to cut the fibers of the mesh in the right place, taking care not to damage the cable.
Then it is necessary to lay out the pieces of the mat so that they cover the entire free surface in the room. Mats with one-sided power supply connection are more ergonomic in installation. Recently, they have become cheap in the domestic market.
Mats with power connections on both sides are more difficult to lay so that the ends of the cables come together to the junction box.
After fixing and laying, the mats are covered with a thin layer of plastic mortar and a new floor covering is laid on it. In bathrooms and in all other wet rooms under the floor covering, for example under tiles, it is necessary to additionally lay moisture protection insulation.
If the coating has a small thickness, the floor level will rise by only 1-2 cm.
Attention! Heating cables should not be laid over expansion gaps because they are easily damaged in such places. As a result, this can lead to a failure of the heating system.
If the heating element is damaged, safety will be ensured by a differential involuntary switch that will turn off the electricity supply, preventing electrical breakdown.
Advantages and disadvantages
Before installing a heated floor, it is necessary to evaluate all the pros and cons of this design. The benefits include:
comfort and safety; efficiency (compared to other methods of space heating, power consumption is lower); aesthetics; hygiene (especially important for the bathroom); easy to install and maintenance-free (electric heating); suitable for all types of floors (i.e. can be installed under carpet, marble, wood, etc.). Underfloor heating temperature control scheme
Scheme for adjusting the temperature of the warm floor.
First of all, the materials used for the final finish must be safe so that no harmful substances are released during the heating process that can harm people.
If you decide to install a warm floor, then you should not use a coating that will interfere with heating. For example, a coating with double insulation will not work.
Operating conditions are directly related to the materials used.If you opted for parquet, then you must take into account that the temperature should not exceed 24 degrees, and the power should not exceed 130 W / sq.m. Many experts do not advise laying parquet and cork on a warm floor. Parquet is too capricious material, and cork has a low thermal conductivity.
Flaws:
- financial costs associated with the installation;
- the floor heating system emits an electromagnetic field, but it is minimal and safe for the inhabitants of the house (electric heating);
- maintenance required (hot water heating).
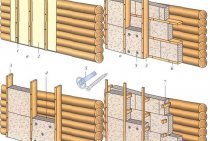
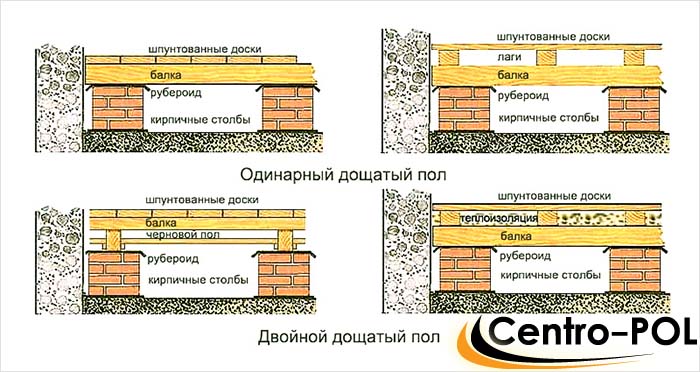
Two structures could serve as a support for the lag
- Special support beams that fit into nests arranged in the stone foundation of the house or rested on the lower crown (if the house is wooden).
- Brick posts, which were arranged in the underground space and could serve both as a base for support beams, and as a support directly for the log.
Nowadays, when there is a wide choice of building materials, including concrete, a concrete slab or pillow is often used as the base of the floor of the first floor.
And, if the slab is mounted directly on the foundation, then the pillow is poured inside it and distributes the load directly on the soil located inside the foundation contour.
Let's talk about the finish
Before laying the finish coat, you should decide what kind of material you need. After all, each room has its own load and humidity level. In addition, when planning the installation of floors in the country, you need to take into account that in winter the room will not be heated.
concrete pavement
The concrete floor for a summer residence can theoretically also be equipped independently. If it is made perfectly even and painted, then it will have a fairly good appearance. Such a coating is strong and durable, you will need to refresh the paint every few years and the floor will be like new.
But no matter how hard you try, concrete is concrete, it will be cold, if you cover it with carpet or bedding, the cold will still be felt. Even in the summer, doctors do not recommend walking barefoot on concrete.
This option may be suitable for a summer kitchen, garage or outbuildings. In residential premises, a concrete screed is made as the basis for a finishing coating.
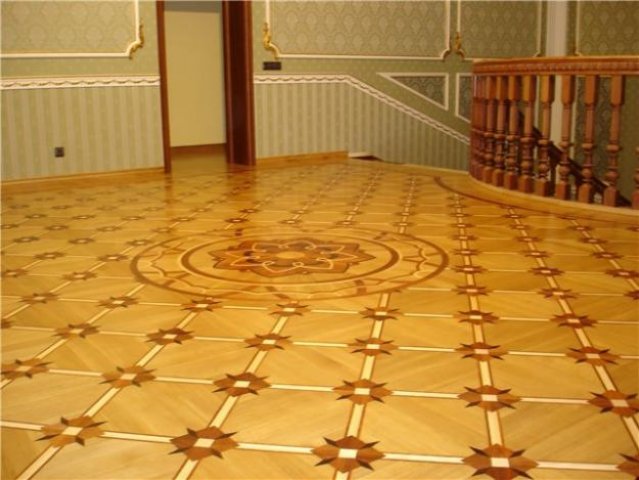
We use natural wood
The device of floors in the country from natural wood is a classic. People have been making them for hundreds of years. The price of such a coating will be average, but wood is a natural material and requires careful processing and care. In particular, a good waterproofing of the wooden floor in the country must be provided. Indeed, otherwise the tree can quickly deteriorate.
This coating is also convenient because on a good basis and well-equipped waterproofing, you will not need powerful insulation. A tongue-and-groove board with a thickness of at least 40 mm is used for the coating, which in itself is quite warm.
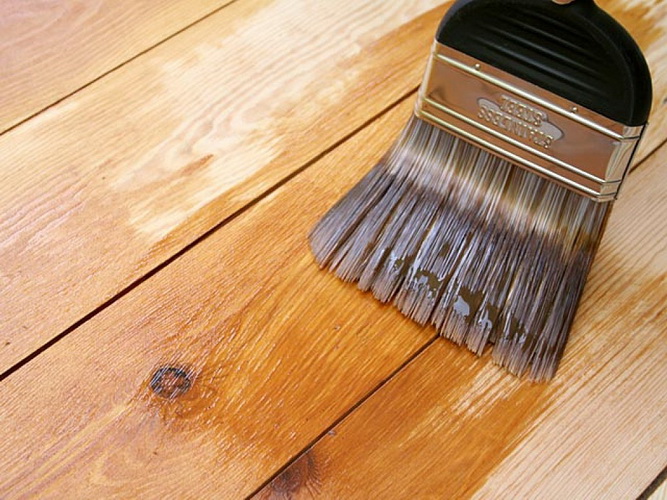
When deciding how to paint the floors in a wooden cottage, experts advise paying attention to acrylic varnishes and paints. In the old days, the floor was traditionally painted with oil paint, it is of course practical and durable, but with such a coating, the tree does not breathe and the whole meaning of naturalness is lost.
The classic wooden floor is mounted exclusively on logs, because it requires constant ventilation from below. DIY installation instructions are quite simple. Initially, waterproofing is covered, wooden logs are mounted on it, onto which a tongue-and-groove floorboard is already nailed. Insulation is placed between the lags.
Laminate
Laminated coating appeared about 20 - 30 years ago, it is currently one of the most popular. The appearance of the laminate can be anything, the range of colors here is one of the widest. As a rule, it emits natural wood.
Among the advantages can be called a low degree of abrasion, ease of installation and durability. If we talk about the minuses, then this coating requires a perfectly even, waterproofed base. The price of expensive species bites, and budget options are afraid of moisture and cannot withstand heavy loads.
Linoleum
This material can deservedly be called the king of floors, not only in the country, but also in most other residential or office premises. It can be thin or thick. Smooth and corrugated surfaces with varying degrees of stability are produced. Linoleum behaves well in a humid environment and is not afraid of temperature changes, plus laying linoleum does not require high professionalism.
There are few downsides to linoleum. In fact, experts consider the ability to push through the material to be the most sensitive place. Linoleum is afraid of sharp heels and heavy furniture. Plus, it requires a perfectly flat surface for installation.
Wood is a material valued for its environmental friendliness, aesthetics and durability, and therefore it is not surprising that cottage owners choose wood as a building resource for floor construction. A coating of natural material is laid not only in the country - in small summer houses, a wooden floor can be laid in a brick cottage or foam concrete structures. How to lay a wooden floor in the country house and whether it is possible to do it yourself - we will figure it out together.
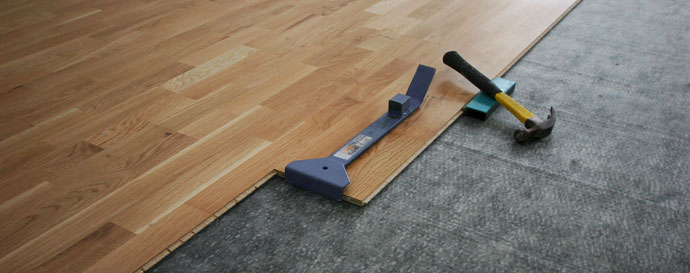
Heating on wooden floor
When working with wood flooring, always remember that the heating elements are located below the floor surface. For installation, there are several methods:
- the pipeline or cable sections are led out between the lags on the surface from the GVL; to pass the elements through the logs, holes are made; corrugated tubes or pipe insulation are installed in them;
- if the floor is formed from boards, then a contour is drawn on the surface; for this, a wall chaser is used; foil material is placed in the strobes;
- perform a contour of plywood or lining; distance between blanks 50 mm; metal heat-distributing plates are installed in the resulting niches; reflective material is laid in them;
- thermal film is mounted on a wooden floor without prior preparation;
- instead of a concrete screed, a wooden crate or drywall sheets are used; lining is laid on a clean dry screed; laminate, linoleum; tile will have to be abandoned.

When installing floor heating in the country, it is necessary to provide an optimal source of energy. If possible, use a liquid line. The pipeline is filled with antifreeze. He doesn't freeze. Additionally, a circuit for hot water supply is output. Electric heating is provided if there are no interruptions in the network.
Autonomous heating with your own hands. Economical battery boiler for underfloor heating
- header
- Autonomous heating with your own hands. Economical battery boiler for underfloor heating
- header
- Underfloor heating under laminate in 1 hour EASY and SIMPLE
- header
- Warm floor. 10 Mistakes THAT SHOULD NOT BE MADE