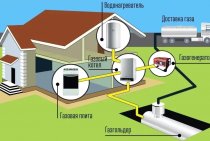
Installation of gas infrared heaters
If the device is powered by a gas cylinder or the gas container is inside (street gas heaters in the form of a lantern), all safety precautions when working with gas must be observed. A good ventilation system is required, as
gas combustion products remain in the room
A good ventilation system is required, as combustion gases remain in the room.
When installing, be sure to observe the requirements for the safe placement of burners in order to avoid the risk of fire.
Subject to all installation rules, you can create a reliable autonomous heating system and significantly reduce heating costs.
Here you will learn:
Infrared heaters are able to create a comfortable atmosphere with minimal labor and financial costs. They are compact, safe and efficient, can be used in rooms for various purposes. Installation of an IR heater is not difficult, even a novice master can handle it, but he already knows how to hold tools in his hands. In this review, we will consider all the subtleties of the installation work.
Necessary tools and materials
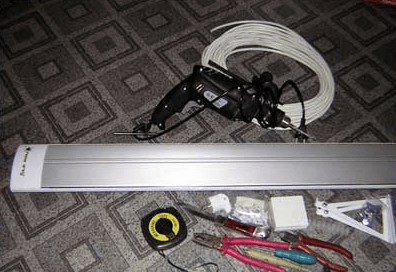
In order to quickly and easily install an infrared heater on the ceiling, you will need the following tools:
- Drill or screwdriver (drill holes for fasteners).
- Pliers (for shortening wires).
- Indicator screwdriver (determine phase and zero).
- Metal detector (optional, used to search for wiring and metal objects in the wall, so as not to accidentally get into these objects when drilling holes. You can make a metal detector yourself from improvised means.
- A simple pencil and construction tape (mark the attachment points on the wall).
 As for additional materials, to install and connect an infrared heater, you may need:
- Detachable electrical plug.
- Three-core copper cable, section 2.5 mm.kv.
- Wall mounts (purchased as needed, as only ceiling brackets are included).
Having collected all the necessary list of materials and tools, you can proceed to mounting and connecting the heater.
Where and how to install an IR heater?
The location of the infrared heater depends on its type and heating plan. It can be installed on the ceiling, on the wall, with or without a slope.
Safety
Remember that installing IR heaters is working with electricity
Therefore, it is important to remain as careful as possible and follow the safety rules:
- Never install the heater near flammable objects.
- Wiring must be run over a non-combustible substrate.
- Fasteners must not touch the heating element.
- Do not install devices with a power of more than 800 watts for a residential building or apartment.
- Do not connect the heater to the mains until the installation is completed.
For best use of the heater in your home, place it near materials that have a high heat absorption rate, such as wood, carpets, stone walls. At
Do not install the heater near reflective surfaces, this will reduce the efficiency of the device.
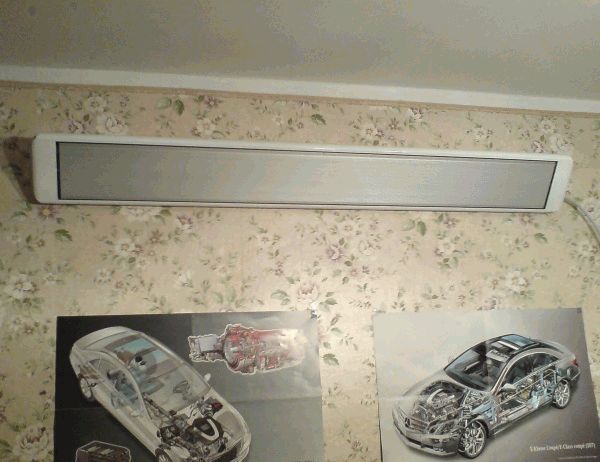
The mounting surface must be strong enough, as some heaters can weigh up to 28 kg, although many are, of course, lighter in weight.
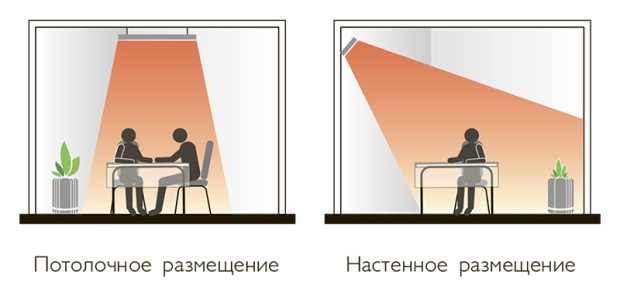
Location and height from the floor
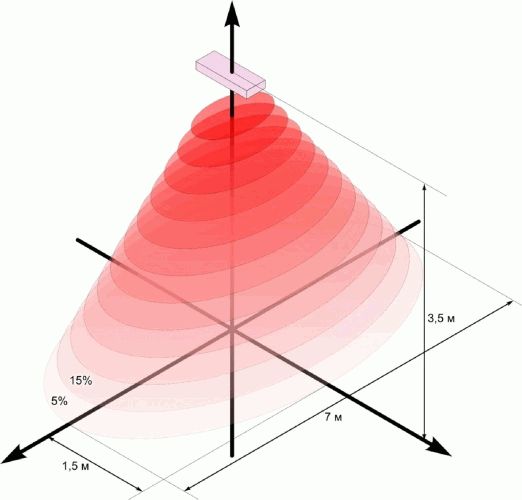
 One of the important requirements for installing an IR heater is the distance to a person’s head, especially in work areas, where a person spends a lot of time almost motionless. This distance should be at least 1.5 - 2 meters. In fact, it is determined by the power of a particular heater. If its power is up to 800 W, then it can be placed at a distance of 70 cm from the human body. If the power is 1-1.5 kW, then the permissible distance starts from 1 meter.
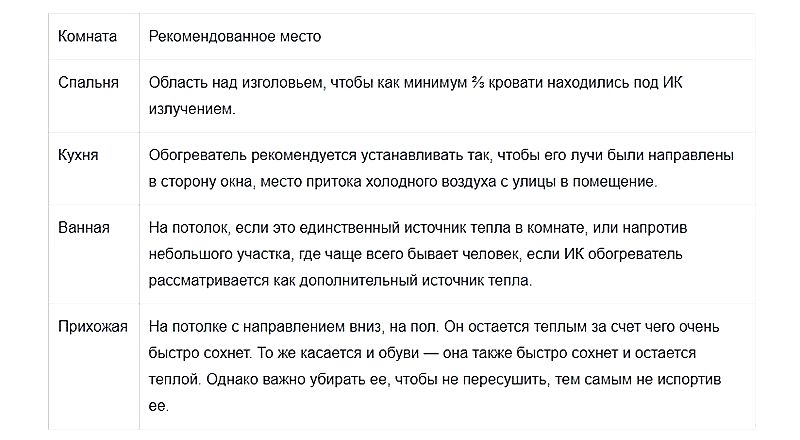
  The specifics of different rooms determine the features of the installation of the heater and the optimal arrangement of devices. Where to place the heater:
Room
Recommended place
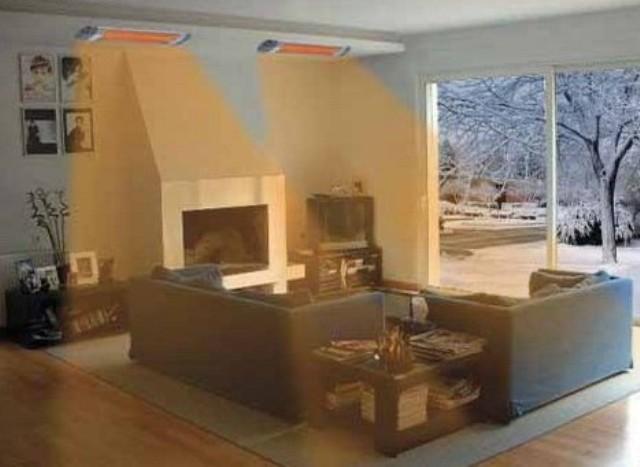
Bedroom
An area above the headboard so that at least ⅔ of the bed is exposed to IR.
Kitchen
The heater is recommended to be installed so that its rays are directed towards the window, the place where cold air flows from the street into the room.
Bathroom
On the ceiling, if this is the only heat source in the room, or opposite a small area where people most often visit, if the IR heater is considered as an additional heat source.
Hallway
On the ceiling pointing down to the floor. It stays warm and dries very quickly. The same goes for shoes - they also dry quickly and stay warm.
However, it is important to clean it so as not to overdry, thereby spoiling it.
 When heating outdoor areas, it makes sense to install several devices at once, so that infrared radiation reaches most of the body surface.
  IR heaters can provide different temperature conditions in certain areas of the room. To do this, several devices with different capacities are installed in the same room.
Next Post
This is interesting: How to properly install the hob in the countertop: lay out the points
Design and principle of operation
The principle of operation of infrared equipment is not complicated. Electricity contributes to the heating of the heating element, which heats a special heat-radiating plate that emits infrared radiation.
The structure of the equipment includes:
- body (in separate modifications);
- heating element;
- emitter;
- reflector;
- electrical fittings and wires;
- remote control.
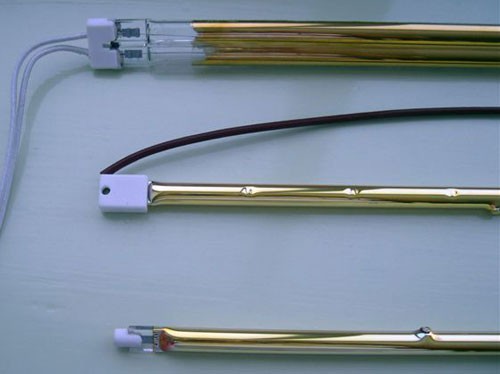
If there is a case, then it is most often metal. Models without a case are made of heat-resistant film or glass. Heating elements are located inside the film. The glass devices contain a pair of 4 mm plates linked together.
The following can act as a heating element in IR devices:
- records;
- heating elements;
- spirals of closed or open type;
- carbon conductors;
- infrared halogen or quartz lamps.
The reflector is made of heat-resistant metal with good reflective characteristics. This is usually 120 micron foil. An insulating material is placed between the body and the foil. Typically, an infrared heater is equipped with a power regulator to select the appropriate heating mode.
Important information about the operation of IR heaters
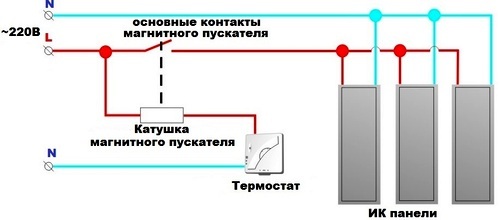
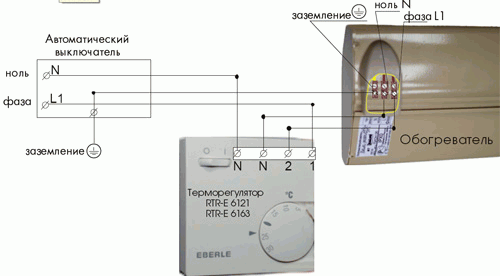
The device of infrared heaters has zonal and spot heating. The connection diagram of this equipment is shown in the following image: one.
Before starting work, you will need to prepare the installation tools and a plan of the house. The tools are as follows:
- perforator;
- screwdriver;
- roulette;
- Screwdriver Set;
- pliers.
Figure 1. Scheme of connecting an infrared ceiling heater to a thermostat.
Before starting installation, you will need to collect complete information about the house, on the basis of which a connection diagram for the installation will be drawn up. Determine the area and size of all rooms, find out the characteristics of thermal insulation, window structures, etc.
You will need to measure the voltage in the network at the highest possible load on the thermostat. To do this, you need to turn on as many different electrical appliances as possible at the same time. The voltage should be about 220-230 V with a deviation of no more than 10-20%.
If there will be a greater deviation, use stabilizers. You will definitely need an individual connection diagram, for which you need a house plan. If there is none, draw it yourself. The following is an example of a calculation for a standard private house.
Choosing the right place
The most important requirement when installing an IR panel is the distance to a person's head. This is especially true in work areas where people stay in one position for a long time.
The distance should be at least 1.5-2 m, it all depends on the power of the device. If it is less than 800 W, the device can be placed at a distance of 70 cm. If the indicators are 1-1.5 kW, then the minimum gap is 1 m. The specifics of specific rooms determine a number of installation features of structures and the optimal layout for their placement. The recommended location for the device in each particular room is clearly shown in the table:
Installation rules
Many homeowners have found themselves in a situation where the placement of large household items in a room is interfered with by batteries. Installing an infrared heater on the ceiling will make it possible to avoid such a problem.
This device does not attract too much attention, but at the same time it allows you to achieve uniform heating of the space in the room.
Installation of heaters is carried out together with the laying of thermal insulation and finishing work. As a result, the equipment is almost invisible.
Installation will be correct only if the following conditions are met:
- from the emitter to interior items, walls, electrical outlets, switches and a person, a safe distance is observed;
- during installation, special brackets, hooks and dowels are used;
- ceiling materials are heat resistant.
Efficient fastening is an important condition for the correct installation of infrared equipment. Separate heaters are mounted on hangers
In this case, the cover is removed from the device, and the suspensions are sent to the grooves. After that, the cover is returned back, and the equipment is put in its place.
To make sure that the installation work is correct, it is necessary to connect an electrical cable with earth to the block with the terminal. Before connecting the equipment, it is necessary to apply alcohol on it, and only after the surface has dried, connect the device to the network. Further, the heater must work non-stop for a couple of hours (to evaporate the lubricant from the manufacturer).
Comparison with other types of heating equipment
Competing heating devices (batteries, convectors, fan heaters, oil coolers) are aimed primarily at air heating.
Only then warm air partially transfers heat to surrounding objects and people.
This method has a number of disadvantages:
- As a result of the heating of the environment, “air stratification” occurs. At the same time, warm air accumulates at the top of the room, and cold air at the bottom. This disadvantage is especially noticeable if a tile is used as a floor covering.
- Mixing, warm and cold air form convection currents, creating drafts in the room.
- The heating of the room is extremely slow.
In all of the above points, infrared heaters outperform their competitors.
Advantages and disadvantages
Ceiling heaters have a number of important advantages, including:
- profitability;
- increased heat transfer;
- low noise level;
- autonomy;
- there is no problem of oxygen uptake;
- do not emit unpleasant odors;
- small sizes;
- no need for design work;
- it is possible to install it yourself (although the seller will probably impose his own installation);
- installation on false ceilings is possible;
- ease of management.

In addition to the advantages of infrared devices, there are also disadvantages:
- the possibility of overheating during prolonged use;
- considerable cost;
- stationary equipment.
Main Process
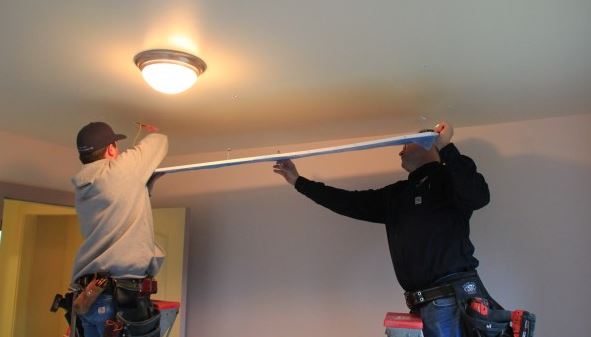
Chassis suspension
First you need to determine the installation location of the infrared heater in the house (or apartment). As we said above, the case can be placed both on the ceiling and on the walls, depending on the individual preferences of the owners.
First of all, you need to mark the places for installing the fasteners yourself. To do this, use a tape measure, which measure the same distance from the ceiling to the selected area. It is also recommended to use a building level, with which you can evenly set the brackets in a horizontal plane.
After marking, proceed to drilling. If the ceiling (or wall) is made of wood, drill holes with a drill. If you have to deal with concrete, you can not do without a puncher. It is necessary to drive dowels into the created holes and screw in the brackets, after which you can install the infrared heater in its place.
We draw your attention to the fact that the design of the unit is different. Some products have guides fixed in brackets
A simpler option is chains fixed in the ceiling (special holders cling to them). Also on the market you can see infrared heaters on the leg, which are simply placed on the floor.
Electric installation work
As we said at the beginning, the process of connecting an infrared heater to the network will be carried out using a temperature controller.
First you need to connect the contacts of the collapsible electrical plug to the terminal blocks of the thermostat, which are installed in the product case. Each "socket" has its own designation: N - zero, L - phase. It should be noted that there are at least two zero and phase terminals each (from the network to the regulator and from the regulator to the heater). Everything is quite simple - you strip the wires, insert them into the seats until they click (or tighten the screws). Be sure to follow the color coding of the wires so that the connection is correct.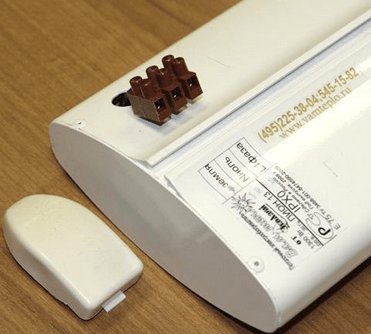
To your attention schemes of the correct connection:
As you can see, connecting an infrared heater through a thermostat is quite simple, the main thing is not to confuse the wires and carefully tighten them in the terminal blocks.
A very important nuance is the correct choice of the location of the regulator. Do not install the product next to a heater, as in this case, warm air entering will adversely affect the measurement accuracy. It is best to place the device in a more remote area, at a height of one and a half meters above the floor.
Also note that you need to install the controller in the coldest room, otherwise the heating problem will not be completely solved. As for the number of infrared devices serviced by one temperature controller, it all depends on the power of the heaters
Usually one 3 kW controller is used for several products, the total power is not more than 2.5 kW (so that there is a margin of at least 15%).
You can read more about connecting a thermostat to an IR heater in our separate article, which provides several installation schemes!
So that you can clearly see the whole process of connecting with your own hands, we provide these lessons for viewing:
Video instruction: do-it-yourself infrared heater connection
How to connect a temperature controller
Advantages and disadvantages
Any equipment has both positive and negative sides. The advantages of infrared heaters include:
- Profitability (especially when using appliances as an additional source of heat).
- The device does not burn out oxygen.
- No harmful effects on human health (scientists have proven that devices can even have a positive effect on the body).
- When mounted on the ceiling, they take up minimal space in the room.
- Safety for children.
- Silent operation. In addition, products can be used as a light source.
- Many models are equipped with a built-in thermostat, with which you can maintain the optimum temperature level.
- Heat is retained for a long time, because heated objects give off energy into space.
- Infrared systems are resistant to moisture, so they can be installed in gazebos, bathrooms or terraces.
 Many models have a thermostat, which maintains a comfortable temperature level.
The only drawback of the products is their high price.
Principle of operation and varieties
A characteristic feature of such products is the release of heat, which contributes to the heating of various surfaces - walls, floors, ceilings, etc. It should be noted that the air is heated partially, because the main radiation flux is directed to objects, which subsequently give off heat from themselves.
 Infrared radiation is not afraid of wind, drafts and is able to warm even on a windy day
The device consists of a reflector and an emitter. The latter is responsible for the transmission of radiation during the heating process. The reflective element is a reflector, which is made from heat-resistant materials with high reflectivity. As heating elements can be:
- plates;
- open or closed spirals;
- quartz, infrared or halogen lamps;
- heating elements;
- carbon conductors.
In accordance with energy sources, all heaters are divided into several types:
- Electrical. The most popular type of devices that are installed in any premises. A mandatory element in the system is a mirror reflector for transmitting radiation in the required direction.
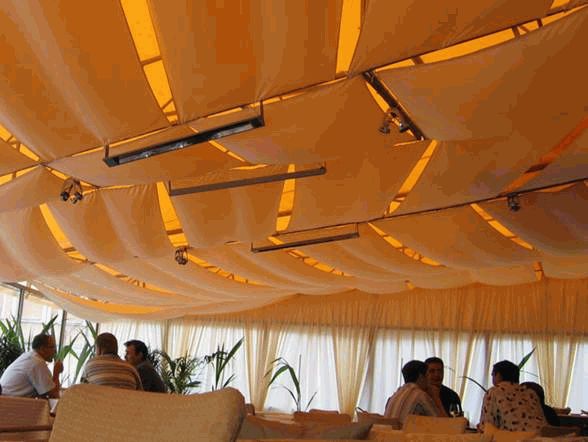
- Gas. Best suited for open areas or industrial buildings. Due to their high power, they are rarely seen in residential areas. The fuel is a gas-air mixture.
- Diesel. Demanded in those rooms where weak wiring. Such devices are often found on the street or in garages. The device does not require chimneys, cleaning is done through several filters.
- Film - often used in residential areas.
We install the heater on our own
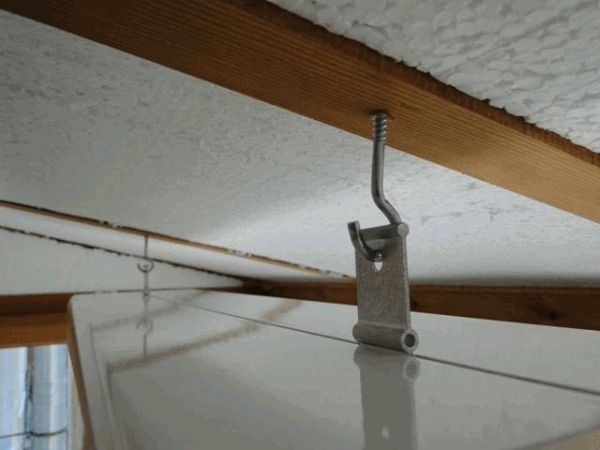
The simplest and most effective installation method involves placing the heater on the ceiling of the room. The suspension of the body is carried out in the following order:
- On the short ends of the case, it is necessary to unscrew the screws and remove the covers, the suspension brackets are inserted into the slots and fixed with a latch;
- According to the distance between the brackets on the ceiling, the installation sites of the anchor hooks are marked;
- According to the marking, holes are drilled in the ceiling slab, plugs are clogged and suspension hooks are screwed in.
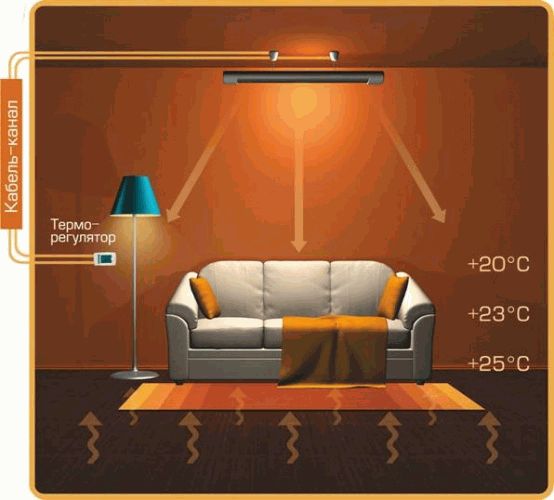
Before fixing the infrared heater, it will be necessary to lay the wiring from the inlet electrical panel to the thermostat installation site and further to the heater. Ceiling structures are rarely equipped with built-in thermostats, so the box responsible for controlling the heating process is placed at a height of 1.6-1.7 m near the entrance to the room according to the above diagram.
To connect an infrared heater, you will need to strip the ends of the wires and fix them in the chips according to the diagram given in the product passport or pasted on the inside of the cover. It remains to connect the wiring to a separate bag on the shield, and you can start the infrared heater into action.
Digital thermostats allow you to control the temperature in the room with high accuracy. But in practice, infrared devices have a small heating inertia. For example, setting the temperature in the room to 22 ° C on the device, the heater will actually raise it half a degree or a degree higher, since the hot radiant coil or heater panel by inertia continues to heat the air for another 5-7 minutes after the thermostat cuts off the power supply.
Where to go and how much does the work of masters cost?
You don't have to do everything yourself. If you do not have enough experience in installation work with electrical equipment, contact one of the companies offering their services. The cost of installation work on average is from 1500 rubles for 1 heater. Many of them guarantee their work, so there is no other good reason to refuse these services other than the desire to save money.
Installation of infrared heaters should not be scary - this is not a reason to abandon one of the most economical ways to heat an apartment or house today. With the help of specialized companies that are ready to help in the installation of heaters, difficulties should not arise.
Varieties of infrared heaters
All devices of this kind are divided into two categories:
Gas. These heaters operate on liquefied gas. Their main advantage is autonomy, because they do not need access to the mains. At home, they are of little demand, since they are more often used to heat industrial buildings and outdoor areas.
Depending on the installation location, they are further divided into two categories:
- Wall. They are mounted to the wall, which is especially important for rooms where there are small children, since they can burn their hands on a heater or knock over an ordinary stationary appliance. Of course, there is a risk of covering the heat transfer surface, and this is forbidden. The advantages of this type of device include significant space savings and ease of use in small spaces.
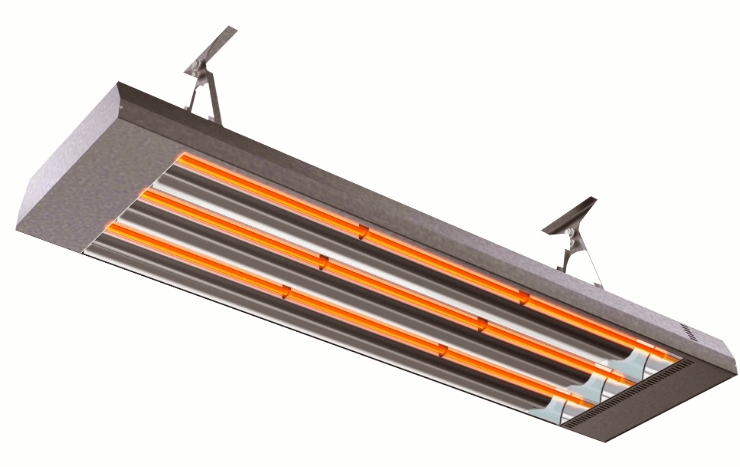
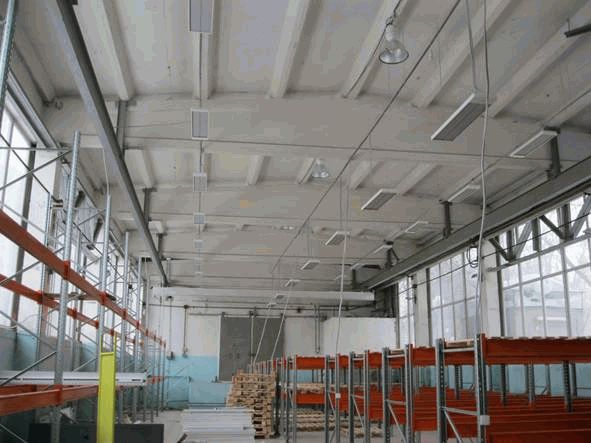
- Ceiling. Such devices are capable of heating fairly large structures in a short time. You can install them even in wet rooms, due to the fact that they emit much more heat than floor and wall options. This is achieved thanks to the original shape and a special rough coating of the heating surface. The fact is that the heterogeneity of the upper layer provides a large area for heat release. Ceiling heaters can have open and closed heating elements. The first option is considered more efficient, since it radiates a narrowly directed hot heat flux. They are fixed, as a rule, in houses with high ceilings, workshops, hangars, and warehouses. A closed heating element is more suitable for residential premises where the ceilings are not too high and the heated area is small.
How to install an infrared heater yourself
Infrared panels are gaining more and more popularity every year. They are easy to use and provide fast heating of the room, and the built-in thermostat allows you to set the desired heating temperature in a few clicks. Moreover, installing infrared heaters with your own hands is quick and easy if you follow the instructions. Other advantages of this equipment include:
- long service life;
- noiselessness;
- safety;
- spot heating;
- possibility of application in open space.
It is not surprising that many people are interested in installing infrared heaters with their own hands. This process does not require special skills and takes from 25 minutes to an hour and a half.
Training

In order for the installation of the infrared heater to go as expected, you must have the tools:
More sophisticated equipment can be used as needed.For example, if you are interested in installing infrared heaters with your own hands in the amount of several pieces, it is best to use a pyrometer for calculations. It will allow you to determine the warmest and coldest places in the room. Based on the information received, you will select the optimal location for each device.
Safety
There is a set of measures that will prevent accidents both during installation and during operation:
- Do not install IR panels near flammable and explosive objects;
Electrical cables must be laid on a non-combustible base;
Fasteners must not touch the heating element;
The height at which the panel should hang is 2.5-3.5 meters;
For a house or apartment, devices with a capacity of not more than 800 watts are bought.
The device must not be turned on until the installation is completed. The device must have an appropriate degree of protection if the panel is mounted in a bath or sauna. Subject to all these rules, the installation of an infrared heater will be quick and without difficulties.
Installation Recommendations
When installing infrared heaters with your own hands, it is necessary that the distance between the ceiling and the body is at least 3 millimeters. In country houses, panels are taken out to heat the external space, for example, a summer kitchen. In such cases, to increase the efficiency, it is necessary to place a heat-insulating material or foil under the housing.

To make the installation of the infrared heater as simple as possible, it is better to place the panel with the connector against the wall. In most models, the contacts are self-clamping. The delivery package includes elements for fixing the device to the ceiling.
The installation process includes the following steps:
- take the device out of the package and place it on any flat surface with the heating plate down;
- mark the mounting location and make several holes;
- screw the screw rings;
- hang the chains by adjusting the height (if necessary).

secure the device with mounting hooks or brackets.
As you can see, installing infrared heaters with your own hands is not a particularly difficult process. Also, the panels can be mounted on the wall, but the heating effect will be much less.
Installation of different models of IR heaters:
Network connection
The device is connected to a thermostat that will maintain the desired temperature. This is done through three terminals: "ground", "phase" and "zero". Accordingly, the supply cable must be three-core. Alternatively, you can use PVA 3x1.5.
The ends of the cable are connected to the terminals. Polarity is indicated at the ends of the wires. After the device is installed and connected, it is advisable to wipe the panel with an alcohol solution before turning it on.
Connecting multiple devices
If you are interested in installing infrared heaters with your own hands in large rooms, then you need to consider that you will need several devices. To ensure smooth operation, all panels are connected to one thermostat. This will effectively regulate the temperature throughout the facility.
Peculiarities
Infrared heaters have a rather interesting principle of operation. They do not heat the air itself, but the objects located around it due to infrared radiation. As a result, they become warm, giving off part of the thermal energy to the atmosphere - the room becomes warm and comfortable. Consider the main features of IR heaters:
The most striking drawback of these heaters is the high power consumption, which is typical for any, even the most economical electrical appliance.
- Proper heat distribution. If you install traditional radiators indoors, it will be cool near the floors, and hot near the ceilings.In the case of IR heaters, the floors will be warm, as they will be heated by IR radiation;
- When installed correctly, they do not harm human health - if this equipment is installed correctly in a regular place, it will not have a negative impact on the body (in particular, there will be no headaches);
- Fast heating of rooms - they warm up noticeably faster than traditional radiators;
- Almost complete noiselessness - only gas appliances make noise (and even then they are practically inaudible);
- Can work in rooms with a high level of humidity;
- Available for outdoor use, creating a comfortable environment in open areas;
- No negative impact on the environment.
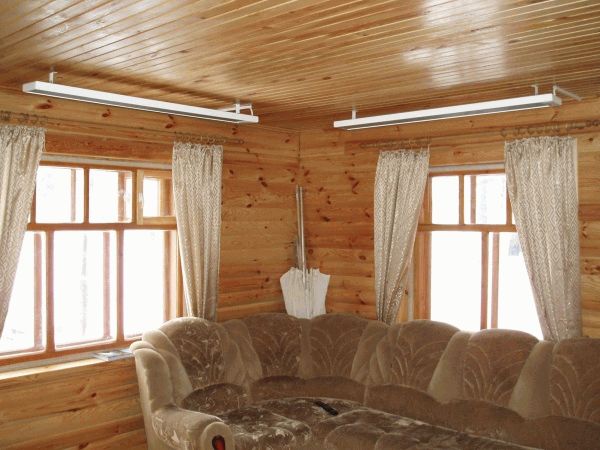
Installing an infrared heater in the living room will create a warm atmosphere in which it is pleasant not only to relax, but also to work.
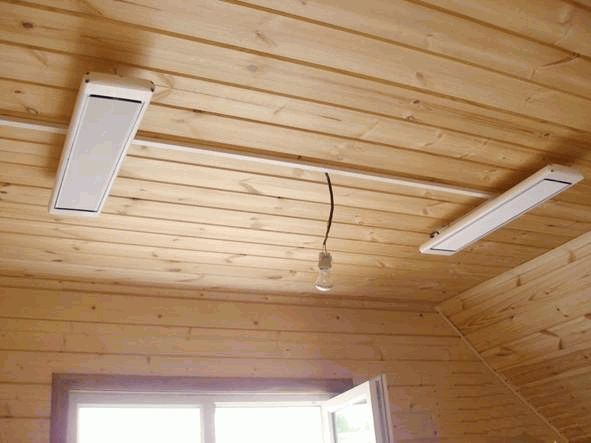
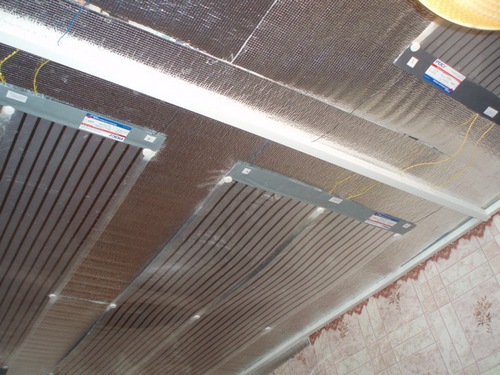
Installation of a ceiling IR heater
In general terms, the instructions for installing an infrared film heater on the ceiling are as follows:
1. Laying insulation
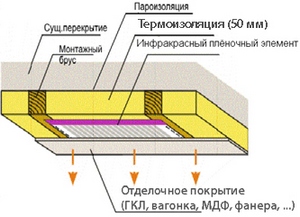 Scheme of installation of a ceiling infrared heater
The IR film must be separated from the ceiling structures with a heat-insulating layer at least 5 mm thick. If the heater is not equipped with a reflective screen, then foil insulation should be chosen. The method of fastening depends on the material of the floor: if it is made of wood, a construction stapler and staples are used, if it is made of concrete, the insulation is pressed with strips fixed on dowels with a pitch of 500 mm.
2. Heater mounting
This operation is practically the same as the previous one. The IR film is fixed with brackets or dowels, depending on the material of the ceiling. We remind you that the heater is equipped with special strips in which holes for fasteners can be made.
3. Electrical work
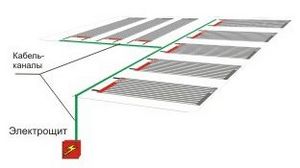 Heater connection diagram
To connect the ceiling IR heater, a cable line is pulled separately from the switchboard. For this purpose, you can use a single-core wire PV-3. The heater must be connected through a temperature controller mounted on the wall. Its installation is practically no different from installing a conventional outlet or switch.
To connect infrared heaters with a large area and, accordingly, power consumption, a magnetic contactor must be included in the circuit.
For aesthetic reasons, the main line should be laid in a duct or channel made in the building structure.
At the final stage, testing of ceiling infrared heating is performed.
For more efficient operation of heaters on the balcony, it is recommended to first carry out its insulation. How to insulate a balcony with polystyrene, read our article.
The infrared radiation system is also actively used in "warm floors". We talked about infrared and other types of underfloor heating for balconies and loggias on our website.
Insulation and heating ready? Then it's time to decorate the room, for example, to make a winter garden. And what is required for this, read here http://balkonsami.ru/interer/ozelenenie/zimniy-sad-na-balkone-svoimi-rukami.html
Popular Models
In PLEN film heaters, the role of the emitter is played by a screen made of reflective foil (aluminum), which is heated by a resistive element (metal thread) connected to the mains. The length of the emitted infrared waves is 9.4 microns. The temperature of the heating element is 40 - 50 degrees, which makes PLEN heaters absolutely safe for people and pets.
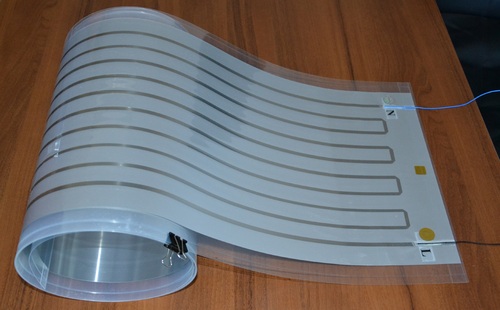 Film heater PLEN
The heating element and aluminum foil in PLEN IR heaters are separated from each other by a lavsan (domestic name for polyester) film. The whole structure is enclosed in a shell of the same material.The total thickness of all five layers of the PLEN heater is from 1 to 1.5 mm.
The maximum installation height of PLEN heaters on the ceiling is 3 - 3.5 m.
Infrared radiation in heaters of this brand is generated by a thin carbon fiber enclosed in a polymer shell. Pion heaters are low-temperature, depending on the settings on the thermostat, they can heat up to a temperature of 30 to 110 degrees. The maximum power of one heater is 500 W.
Power cord and thermostat are included.
The service life declared by the manufacturer is 25 years.
Film heaters Zebra are produced on the same production base as PLEN, but using more advanced technologies and materials. This has resulted in some improvements:
— the protection class was increased to IP44 (for PLEN it is IP20), which made it possible to use infrared heaters in rooms with high humidity;
— a third ground wire has been added to the Zebra heater connection scheme;
— a series of heaters "Multivoltage" was developed, capable of operating under conditions of voltage drops up to 150 V.
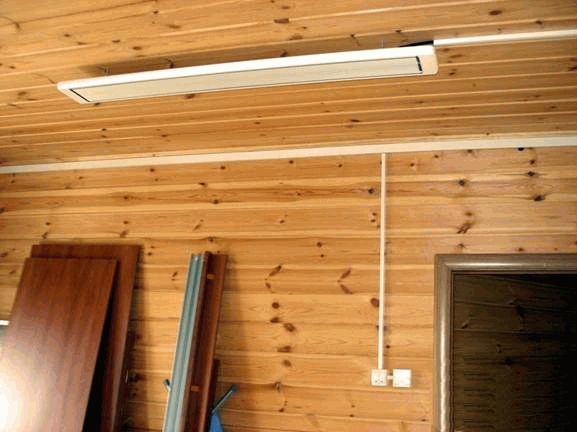
 Film heater mounted on the ceiling
General rules for installing IR heaters
It is very important to take into account:
Power and technical characteristics of the heater
If the infrared ceiling heater is hung too low above the working area, it will strongly heat the heads of people in the radiation area, which will lead not only to overheating, but also to various diseases.
It should be borne in mind that during operation the surface of such heaters becomes very hot, so the distance to curtains, curtains, furniture should be at least 1 meter.
If the heater is supposed to be used in a permanent operating mode, then the height of its location must be at least 2 meters above the working area.
After completing the installation work, it is necessary to make sure that there are no interferences on the radiation path: the devices must not be covered with anything and there should not be any foreign objects nearby.