Making changes to the design
Such methods involve the addition of durable elements to the frame, allowing for reliable installation.
Using mortgages
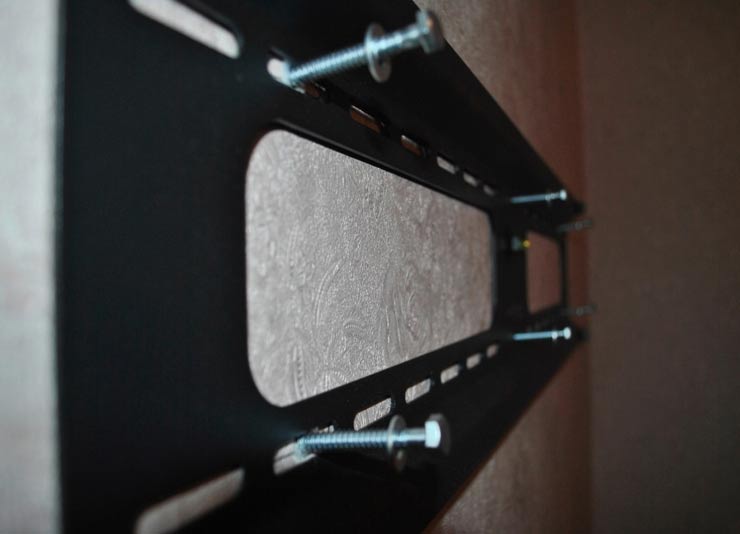
One of the easiest ways to attach brackets and hang other heavy items. It is best to make mortgages from a wooden beam at the stage of assembling the frame for sheathing with plasterboard.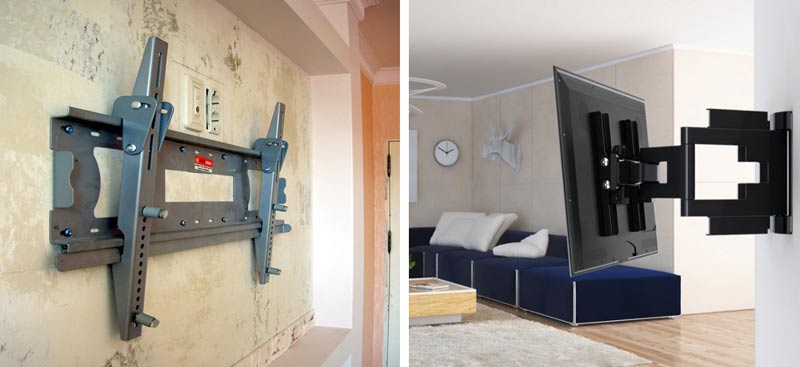 An example of attaching a bracket to drywall For this, lumber of the appropriate section is selected and fastened to the wall with anchors or dowels. After finishing the finish, knowing the exact location of such areas, you can easily attach the bracket with dowels to the created solid structure.
This method is best used when hanging the bracket on a plasterboard partition that does not have a solid load-bearing wall.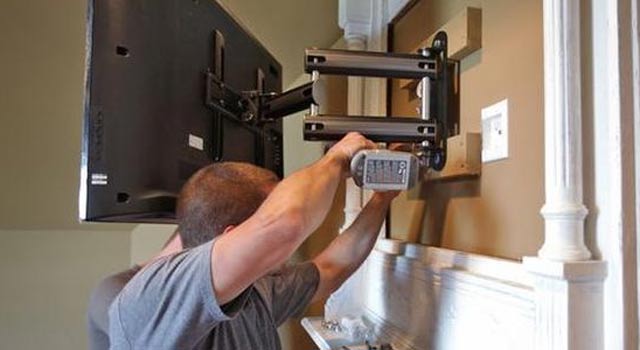 The process of fixing the TV on drywall
Changes in the finish of the plasterboard
This option is suitable when hanging the bracket on the finished plasterboard finish. The method consists in cutting out a part of the sheathing according to the size of the fastener with its further fixation to the load-bearing wall. It is worth knowing that this method is possible only with a small distance of drywall sheets from the main masonry.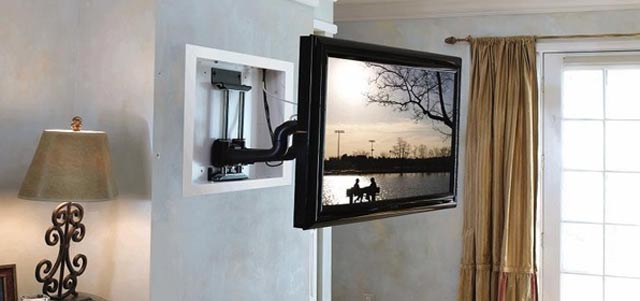
 This is done in the following way:
- according to the size of the bracket, the marking of the finish is made (along the contour);
- for cutting drywall, you can use a regular clerical or construction knife. They gradually cut out the desired section of the wall sheathing;
- a bracket is inserted into the resulting opening and fixed to the wall with standard dowels from the kit.
It is important that the location of the TV mount allows it to be hung freely. The video shows how to mount the TV on a plasterboard wall
https://youtube.com/watch?v=euiMROriMPY
Questions about the installation of heating systems
All video lessons of the author >>
HOW TO MAKE HEATING IN THE HOUSE YOURSELF →
HOW TO LEARN TO MAKE ANY HEATING SYSTEMS →
VIDEO COURSE "HEATING THE HOUSE WITH YOUR HANDS" →
COMBINED HEATING SYSTEMS →
In this video tutorial, Vladimir Kozin answered some questions about the installation of heating systems that were sent by his subscribers and readers of his useful blog Encyclopedia of the Home Craftsman.
So, here are the questions that were asked to Vladimir Kozin: Question 1. How to overcome the doorway during the installation of the pipeline?
Answer: There are two options here:
- walk around the top of the opening
- bypass on the floor Question 2. How to lay the pipeline under the drywall?
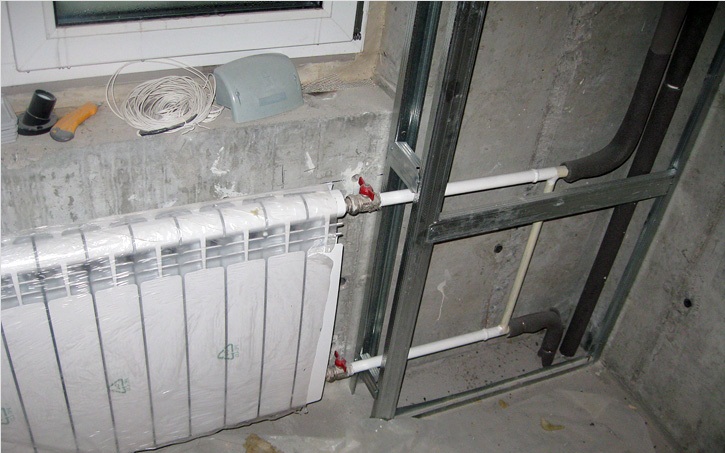
Answer: Usually, drywall is mounted on galvanized profiles, that is, a frame is made. Since the walls are not always even, that is, the distance between the frame and the wall, it is at this distance that the pipe is laid. Question 3. How to fix the pipeline to drywall?
Answer: If it is not possible to hide the pipe between the drywall and the frame, then it is attached directly to the drywall - its frame. There are special clips for the pipeline that fix it to the frame, or butterfly dowels are used. Question 4. How to fix the radiator to drywall?
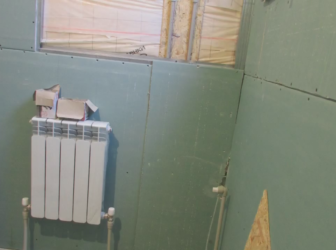
Answer: The radiator will not be fixed on the drywall itself due to the large weight. When you make a frame for drywall, then in the place where the radiator will hang, you need to plan a transverse bar. The second option is to use an overlay bracket, which is attached to the drywall with the help of “butterflies”, and a floor bracket is additionally installed to it. Or you can use only the floor bracket, which comes in several types. Question 5. How to fix the boiler to a wooden wall?
Answer: The same principles are used as when attaching a radiator to a wall. Or take advantage of perforated galvanized plate.In order not to violate fire safety requirements, an asbestos sheet can be laid on the wall and a boiler can already be mounted on it or drywall, which is not combustible, can be used. Question 6. Can plastic pipes be poured with concrete?
Answer: It is not recommended to do this, since pipes, more often polypropylene, have a very large linear expansion, that is, when heated, the pipe lengthens and cracks appear in the concrete. The way out of this situation is to lay a pipe, inside which polypropylene is already placed.
How to close pipes and radiators with drywall
Creating the interior design of his home, every owner dreams of making it comfortable, attractive and unusual. But there is one caveat - cast-iron batteries that catch the eye, especially if the apartment is finished in the latest fashion. Consider how to close the battery with drywall yourself.
To give the room a modern look, it is enough to build a beautiful drywall screen. It will hide the old and unsightly battery from prying eyes. It is worth noting that the work can be done by hand, and the cost of materials is small. Some ordinary people doubt whether it is possible to close the batteries with drywall. Let's consider this question in detail.
Full content of the material
Options for hiding heating pipes in the interior of the apartment
There are many ways that help to disguise the heating devices in the apartment, without interfering with maintaining a comfortable temperature in the room.
- buy and fix a hinged screen on the radiator,
- create a wooden element that is attached above the radiator,
- build a drywall box that will disguise the battery.
If we consider the last option, then it is the most popular. This is due to the ease of assembly and the inexpensive material used for the construction. But this method cannot be called perfect, since in case of unforeseen breakdowns or leaks, the box will have to be completely dismantled.
Before constructing a structure, a thorough inspection of the heating system should be carried out. Check how reliable the joints and connections are. If the pipes are old, then it is better to replace them, the old battery must be replaced if it is unreliable. Only after repairing the heating system in the apartment can work begin on creating a screen for a drywall radiator.
There are parameters that a drywall construction must meet to mask a heating battery:
Important! Some apartment owners completely cover the batteries with GKL sheets - in no case should this be done
Necessary tools and material
Before starting work, prepare the tool. To build a structure around the battery you will need:
- hammer drill,
- level,
- plumb line,
- building corner,
- spatulas,
- roller,
- screwdriver,
- roulette,
- metal scissors,
- stationery knife,
- mixer attachment.
In addition to the tool, the following material is needed:
- profiles,
- GKL,
- putty,
- perforated corner,
- suspensions,
- fasteners.
The material must be prepared in the right amount so that you do not have to go to the store to buy more.
Algorithm of actions when creating a box to hide the battery
The construction of the box is advisable if the radiator is located on the wall. You can do this with your own hands from drywall quickly enough. This method is more preferable, since only the battery is masked, and the usable area is not affected.
The dimensions of the box will depend on the battery to be hidden.
It is important to consider that the edges of the box will be about 15 cm further from the battery, from all sides
Whether the box will be hovering or standing on the floor depends on the interior of the apartment and the designer's decision. Once a decision has been made on the design of the box, you should proceed to surface preparation and marking.
Step-by-step installation instructions
Foundation preparation
For the construction of the structure, the base must be properly prepared.The old coating is cleaned from the surface, dirt and dust are removed, primed.
If the wall on which the battery is located has significant irregularities, then it should be made even with gypsum plaster. Then it is desirable to putty the surface, since it will be impossible to do this after the construction of the structure.
Markup and drawings
If it is supposed to make a floating box to mask the battery, then:
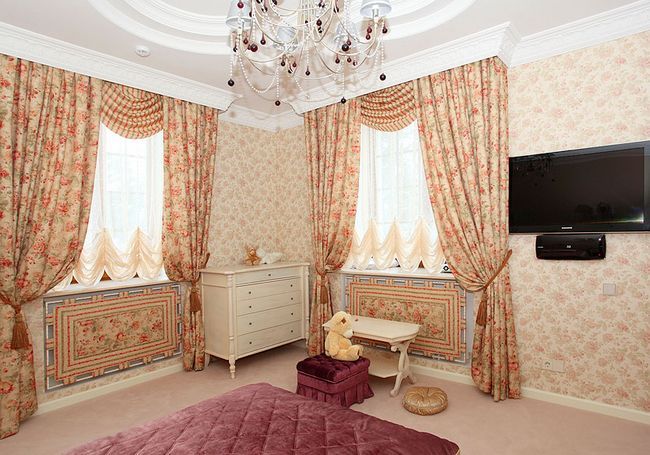
If a box standing on the floor is mounted, then the markings start from the top edge of the battery, and perpendicular lines are drawn from top to bottom. See how to do it in the photo.
In addition, the box is marked on the floor in such a way that the end of the box on the front side protrudes 15 cm relative to the radiator.
In some apartments, heating radiators are installed in niches that developers provide under the windows. In this situation, only the second method of constructing the box is suitable.
Zakrivamo GKL battery shvidko nadino
Sew up the battery with drywall really as easy as shelling pears, clumsy loan process for 4 years. Considering the priority of the GKL, you will take away their head advantage. Drywall is a uniquely durable material, it is easy to install and bend easily. Therefore, prepare a box of the required form for the radiator not in the warehouse of great difficulties. Below descriptions is a simple way to describe how to sew up a battery with drywall.
You can mask the radiator for additional drywall constructions.
You can cope with these tasks independently, smut - mothers with the hand of the necessary tools and materials, even the installation process will not take a lot of time.
Preparation of the robot
Also, in order to sheathe the radiator with drywall, you need to properly mount the frame from the profile. For whom do you need the following window materials:
- metal profiles UD and CD (their profiles are distinguished by the fact that one of them is victorious as a guide, and the other one - as a stalk);
- dowels;
- self-tapping;
- screwdriver;
- putty knife;
- putty;
- knives for metal;
- the lattice is decorative;
- rіven;
- roulette;
- olive;
- without a trace the GKL itself.
You can beat the wall sheet to gypsum board or quickly lost it after the repair of the insole, everything is laid down in view of the design itself, and also in view of your special privilege.
Stages of victorious work
The structure of the drywall sheet.
- For the cob to grow on the basis of the rosette, so you designate the rosette of the UD profile. You will need to walk through the wall 40 mm, because the GKL company is 12.5 mm, and the width of the profile is 27 mm.
- It is necessary to sew a guide profile along the entire perimeter of the opening, in this way we will take the frame of the future design ready. Professionals make the work of fastening with self-tapping screws and dowels, reaching an interval of 15 cm.
- CD profiles are inserted vertically at the frame on the edge of the radiator; Keep track of the fact that the profiles would be sorted strictly according to the given level. Fastening to the frame is the best way to work with self-tapping screws of the “nasіnnya” type.
- In times, even if the installed profiles of the CD type are moved up to the wall more lower by 60 cm, then you will need to install additional vertical straight lines.
- They gave you a requirement to install straight profiles in a horizontal straight line above and below the battery. In this way, you have a ready-made frame around the entire perimeter of the radiator, which you can boldly.
- After that, as the frame is completely covered with sheathing from the GKL, boldly proceed to the final stage of installation work - puttying and filling the surface.
- Install a decorative grille that masks the radiator.
Korisnі priradi pri .
- Buying gypsum boards in the store, the best way is to choose waterproof drywall. Remember that you need to build such a place in an apartment, as the risk of flooding is the most likely.
- After the repair, you have lost enough of wooden slats, the stench can become a good replacement for the metal profile for an hour of installation of the frame.
- In any case, do not allow the ventilated board to vibrate from the gypsum plasterboard construction, otherwise it can lead to a breakdown in the convection of the roof, so that it will be warm until the blowing is warm and the condensate will appear unacceptably on the windows. More than that, even if the booster plate cuts the battery more low by 50%, it leads to an increase in the efficiency of condensation on the windscreens.
- The material for decorating the incendiary radiators can be not only a decorative grille. Here everything is left to fall like special lords themselves. So, for example, for the rest of the hour, the wooden partitions of which we knew well began to stagnate metal structures with chrome-plated and stainless steel. These designs miraculously fit the interior in high-tech style.
- If you want, so that the seams of the drywall are not commemorated, then along the entire edge of the installed GKL, chamfers are made. Їx expansion will be deposited in the same way as you will putty the seams. As you victorious reinforce the line, then the chamfer is taken under the cut at 45 degrees. If you plan to putty without zastosuvanya serpyanki, then cut the chamfers up to 20-25 degrees. Easily chamfer you with a special ceramic planer.
- Before that, how to proceed to puttying, hurry up with a primer, you will be allowed to take a better seal between GKL and sum for puttying. Do not forget about the month itself, de buli ugvincheni samorizi, and kutah.
І choose a farba for processing the finished structure, so it’s better to add a heat-filled one. So, as the opaluvalny season is long, farbies can spend their brilliance, or, even worse, crack.
The main types of radiators
- Cast iron structures of the old model, having a considerable specific gravity. These structures are very difficult to install even on an ordinary wall, so it is better to change them to other models if possible. But it is worth noting that the cast-iron battery has its advantages: durability, practicality, good heat dissipation. Such structures heat up for a long time, but at the same time they have a long cooling process.
- Aluminum radiators are lightweight, heat up quickly and begin to give off heat, but cool down just as quickly if an accident occurs on the heating main. The structures appeared on the market not so long ago, they are already painted, withstand pressure in communication, do not require special care.
- Steel radiators - the characteristics are similar to the second design option for heating. They also weigh a little, serve for a long time, but may not withstand a sharp increase in pressure in the network.
Fixing the aluminum frame
A radiator is an aluminum or metal structure that is much lighter in weight and looks more attractive than cast iron elements. The mounting process is simpler, because: firstly, the weight of the structure is small, and secondly, a special fastener with a cork comes with the radiator.
- The installation process begins, as in the first case, with drilling holes in drywall. Here you need to take a drill corresponding to the thickness of the fastener.
- Then take a puncher and a drill for 8, make holes in the base - 7 cm deep.
- Screw the plug onto the bracket and drive it into the prepared holes with a hammer.
- As soon as the bracket with the cork is driven into the wall, you need to push the cork and tighten the fasteners.
For light radiators, which have a small number of sections, you can use special fasteners that allow you to hang the structure directly on the GKL sheet. This fastener is similar to a butterfly dowel; when this fastener is screwed in, an umbrella opens on the back of the drywall plate, which distributes the load across the sheet.
Plasterboard sheathing
The resulting structure is sheathed with sheets of drywall, cut into the required dimensions. Drywall cutting is carried out with a clerical knife according to the marks made earlier. To do this, cut through the cardboard on both sides and break off the desired part. Irregularities along the edges are cleaned with a planer or the same knife.
Sheathing occurs in this way: a sheet is installed on the resulting frame and a self-tapping screw is screwed in with a screwdriver, slightly pressing the cap into the surface.
In the future, the corners of the box are reinforced with plaster corners, and the surface itself is puttied and finished in accordance with the plans.
The opening itself is closed with decorative bars.
Close the battery GCR quickly and reliably
Sew up battery plasterboard is really easy, simple process takes on the force for 4 hours. Giving preference to the GCR, you get their greatest advantage. Drywall is an incredibly comfortable material, it is easy to assemble and easy to bend. Therefore, to make a box for the desired shape of the radiator is not easy. The following describes a simple way to describe how to sew battery plasterboard.
Camouflage radiator, you can use drywall construction.
To cope with this task can be independently, the main thing is to have on hand the necessary tools and materials, then the installation process will not take much time.
Preparatory work
So, in order to sheathe plasterboard radiator, you need to properly mount the frame profile. To do this you will need the following supplies:
- profiles and the metal profiles UD CD (the differences between these profiles consist in the fact that one of them is used as a guide, and the other - as a stand);
- plugs;
- screws;
- screwdriver;
- putty knife;
- putty;
- metal scissors;
- decorative grille;
- level;
- roulette;
- pencil;
- directly the GCR.
You can use the wall sheet of drywall or you can use the remaining renovated ceiling, it all depends on the size of the structure itself, as well as on your personal preferences.
Stages of work performed
The structure of the sheet of drywall.
- First, shoot the floor layout, so you define the location of the UD profile. You will need to pull back from the wall of 40 mm, so that the thickness of the FCL is 12.5 mm and the width of the profile is 27 mm.
- According to the layout, around the perimeter of the opening you need to sew a guide profile, so we get ready to frame future construction. Professionals advise to make fastening screws and dowels, observing an interval of 15 cm.
- In the frame on both sides of the radiator vertically inserted CD profiles that you first need to cut with scissors for metal according to the desired height from the floor to the sill. Make sure that the profiles would be arranged strictly according to the set level. Fixing to the frame with screws to make the best of "seeds."
- If the distance from the specified CD-type profiles is greater than the distance from the wall more than 60 cm, you will need to install additional vertical guides.
- Next you will need to install the guide profiles in the horizontal direction of the batteries and under it. So you'll have a ready frame around the perimeter of the heat sink, which can be safely .
- Once the framework is completely cover the lining of the GCR, safely proceed to the final stage of installation work — spackling and painting surface.
- Install the grille, radiator masking.
Useful tips when.
- By purchasing the GCR in the store, it is best to choose a water-resistant drywall. Remember that you have to finish a place in the apartment, which is most likely exposed to the risk of flooding.
- If after the repair you have a sufficient number of wooden slats, they may be able to become a worthy replacement for the metal profile frame during installation.
- In no case do not let the bulging window sill of a plasterboard construction, otherwise it could lead to a breach of air convection, ie blowing warm air and an unpleasant occurrence of condensation on the windows. Furthermore, if the window-sill board battery overlaps more than 50%, it increases the likelihood of condensation on the windows.
- Materials for decorating radiators can become not only a decorative lattice. It all depends on the personal preferences of the owners themselves. For example, in addition to the familiar wooden fences, we have recently started to use metal structures of chrome and stainless steel. These designs are great to fit the interior in the style of hi-tech.
- If you want the drywall seams were not visible, then the entire edge of the installed plasterboard chamfer. Their size will depend on the way in which you will be putty joints. If you are using reinforcement tape, then remove the chamfer angle of 45 degrees. If you plan to putty without serpyanku then chamfer angle is 20-25 degrees. Easy chamfer will help special edging plane.
- Before you proceed to putty, primer use, it will provide a better grip between the GCR and the mixture for spackling. Do not forget also about the places where the screws are screwed, and corners.
And choosing the paint finish of the finished structure, it is best to purchase as heat-resistant. Since the heating season is long, the paint may lose their brightness or worse, cracked.
Fastening the battery to drywall
How to screw the radiator to the wall or into a niche yourself will be described in this article.
How to install a heating radiator
You need to hang a heating radiator on a wall or in a niche after the surface is completely puttied. However, for this, connections for radiators must be removed from the wall or niche in advance. Depending on the type of connection of heating batteries, these can be either chrome-plated pipes or simply metal-plastic or plastic pipes.
To install a heating radiator on a wall, you must first correctly carry out marking work. This will require, first of all:
- Roulette and building level;
- Pencil;
- A long rule or a piece of an even profile;
Before installing a heating radiator with your own hands, it is imperative to determine its height, as well as how the radiator will hang, in a niche or under a window. According to the rules in niches, heating radiators are installed in the center, and under the windows on the turn, as low as possible from the floor. If we talk about the height of the heating radiator at which it should be installed, then this distance does not exceed 15 cm from the finished floor covering.
After all the above questions are completed, you can hang the heating radiator on the wall. The first thing to do is measure the distance from the window slopes or niche edges. The resulting size must be divided in half. You need to do this in order to find the center.
Then, a vertical line is drawn from the resulting markup, from which further markup will be made to install a heating radiator. Depending on the type of heater, its installation on the wall may be different, and this applies not only to the dimensions between the fasteners.
How to hang an aluminum radiator on the wall
To hang an aluminum radiator on the wall, you need to step back two sections from each edge of the radiator to the middle. Thus, it will be seen between which sections the fasteners for fixing the aluminum radiator to the wall will be installed.
Then you should measure the distance from the places where the fasteners are installed, and then transfer them to the wall. According to the received marks, holes are made in the wall for installing dowels in them and the subsequent installation of fasteners for the heating radiator.
How to hang a metal radiator on the wall
Panel heating radiators (metal) can be hung on the wall in a slightly different way. Initially, everything happens, as in the first stage of installing an aluminum heating radiator.You need to find the center under the window, and then determine the height of the radiator installation from the floor.
Fasteners of a metal heating radiator are welded to its back side. Therefore, when installing a radiator on a wall, the dimensions are fixed here, they cannot be increased or decreased, as, for example, when installing an aluminum radiator on one or two sections in the middle or to the edges.
In addition, not such long hooks are used to install a metal radiator on the wall, but small fasteners. You should first measure the distance from the middle of the fasteners on a metal radiator, and then transfer them to the wall and install the heating radiator yourself.
How to hang a heating radiator on drywall
You should be aware that when installing a heating radiator, you need to take into account the material from which the wall is made, on which the heating radiator will be hung.
It often happens that when drilling, the drill gets into the brick seam, and after that the dowel does not want to stay in the hole normally. In this case, you can go in two ways: hang the heating radiator higher or lower, or seal the resulting hole with putty, and then try to drill a new hole again.
A heating radiator is hung on a plasterboard wall in a completely different way. There are no usual self-tapping screws and plastic dowels. In order to hang the radiator on a plasterboard wall, you need to purchase special fasteners (moths).
What is included in the heating system
How to sew up a battery with drywall
High-quality screen for the battery: how to make it correctly from drywall
Some new heating radiators look so good that they can be used in visible places. However, old cast-iron counterparts can significantly worsen the aesthetic parameters of a modern room. It will not be difficult to eliminate such a drawback if the corresponding functional product is carefully closed with a drywall construction. To finish the created outer surface, you can use paint, wallpaper, and other decorative materials.
Limitations to be aware of
You can beautifully sheathe drywall with different ledges. But already at the stage of preparation for the implementation of this project, it is necessary to take into account the following important practical details.
A convector-type heating system will work efficiently enough only if free air access is provided to the devices and nothing prevents its subsequent free movement upwards. Blocking these flows will not allow rapid heating. The owners of individual boilers will increase fuel consumption, or electricity. Appropriate holes must be present in the drywall construction.
Cast iron radiators emit infrared radiation. The presence of a solid partition that does not let heat into the room is unacceptable. That is why, the main part of the structure should be created from drywall. A rectangular cutout is made directly in front of the radiator. Latticed metal or plastic screens are inserted into it.

Accident in the heating system. Melting snow that fell on the windowsill by accident. Room cleaning. In all of these situations, it is impossible to exclude the ingress of water on drywall. That is why for the manufacture of such skins it is better to use waterproof types of such building materials.
How to sew up a drywall battery: technology basics and useful tips
The consumption of materials, additional devices, changes in the methodology will depend on the specific conditions, the architectural features of the room. But the following tips will come in handy in most cases when it is necessary to sheathe the radiator with drywall:
- The least amount of funds will be required if the design is made compact for the radiator box.Here it will only be necessary to ensure a minimum distance of 10-12 cm from the surface of the heater to the inner surface of the walls in all directions.
- Before carrying out work, it is necessary to restore the damaged coating of the battery, paint it. It will be necessary to revise the connections to the pipeline system, eliminate the identified malfunctions. Wall defects are also eliminated, gaps are closed in all areas, which will subsequently be covered with drywall sheets.
- Next, markup is carried out using improvised tools and a level. When designing the box, it should be taken into account that it will be more durable if it is installed on the floor. Lines are drawn on the walls and on the floor so that the contours of the entire structure are accurately defined.
- If the entire wall is sheathed, then it will be possible to hide not only the radiator itself, but also all the pipes of the engineering system. In this case, markings are also applied to the ceiling.
- The supporting frame is made of galvanized steel profiles with a section in the form of the letter "P". They are connected to each other with screws. To fix the elements on the walls, dowels are used, which are installed in increments of 20-30 cm. To bend the profiles as needed, you can make cuts on their walls using metal scissors.
- If the supporting frame is created with high quality, then it will not be difficult to close it with drywall sheets. Cutting this material into pieces with the desired dimensions can be done using a conventional large clerical knife. Replace its blades on time to make your work easier.
- In order to sheathe any frame shape with drywall securely, keep a small step between individual screws, no more than 12-15 cm. To prevent mistakes, make consistently and immediately fasten the cut parts. Corner parts (if any) are reinforced with additional galvanized profiles "G" - shaped.
The radiator should be carefully sheathed, all irregularities should be eliminated at the joints of individual elements. This can be done using a mounting polymer mesh and subsequent puttying of such areas. Finishing protective and decorative coatings are applied to the created smooth surface. The opening in front of the radiator is covered with a mesh screen.
Installation of a wooden frame for the box
Do not forget about such material as wood. To assemble such a frame, you can use a beam of 40 × 40 millimeters. This design is assembled as follows:
- The lower part is assembled in the form of a rectangle. Connections can be made according to the "thorn - groove" scheme.
- The resulting base is rigidly fixed to the dowels or anchors to the floor.
- Racks are installed in the corners using mounting brackets.
- The top can be assembled in the same way as the bottom. The upper part is also attached to the corners.
The resulting wooden structure is treated with an antiseptic or simply painted and sheathed with drywall.
Algorithm of actions when installing the box
- Measurements are being taken. When calculating the box for a drywall battery, it is necessary to make an allowance of about 2 cm in front and sides so that its walls do not come into contact with the radiator.
- The load-bearing elements of the frame are installed from the profile 27x28. Before fixing, the level checks their verticality / horizontality, after which it is fixed with dowels to all adjoining ones (windowsill, floor, wall). A shock-absorbing tape is laid between the profile and the surfaces.
- After installing the frame skeleton, jumpers from the 60x27 profile are mounted.
In finished form, the crate should be strong, not amenable to loosening. If it is observed, you need to add transverse thrust bars.
Sheathing the battery with drywall
Practically has no differences from facing works of other directions.
- GCR is cut to exact dimensions. To do this, use a clerical knife.
- The elements are screwed onto the profiles with self-tapping screws with a frequency of 3-4 pieces per linear meter. Hats need to be sunk by 1 millimeter so that they become flush with the sheet, but do not break the cardboard cover.
There is only one difference between the casing of the box and, say, a niche: in order to close the battery with drywall, but not to lose the overwhelming amount of heat it generates, it is necessary to drill ventilation holes in the sheets. They can be done with a drill with a crown nozzle. The recommended hole diameter is 5 cm, but such “holes” may not look very attractive. Alternatively, you can choose one of two directions:
- Drill a large number of smaller holes. A diameter less than a centimeter is unprofitable: heat will pass with difficulty, and the holes themselves will quickly become clogged with dust and will need to be cleaned.
- Make some kind of windows in the box and insert plastic ventilation grilles into them, which are used in the bathroom and in the kitchen.