Padding is an important preparatory step before any finishing work. In order to properly plan your time and make quality repairs, it is important to know how long the primer dries, what type of composition is suitable for the walls or ceiling of your apartment, how long after priming you can start gluing wallpaper or painting walls.

Why do you need a primer
A primer is a special emulsion whose main purpose is to improve the adhesion, or adhesion, of a coating to a surface to be treated. In addition, a special primer impregnates the upper layers of the base, increasing strength and increasing wear resistance. It is used for processing floors, ceilings and walls, when working inside and outside buildings. It must be applied to the surface before painting or wallpapering.
Primer additional features:
- protection of metal from rust;
- manifestation of a pattern on wooden materials;
- decrease in the absorbing ability of surfaces;
- preventing the development of mold and fungus under the wallpaper;
- providing grip for smooth-slippery surfaces.

The composition of the primer emulsion includes natural, synthetic, liquid or solid film-forming materials: drying oil, alkyd and epoxy resins. Sometimes fillers are added - talc, chalk.
The primer is applied to the base to be treated with a spatula, roller, brush. The process of applying the emulsion is called priming.
Before priming, preparatory work is necessarily carried out - cleaning the surface of the walls from paint, dilapidated wallpaper, and, if necessary, degreasing with a solvent.
Types of primers
The building materials market offers a solid selection of primers from different manufacturers. Priming mixtures differ in composition, purpose and drying time, they can be universal and special, for interior or exterior use.
According to the properties and purpose of the primer can be divided into the following types:
- Betonokontakt - the mixture includes quartz sand, cement, other fillers, acrylic binder is the basis of the composition. Designed to increase the adhesion of a smooth, slightly absorbent surface (concrete, tile, old paint) with plasters, putties, adhesives for ceramic tiles.

- Penetrating universal - prepares surfaces before tiling, painting. Strengthens loose, crumbling substrates and reduces their absorption capacity.

- Colorless - used for processing wooden surfaces in order to preserve the natural structure of wood. Forms a waterproof film that prevents wood from rotting.

- Contact - enhances the property of a solid surface to "adhere" with various solutions (paints, adhesives).

- Film-forming - used in work with problematic surfaces. Strengthens the base, creates a film that limits the flow of moisture. Can be applied to all surfaces, from cement floors to fiberboards. It dries quickly, which is convenient when deciding to stick wallpaper on the walls.

Primer drying time
The minimum period of time during which the primer composition dries is 4 hours, the maximum is a day. Despite the fact that the packaging necessarily contains information about how long the primer dries, the waiting time after applying it can vary, and quite significantly.
Factors affecting the drying rate of the primer:
- The consumption of the mixture and the thickness of the layer depend on the condition of the treated surface.There are walls that require repeated priming or applying the composition in a thick layer.
- Type of primer - acrylic emulsions are quick-drying, they need 3-4 hours to dry, oil or contact ones dry up to 24 hours.
- The type of surface to be treated - porous and dry dries quickly, and with freshly applied plaster - about 12 hours.
- The temperature in the building and the level of humidity - the lower the air temperature in the rooms and the higher the humidity, the longer the drying period of the primer composition. For example, after applying Betonokontakt to the walls at a temperature of 23 ° C and a relative humidity of 50%, you can start wallpapering after 12 hours, and when the temperature drops to 20 ° C and the air humidity rises to 65%, you can start finishing work only after a day.

Tip: You can speed up the drying time of the primer by raising the temperature in the room using heaters. To reduce humidity, it is enough to open a door or window and arrange natural ventilation.
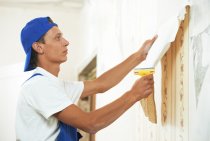
Priming walls for different coatings: stages of work
Priming of various surfaces has differences and its own specifics. You can skip this step and after cleaning the walls immediately stick wallpaper on them or paint them without pre-treatment. After some time, this can lead to a paid result: the paint will begin to crumble, mold will appear through the wallpaper, or during subsequent repairs you simply won’t be able to remove them from the wall.
- The previous finish (old wallpaper, plaster, cracked oil paint) is carefully removed.
- Small cracks and uneven walls are sealed with putty.
- The surface is carefully treated with a deep penetration primer (no dry spots should remain).
- The time of complete drying of the emulsion is maintained. How long does it take for primer to dry before wallpapering? On average, after 5–6 hours at an air temperature of 24 ° C and a humidity of 60%, the surfaces are ready for finishing work. It is recommended to observe the drying period specified by the manufacturer of the particular brand of primer.

Before wallpapering, be sure to run your hand along the walls - if there is a trace of putty on your palm, apply another layer of primer.
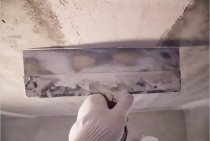
Ceiling priming:
- Carefully remove old whitewash, paint.
- The surface is wiped with a damp sponge and dried.
- The ceiling is covered with a primer emulsion. If there is no stepladder, attach the roller to a long, even stick.
When a thin layer of primer dries, you can continue finishing work.