The tile is a very durable and easy-to-use finishing material, especially in rooms with high humidity or high operational load. But not always the surface on which you want to stick the tile is concrete or brick. In apartments, wooden floors and partitions are quite common. How, then, to glue the tiles on the tree and how durable will such a coating be?

Are wooden bases and ceramics compatible?
A tile is a material that is extremely painful for any, even the most insignificant, deformation of the base. The tree, in turn, constantly changes its geometric dimensions with changes in humidity and temperature parameters. Therefore, a tile simply glued to a wooden base will not last very long. Soon it will begin to peel off, crumble or become covered with cracks.
Wooden floors under a layer of tiles will also have a hard time. The tree must breathe, and under a layer of tiles it is almost impossible. Without a waterproofing layer separating wood floors from tiles, they will rot fairly quickly.
To achieve a positive result, it will be necessary to build a multilayer structure that will allow you to combine materials such as wood and tile with different characteristics. The main and most difficult part of the repair work will not be devoted to gluing the tiles, but to preparing a quality base for it.

Preparing the floor for tiling
There are many preparation options and materials used for this procedure. An important role is played by the condition of the wooden floor. Access to it will be completely closed after laying the tiles, so all unreliable elements must be replaced. In addition, the tree is less durable, so it's better to play it safe.
The weight of the tile will significantly increase the load on bearing logs. If there is no firm confidence that they will cope with their task, then the distance between them should be reduced by adding the required amount of lag.
Let's consider two options:
- The condition of the old wooden floors is close to perfect. They do not bend, do not creak and have no visible defects.
- Wooden floors require partial replacement of elements, including the addition of a lag.

Option number 1
In the event that the wooden base does not require repair and replacement, the preparatory work will include the following:
-
- The floor boards are completely cleaned of the paint layer. This can be done mechanically, using chemicals, or using a building hair dryer. Then the surface of the tree is impregnated with an antiseptic solution.
- A layer of waterproofing is laid. It can be glassine or a vapor barrier membrane (the rough side should be facing the inside of the room).
- To obtain a perfectly even base of a wooden floor, you can use thick plywood or chipboard. They are much less susceptible to deformation under the influence of the external environment than wood. Sheets are laid in a checkerboard pattern, a compensating gap is left along the perimeter along the walls, which is subsequently filled with mounting foam.
You can attach the tiles to the tree with a special epoxy-polyurethane adhesive, which retains elasticity after hardening. This allows you to compensate for minor fluctuations in the base.

Such tile adhesive is quite expensive. Can ceramic tiles be glued to wood without it? There are two options:
- With a sufficient height of the room, you can make an additional screed.Sheets of plywood or chipboard are impregnated with hot drying oil or latex. A reinforced mesh is laid on the still uncured impregnation. Its edges should go a little on the walls. After the impregnation dries, the mesh is additionally fixed with self-tapping screws. The screed is made with various self-leveling solutions, usually based on liquid glass.
- Another option is to align gypsum fiber sheets. They are attached to the wooden floor in a checkerboard pattern, achieving minimal gaps between the individual elements.

A prerequisite is the presence of a compensating gap between the wooden floor and the wall. But the glue in the case of using a screed or gypsum fiber will require the most common cement, since the tile will be attached to a reliable base that is not subject to deformation, and not to a tree.
Option number 2
If there are problems with the wooden base, you will have to disassemble the structure completely. This will allow you to replace the floor elements that have become unusable, add and align the logs, update the waterproofing and insulation.
It is important not to forget to leave a gap between the insulation and the floor boards for natural ventilation.
The further algorithm of actions will be the same as in the case of the floor in good condition.
Preparation of a wooden partition
To prepare a wooden wall for tiles, you must adhere to the following algorithm:
- On the walls you need to glue or attach a layer of waterproofing with a stapler - roofing material.
- On top of the roofing material, a metal plaster mesh is attached with an indent from the wall surface of 1–1.5 mm.
- The wall is plastered with cement mortar, carefully aligned.
- Notches are made on slightly dried, but still damp plaster for better adhesion to the tile.

After the plaster has dried, you can proceed to the cladding.
Experts recommend soaking the tiles in water for 8-10 hours before gluing to the wall for better adhesion to the adhesive composition.
For many, this method of preparing a wooden wall for laying tiles seems too laborious. You can use a worthy alternative - sheathe wooden walls with moisture-resistant drywall or gypsum fiber, and glue tiles on these materials without any problems.
Laying tiles
The process of gluing tiles to a wooden base will be easier if you take into account some of the nuances:
- Before laying the tiles should be wiped from dust.
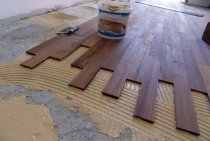
- On the floor, tiles are laid from the middle of the room, and on the wall, laying should begin from the bottom of the corner closest to the entrance. So incomplete fragments will be less noticeable if the tile has to be cut.
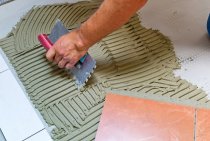
- With a notched trowel, a thin layer of adhesive solution is applied to an area approximately one and a half times the size of the tile. It can not be moved much during the laying process.

- It is necessary to control the level of each masonry element, especially the floor.
- To adjust the position of the tile, use a rubber mallet.
- Excess solution that has come out is removed immediately with a wet cloth.
- After the adhesive has hardened, the joints are grouted with a special compound.