Nowadays, it is not difficult to buy plumbing for the bathroom. On the market there is a wide variety of models for every taste and color. Are very popular shower cabins. These are multifunctional and compact products. But most people still prefer to use a regular bath. The most practical and inexpensive goods are products made of steel. Therefore, the question of the correct installation of a steel bath sounds very relevant.

Preparatory stage
Before proceeding with the installation, it is necessary to complete all repairs in the bathroom, except for the finishing of the walls. It is necessary to level the floors and lay the floor covering. If the floor is covered with ceramic tiles, it will be correct to apply the solution before laying not by the ridge method, but by a continuous layer. This will ensure that the load is evenly distributed and avoid cracks in the brittle ceramics.
Installation of the bath begins with the assembly of the product. To do this, legs-supports are installed on the bottom. These devices are included in the mandatory package and are attached to the bath using self-adhesive pads. To simplify the process of installing supports, it is recommended to perform this event in the hallway (if the area allows) or in the room. The bath is turned upside down, the surface is degreased, the support legs are assembled and fixed in place with a self-adhesive film.

Important! In some steel baths, the racks are attached to the bottom with threaded connections. It is better to refuse such products. Excessive force can damage the enamel at the points where the fixing bolts are tightened. This will significantly reduce the life of the product.
After that, the bath is brought to the installation site (it is better to do it sideways so as not to damage the corners of the product) and level it in height by twisting the support posts. It will be correct to install a bathtub with a slight slope towards the drain, this will ensure that the water drains quickly.

Now you can proceed to the final installation. This can be done in several ways.
Mounting Methods
There are several ways to properly and securely fix the bath in place. Steel bathtubs are not very heavy compared to their own. acrylic or cast iron brothers. Therefore, all actions can be performed alone.
The easy way
The edges of the product are sealed with mounting tape, then the bathtub simply moves close to the walls.

All cracks are sealed with tile adhesive, and the joints between the bathroom and the wall are covered with silicone.

After that, the adhesive tape is removed and you can start connecting the drain.
Strobe or frame
In the first case, in the wall, at the level of the edge of the bathtub, a strobe breaks through. For this you will need a puncher. After that, the edge is simply inserted into the completed strobe and the bath is fixed as in the previous version. This method allows you to gain a few centimeters of free space and provides the bath with additional support.
In the second case, the stability of the bath gives an additional frame. You can make it in the following way: a metal corner is attached to the wall using dowel-nails or anchor bolts. The sides of the bath, adjacent to the wall, are laid on it.
Brickwork
This is the most time-consuming way to install a steel bath. First you need to make accurate measurements of the height, length and width of the bath. Then brick columns are installed under the bottom and on the sides of the bath, which will serve as a support. First, the central support is laid out, then the side ones. In order for the bath to clearly lie on the posts, it is necessary to take into account the thickness of the bricks when measuring. The installation of the bath begins after the cement-sand mortar has set.You can use tile adhesive to bond the tub to the brick. This installation method is considered the most reliable.

Important! After installation, the steel bath must be grounded! This is done by connecting a ground cable to the body of the bath.
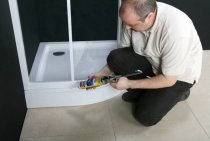
Connecting the bath to the sewer
For this stage, you need to purchase a siphon. This device not only minimizes the possibility of leaks, but also greatly facilitates the process of removing blockages in the pipes. Pipes for connection are better to use plastic, smooth-walled. It is not recommended to use corrugated pipes, debris will accumulate in the folds, which will cause blockages.

Please note that the siphon should be located above the exit level of the common house sewer pipe. The connection is made using fitting connections.

After the installation work is completed, the drain is checked, and then you can start decorating the walls.