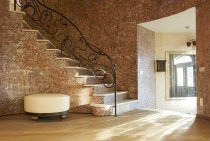
Starting repairs, many people think about what material to use for wall decoration. The classics in the form of wallpaper have already set the teeth on edge, painting requires large-scale rough work, paneling eats up usable area. Perhaps you should pay attention to this type of finish, such as decorative plaster. A variety of textures and application methods allow you to create a unique interior that will not only please the eye, but also provide a favorable climate in the apartment. This finishing material can be bought ready-made, but its cost is quite high, so recently decorative plaster from ordinary putty is gaining popularity among designers.

Types of decorative plaster based on putty
Using putty, you can get the following types of decorative plaster with your own hands:
- invoice. For this type, it will be enough to use putty in its pure form or with minimal additives to increase plasticity (for example, PVA). A surface with such a coating can imitate natural stone, fabric, wood, have a wide variety of textures, which will depend on the tool used.
- Structural. In this case, various fillers are added to the putty: marble chips or flour, small pebbles, shell rock, sand, etc. With the help of such plaster, minor wall errors can be hidden. A unique pattern is obtained due to the grooves formed when small particles move during the movement of the spatula.

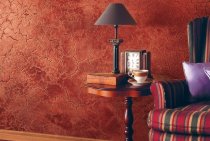
- Venetian. Both real and fake Venetian plaster very difficult to apply. When finished, the surface resembles marble or onyx. However, if you want to try to do it yourself, using a real “Venetian” made of lime with marble chips is risky - the material is expensive and capricious. The option with putty in this case will come in handy.

Work materials
To create textured or Venetian decorative plaster, you will need the following compositions:
- Putty. Polymer (acrylic, silicone) compounds have good plasticity and are easy to apply, but their cost will be higher than that of conventional gypsum putty.
- Dye. The number of shades is selected depending on the planned result. Textured plaster involves the use of 1-2 colors, Venetian - 3 colors.

Important! One of the colors is chosen as the main one, the rest are complementary. Before buying, it is better to study the palette of color compatibility.
- Primer. Suitable acrylic composition of deep penetration.
- Wax for decorative plaster or acrylic varnish.
- Glitter (shine) depending on the desired effect.
- Mother-of-pearl enamel (gold, silver).
The material is purchased depending on the type of decor that you would like to receive.
Features of preparation
Plaster, according to its main purpose, serves to level the walls, but it is impossible to finish and rough at the same time. Therefore, you need to prepare the base:
- Plastering, leveling of visible flaws.
- Sanding.
- Padding.
Textured and Venetian plaster from putty when doing work with your own hands are applied in several layers.
Important! It is worth remembering that the putty dries quickly, so the application of texture, decor is done in squares of 1–1.5 square meters. m.
Textured plaster
The technology for applying this finishing finish with your own hands has a feature: the more embossed the pattern, the thicker the putty layer will have to be applied.
The tool used is varied:
- spatulas (metal, rubber, comb, plastic);
- textured, foam rubber or fur roller;
- film;
- various brushes;
- natural material (leaves, stones, shells);
- templates.

The finishing putty dries quickly. Therefore, you can prepare a solution by mixing it with a 50/50 starter mix.
The process of working with decorative putty plaster:
A layer of putty 3 mm thick is applied to the prepared surface in small squares (may vary depending on the required texture depth). Next, the texture is applied in one of the following ways:
- With a spatula. The tool makes uniform strokes from top to bottom or from bottom to top. The surface relief will resemble large scales. If you added a solid filler (pebbles, stone chips) to the putty, you can achieve the effect of "bark beetle". The pattern is created by circular chaotic movements on a slightly dried surface, paths will form behind the spatula.

- Using film. It can be carefully glued to a damp surface and removed when dry. Another texture can be obtained by applying a crumpled piece of film to a wall covered with putty.

- brush. By drawing up and down, you can achieve the effect of burlap.
- roller. You can use the ready-made texture tool by selecting the desired pattern. And the use of an ordinary roller with a wound rope will give an interesting herbal pattern.

- With the use of leaves, stones. Natural materials are pressed into the putty, after drying they are carefully removed. For this method, the base is prepared with already tinted putty, the decorative layer is applied in the same color.

After the entire surface has been treated and dried, light sanding should be done to remove strongly protruding scars. Prime and then start painting.
- First, a layer of paint of the same color is applied with pressure, the recesses of the texture are painted over. Give time to dry.
- The second layer is applied with light movements without pressure so that the paint does not get into the recesses of the pattern. In the case of natural materials, you can use one color, and make the accent on the drawing at the stage of applying wax or varnish by adding gold or silver enamel. It is applied with a spatula, the collected excess should be distributed according to the main pattern.
- After the paint has dried completely, the walls are covered with wax or acrylic varnish. For greater effect, you can add glitter.

To hide the transitions between adjacent squares, the batch is applied to the next section with an overlap, stepping 30–50 mm onto the already worked out surface, and the drawing is performed with the capture of the finished area.
Venetian plaster
This is one of the most difficult ways to apply decor. Consider the simplest option available for doing it yourself.

You will need:
- putty;
- 3 colors;
- spatulas - cap and wide;
- wax on decorative plaster;
- glitter (optional).
Stages of work:
- Putty of each color is mixed in different containers.
- The main color is applied to a wide spatula, and the other two are applied to it.
- The putty is mixed in two movements with a trowel and distributed over a wide area.
- The composition is applied to the walls in circular chaotic movements with a layer 1–1.5 mm thick. It turns out a spectacular pattern resembling marble.

Important! Be very careful when choosing colors for Venetian plaster. They must be in harmony with each other.
- If visible scars are obtained, the surface should be carefully sanded and primed.
- The wall is covered with a protective layer of acrylic varnish or wax. You can add glitter.
Do-it-yourself finishing with decorative plaster is possible at a high level, and the costs will be much lower than the purchase of a ready-made solution. The main thing is to choose the right color palette and show imagination when applying.