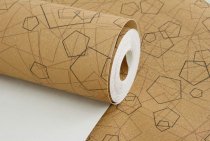
Non-woven photo wallpapers are recognized as the best in comparison with analogues and the most convenient in gluing. They do not get wet and do not tear under the weight of glue, like paper ones, and do not accumulate dust, like textile ones. Tips and instructions, as well as videos on the topic, will help you learn how to glue non-woven wallpaper.

Types of non-woven photo wallpapers
There are 2 options for photo wallpapers made of non-woven fabric:
- consisting of two layers of this material - external with a printed image and a substrate;

- two-layer fabrics on a non-woven basis with a vinyl surface.

Photowall-paper of both types differ in excellent operational characteristics.
Tools and materials
Devices and materials that will be needed for work:
- ladder;
- sandpaper;
- putty;
- primer;
- plumb;
- roulette;
- a simple pencil for marking;
- scissors;
- wallpaper knife with replaceable blades;
- ruler;
- masking tape to protect walls, floors, ceilings;
- rollers - with a long pile, rubber, for joints;
- paint brushes for applying glue - flat wide and round narrow;
- wide and narrow spatulas;
- brush with short pile;
- containers for water and glue;
- plastic spatula with soft edges for smoothing glued fragments;
- sponge or piece of cloth;
- screwdriver for dismantling sockets and switches.

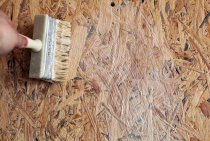
Foundation preparation
The preparatory stage consists of the following steps:
- Fully required remove old coating, peel off and wash off the wallpaper and the layer of glue. If there was a tile on the wall, beat off the fragments with a hammer, scrape off the remnants of the adhesive.
- If it is necessary to level the surface, it is necessary to fill the gaps and cracks with putty, carefully level it.
- When the puttied places are dry, you should treat the wall with sandpaper, and then clean it from the resulting dust.
Note! If non-woven wallpaper without vinyl coating, which can be translucent, will be glued, the surface must be uniform and uniform. So, you need to putty a continuous layer. Detailed instructions - here.
- Process the baseprimer.
ibuilder.decorexpro.com/en/ recommends: even if the murals occupy only one wall or part of it in the room, prepare all surfaces so that you do not double work later and do not stain the freshly pasted image.

markup
Qualitatively paste photo wallpaper it will not work without careful marking, for which you will need a long ruler, a protractor or a square, a plumb line, a pencil.
- It is advisable to start from the window - from the upper corner opposite the entrance.
- If you plan to paste over part of the wall, you must first draw the upper horizontal line at the desired point. Then, using a plumb line, mark the vertical lines in the places where the joints of the photo wallpaper fragments will pass.
- Untreated surfaces are best pasted over with masking tape so as not to stain them with glue.
- If the entire wall is pasted over, it is necessary to mark vertical stripes in increments of about a meter.

The nuances of cropping and combining the pattern
Rules that will help you cut and combine parts of the image correctly:
- If the canvas is long and wide enough, it is advisable to cut it into smaller pieces for convenience.
- When the wallpaper is wider than the marked part of the wall, cut the canvas with a wallpaper knife or scissors at the edges or in places where minimal damage will be caused to the image.
- If the wallpaper is longer than necessary, you need to carefully study which part of the picture - the top or bottom - can be painlessly removed.
- A large wide image - a landscape, a detailed flower or plant, a group photo of people, animals - should be cut and combined especially carefully.No detail should be omitted so that integrity is not compromised.
- When the murals are planned to be pasted in the form modular picture - diptych, triptych, polyptych - you need to think over and carefully mark each part of the image.

Advice. Marking and matching the drawing can be too difficult for one person, so it's best to do this part of the work with an assistant.
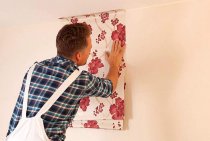
The process of gluing photo wallpaper
Having marked the wall, cutting and aligning the canvases of the photo wallpaper, you need to lay them out in the desired sequence on the table or on the floor. You can put the cut sheets on top of each other in a pile.
Let's start gluing:
- With a wide brush, apply a thick layer of glue to the wall, starting from the top horizontal line and ending with the vertical one. We try not to stain the places beyond the line with glue, even if they are protected with adhesive tape.
Important! You can not glue the entire surface of the wall at once. You should work strictly with one fragment. There is no need to apply adhesive to the wallpaper.
- Carefully apply the dry sheet to the top of the surface treated with glue. Aligning with the upper horizontal and vertical lines, smooth with a rubber roller in the direction from top to bottom and from left to right, expelling air.
If during the work the front side of the canvas gets dirty with glue, you must immediately remove the dirt with a damp cloth or sponge.

Non-woven photo wallpapers are plastic, and if necessary, they can be carefully stretched, trying not to disturb the proportions of the image.
- We consistently transfer all parts of the picture to the wall. The wallpaper must be glued end-to-end, so that the edges do not crawl on top of each other, distorting the image.

The wall pasted over with non-woven photo wallpaper dries for several days, depending on the temperature and humidity of the air. All this time, you can not open windows and doors, sharply raise or lower the air temperature in the room, use improvised household appliances for drying - a hairdryer, an iron - or perform any actions that can damage the image.
Corner gluing
If a fragment of the picture on the photo wallpaper falls at an angle, it is necessary to smear the surface with glue with a narrow brush. Next, the wallpaper is glued in one of two ways:
- The canvas is cut into two parts. First, the wall is glued on one side of the corner, then the adjoining one is processed and glued.
- One fragment is glued to both adjacent walls, the sheet is carefully ironed at the corner joint. This method is quite complicated and is not suitable for uneven corners.

How to mark and paste over difficult places (sockets, switches)
If there is a socket or switch on the wall fragment being processed, they must be carefully removed, after de-energizing the apartment. Next you need to do the following:
- On the wallpaper cut and ready for sticking, mark with a pencil in the places of sources of electric current, attaching the sheet to a dry wall.
- Close the exposed sockets with special plugs or glue them with small pieces of paper.
- Apply a layer of glue to the base.
- Attach a sheet of wallpaper to the wall, first aligned with the top horizontal and vertical lines. Press the fabric down and smooth with a rubber or fluffy roller for better grip from top to bottom.
- When the photo wallpaper is dry, use a wallpaper knife to cut out round or shaped holes for mounting sockets, switches in the places marked with a pencil.
A video will help to visualize the process of wallpapering with a photo image.