Drywall is one of the most popular building materials. It is used when leveling walls, creating partitions, arranging niches and other elements. The reliability of fastening directly depends on how well the crate for drywall is made. This is the most important element in the arrangement of any structure made of this material.

Frame options
Drywall crate can be made from the following materials:
- from wooden bars;
- from a metal profile.
To make the right choice, you should take into account the features of the material for the frame.
To create a frame, wooden bars made of coniferous species are used. Wood is sensitive to high humidity and temperature changes. In damp rooms it is affected by mold. With a sharp change in temperature, it can be deformed. But the material for the frame made of wood is cheaper. Also, the bars provide a more reliable fastening of self-tapping screws, since the latter are held in the tree with each turn.

Metal profiles are more expensive, but they are more reliable and durable. They do not have such a detrimental effect of the environment. Also, such a frame takes up less space. The metal does not need additional processing and fitting, therefore, it will take less time to assemble.
In general, everyone decides for himself what material to choose. The tree is suitable for warm and dry rooms. Metal is a more versatile material.

Materials, tools
You will need:
- metal profiles PN and PNP - rails for walls and ceilings;
- PS profile - rack-mount;
- PP profile - ceiling;
- EU brackets - direct hangers for fastening rack profiles;
- anchor hangers for the ceiling;
- simple connectors for lengthening the metal profile and cross-shaped - "crabs";
- dowel-nails with a diameter of 6 mm;
- self-tapping screws "bugs".
Tools:
- metal scissors;
- screwdriver;
- long level;
- perforator;
- pencil;
- a hacksaw for wood, a hammer - when installing a wooden crate.

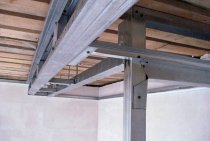
Installation of a metal profile crate
Most often, to create a crate, they use metallic profile. The construction of the frame is carried out in several stages.
Room layout
First, work is carried out on the layout of the premises.
Marking for the crate on the ceiling:
- From the lowest angle, the distance to which the ceiling surface will be lowered recede and which depends on the size of the recessed fixtures used.
- From the marked point, with the help of a level and a chopping cord, a line is drawn along the entire perimeter of the room. Ceiling guide profiles will be located along it.
- Now markings are being made for the main ceiling profiles. They should be fastened at a distance of 60 cm from each other, and jumpers should be located between them at the same distance. After marking on the ceiling, you should get a grid of squares with a side of 60 cm.
- The attachment points of the suspensions are marked, which should fall in the middle of the side of each square.

For the wall frame, the markup is as follows:
- They retreat from the walls at a distance of 5 to 15 cm. This depends on the degree of unevenness of the base, as well as the planned communications and insulation (if necessary).
- Draw a straight line across the ceiling.
- With the help of a plumb line, the line is transferred to the floor. Both lines must be straight, aligned with the level and running parallel to each other: guide profiles will be located along them.
- Mark the places where the carrier profiles will be located. The distance between them is from 40 to 65 cm. At the same time, it is necessary to guess so that the edges of the sheets at the joints fall on the metal racks, and not on the space between them.

It is best if the sheet of drywall "lies" on 3 profiles: 2 along the edges, 1 in the center. With a standard GKL width of 1.2 m, the optimal distance will be 60 cm.
Lathing installation
Preferably start with frame mounting for the ceiling.
- Guides are mounted along the perimeter of the walls along the marked line using dowels with a step of 60 cm.
- At the points where the main ceiling profiles will be located, suspensions are attached to the ceiling.
- Ceiling profiles, if necessary, elongated, are inserted into the guides and fastened with self-tapping screws.
- Jumpers are cut from the ceiling profiles, which are fastened with self-tapping screws. The junctions are reinforced with "crabs".
- Each profile is set according to the level, adjustment is carried out with the help of suspensions.

Now you can start assembling the battens for the walls.
- First attach the guides. They are attached horizontally along the drawn lines on the floor and ceiling. They are fastened with dowels in increments of 40–60 cm.
- Then rack profiles are inserted into the guides. The carrier profile is attached to the wall using mounting hangers, the distance between which is 60 cm.
If you plan to hang something on the wall (for example, a flower shelf or a TV), then you need to install an additional carrier profile in this place.
wooden frame
How to make a crate for drywall from wooden bars? In general, the creation of a wooden frame is similar to the assembly of a metal profile crate. However, there are some nuances that need to be considered:
- When preparing the material, the bars must be treated with a special antibacterial and antiseptic impregnation, it is desirable that it be oil-based. Before assembly, the tree must be thoroughly dried.
- For the frame, take bars with a section of 5 × 5 cm. The thickness of the tree cannot be less than 5 cm, otherwise the bars will not have sufficient strength.
- When assembling the frame, you need to use special wood screws.

Further assembly of the frame is as follows:
- Lines for guides are marked on the floor and on the ceiling.
- Install guide bars around the perimeter of the wall.
- Between them, vertical slats are fixed so that the edges of the drywall sheets lie on the racks. The distance between the bars should not exceed 50 cm.
- Reinforce the crate with transverse bars.
- The bearing bars are fastened together with self-tapping screws. For a more secure fixation, you can use the corners.
- The crate should be in the same plane and form a perfectly flat surface.
- If you plan to hang something on the wall, reinforce the crate with additional horizontal bars.
Drywall is being installed on the finished crate.