The installation of a window sill usually completes the installation of a window. It is impossible to exclude this element from the window construction. First, it is an element of decor. Agree that a window opening without a window sill will look, to put it mildly, ridiculous. Secondly, this additional element also performs a protective function, taking on temperature fluctuations and mechanical loads. Replacing old windows with more practical PVC structures is carried out by specialists. Typically, the range of services provided includes the installation of a window sill and slopes. However, installing a plastic window sill with your own hands is not particularly difficult, so you can save money by doing the installation yourself. Immediately clarify that this procedure is carried out only after replacing the window. Consider all stages of installation work, including sizing.

Training
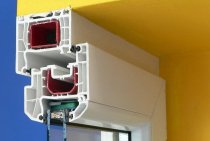
The installation procedure begins with the dismantling of the old structure. This is a very important nuance: PVC structures are never installed with wooden frames. If you ordered the installation of a window in a specialized company, then this stage will be performed by installers. Specialists dismantle old frames and install pvc windows. You just have to prepare the window opening. To do this, it is necessary to clean the lower part of the window opening from the remnants of construction debris, remove the remnants of the plaster and make grooves in the side walls. This is done to securely fix the plastic structure.
Please note that it is not always advisable to make grooves. Usually this procedure is performed if the width of the panel will go beyond the window opening.
Then you need to foam all the cracks that remained after installing the window, align the lower part of the window opening and prime the surface. These precautions will help to eliminate drafts, respectively, to keep warm in the apartment.
measurements
It will not be possible to purchase a product of suitable sizes: window sills are adjusted individually according to the parameters of the window opening. Therefore, the plastic panel will have to be cut by yourself. Fitting the window sill with your own hands to the size of the window is not difficult: plastic can be easily processed and cut with any sharp tool. At this stage, it is important to correctly calculate the length and width of the structure.

First, we measure the width of the window opening. To the resulting figure you need to add 1.5-2 centimeters on each side. Usually the edges are retracted into grooves or closed with slopes. The width of the window sill depends on your desire. If the structure does not extend beyond the wall, then 2 centimeters must be added to the width of the window opening: this part will go under the window. If you plan to install a protruding structure, then ideally the window sill should reach the middle of the radiator.
It is not recommended to close the heating system. Warm air will not rise to the windows, as a result, condensation and frost will form in winter. Accordingly, the life of PVC windows will be significantly reduced. If you still decide to close the batteries completely, you need to make ventilation holes in the windowsill.
The thickness of the window sill does not play a special role: this element does not have high mechanical loads. The exception is situations when the PVC panel is installed on the entire wall, combining two windows. In this case, the thickness of the window sill should have a maximum value of 22 millimeters. Do not forget to equip the window sill with end caps.
Installation process
How to install a window sill? It is enough to responsibly approach the installation procedure and follow the instructions given. Here is a step by step installation diagram:
- The dimensions of the structure are already adjusted to the parameters of the window opening. To make sure that the calculations are correct, the window sill is installed in place. If the panel does not fit, you need to remove the element and clean the end and front sides with a knife.
- Please note that window sills are not laid on a concrete or brick base. Therefore, the installation of the panel involves the use of wooden or plastic supports. The recommended width of such substrates is at least 50 millimeters, the length is less than the width of the panel. The thickness of the supports is selected individually, the main thing is that the window sill clearly fits into the groove under the window. It is worth noting that the supports are installed only on a leveled surface in order to avoid distortions of the structure. The distance between such substrates: 40-50 centimeters. You can check the correct installation of the supports by trimming the window sill: a piece should fit snugly into the groove between the support and the bottom of the window.

- The voids between the supports are usually eliminated. To do this, use mounting foam or mineral wool. In the second case, the substrates must firmly adhere to the base of the window opening, so the supports are fixed with silicone glue. It is recommended to degrease the surface before using this material.
- We proceed to the installation of the PVC structure. Before starting work, you need to remove the protective film from the side of the window and install the end caps. Then we install the window sill in place.
Please note that the element should fit into the groove tightly enough, but it is not necessary to apply excessive force. On the sides of the structure, you need to leave a small gap (about 5 millimeters), this is a precautionary measure that will help prevent deformation of the window sill. For this, substrates of appropriate thickness are installed from the sides. These beacons then need to be removed, and the gaps sealed with sealant.
- Align the panel in a horizontal plane with light taps. We check the position of the window sill by level.

- The installation is almost complete. Now you need to foam the free space under the window. Please note that the mounting foam increases in volume during the drying process, so you need to install special spacers. If this is not done, the structure will be skewed and subsequently replaced. Spacers are made of wooden blocks, set one in the center and two on the sides. The fixatives are removed after the foam has completely solidified (about a day), the excess of which is removed with a knife.

- Then the slopes are installed and the remaining gaps are closed. For this, a sealant is usually used. The edges of the window sill adjacent to the walls are covered with mounting tape.
- After completion of all installation work, the protective film is removed from the window sill.
Don't repeat mistakes
Remember: a violation of the installation technology will invariably entail the replacement of the window sill.
Therefore, here are some useful tips that will help you avoid unpleasant consequences:
- Installation is carried out immediately after the replacement of the window. If you first put the slopes and plaster the walls, the risk of damaging the surface increases. Accordingly, all the work done will go down the drain.
- Wide and long panels need to be additionally fixed. This is usually done if the window sill exceeds the width of the window space by a third. Brackets are used for fastening.
- Carefully maintain the size and be sure to use the building level.
- For better adhesion of surfaces, the window opening must be moistened with water.
- Do not use too much mounting foam. Foaming the window sill space, it is recommended to leave small gaps.
Doing all the work yourself is not difficult, but if you are not confident in your abilities, it is better to seek help from professionals.