Replacing the Rubber Seal of the Ball Mixer
To replace the rubber seals in the ball valve, you will need a screwdriver, pliers, a hex key, an adjustable wrench, a fum tape, and a set of new gaskets.
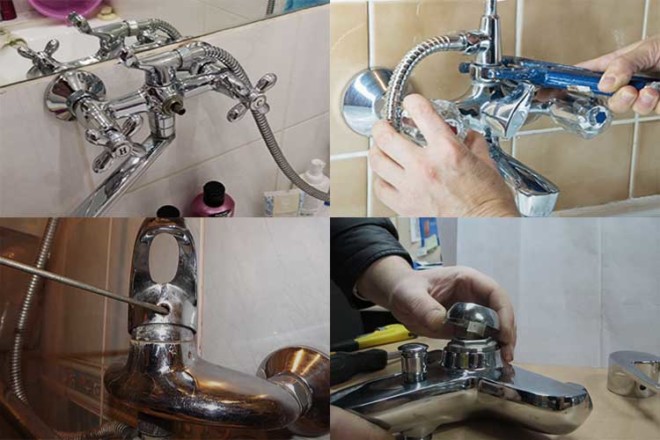
Perform work to eliminate leaks of this type of mixer in the following order:
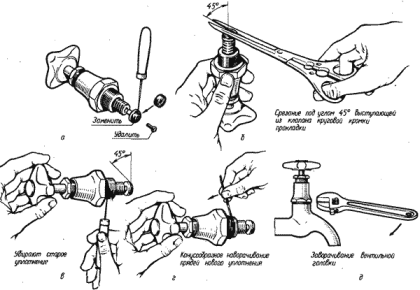
remove the decorative plastic plug by tucking it with a screwdriver;
using a hex wrench, unscrew the locking screw securing the valve lever to the ball stem;
pulling the valve lever, remove it from the stem;
unscrew the threaded connection by hooking the slots in the housing with a screwdriver
Work should be carried out carefully so as not to damage the corrugated hoses.
using pliers, remove the chrome dome along with the cuff;
carefully remove the ball from the mechanism;
after carrying out a troubleshooting inspection, replace the seals that have become unusable, and also, if necessary, the ball itself;
when repairing, it is also recommended to replace all the springs inside the ball;
reinstall the parts, following the accuracy of the positioning of the ball relative to the ledge at the crane;
by adjusting the chrome dome ring, adjust the ease of turning on the tap;
install the lever and secure it with the set screw.
This will achieve smoothness in its operation and extend the life of the seals.
Important: Before installing the ball, apply some plumbing grease to the seals. This will achieve smoothness in its operation and extend the life of the seals.
Repair of a cartridge mixer does not involve the replacement of seals. Cartridges are issued in non-separable execution and are replaced entirely. At the same time, disassembling a single-lever cartridge-type mixer is completely the same as in the case of a ball valve.
When choosing a cartridge, pay attention to the size of the holes and the latches on its bottom plate. More durable are cartridges with a silicone disc gasket.
Replacing gaskets in devices with a flywheel
This kind of taps in most cases is equipped with a protective cover, which must be dismantled before the direct disassembly of the mixer. Only by getting rid of the protective device, the homeowner will be able to find the fixing nuts that secure the faucet.
After that, all repairs will be carried out in accordance with certain actions.
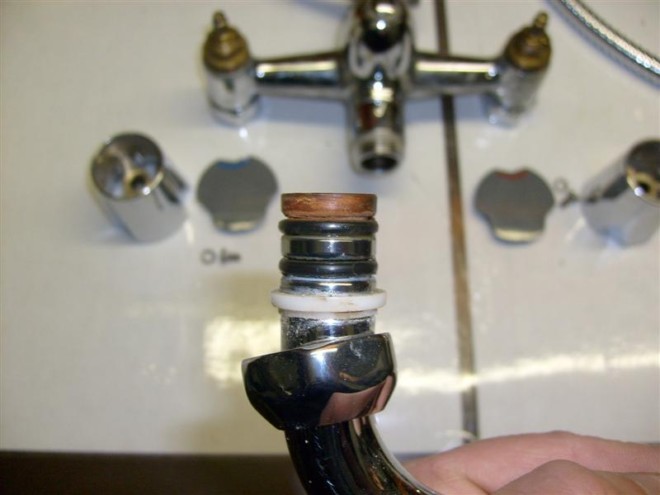
- using a wrench, unscrew and remove the nut;
- a neck is removed from the valve body in which a sealing gasket is placed;
- the seal is removed with a screwdriver and inspected for damage;
- the old gasket is replaced with a new analogue and all parts previously dismantled from the crane are installed in reverse order in their places.
When assembling, remember to be careful not to distort the threaded connections and not to apply excessive force when tightening the nuts. If the homeowner has not previously changed other gaskets in the tap, then when disassembling the valve, it is advisable to inspect all rubber seals, but it is better to immediately change them with new counterparts
If, after the repair was completed, the leak could not be eliminated, then most likely the valve valve, or the seat in which it is installed, is very worn out and they will have to be completely replaced.
Valve equipped with reciprocating stem
To change the gasket, using a suitable screwdriver, unscrew the bolts responsible for fastening the valves. After removing them, it is necessary to unscrew the base of the valve, where the damaged gasket is located. You can use a wrench for this.
It will not be superfluous to look at the core of the crane and assess its condition.If there is any suspicion of its reliability, then it is better to replace it immediately.
When removing the gasket, it is necessary to pry it with a slotted screwdriver.
Then you should carefully clean the surface below it, contaminated with limescale. This is where slightly warmed vinegar comes in handy.
A new gasket is installed in place of the worn gasket.
It is important to choose its size with absolute accuracy. To do this, you need to know which gaskets in the bathroom faucet are used in your case.
If the new product is too big, then its edges will protrude beyond the walls of the tap and it will not be possible to shut off the water. A smaller gasket will allow water to pass into the gap formed, and the leak will not be fixed.
When fitting the gasket onto the pin, some force must be applied, then it will become a reliable protection against leaks.
You should definitely pay attention to the type of seal when choosing a suitable gasket. A rubber seal would be a good option for installation in a cold water faucet.
For a hot water faucet, a leather seal is more suitable.
When assembling the crane, it is important to arrange all the parts in reverse order. The first step is to fix the core on the valve and tighten it slightly
The crane is assembled, it remains to fix the cap, and check the quality of your work. To do this, open the water supply valve and check if there is a leak in the bathroom.
It will be interesting: If the faucet in the kitchen or in the bathroom is dripping, we will tell you how to fix it
Sources
- http://sovety-vannoy.ru/santexnika/smesiteli/kak-zamenit-prokladku-v-smesitele.html
- https://kanalizaciyaseptik.ru/santexnika/kak-pomenyat-prokladku-v-smesitele.html
- https://remoskop.ru/pomenyat-prokladku-krane-pomogaem-sebe-sami.html
- http://fb.ru/article/290193/kak-pomenyat-prokladku-v-krane-rezinovyie-prokladki-dlya-smesitelya
- https://otoplenie.site/santehnika/krany/prokladki-dlya-smesitelya-v-vannoj.html
- http://santex1.ru/kak-pomenyat-prokladku-v-smesitele-na-kuhne.html
- http://openfile.ru/bez-rubriki/%D0%BA%D0%B0%D0%BA-%D0%BF%D0%BE%D0%BC%D0%B5%D0%BD%D1%8F% D1%82%D1%8C-%D0%BF%D1%80%D0%BE%D0%BA%D0%BB%D0%B0%D0%B4%D0%BA%D1%83-%D0%B2- %D0%BA%D1%80%D0%B0%D0%BD%D0%B5-%D0%BD%D0%B0-%D0%BA%D1%83%D1%85%D0%BD.html
- http://santex1.ru/prokladki-dlya-smesitelya-v-vannoj.html
- http://santex1.ru/kak-pomenyat-prokladku-v-smesitele.html
How to know when it's time to change the gasket
Often, homeowners ask themselves the burning question of when and how to change the gasket in the bathroom faucet in order to extend the life of plumbing fixtures. Professional plumbers say that this moment is impossible not to notice
The main thing is to always pay attention to the places where the elements of the mixer are connected to each other. As soon as you see that there is oozing or dripping water, start preparing to replace consumables
There are 2 types of gasket replacement:
-
Planned or preventive. The scheduled replacement of the gasket in the bathroom faucet is carried out after a period, which is usually specified by the manufacturer in the instructions. Usually this period depends on the quality of the material. As a rule, plumbers recommend making a scheduled replacement of consumables in the mixer at least once every 2-3 years, because they cost a penny, but significantly extend the life of the faucet itself.
Gasket replacement scheme
- emergency or emergency. Emergency or emergency replacement is not carried out within the time recommended by the manufacturer, but due to accelerated wear of consumables due to the above factors. The most obvious signal to replace the seal is the leakage of the mixer through the junctions of its components.
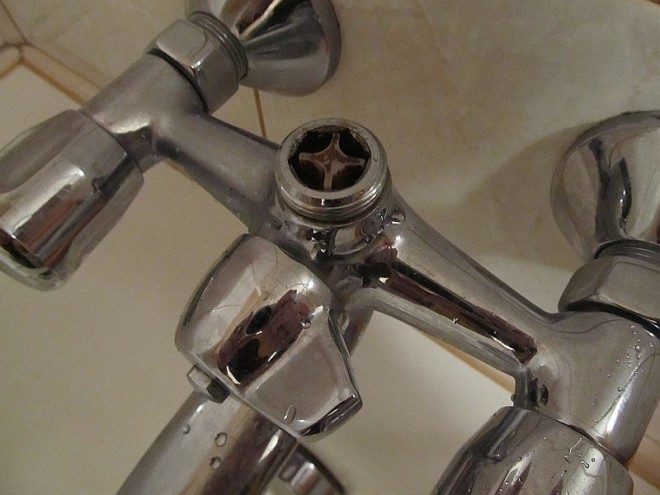
Double valve

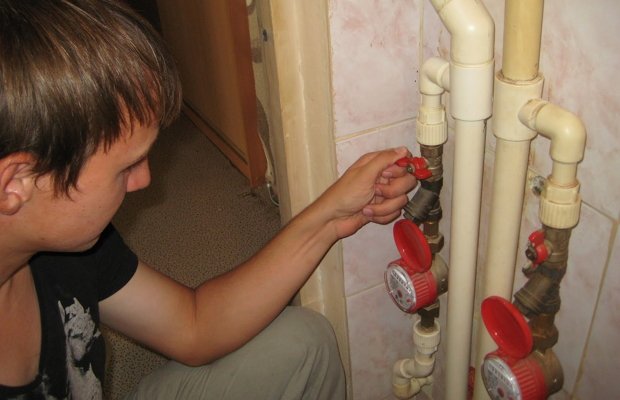
- The water is shut off.
- The valve flywheel is switched to the on position - this is necessary to save the valve parts from strong pressure.
- The mixer is disassembled (you need a screwdriver and a wrench):
- caps are removed;
- the screw on which the flywheel is fixed is unscrewed;
- the neck is removed by unscrewing the fixing nut.
If the problem is in the valve head of the faucet, it is replaced with a new one of the same size. After that, the design is assembled in the reverse order. If it's a gasket. the old one is removed (it is located freely on the neck or secured with a pin), a new one is put in its place. It should be lubricated first. In some cases, a leaky oil seal may be the cause of a mixer malfunction. Then the crane is disassembled in a similar way and the packing is replaced with a new one.
To prevent leakage of the faucet mixer, try tightening the stuffing box bushing. Sometimes this is enough.
After replacing the necessary parts, wind the FUM sealing tape around the thread of the spout and fix it with a clamping nut. Assemble the faucet in reverse order and check that it is in good working order.
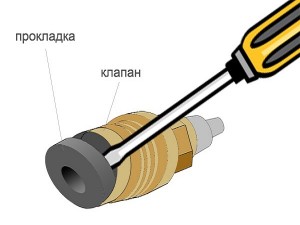
Laying in the crane, its purpose and device
The gasket is an important part of the design of the faucet, it seals the valve seat and its body, blocking the flow of water. When closing, the working gasket is strongly pressed against the seat and, at the same time, experiences significant static loads. In addition, it is subject to dynamic loads from the flow of flowing water.
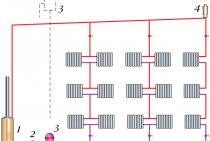
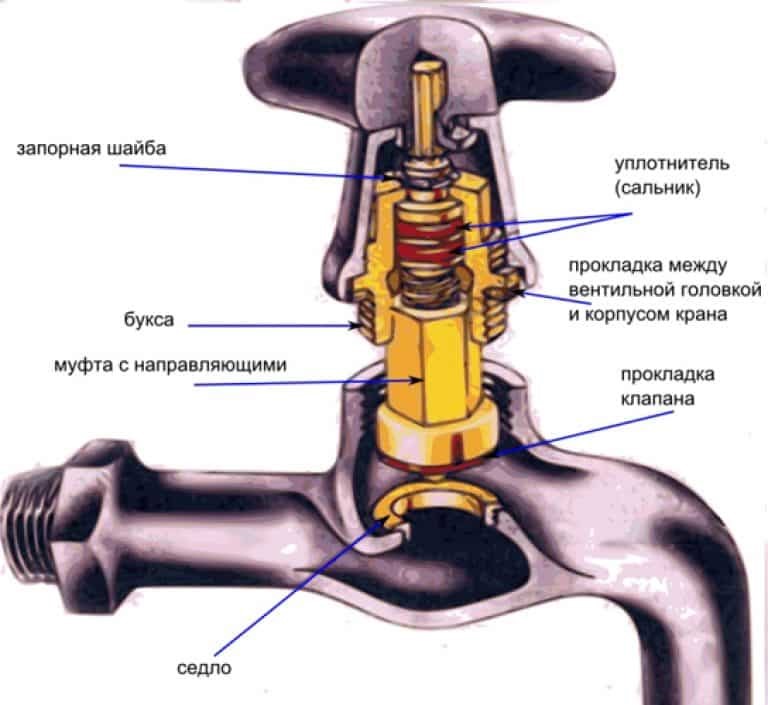 Figure 1. Scheme of a worm crane
In addition to the working gasket, the design provides for one or more sealing rings located between the faucet mount and the core body, sealing the threaded connections of the mechanism parts. These rings are less subject to wear, but if the replacement of the working gasket does not give the desired effect, they will also need to be replaced.
Causes of gasket wear
A gasket for a mixer is an indispensable element of its device, which is a silicone or rubber seal that visually resembles a ring, the diameter of which corresponds to the diameter of the pipe. It is a consumable that is used to seal the connected parts of the crane. The gasket seals the joints, preventing leakage through these most vulnerable parts of the structure. Periodically, these consumables wear out and need to be replaced. The most common cause of wear on the seals inside the bathroom faucet is:
Inconsistency between the size of the seal and the diameter of the valve
When installing a faucet in the bathroom, it is extremely important to accurately select the size of the gaskets, otherwise they will wear out faster during operation or even deform, losing the ability to perform their function.
leak
Getting under the gasket of small grains of sand. When installing under the seal, small particles of metal, rust, specks can penetrate
Due to the friction of these elements on the rubber during the use of the crane, the gasket wears out and becomes unusable.
Low quality material. Faucet gaskets are usually made from rubber, latex, or silicone. If the products are of poor quality, then the material may have lower elasticity, it may deform, wear out.
Low water quality. Tap water usually has a large amount of impurities that have a negative effect on the rubber from which the faucet seal is made. In addition, constant temperature changes lead to deformations, the appearance of cracks.
Breakdown prevention
To prevent premature failure of the product, follow these rules when working with it:
- Open and close the faucet as far as it will go, but do not apply too much force.
- From time to time, disassemble the mixer, clean it from dirt and lubricate the moving parts. This will increase the duration of the product by about 3-4 times.
- Install a filter. As a rule, the main reason for the breakdown of taps is not enough clean water coming into our homes from main water pipes. To solve this problem, install a water pre-filter.
Replacing a gasket in a faucet does not take much time, and this work can be done by any person who knows how to think technically. The above instructions and recommendations will help you cope with this simple task perfectly.
Crane Diagnostics
The quality of the repair largely depends on the accuracy of the “diagnosis” made.
It is important to correctly determine the location of the malfunction, to understand what exactly is broken. There are several seals in the mixer taps and valves, each of which can cause breakage
The result obtained will help to orient and choose the optimal repair strategy.
The first step is to locate the leak.For example, water drips from a drain, and attempts to stop the leak do not lead to any results. The culprit of the situation is a sealant installed directly in the crane box.
It happens that water oozes at the point where the faucet body is attached to the pipe. The gasket installed on the connecting thread is to blame. A similar situation is possible in the case of a valve mixer. There is only one way out - unscrew the device and replace the gasket.
Sometimes changing the gasket in a bathroom faucet is not possible. In the case of a device with cartridges, then there will be nothing left but to buy a complete assembly and install it in place of the failed one.
This is interesting: Replacing pipes in the bathroom: we set out in detail
Recommendations of experts and possible difficulties
Experienced craftsmen have collected the most common mistakes when replacing gaskets:
Too much effort applied when tightening the threaded connections for fastening the crane box. At the same time, the seal is pressed through, and after a while the problem will arise again.
Therefore, the thread must be tightened carefully. If drops of water ooze through the thread during the test, you can tighten it a quarter or half a turn.
Inaccurate installation of the gasket in the mount
Displacement of the ring relative to the longitudinal axis leads to misalignment, seal failure and rapid wear.
Error in determining the cause of the leak. This may not be a worn rubber gasket, but, for example, wear of a worm drive or valve seat. If the replacement did not help, you should check all the details of the mechanism and the mixer body itself for mechanical damage.
Damage to the chrome coating of mixer parts. This occurs when sharp or heavy instruments slip off. To avoid this, you can wrap the parts with a soft cloth or wrap with an elastic bandage.
To reduce wear on seals and extend their life, consider installing filters. Mechanical ones are inexpensive and trap particles of sand and rust, which ceramic crane boxes are especially afraid of. Iron removal and demineralization filters are more expensive, but they protect plumbing fixtures in the bathroom and kitchen, washing machines and dishwashers from harmful deposits.
It would also be reasonable to plan in a timely manner the replacement of pipes with modern ones - plastic or metal-plastic, not subject to corrosion. With such pipes, all plumbing will last longer.
How to change gaskets in slewing taps
After shutting off the water supply to the central water supply of the apartment, the remaining liquid is drained from the system, and only after that it is possible to proceed to the repair, which consists of certain stages.
-
On the tap, using a regular knife or a thin screwdriver, pry off a decorative cap that closes the fixing screw.
- Using a screwdriver, the screw is unscrewed and the rotary device is dismantled.
- At the next stage, a visual inspection is carried out, the removed rotary mechanism in the body of which is usually located a rubber seal, which is dismantled with a screwdriver or knife.
- A new rubber gasket is installed in place of the old counterpart.
- The thread on the box is wrapped with sealing tape after removing the old insulating material.
- The assembly of the crane is carried out in the reverse order of disassembly and the quality of the work performed is checked.
In a situation where the gasket is attached to the stem mechanism using self-tapping screws or screws, it is often necessary to replace the entire assembly. This is primarily due to the fact that rusted fasteners simply cannot be removed.
If the disassembly of the mechanism is hindered by limescale, it can be removed with ordinary vinegar or alcohol.
What do you need to work
Changing the gasket in the faucet in the kitchen or bathroom with your own hands is quite realistic if you stock up on the necessary tools and materials.If you notice that the mixer has begun to leak a little, then do not postpone the replacement of the seal until later, so as not to completely ruin the equipment. For work you will need:
-
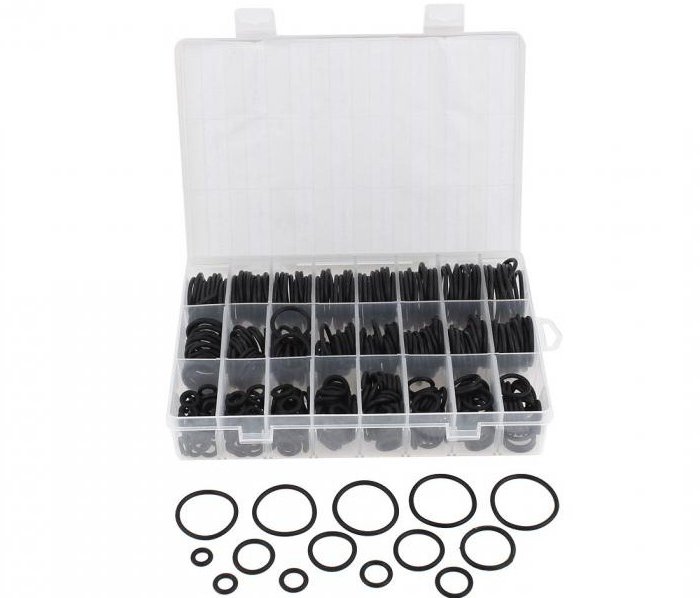
The right size rubber gasket. To purchase a seal of the right size, you need to determine the diameter of the tap, for this you can remove it, attach it to a piece of paper, and then circle it with a pencil or marker.
Faucet Gasket Replacement Tools
- Adjustable plumbing wrench.
- Screwdrivers.
- Pliers.
single lever
- Remove the cap (red/blue) with the tip of a knife. Unscrew the screw hidden under it.
- Remove the lever and cap.
- Remove the cartridge and inspect it for defects. To do this, you need to unscrew the "cam" washer with an adjustable wrench.
- Check all parts of the valve disassembled - the surface of the ball and spring, gaskets, rubber seals. Clear them of accumulated plaque. If necessary, replace the settled springs with new ones.
If the problem is a clogged cartridge. it should just be changed. The new part is installed in such a way that the holes on the cartridge coincide with the corresponding recesses inside the faucet body. After that, the washer is screwed - first with your hands, then with a key (but not much, it can harm).
In order to buy a new component of the right size, take the old part with you to the store. Now they produce cartridges of various sizes and materials, so it is easy to miscalculate with the choice.
If the cause of the leak was the wear of the gasket - it cracked, changed shape, leaked - it should also be replaced. The old seal rings are removed (carefully pry them with a screwdriver or knife), and new ones are installed in their place. The gasket diameter should be slightly larger than the socket.
Tightening the nuts after work should be done carefully. In the event of misalignment, premature wear of parts and, as a result, leakage
If water flows out under the spout itself, o-rings require replacement - they are easily removed, then new ones are installed. When the problem is solved, a small “general cleaning” of the structure should be carried out:
- wipe clogged rubber seats with a rag;
- clean the seat and overflow holes from dirt and rust.
Lubricate all friction parts with non-toxic silicone grease. This will significantly increase their service life.
After installing the cartridge back and tightening the washer, check the quality of your work. Let the water go - if it doesn’t leak anywhere, you can fix the cap and the lever - we tighten the screw and put the plug.
Training
Before changing the gasket in the tap, it is necessary to draw a certain amount of warm water into a container. Only then can the valve of the water supply system be closed. After the main tap is closed, the remaining water can be drained from the system. Then, using thick cardboard or a thick towel, you need to cover the surface of the bathtub or sink, which will prevent damage to the plumbing.
To carry out the work you will need:
- screwdrivers;
- fum tape;
- adjustable plumbing key;
- scissors;
- new gasket.
If a single-lever faucet fails, then the cartridge inside it can be replaced or a new faucet installed. Other types of faucets are fairly easy to repair.
Tools and materials
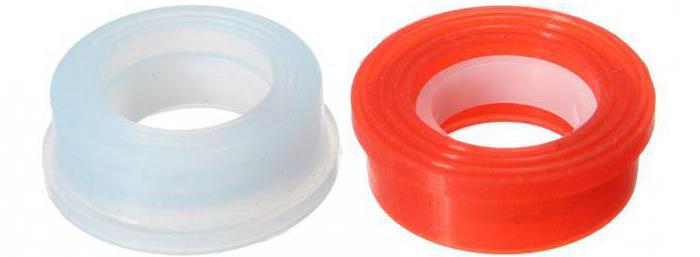
First of all, you will need sealing gaskets, which you can make yourself or purchase at a plumbing store. The cold water faucet ring can be made of rubber or leather. But it is desirable to equip the hot water mixer with a sealant made of paronite or silicone, that is, a material with a higher heat resistance.
In addition to the gasket itself, you need to prepare the following tools for work:
- wrenches and wrenches;
- minus and plus screws.
Also, a clean cloth or sponge and detergent will not be superfluous to clean the inside of the mixer from accumulated dirt, sand, plaque and other deposits.
Causes of gasket wear
A gasket for a mixer is an indispensable element of its device, which is a silicone or rubber seal that visually resembles a ring, the diameter of which corresponds to the diameter of the pipe. It is a consumable that is used to seal the connected parts of the crane. The gasket seals the joints, preventing leakage through these most vulnerable parts of the structure. Periodically, these consumables wear out and need to be replaced. The most common cause of wear on the seals inside the bathroom faucet is:
Inconsistency between the size of the seal and the diameter of the valve
When installing a faucet in the bathroom, it is extremely important to accurately select the size of the gaskets, otherwise they will wear out faster during operation or even deform, losing the ability to perform their function.
leak
Getting under the gasket of small grains of sand. When installing under the seal, small particles of metal, rust, specks can penetrate
Due to the friction of these elements on the rubber during the use of the crane, the gasket wears out and becomes unusable.
Low quality material. Faucet gaskets are usually made from rubber, latex, or silicone. If the products are of poor quality, then the material may have lower elasticity, it may deform, wear out.
Low water quality. Tap water usually has a large amount of impurities that have a negative effect on the rubber from which the faucet seal is made. In addition, constant temperature changes lead to deformations, the appearance of cracks.
How to replace the faucet in the bathroom with your own hands
What to do if a faucet leaks on a pipe
But valves are not only on the tap in the bathroom or kitchen. They are also installed on water pipes with hot and cold water. These devices tend to also leak after a long time of operation. As a rule, most of these troubles occur due to loosening of the union nut located under the valve itself. Sometimes it is enough to slightly tighten this part so that the leak disappears. Here also one should not be zealous, applying force.
Loose union nut under the valve
If the water from under the stem continues to ooze, the matter is more serious than it turned out at first. It is likely that the stuffing box has worn out. Easier - linen tow, used for sealing. Then you should again block the general access of water. If a malfunction has occurred with the main valve, then it is better to call a locksmith from the housing service, since you will have to block the common house riser. You can deal with the leakage of ordinary devices on your own.
The general access of water is blocked again. The valve to be repaired is screwed into the “closed” position until it stops. The nut is unscrewed with a spanner, the stem must be motionless. The screw located at the very top is unscrewed and the rotary handle (flywheel) is removed, and then the union nut and the stuffing box bushing under it are removed from the stem. The tow is being replaced. When laying, it is necessary to tamp it with a screwdriver. The valve is assembled in the reverse order. The common valve is opened, a check is made for leakage.
And finally, if the faucet is so old that the shape of its parts is non-standard, or you doubt that you can remember what sizes the gasket should be, keep the old "gum" as a reference.
Expert advice
In order to facilitate the process, it is recommended to use some silicone grease.Once the faucet gaskets have been installed, the faucet can be assembled. The core returns to its place, it is not necessary to screw it in too hard, then you will not damage the seal. Next, the flywheel is installed, and then the fixing bolt.
Now you can check the performance of the crane, for this it is turned in different directions. The next step is to open the main valve. Only now can you check if the mixer is working properly. If the repair did not achieve positive results, then the rubber gaskets change again. Sometimes it is necessary to completely replace the mixer.
Preventive measures
Minor malfunctions in the operation of the kitchen faucet can be completely eliminated by yourself. However, it is better to prevent breakdowns than to repair them. Therefore, we will give you some tips that will minimize such problems:
- choose designs made of brass - they are more durable;
- a single-lever faucet is not only easier to open (with any free hand), but also repaired due to fewer components;
- a frequent cause of faucet breakdowns is pollution coming from the plumbing system - install a coarse water filter to maintain the integrity of the tap.
You can easily make minor repairs to the kitchen faucet on your own. The most common problems are cartridge clogging, valve head damage, or worn gaskets. Replacing these parts with new ones is quite simple. Instructions for disassembling and repairing valve and single-lever faucets will help you with this. https://www.youtube.com/watch?v=-vyEHpAZv1E
-
Appliances
-
Doors and windows
-
Inventory
-
Interior
-
Furniture
-
Lighting
-
layout
-
Floor
-
Ceiling
-
Problems
-
Plumbing
-
Walls
How to change the gasket in the faucet in the kitchen
A gasket in a faucet is a very small detail, but an important one. If it does not fit snugly or is worn out, then in addition to the annoying sound of dripping water, damage to the family budget is caused. The cost of a rubber or silicone gasket for a faucet is cheap, so it is not advisable to save on its purchase and replacement.
The quality of tap water leaves much to be desired, which affects not only our health. As practice shows, crane parts wear out faster for such reasons, namely:
- the presence of rust and other large particles in the water;
- poor quality rubber or silicone in the gasket;
- exposure to high temperatures;
-
errors when installing faucet parts.
As the faucet wears out, it is necessary to carry out repairs and replacement of plumbing parts in a timely manner
If you do not change the gasket in the kitchen faucet in a timely manner, this will invariably lead to the formation of unsightly rusty streaks and plaque in the sink and on the faucet. From this, the service life of parts is significantly reduced, as they fail. Experienced craftsmen do not recommend postponing crane repairs
It is important to fix the leak as soon as possible. To this end, we recommend that you adhere to the following sequence of work:
- Buy a universal set of silicone or rubber gaskets from a plumbing store.
- Put cardboard and a thick towel on the bottom of the sink, which will protect the decorative surface from an unexpected fall of the key or parts.
- Fill a bucket with warm water to wash parts from rust and plaque.
- Turn off the water on the central water supply pipe.
- Using wrenches, carefully disassemble the faucet so as not to damage the decorative details and ceramics.
We dismantle and repair the crane box with rubber seals
Removing a worn gasket from a faucet valve
- The valves have decorative plastic caps. We dismantle this overlay by prying with a sharp object.
- There is a fixing bolt under the cover. Unscrew it with a screwdriver.
- Now you can remove the lamb from the mixer
- Using a wrench or adjustable wrench, we unscrew the core with the gasket fixed on it.
-
We hook the gasket with a sharp knife or scissors, remove it from the stem.
- We clean the surface of the part with warm vinegar to remove limescale.
- We make or take out a new gasket-seal from the package (from rubber to the cold water tap, from leather - hot), put it on the rod with force (if defects are found in the core, it is recommended to replace it immediately). You can use some silicone grease to make the job easier.
- We collect the crane. We return the core to its place (it is not recommended to screw it in too hard so as not to damage the new seal), then the lamb (flywheel) and the fixing bolt.
- We check the performance of the crane by scrolling it in different directions.
-
Open the main valve and check the operation of the mixer. If the repair fails, it is recommended to repeat the gasket replacement operation or completely replace the mixer with a new one.
Causes of a leaky faucet in the kitchen and bathroom
If you notice that a faucet is leaking in the kitchen or bathroom, then you need to immediately solve this problem. The device can fail for various reasons. Let's consider the most common of them.
- Most often, leakage is caused by wear on the gasket that seals the inlet. The rubber product wears out very quickly, especially in the case of a strong tightening of the valve. As a result, the latter does not close “until the end” and the tap starts to flow. Repair in this case consists in replacing the rubber ring.
- In addition to the gasket, there is another sealing element in the faucet, which is also subject to premature wear. This is a seal bushing. When it is worn in the closed position of the valve, water does not flow. But having unscrewed the tap a little, it begins to flow between the valve stem and the gland nut. If the gland is depressurized, its rubber liner must be replaced.
- Careless or incorrect installation of the device can also cause failure. If you have purchased an expensive and reliable crane from a well-known manufacturer, then you need to carefully install it. After all, the flaws made during the installation of the device can cross out all the advantages of a branded crane.
- In the event of a malfunction of a completely new plumbing device, it does not need to be disassembled, because, most likely, this is just a factory defect. In such a situation, it is better to seek advice from an experienced plumber. If he confirms the initial assumption, then he will have to return the product to the store or ask him to change it.
Due to the fact that the cause of the faucet leaking in most cases is the wear of the gasket, we will talk about how to replace it yourself.
Reasons for failure
Before you start disassembling the mixer, you need to make sure that the gasket is the cause of the leak. If drops or a trickle of water appear from the spout when the valve is fully closed, this is a sure sign of a malfunction of the working gasket. In this case, you can start disassembling to replace the valve's working gasket. With a visual inspection, it is easy to establish a malfunction:
- The shape is changed, dents are visible.
- Breaks are visible.
- Partially or completely destroyed.
There can be several reasons for a seal failure:
- Incorrect layout was selected during the previous installation.
- Distortion during fastening.
- Low quality rubber.
- Severe contamination of water with mechanical impurities.
- Accumulation of mineral deposits.
Regardless of the cause, the treatment is the same: seal replacement. In case of damage by grains of sand or precipitation, it is necessary to think about installing filters for mechanical and chemical water purification.
This is interesting: How to remove mold in the bathroom - we explain the essence
Breakdown prevention
Any breakdown is easier to prevent than to deal with its consequences.This also works for faucets and faucets. Of course, it will not be possible to completely protect yourself, but everyone can noticeably delay repairs.
List of tips:
- do not save on plumbing and spare parts;
- use a filter, especially in the case of old water pipes;
- do not neglect care, periodically disassemble the taps, clean, lubricate the moving parts;
- Tighten the valves until they stop, but do not apply excessive force, often this is what breaks the seals.
If it so happened that you can’t do without a replacement, you should approach the work with all possible responsibility. Only a properly installed high-quality gasket will allow you to delay the replacement of an expensive locking device for a long time.
Seal replacement sequence
The main reason why the faucet leaks is the wear of the rubber gasket. This is quite logical, since it is made of the most short-lived material. Usually flows
a valve that regulates the supply of hot water, because it is hot water that can destroy the rubber from which the faucet gasket is made. Under the influence of high temperature, cracking of the rubber seal occurs, as well as loss of elasticity. At the same time, in order to shut off the hot water, more and more efforts are required, compressing the already deformed sealing element. As a result, over time, an unpleasant hum appears when water flows out, which occurs due to the vibration of the thinned edge of the rubber gasket. As with a leak, it must be replaced.