How to make your own pad
Carburetor gasket, you can make yourself. Such a need arises when it was not possible to find the original spare part. To make a gasket, you will need the following tools and materials:
- Thick cardboard;
- Nail scissors;
- Pen stem.
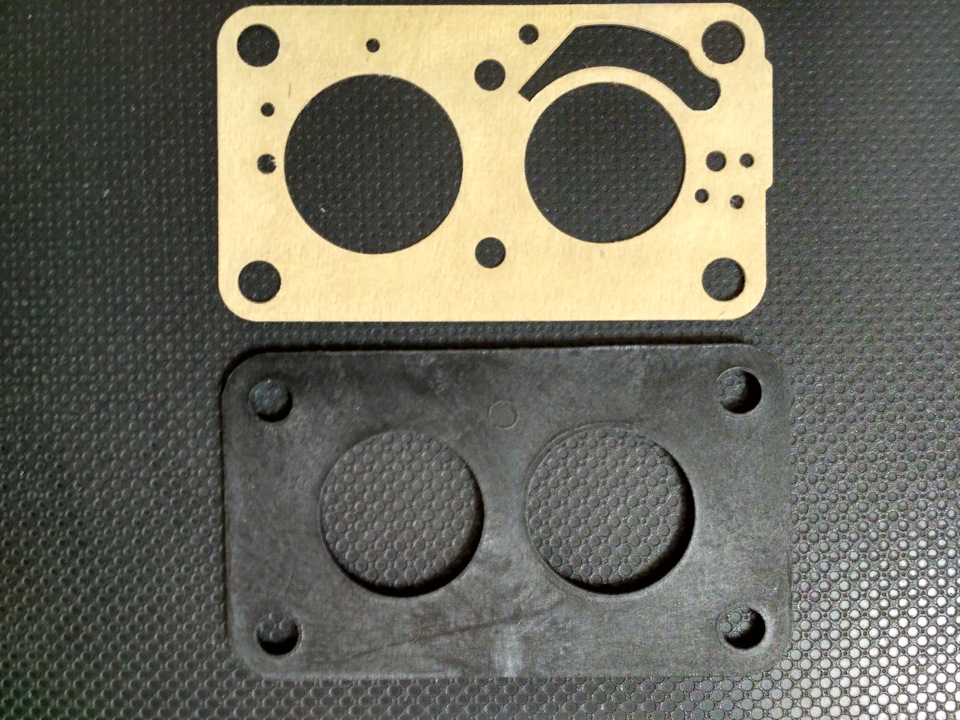
For the manufacture of gaskets, you can use any thick cardboard. The thickness of the material should be about 0.8 mm. If the thickness is greater, then such cardboard can also be used to make a gasket, but in this case it will be necessary to additionally adjust the position of the carburetor float.
To make a gasket, you will need to remove the carburetor from the engine. Then the cover and float are removed in the manner described above.
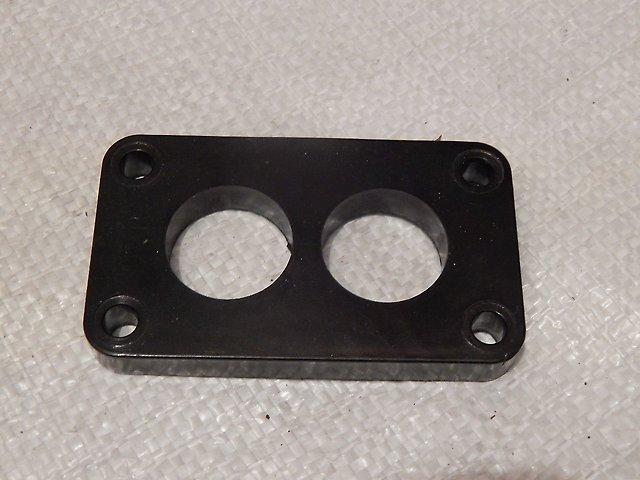
The old gasket is removed and the surface of the carburetor cap is cleaned of traces of gasoline.
Then the stem of the ballpoint pen is cut with scissors, and the ink is applied in a thin layer to the surface of the carburetor cap.
The next step in the manufacture of the gasket should be done as carefully as possible. The cardboard must be leaned against the carburetor cover and slightly pressed against the surface of the part, but in such a way that the sheet does not move at this moment. Then the cardboard is sharply separated from the surface of the inked part.
Holes for the cover bolts can be made using a spent cartridge case of a suitable diameter. For this purpose, the blank of the gasket is placed on a wooden board, and a sleeve is applied to the designated places for the holes with the hollow side, and precise blows are applied from the side of the capsular nest with a hammer.
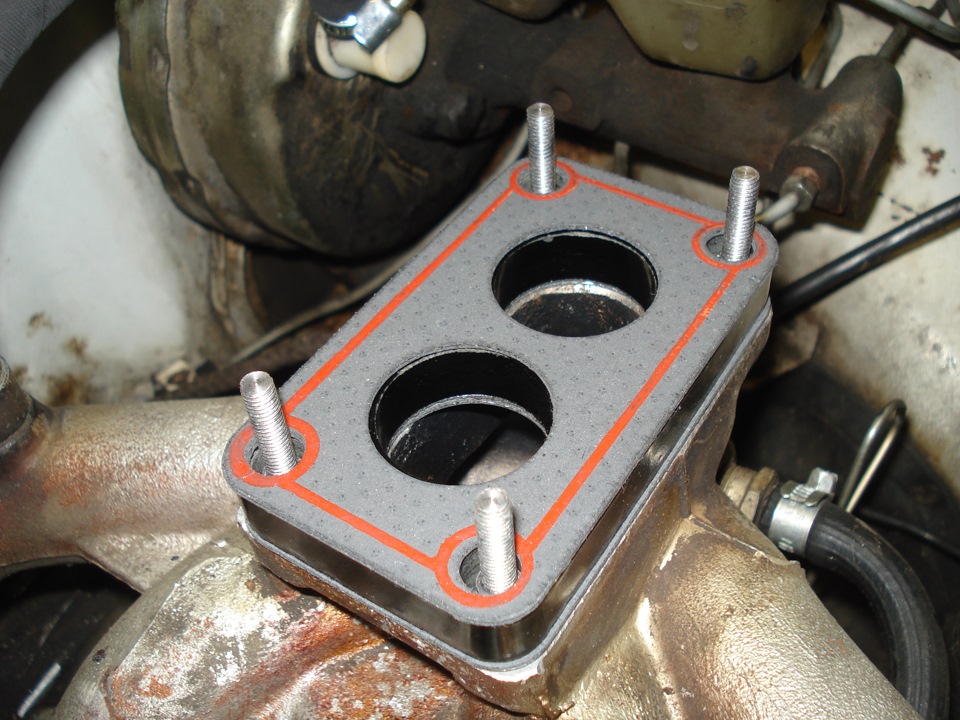
The manufactured gasket is installed in the usual way, but if the thickness of the cardboard for manufacturing the gasket differed significantly from the original, then it is imperative to adjust the position of the float in the chamber, as well as adjust the carburetor operation in idle mode.
Replacing the carton pad
Installing the cardboard gasket will not take much time, but this operation requires care and caution so as not to damage the fragile internal parts of the carburetor, as well as to exclude the possibility of dust and dirt getting inside the float chamber. On Solex carburetors, you can find, sold separately, cardboard gaskets
In this case, the cost of repairs will be almost invisible to the budget.
On Solex carburetors, you can find, sold separately, cardboard gaskets. In this case, the cost of repairs will be almost invisible to the budget.
After the carburetor is dismantled, five bolts are unscrewed that secure the cover. Then the cover is removed, and the float is removed from it, which is held with a pin.
The pin should be carefully knocked out of the hole with a thin carnation and a hammer.
Then we assemble the carburetor and install in the reverse order of removal.
Tightening the carburetor bolts that hold the top cover must be done evenly and crosswise to prevent distortion and possible air leakage into the carburetor mixing chamber in this case.
When assembling
It is not necessary to look for any gaskets for the construction of moonshine if the device is bought in a store. Everything you need is included in the kit. , it is necessary not to damage the silicone by excessive tightening of the threaded connections. It is elastic and flattens under the action of metal. For moonshine home-made structures, it is not difficult to choose a sealed ring or ring of the desired diameter and thickness. You can use both liquid silicone and commercially available seals made from it.
Tightness during the distillation of mash is an integral part of high-quality strong alcohol obtained at home.
The fact is that part of the alcohol vapor can escape through loose connections, which is why the gasket for the moonshine still made of good material is so important.
The most famous for distillers - silicone and rubber
. In modern purchased devices, wherever there is contact with alcohol vapors, silicone is used. But at home, this is not always an unambiguous choice, since they often use it as a distillation cube, in which there is initially a rubber gasket.
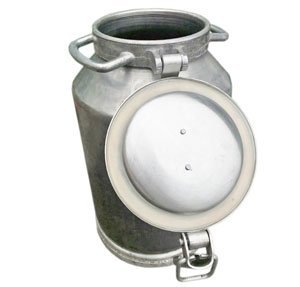
In milk cans, even produced today, under the lid - rubber
. It reliably seals the contents of the flask, but has a significant drawback - corrosive smell
. Moreover, if for a cold product (the same milk) this is not of decisive importance and is practically not transmitted to the product, then when heated, the smell of rubber intensifies.
First you need to draw a future part (for example, by attaching an existing one from another material) on paper. Then put the film on top and fill the desired part of the pattern with silicone.

Cover with another piece of film, put a flat board on top so that the gasket is of the same thickness. Leave it like that for a day. Remove the board and paper, check the degree of polymerization by pressing with your finger.
From time to time, you can dry it with a hairdryer, not bringing the nozzle of the device much closer to the silicone. Trim the completely dried part with scissors.
Important.
Boil the pad before putting it in to completely get rid of the smell. After that, it can be used for its intended purpose.
Milk flask lining
Everything is simple here. After removing the existing rubber sealing ring, fill the recess in the lid with silicone to about a third of the depth at which the previous gasket sat. Make sure the lid is level!
Leave it like that for a day. Feel how the silicone "grabbed". If only the upper part has dried up, and “jelly-like” is felt inside, leave for another day, or even two. Fill with silicone repeat three times. Close the flask with a gasketed lid, making sure the connection is tight and airtight.
In case of insufficient thickness - either add silicone and dry again, or use a substrate under the can clamp. So the cover will sit deeper and the silicone will tighten all the cracks.
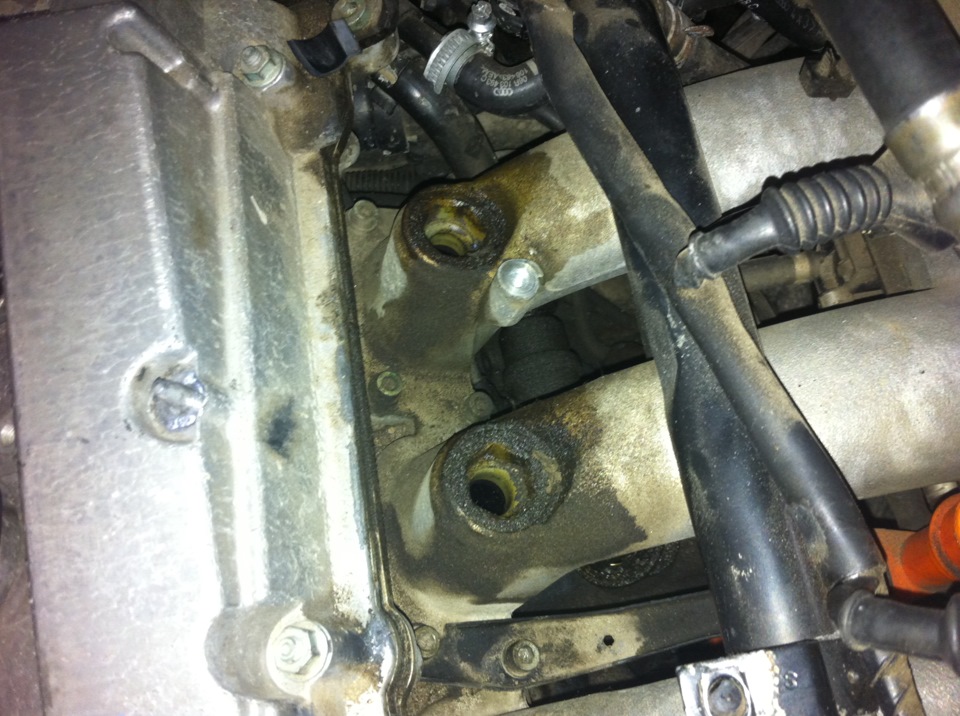
Replacing the sealing ring on the injectors
O-rings for injectors are one of the most important components in a vehicle's injection system. These rubber products are necessary to create a very reliable tight connection between the nozzle itself and the fuel line. The presence of sealing rings on the injectors avoids possible leakage of fuel, drops of which, if they enter the manifold, can lead to ignition. In addition, this rubber product, due to its unique technical characteristics, perfectly prevents dust, dirt, moisture or air particles from entering the injection system.
However, even high-quality seals, under the constant influence of extremely high or very low temperatures, sooner or later begin to lose their elasticity. In addition, due to prolonged aggressive operation, small cracks may appear on the surface, which can lead to loss of tightness. Such wear will entail the ingress of gases or air into the oil, after which coke masses are formed, which simply fill the oil receiver. And in the event that drops of oil can seep through the seal and fall on a hot collector, then it is likely to ignite.
To avoid such troubles, timely replacement of the nozzle sealing ring is necessary. It will be possible to determine the malfunction of the sealing element by some characteristic features. Firstly, fuel smudges immediately appear on the injectors. Secondly, when the motor is running at low speeds, it operates with the least power, which can be immediately felt.Thirdly, the exhaust gases from the car are emitted in larger quantities, and the smoke is white and has a rather pungent odor. In addition, when the engine is started, the smell of gasoline seeps into the interior of the car.
Replacing the o-ring on injectors is usually done when you need to temporarily remove the injectors for flushing and testing, or need to replace them with new ones. However, if the first signs of a malfunction of these seals are detected, it is necessary to replace them in the near future.
Please note that during operation, you will need to thoroughly clean the seat itself, since the installed copper washers may stick in it. Be sure to lay out all necessary tools, lubricants and new O-rings before replacing.
Please note that the replacement of the sealing ring on the injectors will necessarily have to occur only when the pressure in the vehicle's fuel system is completely relieved. In addition, the initial stages of replacement on different brands of cars, and in some cases on different models of the same brands, may have certain differences.
This is due to the unique design features of each brand. Therefore, we do not guarantee 100% compliance with the method specified here. To learn how to change the sealing rings in your particular case, the instruction manual will help.
How to replace injector o-rings?
Initially, we will need to de-energize the fuel rail. To do this, you need to alternately remove both battery terminals - both negative and positive.
Now, in order to gain full access to the nozzle with a damaged seal, we should disconnect all pipes and hoses connected to the fuel rail from the fuel rail.
Then, using a hexagon or another wrench suitable for the configuration of your bolts, the fasteners are unscrewed and the fuel frame is removed immediately along with all the injectors.
Finally, all the nozzles in it are carefully removed one by one from the frame.
The old O-rings of the injectors are dismantled manually by ordinary tightening. If worn products have lost their elasticity and do not lend themselves, then you can try to either pry them with a flat screwdriver or cut them with a knife.
After removing the old rings, new ones are installed in their place.
It is important not to forget to treat them for lubrication with any engine oil.
The disassembled structure is assembled and installed in the reverse order. In this case, distortions must be avoided when mounting the ramp.
The last step is to check the system performance.
Please note that the installed nozzles must be able to rotate freely in all directions.
Source s-agroservis.ru
Symptoms that indicate the need for seal diagnostics
During operation, cracks of various sizes may appear on the nozzle sealing ring. The ring loses elasticity. Appearance and shape change, deformations appear.
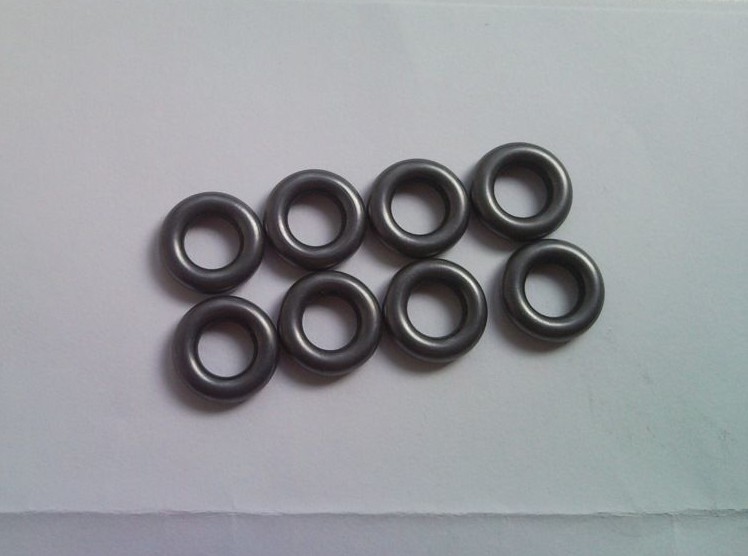
 Appearance of old and new O-rings
Visual inspection may reveal fuel leaks. Depending on the size of the damage, it can be a drop, a speck, a trickle. The problem with loss of tightness can lead to serious consequences. If fuel gets on a hot surface, it can ignite and, as a result, a fire in the engine compartment of the car, so it is not recommended to hesitate to replace the gum.
 Gasoline seepage
Also, a symptom of damage to the seals is the operation of the engine on a lean mixture. This situation arises due to air leakage through the formed damage to the ring. Often this is due to loss of elasticity as a result of prolonged exposure to temperature, especially after the engine has overheated.
 Old rubber nozzles, some of which were torn in half
In diesel engines, the escaping gases enter the oil.This causes the oil to coke. The oil receiver starts to clog. The first time after starting the engine, you can detect white smoke from the exhaust pipe, which has a pungent odor. In the most advanced cases, a periodic flashing of the lamp is observed, indicating deviations from the norm of oil pressure.
Homemade reusable pads
Recently, reusable menstrual pads have begun to gain popularity. Such products have a lot of advantages, which can be discussed in a separate article. Here I would like to talk directly about the manufacturing process of this hygiene product. In principle, it includes the following steps: find (make) a pattern, select materials, sew. You can determine the sizes yourself, because every woman knows which pads she most often uses every month.
Product structure
The structure of such a gasket is not much different from the usual one:
Upper layer
Materials for it are selected based on personal preferences: natural (cotton, terry, jersey, plush, velveteen) or synthetic (fleece) fabrics.
absorbent layer
Here you need to choose a good absorbent. The thickness of the finished product will depend on the material chosen. Several options are possible:
- cotton fabric (flanel, terry, fleece, sherpa) is a popular and affordable material, but not the best absorbent properties;
- hemp fabric is a durable material with better absorbent characteristics, but can become stiff over time;
- bamboo fabric - absorbs even better, softer than hemp and cotton fabric, but less durable;
- microfiber - able to absorb a large amount of moisture, but can cause discomfort during prolonged wear due to the sponge effect (when pressed, moisture will be released back).
There are often pads on the market with a bamboo layer combined with cotton for increased strength.
waterproof layer
This is an optional part of a reusable pad, making it a little less breathable, but more protective.
For its manufacture, you can use aul fabric, Gore-Tex or Oxford. By the way, the first two types of fabric allow a little air to pass through, so in this case it is preferable.
bottom layer
This is the part of the product that can also function as a waterproof layer.
Product assembly
- Prepare the inner layer. Fold the material several times and sew along the edges.
- Join the inner layer to the bottom, leaving one side open.
- The homemade gasket is turned inside out, and only then the remaining side is sewn up.
- You can attach a button, sew on ribbons, ropes.
Recommendations
The material used must be selected so that it is not highly slippery. In such a hygienic product there is no adhesive base, it is this layer that ensures the fixation of the pad on the linen. You can use chintz, flannel, pool fabric, corduroy, synthetic fleece, or other non-slip fabrics.
The selected materials are sewn according to the selected pattern. Buttons can be sewn or nailed to the wings. Thus, the pad will be attached to the underwear. You can use the resulting hygiene product for several years, it all depends on the degree of tissue wear. As for caring for them, it is limited to regular washing.
Making pads at home, as you can see, is quite realistic. This practice can save you money and even health, because disposable products are not suitable for individual women due to the use of synthetic materials in the production that cause irritation and allergies.
About silicone

Silicone gaskets
Shops today sell special silicone parts for home brewing. For all devices and different sizes. If you are looking for a gasket to connect the coil and the wall, then it is also better to choose silicone. And for the distillation apparatus, it is the best material. It is environmentally safe.You can immediately buy a set of gaskets for moonshine production at home.
All silicone gaskets are chemically inert and durable. The connection of the fitting and must also be tight. It is better to wind one turn of FUM tape on the thread before tightening. This will ensure tightness. And the gasket for connecting the lid to can be installed not one at once, but two, if they are thin. All distillery gaskets made from silicone are guaranteed to deliver. If the gasket for the lid of the distillation vessel is rubber, then this material hardens and cracks over time from heating. Tires don't last long. Immediately replacing 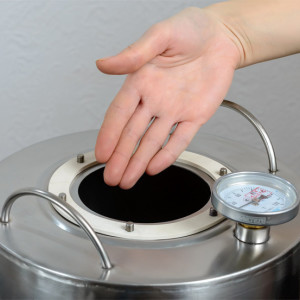 rubber on silicone, you can remove the imminent future worries about finding the next gasket.
Types of O-rings for injectors
Inlet or top o-rings are present on both petrol and diesel injectors. They serve to eliminate air leakage and fuel leakage at the point of connection of the nozzle to the fuel line. Most often they are made of rubber, because:
- there are no large mechanical loads;
- the temperature effect is small, due to the distance to the hot engine;
- rubber is characterized by high elasticity;
- slow loss of properties under the influence of an aggressive environment.
 Rubber inlet seals
The lower seal works in more severe conditions, so the following options are possible:
- metal ring;
- alloy seal;
- rubber, made of a special composition, able to withstand thermal and mechanical stress.
To increase reliability, it is possible to use a metal and elastic seal at the same time. In this case, the lower ring is made of a resistant material, for example, copper, and acts as a flame arrester. The upper ring in this case is protected from adverse influences. It is made of rubber, which allows you to ensure the tightness of the system at the proper level.
Varieties and sizes of concrete rings for wells
Industrially manufactured concrete and reinforced concrete rings must meet the standards prescribed in GOST 8020-90. Their dimensions can be taken from the table, as well as the approximate weight and price (indicated with delivery in Moscow).
| Name | Height | Wall thickness | Inner diameter | Weight | Price without lock/with lock |
|---|---|---|---|---|---|
| KS-6 | 7 cm | 12 cm | 58 cm | 60 kg | 390 rub |
| KS-7-1 | 10 cm | 8 cm | 70 cm | 46 kg | 339 rub |
| KS-7-1.5 | 15 cm | 8 cm | 70 cm | 68 kg | 349 rub |
| KS-7-3 | 35 cm | 8 cm | 70 cm | 140 kg | 589 rub |
| KS-7-5 | 50 cm | 8 cm | 70 cm | 230 kg | 800 rub |
| KS-7-6 | 60 cm | 10 cm | 70 cm | 250 kg | 830 rub |
| KS-7-9 | 90 cm | 8 cm | 70 cm | 410 kg | 1230 rub |
| KS-7-10 | 100 cm | 8 cm | 70 cm | 457 kg | 1280 rub |
| KS-10-5 | 50 cm | 8 cm | 100 cm | 320 kg | 1110 rub |
| KS-10-6 | 60 cm | 8 cm | 100 cm | 340 kg | 1130 rub |
| KS-10-9 | 90 cm | 8 cm | 100 cm | 640 kg | 1530 rub / 1700 rub |
| KS-12-10 | 100 cm | 8 cm | 120 cm | 1050 kg | 2120 rub |
| KS-15-6 | 60 cm | 9 cm | 150 cm | 900 kg | 2060 rub |
| KS-15-9 | 90 cm | 9 cm | 150 cm | 1350 kg | 2670 rub |
| KS-20-6 | 60 cm | 10 cm | 200 cm | 1550 kg | 3350 rub |
| KS-20-9 | 90 cm | 10 cm | 200 cm | 2300 kg | 4010 rub |
| KS-25-9 | 90 cm | 12 cm | 250 cm | 2200 kg | 16100 rub |
For the manufacture of products of each type, there must be two parts of the formwork - external and internal. The distance between them is prescribed in GOST, depends on the size of the ring. For reinforced rings for a well with a diameter of 70 cm or 100 cm, these are 7 cm and 8 cm, respectively; when making rings without laying reinforcement, the wall thickness is much larger - 12 cm and 14 cm.
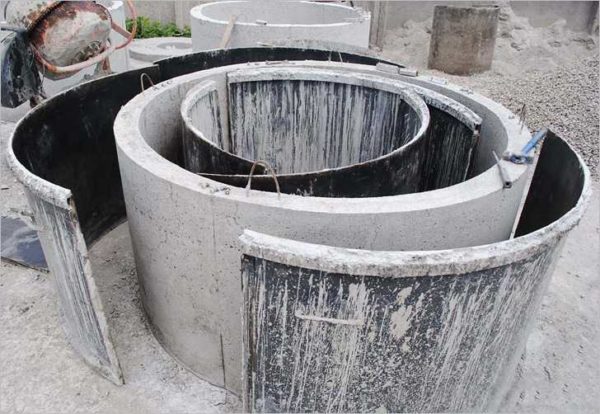
For the manufacture of w rings, special molds are required
In addition to different sizes, there is also a different profile of the end part of the rings - even and with a lock. The lock is a protrusion of the comb-groove type. Such rings are called tongue-and-groove or castle rings.
Placed on top of each other, they adhere well, it is difficult to move them under lateral loads, which is very important when constructing wells for any purpose. The disadvantage of this option is more complex shapes for concrete rings - it is necessary to form the corresponding steps at the ends
Application of silicone gasket
 All joints of the device should be equipped with silicone gaskets. In our time, it’s even somehow ridiculous to coat leaky places with dough.
First, it's inconvenient. Secondly, you will have to make extra efforts to clean it after distillation.
And, thirdly, it is unreliable, because when heated and pressure arises inside the system, the dough can give a “fistula”, through which vapors will begin to escape.
We'll have to urgently stop the distillation, let the wort cool down a bit and grease again.
While a properly selected or manufactured silicone gasket will not give a chance to breakouts. And the taste of the final product will not be affected.
Was the article helpful to you? Like, share on social networks.
Any drop or mechanical impact can lead to cracks. A container that passes water becomes useless. But seal plastic water container
it is quite possible that she will serve well for some time.
It is quite possible to seal a plastic barrel at home. Consider two options for how to fix holes in plastic barrels and other containers.
Option 1
To work, you will need the following materials and tools:
- stainless mesh (you can take aluminum, copper),
- scissors,
- soldering iron 100 watts.
Operating procedure:
Cut off a piece of mesh with scissors.
We fix the mesh at the site of damage to the depth of the mesh thickness.
Align it along the seam, moving along the entire plane
At the same time, we solder the mesh with a soldering iron in parallel, hold the free edge with a knife, immediately after soldering we cool it with a heat exchanger (knife) - this is an important rule so that the mesh does not bulge.
We introduce the entire mesh into the seam using this method.
At the end of the work, the seam is completely sealed and reinforced, which gives it strength.
We repeat the procedure on the back side of the container.. VIDEO INSTRUCTION Option 2
VIDEO INSTRUCTIONOption 2
If you have to repair a container with water under pressure, you can resort to another method.
For work you will need:
- flexible plastic patch
- building hair dryer,
- protective gloves.
Operating procedure:
We wipe the area with damage, remove dirt.
We begin to heat with a hairdryer at low power so as not to burn a hole, a place with a defect.
We heat the patch with a hair dryer from the side that will be adjacent to the crack. We heat already at a higher power.
We apply a patch to the place of damage and continue to warm up with a hair dryer, adding more power. Wear protective gloves on your hands to avoid burns.
It is important not to overheat the surface.
We smooth the patch with our fingers and wait for it to cool. We pour water and check the quality of work.
Exhaust system repair
Any work related to the repair of this car system will require you to install the car on a flyover, since the entire network of pipes runs along the bottom. If it is necessary to remove the entire system or part of it, a number of measures should be taken:
- Unscrew the bolts that tighten the clamp. Usually they are covered with rust, so it is very difficult to unscrew them. Usually, they are simply cut off with a grinder, changing to completely new ones during each repair.
- Next, the graphite o-ring is removed. If it shows signs of damage, then it should also be replaced, below we will describe how to do this.
- After that, the muffler is carefully removed from the suspensions, they are special rubber bands, which it is also desirable to replace with new ones during the repair.
- Next, a new muffler is mounted, it is attached to rubber bands.
- At the joints of the nozzles, a graphite o-ring must be installed.
- Next, the clamp returns to its place, which must be tightly tightened with bolts.
According to a similar scheme, it is also possible to repair the resonator or replace it together with the muffler
It is important to remember that small fastening devices that have been subject to wear are also desirable to replace, they are inexpensive and will keep your car out of trouble for such small reasons.