How to install a cast iron bath on bricks
There is another way to mount the bath - on a brick base. Some of the experts argue that this installation method is the most reliable and durable. But compared to the previous one, this method is more laborious and time consuming. To perform it, it is not necessary to be a professional builder, this work is within the power of any person who has an idea of \u200b\u200bwhat should be the result.

Necessary materials:
- bricks - up to 20 pieces;
- cement mortar;
- waterproof tile adhesive;
- trowel, spatula, hydraulic (or liquid) level;
- solution container.
- Calculate the number of bricks needed for your future supports. The masonry should be several bricks high, with a distance between supports of about 50 cm. If you install a standard bath (150 cm), then 2 supports will be enough for it. The width of the support is determined by the width of your bathtub bottom. Calculate the height of the supports so that after installing the bath, its upper edge is no higher than 70 cm. One support, located in the direction of the drain hole, should be at the level of 17 cm, and the second - at the level of 19 cm (calculations are given for a standard bath). If in the future you plan to install a decorative screen and have already purchased it, consider its height to determine the level of masonry.
- Now take the prepared container and knead in it a solution consisting of cement and sand in proportions of 1: 4.
- Start laying supports. For reliable support of the bath, lay half the bricks along the edges of each masonry. Thus, you will form a recess in the shape of the bottom of the bath.
- Allow the solution to dry, and after two days you can proceed with the actual installation of the bath.
- Place the tub on the prepared brick supports. Level check the correctness of its installation.
- Attach the siphon and overflow to the drain holes as described above.
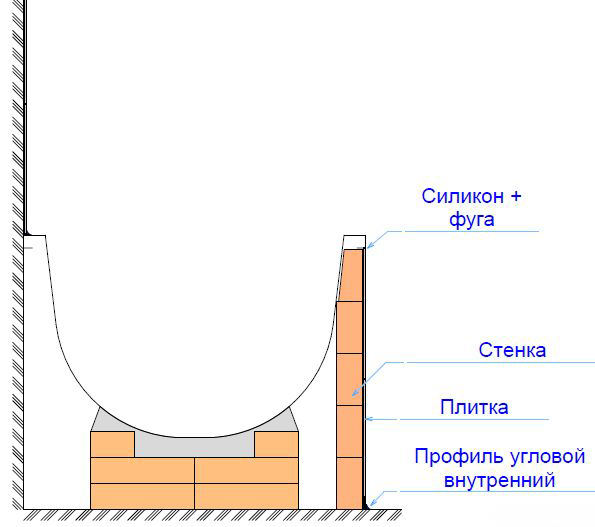
- Using tile adhesive, cover the joint between the wall and the bathroom so that water does not flow there during operation.
- Coat the junctions of the bathtub and supports with mortar to strengthen the strength of your structure.
Grounding and finishing is carried out in the same way as in the previous installation method.
To give your design an aesthetic and finished look, you can install a decorative screen, through which you can close the free space under the bathroom.
As you can see, installing a cast iron bath is a rather laborious process. But the results of your labors will serve you for decades.
Cast iron bath installation
We recommend mounting in the following order:
- Bring the disassembled bath into the prepared room;
- Make sure that the floors in the room are absolutely flat, otherwise you will have difficulty adjusting the stability of your bathing vessel;
- Strengthen your legs.
It is better to do this already in the room itself, since it is impossible to bring a cast-iron bath with legs fixed on it into the bathroom of a modern apartment. There are several varieties of bath legs, they can all be divided into those that can be adjusted and non-adjustable:
- if you have a set of non-adjustable legs, then in order to install the vessel at the desired height, you can simply file them;
- in the event that the product is provided with a set of legs with a support-screw adjustment system, then it will not be difficult to install it to the required height.
For the convenience of installing a set of legs on the bathtub, turn it upside down. If it was purchased with a set of legs, there should also be brackets for mounting. First install the brackets themselves on the vessel, and then attach the legs to them using the fixing bolts.
Important: when purchasing a cast iron product, pay attention to whether there are brackets in the set of legs, whether they are all intact. Without brackets, you will not be able to strengthen the legs on the bath
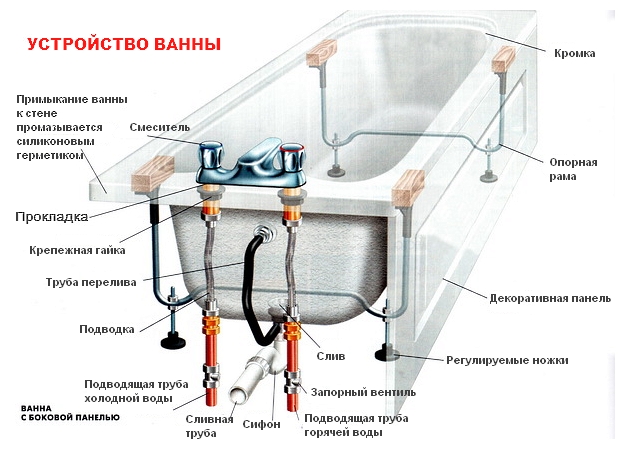
Install a drain siphon and a water overflow device. A siphon with an overflow device can be included in the general kit, or purchased separately. A siphon for draining water is fixed in the lower hole of the bath, then from the outside it is connected to an overflow device, which is fixed in the upper drain hole of the cast iron product. Be sure to use silicone gaskets when attaching to seal the joints.
Install the assembled bathtub in place:
check the horizontal position of the installation on the upper sides using the building level. Cast iron bathtubs are shaped so that, if properly installed, the bottom slopes slightly towards the drain. If during installation the horizontal position is not observed, then you will have to additionally adjust it with the help of legs. In this case, the distance between the bottom of the bath and the floor should not be less than 14.5 cm;
make sure that the edge of the bath does not recede from the wall by more than 0.2 cm
This is important to ensure the tightness of the connections and prevent water leakage during the adoption of water procedures;
if the distance between the bathroom and the wall is minimal, then the gap is easily sealed with silicone glue;
with a larger gap, it can be closed with a special waterproof plastic tape.
To prevent possible damage to the enamel when installing the bath, cover it with a thick plastic film.
Connect the drain siphon to the sewer system. When repairing the premises, you have already taken care of removing the sewer pipe to the place necessary for installation. When connecting the siphon system and water overflow to the sewer pipe, use the supplied connecting rings and silicone gaskets. Make sure that the siphon occupies a position above the sewer outlet.
Important: first put a silicone cuff on the sewer outlet to ensure the waterproofing of the connection. Install a protective screen
You can buy it ready-made or make your own. In order to correctly calculate the height of the screen, you should take into account the height from the floor of the bathtub installed on the legs. Standard sizes of finished screens - from 55 to 60 cm
Install a protective screen. You can buy it ready-made or make your own. In order to correctly calculate the height of the screen, you should take into account the height from the floor of the bathtub installed on the legs. Standard sizes of finished screens are from 55 to 60 cm.
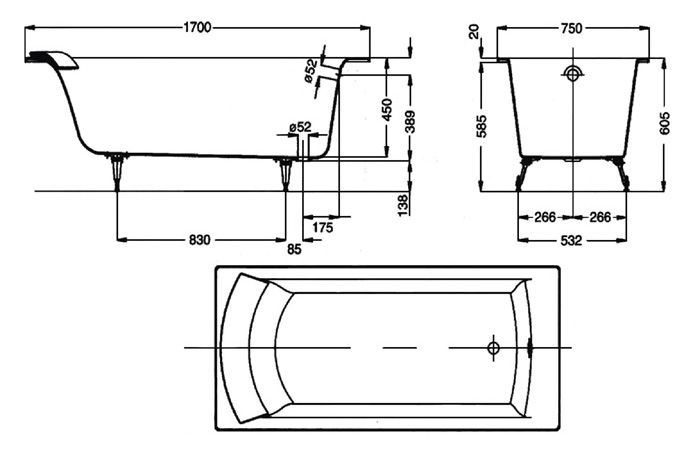
Cast Iron Bath Installation Dimensions
The next point I want to talk about - I want to draw your attention to is ....
If you have a bathtub 75 cm wide, then an important dimension is to set the mixer in the center of the bathtub, so that the jet of the open mixer hits exactly the drain hole of the bathtub itself. That is, we measure 75 cm from the wall in half (37.5 cm) and set our mixer. The next dimension is the installation height of the faucet. In this case, the height of the mixer is set to the height of the sink - it is 85-90 cm. If no additional instructions and wishes have been received from the customer, then we set it to this height. The next dimension is the height of the tub itself. The height of the bathroom is a constantly changing issue and it depends on how high the sewer riser is, the sewer drain. In this case, the riser is high enough
Please note - in this case we have a 110 cm sewer pipe at the outlet

Further, after 110 pipes there is a 50 mm pipe, and it turns out that by providing a natural drain at a slope of 2-3 degrees, we get to the top of the drain 13 cm.
And it turns out that if we have 13 cm along the upper flange 50 of the pipe at the inlet from the bath overflow drain, then on average we need to add 5 cm, this will be the lower part of the most installed cast-iron bath.
That is, we must lay at such a height - 13 cm + 5 cm. Well, plus the depth of the bath is also different and 50, and 54, and 55 cm. In this case, we have Soviet conditions, and we provide natural flow from the sewer riser. In this case, the height of the side of the bathtub, the bathtub stands at a height of almost 65 cm.
But there's nothing else to think of here.
Cast Iron Bathtub Overflow Drain Installation.
Once again I will show you these dimensions clearly. 13 cm + 5 cm is the bottom of your bathtub. If your flange is low, then we add 10 cm.

The height of the installation of a cast-iron bath, taking into account the provision of a natural drain into the sewer riser, is a rather tricky question. However, I hope you understand and understand what I was talking about.
Please do your work efficiently, quickly and without rework. So that the customer is always satisfied and happy with you, taking a bath for many years of his life.
Leave an Application for the repair of a turnkey bathroom from Oleg Ivanovich is also EASY.
| Was the article Installing a Cast Iron Bathtub - Important Dimensions helpful? Please rate - | Leave a Question, Comment ... Thank you :))) |
Bath feature
Bathtubs made of cast iron, as before, are very popular. The advantages of such baths in comparison with acrylic products are beyond doubt. After all, a cast-iron bath has high strength, wear resistance, durability, and most importantly, a high heat capacity. It is these bathtubs that retain heat for the longest time and are less susceptible to various damages and scratches. And the price of a cast-iron bath is not particularly different from its competitors. The main disadvantage of such a bath is its large weight, but with proper installation this is not essential. You can save a lot of money by doing the installation of the bath with your own hands, without resorting to the services of professional craftsmen.
If you are doing general repairs in the bathroom, then the installation of the bathtub must be done immediately after the completion of the rough repair work. Fine finishing is carried out after the installation of the bathroom. It is also better to do wall tiling after installing the bathroom, which will allow for high-quality waterproofing and minimize the distance between the wall and the bathroom.
When installing a bathtub, it is important to consider the nature of the flooring. If you plan to lay floor tiles in the bathroom, we recommend that you install the bath directly on the screed, and then lay the tiles
It is undesirable to put a bathtub on a tile, as it can push through it with its weight. If instead of tiles you use porcelain stoneware as a floor covering, in this case, you can not be afraid to put the bath directly on the floor. If the floor covering on which the bath is placed is soft (for example, linoleum or wood), then a metal plate with a thickness of at least 5 mm and a diameter of 50 mm must be placed under each support. This will help prevent subsidence of the floor.
Do-it-yourself cast-iron bath installation
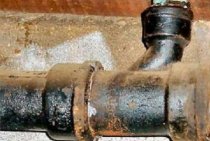
The process of dismantling the cast iron bath begins with the dismantling of the siphon located under the bath. It should be noted that during the period of operation of the device, this part sticks strongly, and there is no way to simply unscrew it. This is where we need a hacksaw. Carefully cut down the brass drain grate
If the gap is too small and the hacksaw blade does not pass, then a hammer and a chisel are used: they carefully knock out the knot
It was the turn to get rid of the overflow and the outlet pipe connected to the sewer. The socket is plugged with a cork or rags, only after that the grounding, fixed on the bottom of the device, is removed. The gap between the wall and the bathroom is usually sealed with a mortar or sealant. We get rid of it and proceed to the dismantling of the supports. We remove the bath from the place. It remains only to take out the resulting garbage and the old bath.
The installation of a cast iron bath is carried out only when the bathroom is repaired - the floor tiles are laid and the walls are lined. Each step in the installation of a cast-iron object looks like this:
Siphon installation.
Installing and fixing the overflow, attaching it to the overflow pipe.
Installation of supports under the bath and their reliable fixation.
Connection of a branch outlet to a siphon.
Installation of a cast-iron bathtub on ready-made legs.
Leveling the bathtub with a level.
Fixing the outlet outlet in the sewer pipe.
Grounding deviceif there is a need for such an operation.
The device for waterproofing the gaps between the wall and the bathroom.
In any case, the installation of a cast-iron bathtub is a very laborious enterprise and requires safety net. Therefore, it is better to install it together.
How to insulate the floor in a wooden house?
Instead of a pleasant coolness, does the floor give off a sepulchral cold? This means only one thing - it's time to warm up! If you live in a private house, then the solution to this issue is more than relevant, because. a significant part of the heat escapes through the ceilings of the first floor. As part of this review, we will give recommendations regarding the selection and installation of thermal insulation
Bath and sauna interior design
How to make a bath procedure really cool? For this, three conditions are important: a good company, a serviceable heater and a really cozy interior of the bath. In this article, we will not be able to help you with advice on the first two conditions, but we will tell you about the basic rules for designing a steam room, washing room and rest room
Enjoy Your Bath!
Design of a gazebo in a suburban area
Pavilions have long ceased to be exclusively a place to relax, rightfully being a real decoration of a suburban area. We invite you to evaluate the implemented options for such structures and draw valuable ideas for your own project. Choose something of your own among the design solutions presented in the article!
Do-it-yourself cast-iron bath installation
Before properly installing a cast-iron bath, waterproof the room so that water spilled on the floor does not cause trouble to the neighbors below.
Installation equipment you will need:
- bath bowl;
- a set of supports and fasteners;
- adjusting bolts;
- level for measuring evenness;
- hammer;
- wrench;
- rubberized gaskets;
- siphon;
- plastic pipe;
- curb tape, ceramic plinth, silicone gel - for sealing the gap.
Important! Many users do not know how to drill a cast iron bath. Professionals advise to punch a hole, and only then drill with a drill for metal
The fact is that cast iron casting can have the smallest air gaps and when drilling, the drill begins to “walk” from side to side. In this case, drilling the cast iron tub is problematic and the hole may end up uneven and larger than desired.
Cast Iron Bath Installation Technology
I repeatedly encounter the fact that the installation of a cast-iron bath, or acrylic, is also done incorrectly. What is the reason for the wrong installation of the bath? Why is it wrong? What's wrong?
The option when, first, behind the bathroom, the place where the cast-iron bath will be installed, tiling is carried out from floor to ceiling, and then, in this place, a bath is installed - does not cause reliability!
Some masters do this to speed up the work. So faster. They first lay the tiles on all the walls, then move the bath to the wall. And, voila, the bath is worth it. But such installation does not provide reliability, does not provide a good joint between the edge of the bath and the tile. In addition, with this installation option, the bath can “play”, stagger and move during operation. Therefore, it is not necessary to do so. This is not the way to set up a bathtub.
And how to do it right?
Now let's show... Video 360.
https://youtube.com/watch?v=0RJsv5oDtdM%3F
In this case, the dimensions of our bath are 170 by 75 cm. In order to put it well, we had to make strobes, because here the width of the room is 168 cm. That is, 2 cm is not less than the bath itself. Our bath is 1 m 70 cm long. So we made strobes, slipped the bath into the strobes on both sides and installed it on mounting foam.
Mounting Foam in Cast Iron Bath Installation
Please note that the mounting foam just clamps the bath from all sides and does not allow it to move. After the mounting foam sets, we cut it off and cover this part with tiles. That is, it turns out that in addition to the foam, the bathtub is also clamped on three sides with tiles. And due to this, there is no backlash and the possibility of her moving during operation. Thus, the bath is capitally and reliably
That is, it turns out that in addition to the foam, the bathtub is also clamped on three sides with tiles. And due to this, there is no backlash and the possibility of her moving during operation. Thus, the bath is solid and reliable.
Of course, all this is done in addition to installing on legs. Legs are a must. With the help of legs and a level, we set the bathtub according to the level. After the bath is carefully leveled, we perform the operation described above. Namely, we glue the bath into the walls. We make a single linked structure with the walls. This operation is required!
The bath should not be moved to the wall, but mounted, glued into the walls, regardless of whether it is a cast-iron or acrylic bath.
Leak test and preparation for operation
Even professionals check the reliability of all connections before completing work:
- close the bottom drain; fill the water to the brim. Check whether the tightness of the waterproofing between the edges of the vessel and the walls is observed;
- when pouring water through the top overflow hole, check that it is securely connected to the siphon and that there is no leakage;
- open the drain and check if water is leaking at the junctions of the exhaust system with the sewer outlet;
- put a sheet of white paper under the siphon - even with a slight leak, it will leave stains from a few drops.
The work can be considered completed if, after testing for waterproofing, you do not find any signs of leakage at the joints. So, having useful knowledge, you can easily cope with such a task as installing a cast-iron bath with your own hands. It remains only to clean it from the contaminants that arose during the installation. Do it right away before the stains get old. For these purposes, there are many special detergents. Enamelled cast iron vessels can be washed and cleaned with most of them, except those containing abrasives or acid concentrates. It is also not recommended to clean them with hard cutting and scratching objects - for example, a knife or a metal brush.
Basic requirements for choosing a bath
Most preference is given to cast iron bathing vessels, because they have a longer service life compared to other products. In addition, heavy cast iron tubs are much more stable than their lighter counterparts made of steel and plastic, and retain heat well.
If you decide to replace your old bathtub with a new cast iron one, you should carefully consider your choice:
pay attention to the quality of cast iron, choose a product without "shells" and cracks;
inspect the bathtub from all sides: the outer, cast-iron surface should be even, and the enamel coating layer inside the bathtub should be thick enough and glossy-smooth;
the thickness of the enamel coating is characterized by the even color of the enamel and the thickness of the layer at the end of the enamel layer along the outer edges of the product;
the sides and corners themselves should have a flat, slightly rounded surface.
Important: the comfort and duration of its use will depend on how high-quality the product you choose.
Finishing the walls of the bathroom before installation
Facing work of wall panels before installing a cast-iron bath deserves special attention due to the mass of the cuvette and the difficulty of moving the latter. Finishing can be done in the following ways:
- The usual laying of tiles throughout the area. Finishing is done before the installation of the font. This option is suitable in the case when a major renovation of the premises is being carried out.
- Facing the wall above the bath is an option that allows you to "drown" the edges of the bowl into the wall, reducing the gap between the side of the font and the wall panel, where water will no longer flow. Finishing is done only after the correct installation of the cast-iron bath has been completed. Finishing should be done by covering the bowl with a film to protect it from tile adhesive.
Advice! The disadvantage of the second finishing option is that it is difficult to find a tile in the color of the old one with a partial replacement of the cladding and the overall style of the room may be violated.
Installing a cast iron bath
It's no secret that the best way to wash yourself is to take a bath. No shower stall compares to the pleasure and comfort of immersing yourself in hot water. But the bath tub - strife.
For the correct installation of a cast-iron bath, it is necessary to correctly measure its dimensions and the dimensions of the room where it will be installed.
And the durability of a cast-iron font has been proven by time, because in many old houses people still use cast-iron bathtubs, which were installed back in Soviet times.
If your old cast-iron bath has broken, deteriorated, or you simply don’t have it, and you want to put a cast-iron bath instead of a shower or some other bath, then you need to know how to install it yourself correctly. The main problem when installing this device with your own hands is that cast iron products have a rather large mass - about 100 kg or more, so all work (transportation and installation of this hygiene item) must be done together. 2 people will just be able to lift and move the cast-iron bath (this is practically impossible to do alone, in any case, it’s not worth the risk), and 3 will only interfere with each other when transporting the product.
Scheme of attaching the bath to the wall and connecting additional communications.
In the absence of a freight elevator, a cast-iron bath should be raised to the required floor with drain holes in the direction opposite to the direction of movement. The object is brought into the bathroom vertically, which is necessary for the convenience of location in the room, since the bathtub located in this way takes up less space in a small room, giving more room for movers to act. At the same time, it is necessary to cover the threshold and the door jamb with dense soft material to prevent damage to the new bathtub.
The bathroom room must meet the requirements for the installation of such a heavy object. The main task is to properly prepare the floor covering. It must be covered with a concrete screed, on top of which hard ceramic tiles are laid. If the floor is not hard enough, and it cannot be changed (for example, in order not to disturb the general style of the room), then steel plates at least 5 cm wide and at least 0.5 cm thick are placed under the legs of the bathtub.
Wall decoration should also be taken carefully due to the large weight of the object and the difficulty of moving it. Wall tiling is done in 2 ways:
- Wall tiling completely implies the usual laying of tiles over the entire area of \u200b\u200bthe wall. Thus, the room should be finished before installing the cast-iron bath. This method is good in the case when you have to change the old bath, as the whole room will be finished.
- Finishing just above the bathtub allows, as it were, to sink the edges of the bathtub into the wall, thereby reducing the gap between the sides of the product and the wall, reducing the amount of water flowing to the floor. This finishing is done only after the installation of the bath, in order to fit the edge of the bath and the border of the tile laying as close as possible. When the bath is installed, proceed to the finish, having previously covered the bath with a film fixed with mounting tape to protect it from tile adhesive. The disadvantage of this method of laying tiles is that with the general style of the room it will be violated, or you will have to adjust the new acquisition to the already laid tiles, installing the bath in the old place.
The room must be properly waterproofed so that water spilling onto the floor does not cause trouble to the neighbors below, and therefore to you.
Installation sequence
Do-it-yourself installation of a cast-iron bath is carried out after leveling and finishing the floor surface, but before laying ceramic tiles on the walls. By installing in this sequence, you can achieve a minimum gap between the wash tank and the wall, so that moisture does not penetrate there.
Install a cast iron bath in the following sequence:
- In order to properly install the washing tank in the bathroom, it is necessary to turn off the water supply in the apartment, and then drain the remaining water from the pipes by opening the taps.
- The bath, installed vertically in the room, is carefully turned, and then laid on its side with the bottom against the wall, at a distance of 70 cm from it.
- 2 pairs of legs supplied by the manufacturer are attached to the bottom of the bathtub. Fastening is done with wedges or screws. Fasteners are fixed tightly, but without excessive force, so as not to strip the threads.
- Without turning the bath over, connect the siphon with overflow. According to building codes, the siphon should be connected 2-3 cm above the sewer pipe. To avoid leaks, the connections are made using rubber seals.
Experienced craftsmen say that due to the significant weight of cast iron baths, they can only be installed on floors finished with hard materials. To reduce the load on the floor finish, you can put a metal plate made of steel with a thickness of 0.5 mm or more under the knives.
Step by step installation of a cast iron bath
Wall covering
It is desirable to finish the walls of the bathroom with tiles. This can be done in whole or in part. In the first case (before the product is installed), the repair of the premises will create the effect of completeness. The second option makes it easier to get to it in the event of a leak.
Accommodation
Before installing the bath, first you need to bring the cast-iron bath into the room and lay it on its side in the place where it is supposed to be installed. In the case of a small room, the bath must be brought vertically. In this case, the threshold and the floor should be protected with a thick soft material.
Installing a siphon in a bathroom
The drain hole for the siphon must be protected with rubber rings at the top and bottom. Through them, a floor-type hydraulic siphon is connected to the bath. After that, the overflow is fixed and joins the overflow pipe.
Adjusting the bathroom feet
Installation of cast iron bath supports begins with two legs. The wedges are driven in a series of stages. It is necessary to perform light tapping in three directions on the ends of the supports, from the center of the tub to the edges. Supports fixed with a coupling bolt are installed without tapping. Before fixing the supports, it is recommended to install the adjusting screws on them.
The outlet to the sewer pipe is connected to the siphon
Then you should turn the bath upside down and raise it onto two ready-made supports. The other side is mounted on a reliable support. Then the remaining legs of the bath are installed, the support is removed and alignment is performed.
Bath leveling
In the event that the cast-iron bath has supports that require adjustment, its alignment is carried out with adjusting screws. Then they are tightened with fixing nuts. The alignment of the bath should be carried out from one side of the bath and from one end of it. In order to carry out the work correctly, you must use the building level.
When the adjustment work is completed, the bath should practically be located at its installation site. There will be only a gap from the walls (about 1 mm). After the final adjustment, any displacement of the product can only be carried out by carefully tapping those supports that are located closest to the points of movement. Installing a bathtub on a slippery surface involves fixing its supports with a polymeric waterproof adhesive.
Connecting the bathroom to the sewer
A sealing rubber ring should be put on the outlet of the sewer pipe. It will serve as a waterproofing and fix this pipe outlet in the sewer socket.
Bath grounding
An important point to pay attention to after installing a cast-iron bathtub with your own hands is its grounding of the bathtub. This applies, of course, to those baths that are connected to a steel pipeline.
This work should be done by an electrician, as their responsibility is incredibly high.