Is assembly required
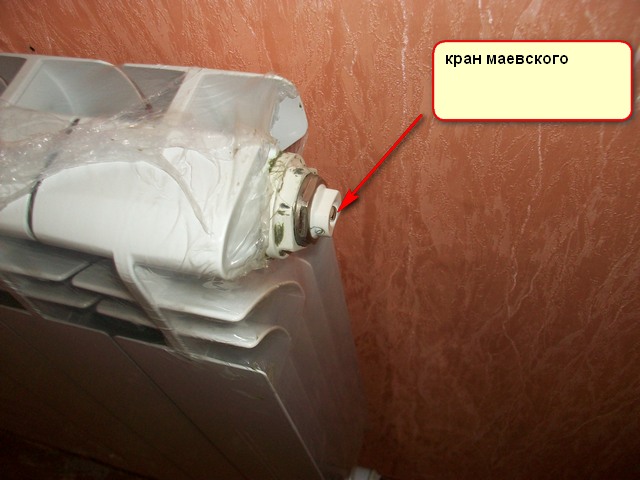
If the radiators are supplied assembled, it is enough to install the plugs and the Mayevsky crane. Most models have four holes located at the four corners of the case. They are used to connect heating lines. In this case, any scheme can be implemented.

Before the installation of the system begins, it is necessary to close the extra holes using special plugs or air vent valves. Batteries are supplied with adapters that must be screwed into the manifolds of the product. Various communications should be connected to these adapters in the future.
prefabricated models
The assembly of batteries should begin with laying the entire product or its sections on a flat surface. Best on the floor. Before this stage, it is worth deciding how many sections will be installed. There are rules that allow you to determine the optimal amount.
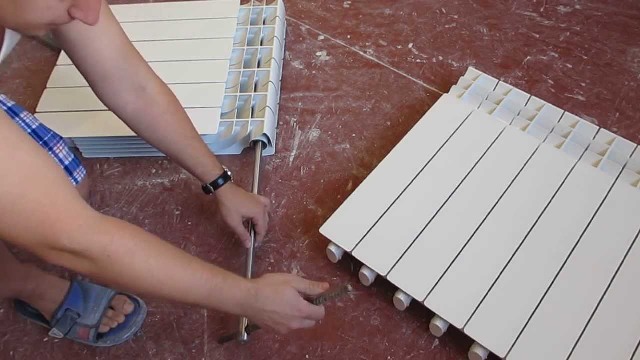
The sections are connected using nipples with two external threads: right and left, as well as a turnkey ledge. The nipples should be screwed into two blocks: top and bottom.
When assembling the radiator, be sure to use the gaskets supplied with the product.
It is necessary to ensure that the upper edges of the sections are correctly located - in the same plane. The tolerance is 3 mm.
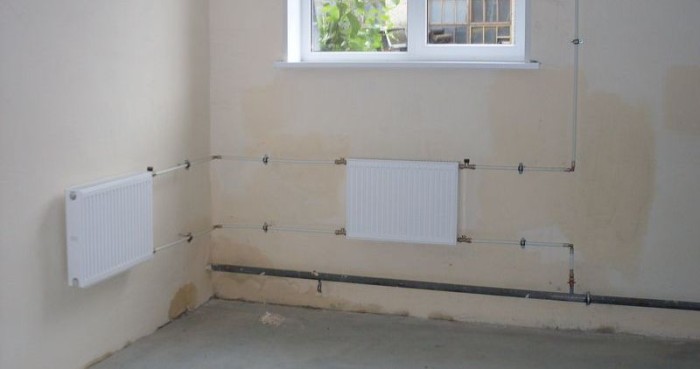
Ways of wiring radiators and their connection diagrams
Methods for distributing heating pipes - Photo
You should start by studying battery wiring methods, and choose the most appropriate of the existing options:
Single pipe or series. It is the simplest in terms of its device, which is a definite plus for people who decide to do such work for the first time and do not really understand how to install a battery.
The coolant is sequentially supplied to all heating devices and returned through the same pipe. It has the following significant disadvantages:
- the final battery with such a scheme most often does not warm up enough;
- there is no possibility of control over the temperature regime of each radiator;
- to repair or replace the battery, you will have to turn off the entire riser.
ADVICE. Install a bypass, which will allow you to turn off only those radiators that are equipped with this device.
Two-pipe. This option is somewhat more complicated than the previous one, but it’s real to deal with it with your own hands, you just need to make every effort and effort.
Here, a parallel connection is used, when the coolant is supplied to each radiator and returned already cooled down through another, called the return.
Among the advantages of this option: the ability to regulate the degree of heating of the battery using thermostats, the room warms up more evenly, and repairs are much easier to perform, since you can turn off any of the devices separately without involving the entire system in the process.
Collector. For apartments, it is not used and, moreover, is the most difficult to implement. Therefore, we will not dwell on it in detail.
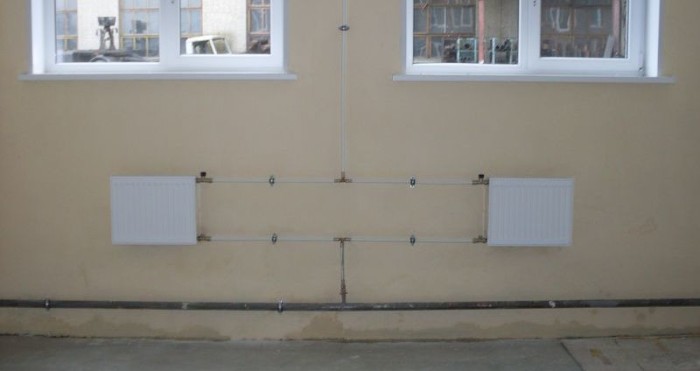
battery connection diagrams in the apartment - Photo
The wiring diagram is just as important. They are selected taking into account the structural features of the apartment, the existing heating system and some other factors. Consider the features of each option:
- The most common type of connection is one-way lateral. It has good heat dissipation, but if multi-section radiators are used in the apartment, then insufficient heating of those sections that are located on the edge is possible. Correcting this shortcoming is not at all difficult - you need to install an extension cord for the water flow.
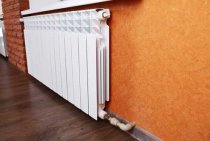
- Lower.This method is advisable if the heating pipes pass under the plinth or are built into the floor. Branch pipes for hot water supply and return are located at the very bottom of the battery and directed vertically downwards, which does not violate the aesthetic perception of the room. However, heat losses can reach very significant values - up to 15%.
- Diagonal. This option is preferred if the radiators have 12 or more sections. Here, the pipe with the hot carrier is connected to the upper branch pipe on one side of the battery, and the return pipe is connected to the lower one located on its reverse side. Heat losses do not exceed 5%. However, this figure will double if the connection points of the return and the main pipe are reversed.
Given the characteristics of your home, as well as your preferences, you can choose the most suitable type of connection. In case of serious doubts, you can seek the advice of professionals.
How will we connect
The scheme for connecting radiators can be different. The level of heat transfer and the comfort of being in the apartment depend on which option will be preferred. Incorrectly selected wiring can reduce the power of the heating system by 50%.
The most widespread is the one-sided side scheme, which has the highest heat transfer rate. In this case, the pipe supplying the coolant is connected to the upper branch pipe, and the outlet pipe to the lower one.
If you do the opposite, the efficiency of space heating will decrease by almost 7%. To connect multi-section radiators, such a scheme is not always justified, since insufficient heating of the last sections is possible. This can be avoided by installing a water flow extension.
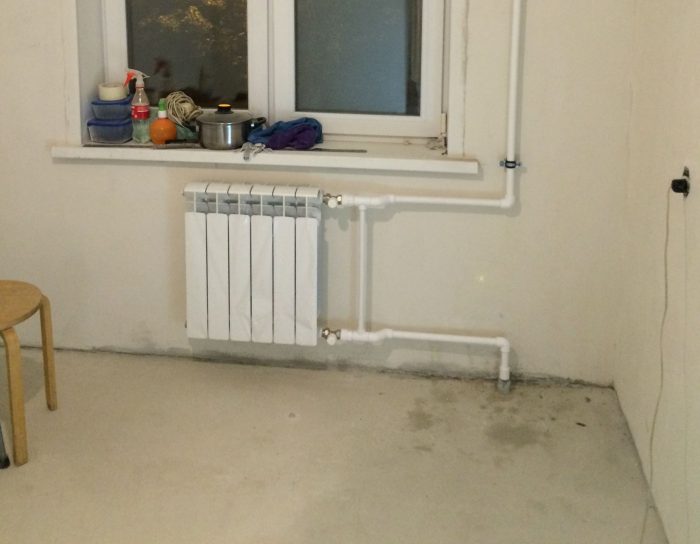
In an apartment with pipes hidden in the floor or passing under the plinth, a bottom connection is used.
This is the most aesthetic option, in which the pipes for supplying and discharging the coolant are located below in the floor, and therefore the lower holes are used for connection.
Diagonal
Installation of batteries with twelve or more sections is carried out in a diagonal pattern.
The coolant is supplied through the upper branch pipe located on one side of the radiator, and is discharged through the lower one on the other side.
Sequential
Such a connection scheme assumes the presence in the heating system of pressure sufficient for the movement of the coolant through the pipes.
In this case, it is worthwhile to provide for a Mayevsky crane, designed to remove excess air.
It is important to remember that the implementation of repair and maintenance work will be accompanied by a shutdown of the entire heating system.
Parallel
Parallel wiring assumes the presence of a special heat pipe built into the heating system, through which the coolant is supplied and discharged outside.
The presence of special taps at the inlet and outlet makes it possible to replace individual radiators without turning off the heat supply. However, the scheme can cause insufficient heating of the pipes at reduced pressure in the system.
Work sequence
Installation of batteries begins with a complete overlap of the circuit. When replacing old radiators with new ones, water is drained and the heating elements are dismantled. It will be correct to use the pump to exclude the presence of coolant residues in the system.
After all the water has been removed, the battery attachment points are aligned in both planes. Brackets are installed.
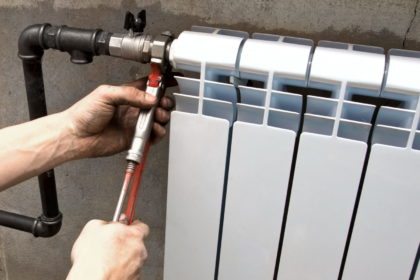
The next step will be the packaging of radiators using sealing linen, packaging paste or special shut-off valves. Using a torque wrench, tighten the connection, creating the force specified in the documentation.
Installation work
Installation of radiators on the wall is carried out by welding or polypropylene pipes.In the first case, it is enough to use two fasteners; in the second, at least three are required. Two should be at the top, one at the bottom.
With ten or more sections, the number of fasteners should be increased to five. There should be three at the top, two at the bottom.
Spatial control
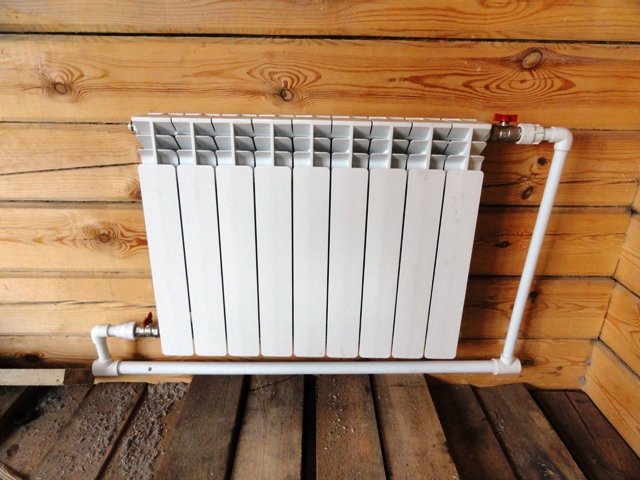
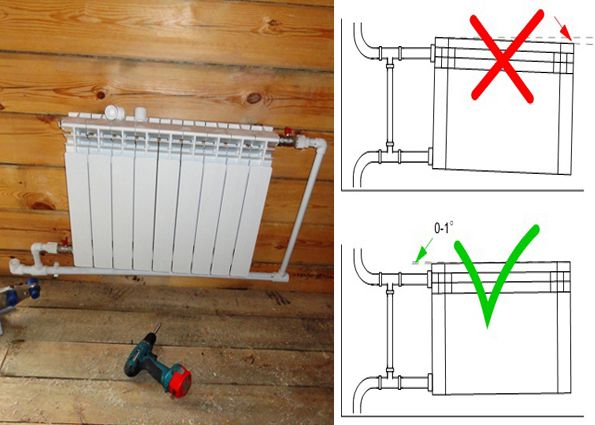
The position of the batteries in both planes is monitored. It is advisable to provide a slight slope towards the wall. This will avoid airing the system during its operation.
The final stage
Threading is performed on the risers and the connection of all elements of the heating system. The tightness of all connections is carefully controlled.
After that, trial tests can be carried out in order to detect a possible leak.
If until now everything has been done by hand, at this stage it is better to invite a ZHREU locksmith. By shutting off the taps of the "American", you can open the connecting tap. It is better to entrust the opening of the return pipe to a locksmith.
If there are no leaks at the connection points, it will be possible to open the valve on the batteries and close the bypass valve. The coolant will begin to flow into the heating system. To bleed air, you should use the Mayevsky crane.
As soon as the heating circuit in all rooms warms up, the locksmith will open the straight pipe. This will restore pressure in the system. We can assume that the control tests are completed. If the installation was done correctly, the apartment will be comfortable at minimal cost.
Do-it-yourself installation of heating radiators connection options, installation steps, tips and tricks

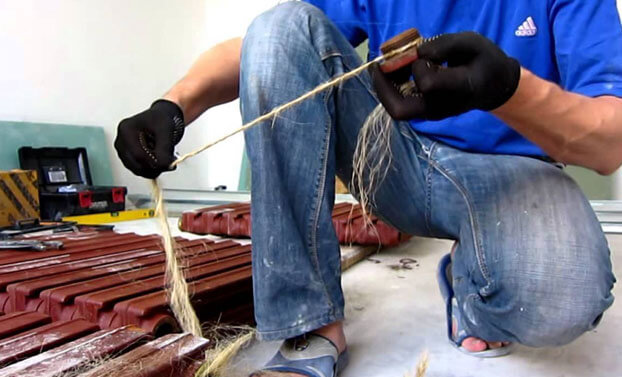
In the old days, it was problematic to install heating radiators on your own due to welding, which was an integral part of the installation. Modern materials make it possible to do without special devices, which makes it possible to install heating radiators in the house with your own hands.
To carry out similar activities in the apartment, it is recommended to involve plumbers of the service company, as it will be necessary to completely disconnect the system from the main line and drain the water. Not everyone knows how to do it right, and a poor-quality connection can turn into a flood of hot water.
What is a heating system
This is a set of devices for creating a comfortable microclimate in the room where people live and work. A comfortable temperature for a person is about 20 ° C. Any premises, even if they are thoroughly insulated, lose heat that escapes into the surrounding space through walls, floors and windows. Therefore, in order to maintain a comfortable temperature in the room, it is necessary to constantly supply such an amount of heat that makes up for its losses.
The main requirements for heating devices:
- Mechanical strength. In centralized heating systems, the coolant is supplied under high pressure, usually at least 10 atmospheres, so that heat reaches even the upper floors of multi-storey buildings. So durability is a key requirement for batteries.
- Corrosion resistance. Water itself is an aggressive medium that actively interacts with most metals. At high temperature and pressure, the aggressiveness only increases, especially considering the regular mixing of alkaline additives into the coolant, which reduce the formation of scale.
- Maximum heat dissipation. In conditions of central heating, it is desirable to take the energy of the coolant as best as possible to heat the room.
- Appearance batteries must be in harmony with the interior of the room in which they are installed.
Installation
Installation of a radiator in an apartment or in a house is performed in the following sequence:
- Do the markup with your own hands and carry out the installation of the mount. The second procedure is performed according to a simple scheme: holes are drilled, dowels are inserted, brackets are applied and fixed with screws.If the mount is floor, then it is attached to the floor with screws. Sometimes it is fixed on the bottom of the wall.
- Perform installation of accessories. First of all, they put a device that removes air. It can be either automatic or manual. It is placed with your own hands on the upper manifold opposite the hole to which the inlet pipe can be connected. A plug is placed on one of the collectors. These elements are installed according to the battery connection diagram. If the diameters of the collectors and pipes are different, adapters are mounted on the free holes.
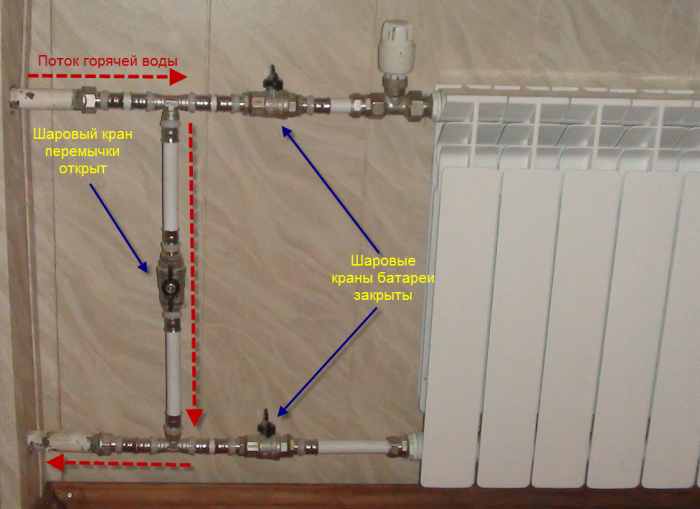
- If the heating system of the apartment is single-pipe, then it is necessary to install a bypass - an additional pipe that connects the inlet and outlet pipes. Ball valves should be installed at the ends of the bypass.
- Perform installation of control and shut-off valves. The control valve is a valve with a thermal head. At this stage, only the valve is screwed in. It is placed on the hole to which, according to the diagram, the inlet pipe will be connected. The thermal head is set aside. If such a valve is used, a shut-off valve is placed on the outlet. The replacement for this pair of fittings are ball valves. The shut-off valves are mounted as follows: fittings with American women are screwed into the radiator holes. And the base is fixed on the pipes. If the pipes are metal, tow is wound on the thread.
- Hang the radiator on the brackets. Before and during this process, it is not necessary to remove the protective film from the bimetallic device. It will protect the beauty of the product as long as all work, including construction, continues. The only thing you have to do is to tear the film with your own hands in those places that will be in contact with the mount.
- Connect the incoming and outgoing pipe with your own hands. They are connected depending on the selected connection scheme. The process involves applying the base of the tap or valve to the pipe with an American and tightening the American with your own hands. The connection may be different, because not every stop valve has an American. It may be that, first, shutoff valves are connected to the radiator, and then it is connected to pipes. At the same time, they can be connected by crimping, welding or under pressure. Their features are often described in different videos.
- They pressurize the radiator and the entire heating system circuit. At the same time, at first the taps are almost completely closed. Then gradually open. A sudden opening can cause water hammer.
Characteristics of bimetallic radiators Arrangement and selection of bimetallic radiators Accessories for heating radiators Selection and installation of brackets for radiators
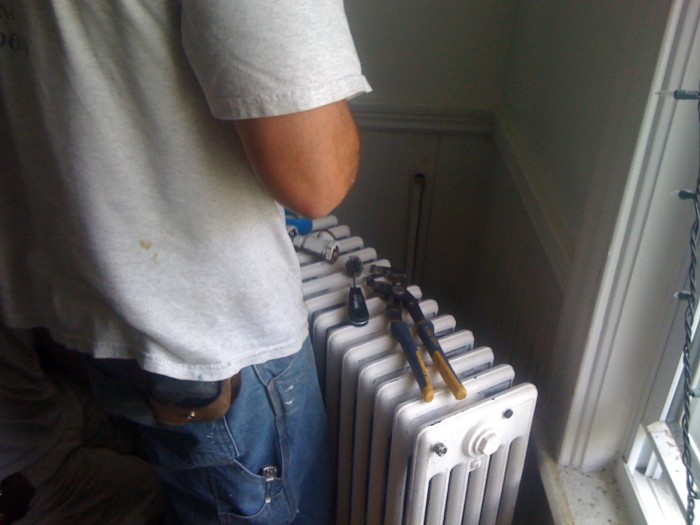
Correct battery installation
You need to replace or install batteries; The prices for such operations depend on many factors. In addition to the fact that in big cities this service is more expensive than in small ones, it can also vary in different areas of a big city.
It also depends on the type of radiator (for example, cast-iron ones weigh more - the master can easily ask for a higher price), ease of assembly, the need to assemble sections, and the need to dismantle the old battery.
If you decide to install the heating battery yourself, read how to do it and watch the video clip below. We guarantee that you can do everything yourself.
Regardless of which type of radiator you choose (here are useful tips on this subject), certain requirements must be observed to improve heat transfer.
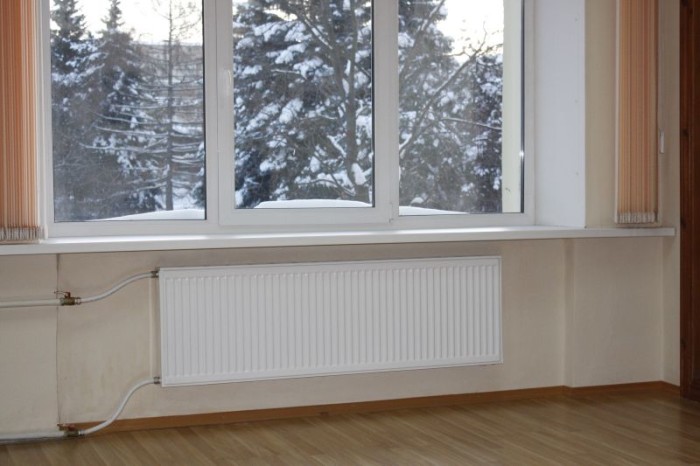
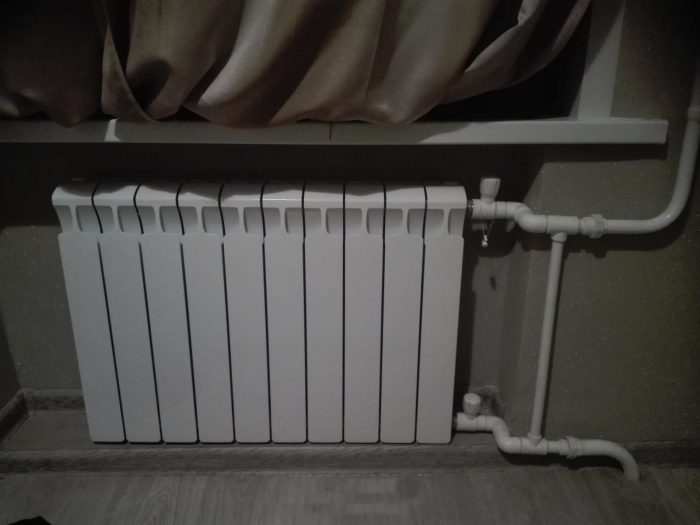
The distance between the window sill and the upper grille should be at least 5 centimeters (better - about 10), between the lower surface and the floor - from 8 to 12 centimeters. The radiator should be 2-5 centimeters from the wall.
Determining the location of radiators
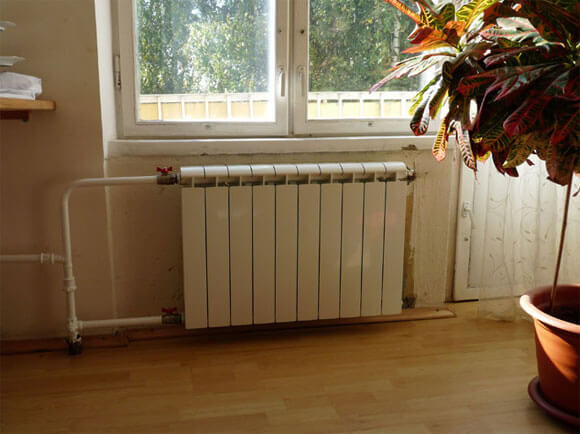
If we are talking about replacing old structures with new ones, then the question of location disappears by itself. In the case of planning a circuit diagram, it is necessary to take into account important factors according to which batteries must create reliable thermal protection. No matter how high-quality modern double-glazed windows are, they are still sources of cold air flow. That is why batteries are installed in almost all rooms below the window. But at the same time, it should be borne in mind that the radiator must cover at least 70% of the window opening. Only then will it function effectively.

- the distance from the window sill to the top of the heater should be within 9-14 cm;
- from the bottom of the battery to the floor, a gap of 7-12 cm is required;
- between the radiator and the wall you need to leave a distance of 3-5 cm;
- the heating structure should be placed in the center of the window opening.
Based on the listed requirements, we can summarize that the installation site should precede the choice of model. Only if certain parameters are available, the power and configuration of the sections are selected.
aluminum batteries
These radiators are the lightest. They look beautiful and easily "fit" into almost any interior.
Aluminum batteries have the following advantages:
- They have good heat dissipation.
- They weigh little.
- They have low inertia.
- When draining the coolant, they do not corrode, but are covered with an oxide film.
Installation example of aluminum batteries
They also have disadvantages, and quite significant ones. For example, they are much more demanding on the coolant: if it is, for example, water, then its pH should be about 7-8. Connection to the radiator must be made either with aluminum pipes or with metal-plastic pipes. Connecting with pipes made of another metal leads to corrosion and even destruction of the radiator sections themselves. The absence of an air vent also leads to damage to the sections.
The weak point of aluminum radiators is the threaded connections, which are the first to suffer in the event of a water hammer.
Aluminum radiators are subject to the so-called "airing" - air is formed as a result of chemical processes occurring in the radiator, and it needs to be bled from time to time.
In addition, the installation of aluminum radiators requires more accuracy, it is better to entrust it to professionals.
Today you can buy two types of aluminum radiators:
- Standard (European).
- Reinforced (withstands up to 12 atmospheres).
How to calculate the number of sections for a bimetallic battery
The number of sections is calculated by the formula S x 100/W S is the area of the room, W is the power rating of the radiator section, indicated by the manufacturer in the technical documentation. The calculation is carried out not for the entire room as a whole, but for each room separately. The type of radiator is not taken into account in the calculation.
Calculation example
It is necessary for a living room with an area of 15 square meters to calculate the number of sections, each of which has a power of 200 watts.
Installation of bimetallic heating radiators with 8 sections will warm the living room with a margin.
Bimetallic heating batteries, the installation of which is available to any household man, is the best heating device in an apartment with centralized heating.
How the location of the radiator on the wall affects its efficiency
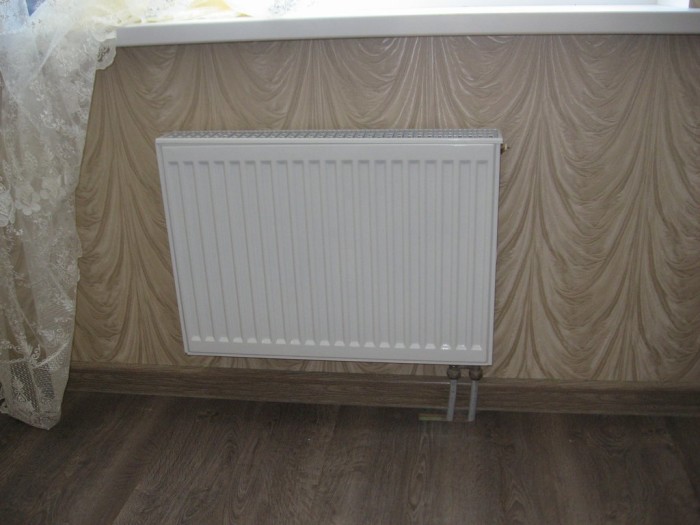
The choice of location for their installation affects the efficiency of the heating devices. Typically, batteries are installed under window openings, because the heated air flow due to upward convection creates a kind of thermal curtain opposite the window opening (it is through the windows that the most heat is lost).
When installing the heater, adhere to the following standard distances:
- The distance from the bottom of the window sill or other obstacle from above to the battery must be at least 10 cm or at least ¾ of the radiator depth. Otherwise, the barrier from above will interfere with convection flows.
- From the floor, the battery is installed at a distance of 10-12 cm. At a smaller distance, convection becomes more difficult. In addition, under the device it will be difficult to remove dust, which accumulates here in large quantities. If you install the device from the floor at a height of more than 15 cm, then the lower part of the room will not warm up well.
- The heating unit is installed at a distance of at least 20 mm from the wall. To do this, it is fixed on brackets. As this distance decreases, convection worsens, and dust collects behind the battery.
Calculation of a radiator for a room
The sequence of the calculation is as follows:
- First you need to find the amount of heat that is needed to heat a room of a certain volume. It is also necessary to take into account heat loss compensation and other important criteria (climatic region, orientation of the room, quality of its insulation, etc.).
- The resulting value is corrected taking into account the scheme of inserting the device and the nuances of its placement on the wall surface.
- If you plan to buy a collapsible radiator, then after determining the required power of the device for a particular room, you can calculate the required number of sections.
Do-it-yourself installation of cast-iron radiators
It's no secret that such heating devices as cast-iron batteries have been used in almost all residential buildings for quite a long time. They are common today, however, the development of technology contributes to the fact that these units are being replaced by more modern and functional radiators.
- bimetallic;
- steel;
- aluminum batteries (more details: "Aluminum radiators - technical specifications, installation").
In order to understand how the installation of cast iron radiators should take place, it is necessary to study what technical characteristics these devices have, and also to consider on what basis the calculation of cast iron radiators should be carried out.
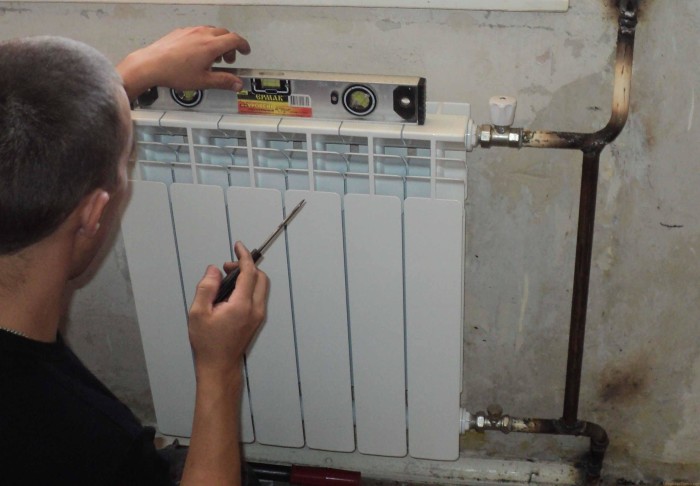
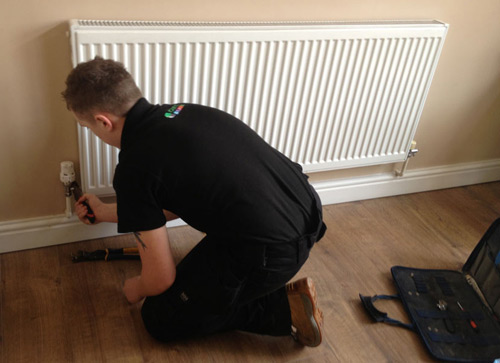
Bimetal radiators
A man makes the installation of a bimetallic battery
The main disadvantage is the high price compared to other varieties. However, it should be noted that for the most part it is justified: they "inherited" the best qualities of steel and aluminum devices. They have an outer aluminum shell and an inner steel tubular part.
Bimetallic batteries are beautiful, there is practically no inertia in them. Installation of bimetallic batteries in an apartment can easily be done by hand.
Their advantages can also be called resistance to water hammer and high pressure, high heat transfer. The thermal conductivity of bimetallic radiators is lower than aluminum, but, in principle, it is quite high.
Calculate the number of sections
Useful formula for calculation
For every 10 meters of square area, 1 kW of energy is required - in the case of a standard ceiling height (2.5 meters). If your ceiling height is higher - recalculate! Remember that it is not the area that is heated, but the volume!
Self-installation of the radiator step by step
When planning work, you should choose a radiator installation scheme, gain theoretical skills, watch a video tutorial, prepare tools:
- pliers;
- impact drill or hammer drill;
- level;
- drill with victorious soldering;
- tape measure, pencil;
- torque wrench for pipes.
It is desirable that the sections are already connected when buying: a special key is needed to assemble them.
Connection is possible only with radiator fittings. Sometimes part of the connecting elements is attached to the device, everything else is purchased independently.As a rule, the mounting kit for radiators of each brand is universal and suitable for all types. Mounting kit contains:
- stopcocks and Mayevsky's crane (valve for air release);
- plug and adapter, gaskets for them;
- brackets with dowels;
- temperature control devices: thermostats, thermostatic valves, thermostatic heads.
Installing the battery sideways is done in a certain order.
1. Markup. For maximum heat transfer, the following parameters are maintained:
- height above the floor - at least 10 cm;
- distance from the window sill - 10-12 cm;
- the gap between the wall and the radiator is 2-5 cm.
2. Fixing the brackets to the wall. For a small number of sections (up to 8), three points are required, in other cases the number of supports is increased.
3. Assembling the mounting kit, connecting the tap and valve for the thermal head, Mayevsky valve.
4. Hanging the radiator - its location in the horizontal plane is checked by level.

5. Connection to supply and return pipes.
The lower connection of a radiator (for example, aluminum) is just as simple and is made in the same sequence. It is only required to find out when buying what exactly the selected heating element is: right- or left-handed (the installation depends on this).
How much does it cost to install a radiator
If a diagonal scheme is chosen for fastening, then it is better to use the services of specialists. This method requires theoretical knowledge and practical skills in order to achieve a uniform distribution of the coolant. The price for installing heating radiators in an apartment is determined by their number: installation of a unit costs on average up to 5,000, from two or more - about 4,000 rubles. If the radiator is placed on a ready-made liner, the procedure costs the customer 2,500.
https://youtube.com/watch?v=3BaaUUG4JZE
Features of installation of various types
The material from which a particular heating element is made imposes certain requirements on its installation. If cast iron is not afraid of serious mechanical stress, then others require special care.
Cast iron classic
Cast iron radiators are still relevant. The special characteristics of the material used in their manufacture make it possible to effectively heat a room of any area due to slow cooling.
To install such a heating element correctly, before connecting, you should:
- disassemble the finished product into sections;
- stretching all the nipples, assemble the product in reverse order.
When performing installation work, it is worth considering the weight of the product and the composition of the material from which the house was built. The heating element can only be mounted on brick and concrete walls. Installing the battery near a drywall wall is done on a floor stand.
Modern models
Such products are characterized by low weight and increased fragility. For them, it is necessary to provide a Mayevsky crane.
In the process of performing installation work, do not remove the packaging to prevent deformation of the surface.
Installation of bimetallic heating radiators
The duration of the heating season in our country forces homeowners to carefully prepare all heating equipment. Adjustment and repair of the system is carried out in the spring-summer period. At this time, replacement or installation of bimetallic heating radiators is often carried out. They are manufactured using advanced technology that allows the most efficient use of thermal energy from the coolant.
- general information
- Technical requirements
- Design features
- Radiator wiring options
- Installation work
- Why batteries are placed under the window
Rules for the location of the battery and wiring diagrams
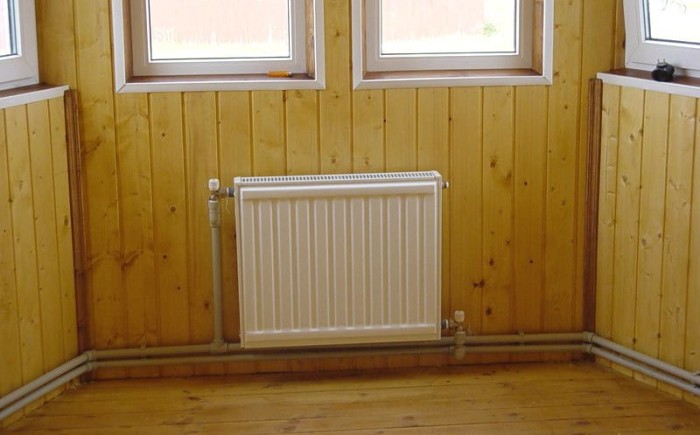
In addition to the characteristics of the radiator itself and the literacy of its connection, one of the most important factors affecting the efficiency of the heating system is choosing the right place to locate the product. True, in most cases it is predetermined in advance - the new battery, most likely, will stand in place of the old cast iron one, which has been since the building was built. But still, here are a few recommendations for the proper placement of the radiator.
How to install a radiator with your own hands
Firstly, it is desirable to place the battery under the window. The fact is that it is a “bridge” through which cold from the street enters an apartment or cottage. The presence of a radiator under the window forms a kind of "thermal curtain" that interferes with the process described above. In this case, the battery should be placed strictly in the middle of the window, and, preferably, occupy up to 70-80% of its width.
Secondly, from the floor to the radiator should be at least 80-120 mm. If there is less, then it will be inconvenient to clean under the battery, a huge amount of dust and debris will accumulate there. And if the radiator is located higher, a certain amount of cold air will collect under it, which requires warming up and, as a result, worsens the operation of the heating system. In addition, a too small distance to the window sill negatively affects the battery efficiency.
Thirdly, a distance of 2.5-3 cm is allowed between the back of the radiator and the wall. If it is less, the processes of convection and the movement of warm air flows are disturbed, and, as a result, the battery works less efficiently and wastes part of the heat in vain.
All of the above principles for placing a heating battery are presented in the diagram above.
Table. Standard schemes for connecting heating batteries.
Boiler room in a private house - selection of equipment, a complete installation scheme Competent design of engineering systems in full compliance with building codes and regulations, not only.
Double-circuit wall-mounted gas boiler The specifics of the construction of country houses implies independent heating and hot water supply - laying.
Coolant for the heating system: water, antifreeze - which is better? Heating in a private house is not just a combination of several pipes and radiators. This is a complex system that, in order to.
Water heating convectors: selection, principle of operation, installation Water heating convectors are increasingly being installed in modern houses and apartments. High heating efficiency.
Schemes for connecting radiators to the heating circuit
Since the connection of heating radiators to the main may differ, the efficiency of heat transfer depends on the scheme
It is important to choose the optimal direction of movement of the heat carrier through the device. Its current depends on the dynamic pressure of the liquid medium and the temperature difference in the radiator cavity
Diagonal connection

Installation of heating radiators with a diagonal connection and top feed is considered the most effective, since the devices have maximum heat transfer. This is due to the fact that with such a connection, the coolant does not encounter any obstacles in its path. The liquid completely fills the upper collector and, flowing through vertical channels, enters the lower collector. This contributes to uniform heating of the entire area of \u200b\u200bthe device, so the heat transfer of the battery is maximum.
Diagonal connection of heating radiators with bottom feed is rarely used. In batteries with a large number of sections, a stagnant area is formed with a coolant temperature below normal in the area of \u200b\u200bthe branch pipe into which the return line cuts. In this case, heat transfer efficiency losses can reach up to 20%.
Single sided with top and bottom feed
The option of connecting devices to the main with an upper single-sided supply is usually used in single-pipe wiring of high-rise buildings with an upper supply or in a descending vertical network with a lower wiring.
This scheme is more suitable for radiators with a short length. But with a large number of sections, the kinetic energy of the heat carrier may not be enough for the full passage of the flow through the collector.If you use the installation of heating batteries with one-sided top supply, then you have to put up with a decrease in heat output by a maximum of 5%.
A one-way bottom connection cannot be called effective, but it is often used in high-rise buildings with one-pipe wiring. The disadvantage is the formation of a stagnant zone in the remote part of the device from the inlet. Because of this, the far edge of the battery will be colder. In this case, the decrease in heat transfer efficiency can reach up to 22%.
Double sided with top and bottom feed
Battery installation with double bottom connection allows you to hide the pipes in the interior as much as possible. Since the coolant hardly penetrates into the upper part of the device due to the oncoming flows of the cooled liquid, the top of the radiator warms up more slowly and worse. In this case, the decrease in heat transfer efficiency reaches 15%. But if necessary, this scheme can be optimized.
Proper connection of heating radiators excludes the possibility of using a double-sided connection with a supply from above. Only illiterate heat engineers can apply such a scheme in practice. Since the passage through the upper manifold is open for liquid, it will not flow into the lower pipe, so only the upper part of the device will warm up.