Water heated towel rails
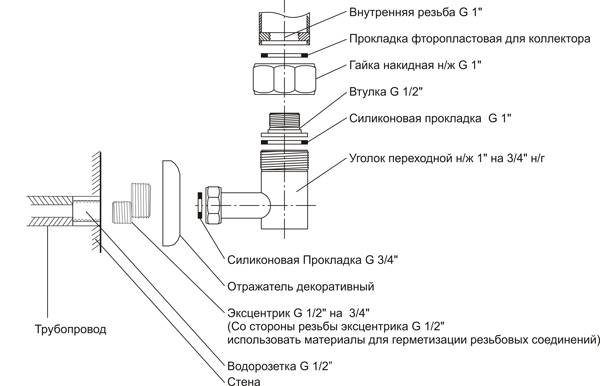
The order of fastening the connecting elements.
Water valves are almost always made of stainless steel or chrome-plated brass. Visually, they are almost the same. A heated towel rail made of steel is more reliable, withstands high pressures during the operation of central heating in Khrushchev. However, there is one “but”: it must be solid, that is, made of a seamless pipe.
When purchasing a stainless steel device, it is necessary to choose the one with the thickest walls (3 mm or more), that is, the thicker the pipe walls, the better.
In the building materials market, imported brass heated towel rails are mainly represented. They are not suitable for installation in systems with centralized heating and water supply. The maximum allowable working pressure for brass towel warmers is lower than that of stainless steel analogues.
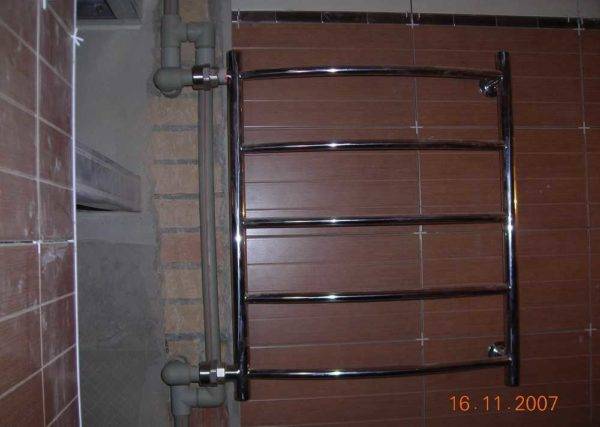
If it is decided to replace the water heated towel rail in Khrushchev by moving it to another wall with an increase in the length of the pipes for supplying water, then it is better to choose models that have an air release valve (Mayevsky tap).
When replacing a water heated towel rail, it is advisable to equip the riser with a jumper by installing ball valves at the inlet and outlet. A jumper of this type will cost 4.5-6 thousand rubles, taking into account installation costs.
Basically, water heated towel rails are connected to the pipeline using an “American” type connection, a characteristic feature of which is the presence of rubber or paronite seals.
How to make bends and how to change the riser
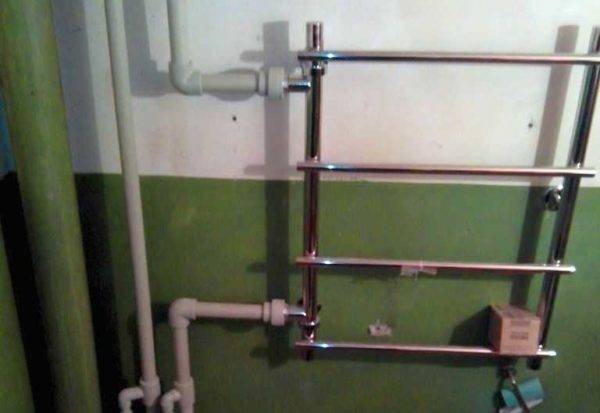
If the riser is metal and you are not going to change it, then installation of a heated towel rail is possible with steel or polypropylene pipes. If you change the riser (the best option) and install polypropylene, there is no choice - PPR pipes also go to bends. Take polypropylene for hot water, better - reinforced with fiberglass.
Why is metal-plastic not suitable? Because he has fittings with a strong narrowing of the lumen. This is very bad for circulation. As a result, even 100% efficient circuits do not provide normal heating.
Installing a heated towel rail with polypropylene pipes
A little about why to change the riser. It makes sense to do this in old houses when repairing a bathroom or a bathroom (depending on where your riser is located). First, the pipes are usually already old and worn out. Even a branch can be problematic to weld to them, so the metal has worn out. Secondly, modern renovation involves hidden laying of communications and you also want to close the riser. Hide the old pipe, and after a few years to destroy everything again ... not the best solution.
A little about how to change. You need to negotiate with neighbors from below and above, as well as with the Housing Office (DEZ, UK). With neighbors that you will cut off their riser and install a new one on the thread. Why have them? Because leaving the old pipe in the ceiling is dangerous: it will collapse and flow. Will flood you or neighbors from below. Therefore, it is better to pass through the ceilings with a new pipe.
With this connection, the dryer is part of the riser and there can be no taps
Having agreed or not with the neighbors (they may have already closed the riser), go to the housing office and agree on the date of replacement and the time for which the riser will be turned off. “Local” locksmiths, you yourself (if you are qualified as a welder) or people hired by you can work. After the tie-in, the water is turned on, you check the performance of the heated towel rail and the system as a whole. If in 30 minutes it does not begin to cool, then it is set correctly. This completes the replacement or installation of the heated towel rail.
Electric towel warmers
Towel dryer connection.
Electric heated towel rails are installed if there is no possibility or desire to disrupt the existing water supply system. Such devices will work quietly all year round, which cannot be said about water ones, because hot water is turned off in the summer for maintenance or repair.
Electric heated towel rails do not heat up more than 60 ºС. For a small bathroom in Khrushchev, a device is perfect, the electricity consumption of which ranges from 50-100 W, which will not particularly affect the overall family budget. The electric heated towel rail can be turned on or off at any time without much difficulty. Such devices will never cause flooding of neighbors. The devices are heated by heating elements installed inside and cables in a silicone sheath. There are dry and oil heated towel rails.
Many are afraid to replace a water heated towel rail with an electric one. However, if you qualitatively hide the wiring in the walls, mount an additional automatic machine in the shield, perform grounding, then an electric heated towel rail will be an excellent alternative to a water one. It can be fixed anywhere, the main thing is to observe the minimum allowable distance from the shower, bath or washbasin (60 cm). Such heated towel rails can also be installed in the kitchen, balcony or hallway.
Electric heated towel rails are more diverse in their shapes and colors compared to water ones. With the right selection, they will perfectly fit into any interior.
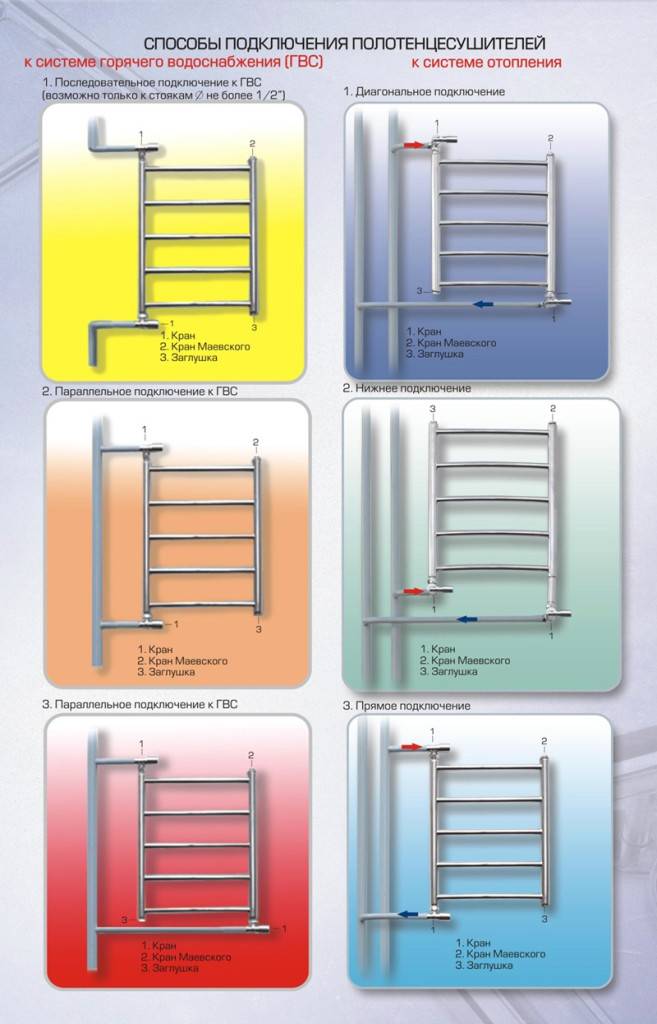
Connection options
The principle of connecting a heated towel rail to a riser is the same for all models: water is supplied to one end, and its outflow (return) from the second. The connection option depends on the specific device modification:
- hot coolant is connected at the top, return - from below;
- connection is made from below;
- hot water supply - from above, outlet - on the opposite side from below, diagonally;
- bottom center connection;
- connection to four points (for large dryers with horizontal pipes).
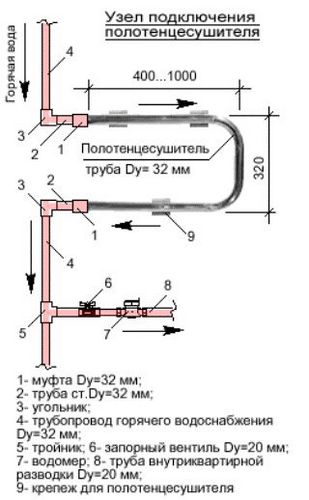
Ways to connect heated towel rails to the hot water system.
Schemes for connecting heated towel rails to the heating riser:
Connection order:
Installation and connection of a new heated towel rail
How to connect a water heated towel rail to hot water supply is regulated in SNiP 2-04-01-85. If interested, this SNiP can be easily found on the Internet.
The process of installing a heated towel rail in the bathroom and connecting it to plastic pipes is quite simple. Their ends are connected using a welding device with a polypropylene pipe.
When installing the heated towel rail, it is necessary to maintain the slope of the supply pipe, which must be made in the direction of hot water flow. It is in the range of 5-10 mm throughout the entire eyeliner. Water must flow through the heated towel rail from top to bottom, so the supply riser should be connected to the upper socket of the heated towel rail.
The maximum distances that must be maintained between the heated towel rail and the lined or plastered wall surface are also regulated. They make up:
- 35 mm - for pipes with a diameter of not more than 23 mm;
- 50 mm - for pipes with a diameter of more than 23 mm.
In order not to expose the walls to excessive loads due to temperature deformations of the heated supply pipes, the entire system is not fixed rigidly, but on supporting brackets.
After completion of work, it is necessary to check all connections - they must be absolutely dry.
Scheme 1 lateral and diagonal connections, open and unbiased bypass.
The most efficient connection for the vast majority of substations (exceptions will be added a little later) is with the coolant supply to the upper part and the cooled coolant outlet from the bottom.This can be ensured by using a lateral or diagonal connection with an open and unbiased bypass.
Figure 12. Connection of the PS-ladder, working on natural circulation, without narrowing and without offset bypass. Side connection.
Figure 13. Connection of the PS-ladder, operating on natural circulation, without narrowing and without offset bypass. diagonal connection.
The schemes are equivalent, the diagonal version has practically no advantages over the side one.
This PS connection scheme is the most versatile:
- Works with any direction of supply in the riser.
- It is completely independent of the circulation rate in the riser.
- It is not required to bleed air from the PS after turning off the water.
- The distance from the riser is arbitrarily large.
Conditions for the scheme to work:
- The lower outlet of the riser should be below the connection point to the substation, and the upper outlet of the riser should be above the connection point to the substation.
- The slope of the supply pipes must be observed (direction shown in the figure). For definiteness, you can take a difference of 3 ... 30 mm per meter. More is better. With small distances from the riser (a couple of meters) and a large diameter of the supply pipes (PPR 32 mm), strictly horizontal laying is permissible.
- There should be no “humps” (completely unacceptable, otherwise air will accumulate in them and circulation will stop) or dips on horizontal routes (allowable only within small limits, deep “pits” will serve as “pockets” for airing).
- With a lower feed, there should definitely not be any narrowing between the outlets! It will interfere with the operation of the PS up to complete inoperability! At the top supply, it is permissible in extreme cases to narrow the bypass by 1 step of the riser diameter (we will consider this option in detail below), but it is not required for the operation of the substation.
- Pipe diameter to ensure maximum circulation - preferably at least DN20 (3/4" for steel, 25mm for good reinforced PPR), ball valves - at least 3/4". The practical maximum distance of the substation from the riser when using a plastic pipe with a diameter of 25 mm is approximately 4.5 meters.
- It is highly desirable to place the supply pipes in thermal insulation. In addition to the fact that it is mandatory when embedding any plastic pipes (provides mechanical protection and compensation for thermal expansion), such insulation can improve the operation of the substation in certain cases (sagging pipes or "pits" on them).
It is strictly forbidden to install any taps on the bypass - this is vandalism and sabotage to yourself and your neighbors. Overlapping or excessive narrowing of the bypass:
- a) Slows down the circulation in the entire riser (the temperature of hot water drops from the points of water intake in the apartments).
- b) Radically worsens the water pressure in all apartments located further in the direction of supply. And with a certain location of the hot water outlet - and at the vandal himself. Indeed, when the bypass is narrowed by one pipe size, its throughput becomes approximately half as much.
- c) It does not noticeably improve the efficiency of the above scheme, and with a lower feed, on the contrary, it interferes with the operation of the PS.
A bit of history, old types of PS
Twenty years ago, the substation "from the developer" was a monolithic riser pipe, curved in the form of the letter "P" or "M".
Figure 1. U-shaped PS, which is part of the riser.
Figure 2. M-shaped PS, which is part of the riser.
Despite the unsightly appearance, this type of substation had undeniable advantages: it was constantly hot, did not introduce any noticeable hydraulic resistance, and did not allow residents to disturb the operation of the hot water supply (DHW) riser in any way.
However, time passed, and the tenants in the old housing stock, making repairs, changed the old and ugly substation to a new and shiny one. In a good scenario, it turned out like this:
Figure 3. New substation, which is part of the riser, a competent replacement.
The diameter of the substation corresponds to the diameter of the riser, the connection is made without narrowing and without stop valves (cocks).
In case of an unsuccessful scenario - like this:
Figure 4. New substation, which is part of the riser, an illiterate replacement.
Four extra constrictions from the used fittings appeared in the riser:
Figure 5. Internal section of a fitting for metal-polymer pipes.
But it gets much worse:
Figure 6. The new substation, which is part of the riser, is an absolutely illiterate replacement.
In addition to the narrowing already mentioned above, shut-off valves have been added. When any of them is blocked in the riser, the circulation stops completely, the pressure in the apartments following in the direction of supply drops down to zero (water can somehow come from the “return” line), the riser cools down in the absence of water intake, when the mixer is opened, cold water has to be drained for a long time .
Installation of shut-off and control valves (faucets) on risers is strictly prohibited!
Calculator for calculating the number of rolls of wallpaper
How to mount a heated towel rail in Khrushchev?
When carrying out repairs in Khrushchev houses, the owners often wonder if a heated towel rail is needed in the bathroom or not? He is definitely needed! After all, its functions include not only drying clothes, as many people think, but also creating an optimal microclimate in the room. Using a heated towel rail will prevent odors, dampness, fungus, or other harmful bacteria from building up.
A heated towel rail will reduce the risk of mold and mildew in the bathroom, as well as dry wet towels.
Independent replacement of a heated towel rail in Khrushchev is a very complicated matter. The work includes a whole range of operations and is carried out at the initial stage of bathroom renovation.
There are two types of heated towel rails: water and electric.
Welding of polypropylene pipes
We will connect the heated towel rail using polypropylene pipes. Why polypropylene? This is the best option.
The most common materials for supply pipes are steel, copper, and polypropylene:
- Steel pipes are heavy, subject to corrosion, and a welding machine is required for installation.
- Copper ones do not rust, but are very expensive and are mounted by soldering.
- Polypropylene are not subject to corrosion, are cheap, have small weight. Reinforcement with a special fiber significantly increases their strength and resistance to high temperatures. The presence of a variety of fittings makes it easy to connect polypropylene with metal pipes. Mounting them is very easy. For this, there are special welding devices that can be mastered in just half an hour and freely make high-quality connections. In addition, these devices can be rented at most shops selling plastic pipes and building materials. This service costs about 400 rubles per day.
You can read more about soldering and installation of polypropylene pipes here.
Installing the Bypass Jumper and Ball Valves
The jumper is your lifesaver for unforeseen situations. Its installation is not required, but highly recommended.
Imagine that a leak has appeared at the junctions of the heated towel rail, which becomes more intense every minute. Call the emergency services and wait at least an hour for their arrival? Or do you need to replace the heated towel rail. Again run to the Management Company and wait for the hot water to be turned off in the riser?
In order not to depend on such situations, a jumper is installed. It is an ordinary (in our case, polypropylene) pipe. To install it, ball valves are mounted on the ends of the heated towel rail, which, if necessary, block the flow of water through it. With the jumper installed, the circulation of water in the riser does not stop even if the heated towel rail is turned off.
To remove air from the system, it is recommended to install an additional ball valve in the jumper itself. This will help ensure that hot water circulates freely in the heated towel rail.