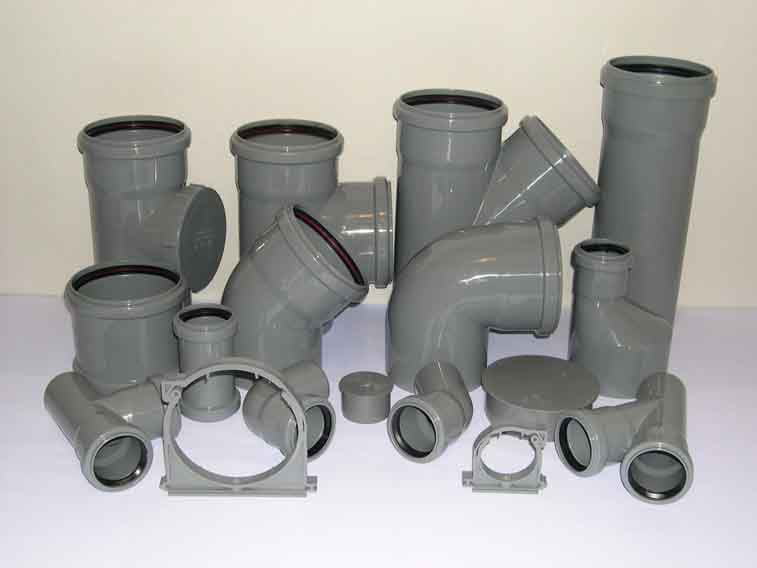
Types of polypropylene pipes
The service life of products depends on the temperature of the medium and the pressure created in them. With the right choice of the type of material, it is possible to significantly extend its operational capabilities.
There are 4 types of pipe materials that have different characteristics depending on the temperature of their operation.
|
Product type and corresponding marking |
Purpose | Medium temperature, С |
Working pressure, MPa |
|
PN10 |
For cold water supply and underfloor heating | 20 for cold water supply, 45 for warm system floors | 1 |
| PN16 | For cold and hot water supply | Up to 60 |
1,6 |
|
PN20 |
For hot water supply | Up to 80 | 2 |
| PN25 | For central heating systems, reinforced products, hot water supply systems | Up to 95 |
2,5 |
PN10 brand materials refer to products intended for cold water supply. They are not able to withstand the high temperature of the environment. The second type, marked PN16, refers to mixed-type products and is designed for cold and hot water supply, but with a limited operating temperature. PN20 and PN25 are materials intended for hot water supply. Such pipelines are able to withstand high temperatures, and products marked PN25 are additionally reinforced with metal, which increases their service life and ability to withstand high pressure and temperature conditions.
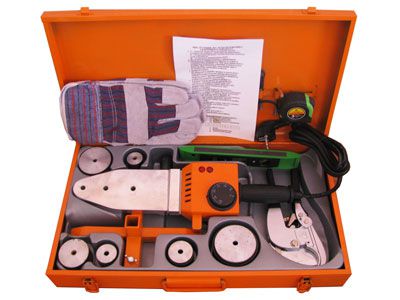
Pipe welding kit
If welding of polypropylene products has to be carried out regularly, then it is advisable to purchase a special welding kit, which is immediately sold in an appropriate suitcase. Its average cost is about one hundred dollars, and it consists of:
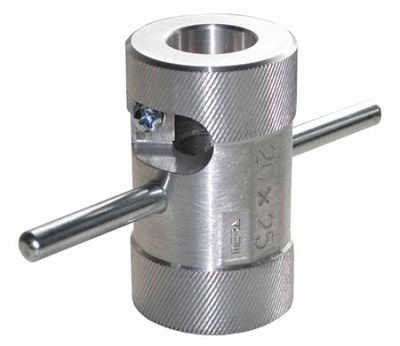
- heating element;
- Teflon nozzles of different sizes;
- scissors for cutting polypropylene pipes;
- bolts that are attached to the heating element of the nozzle;
- level;
- supports for the heating element;
- hexagon for tightening bolts.
In the case when welding work is carried out from time to time, it is more rational to rent welding equipment.
Types and purpose
Polypropylene pipes are available in four colors - green, grey, white and black. Only black ones differ in characteristics - they have increased resistance to ultraviolet radiation and are used when laying an irrigation system on the ground. All the rest have similar characteristics and are laid indoors or buried in the ground.
By appointment, polypropylene pipes are of the following types:
- For cold water (temperature up to +45°C). It is easy to distinguish them by the longitudinal blue stripe.
- For hot water supply (heating up to +85°C). A distinctive feature is a red stripe.
-
Universal (maximum heating up to +65-75°C depending on the manufacturer). Two stripes are applied side by side - blue and red.
For both cold and hot water, there are pipes with different characteristics. This is displayed in the label:
- PN10 are used exclusively in cold water supply systems (up to +45°C) with low pressure (up to 1 MPa). They have a small wall thickness. Not suitable for high rise buildings.
- PN16. They are often labeled as universal, but more often used for cold water - they withstand heating of the medium up to + 65 ° C and pressure up to 1.6 MPa.
- PN20. Thick-walled pipes, which can transport medium with temperatures up to +80°C, withstand pressures up to 2 MPa. Used in the distribution of hot water and heating systems.
- PN25. These are reinforced polypropylene pipes (foil or fiberglass). Due to the presence of a reinforcing layer, they often have a smaller wall thickness than PN20. Medium heating temperature - up to +95°C, pressure - up to 2.5 MPa. They are used for hot water supply and heating.
All of them are produced in different diameters - up to 600 mm, but in apartments and private houses they are used mainly in sizes from 16 mm to 110 mm.
Please note that the inner diameter is indicated, as the wall thickness may vary.
Stage two. Welding of polypropylene pipes
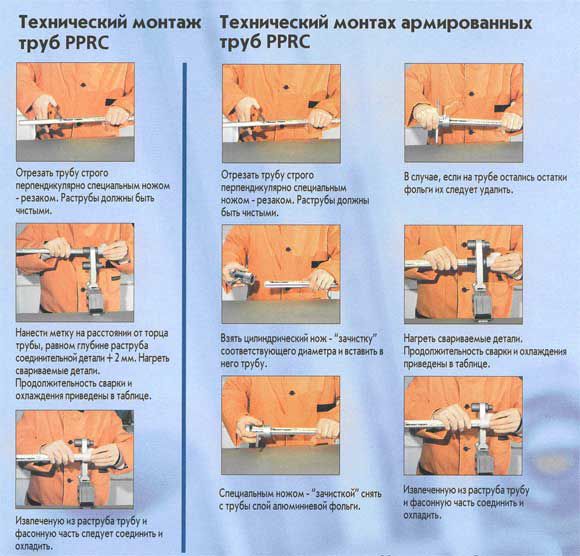
This procedure will require an electric jigsaw (cutting polypropylene) and special welding equipment.
Step one.
While the apparatus is warming up, the necessary measurements are taken, the pipes are marked and cut.
Step two.
The ends of the products that are planned to be interconnected are carefully cleaned and degreased.
Step three.
Using a pencil, the depth of entry of each product into the sleeve is marked. It is characteristic that at the same time there should be at least a millimeter gap, so the pipes do not abut against the coupling of the fitting.
Step four.
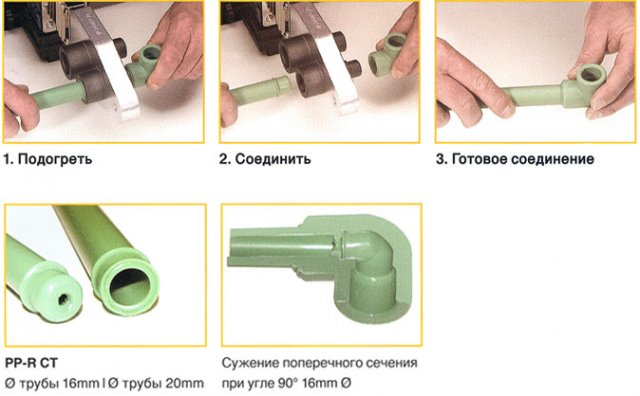
A PP pipe with a fitting is put on the sleeve in accordance with the marks made, and the heating of all elements must occur simultaneously.
The duration of heating depends not only on the diameter of the products, but also on the depth of welding (this can be found in the table below).

Step five.
After a certain period of time, the products are removed and connected, with little effort, sitting on each other. At the same time, it is forbidden to rotate the elements along the axial line.
Step six.
Within a few seconds after the connection, the primary adjustment is performed, then the elements are finally fixed.
If there are no gaps left at the junction, then it (the connection) can be considered of high quality.
Welding Machine Manufacturing
In view of the fact that a more or less good one costs over a thousand rubles, it is cheaper to rent it or make it yourself. If the latter was chosen, then for work you should prepare:

The sequence of actions should be as follows.
Step one.
In order to improve heat transfer, the sole of the iron is treated with thermal paste, then a Teflon sleeve is fixed. The location of the latter is determined in advance - the wide part up or down.
Step two.
A sharp “nose” is sawn off for more convenient work near the walls.
Step three.
The heating of the iron is carried out until the device switches off a second time.
Step four.
It is good if the iron is equipped with a temperature sensor - this will allow you to accurately determine the heating temperature. But there is an easier way - through lead. This metal melts at 230ᵒС and higher, which approximately coincides with the temperature required for welding.
Further technology is identical to that described above.
Required Tools
Fitting;
Polypropylene pipes themselves;
Special apparatus for welding such pipes;
Welding machine
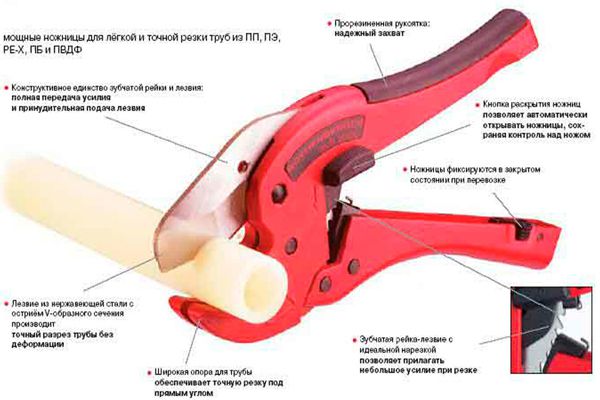
A hacksaw for cutting them, a special cutter is often sold complete with a welding machine; for large volumes of work, you can use a ring cutter or special scissors;
Degreaser (ethyl or isobutyl alcohol); acetone in this case is forbidden to use, as it is able to soften the plastic;
Beveler: Its interior resembles a pencil sharpener, however, since the bevel must be cut evenly, the knives are at a different angle; you can replace the beveler with an ordinary file and a knife;
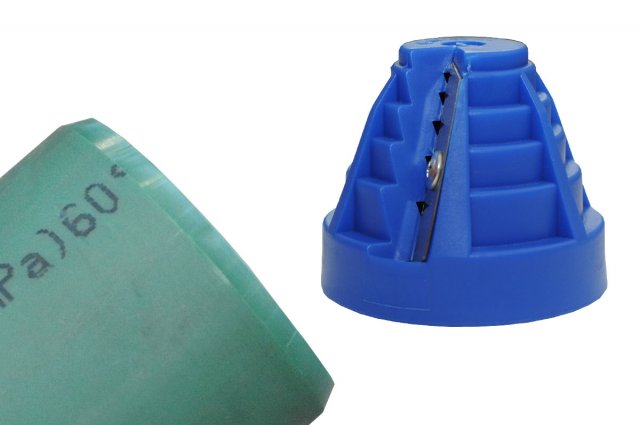 Beveler for plastic pipes
Shaver: a tool for removing the reinforced layer (if our pipes have a layer of reinforcement).
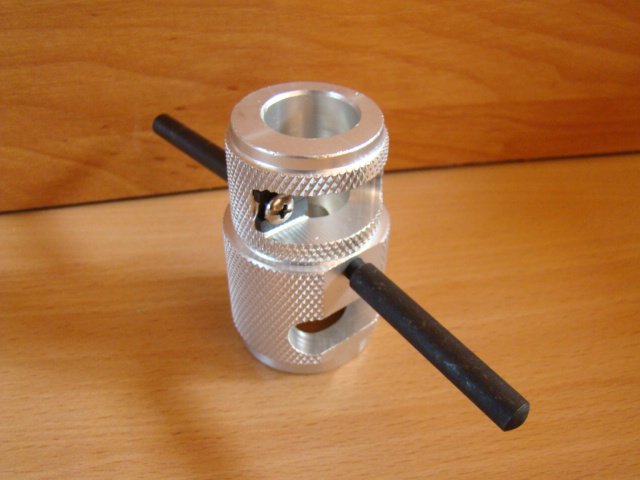 Shaver
Advice.
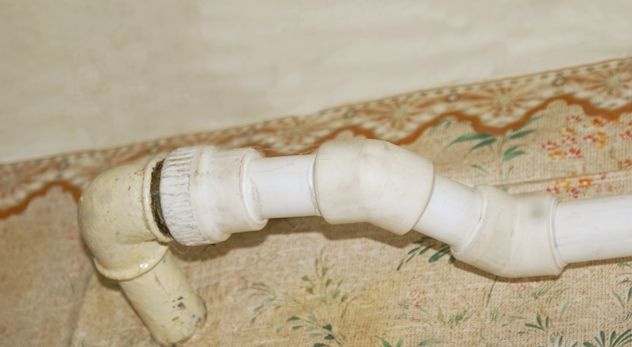
Pipes that fit close to the heating boiler (at a distance of less than half a meter) should be made only of metal. They are connected to polypropylene using adapters from a welded joint to a threaded one.
Working with polypropylene pipes
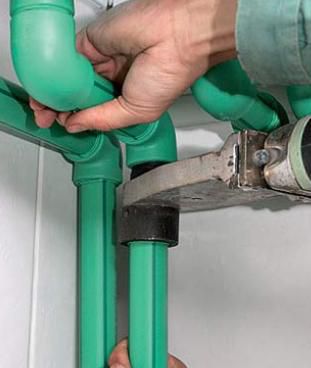
Today's polypropylene pipe installation system includes all the necessary elements for connecting pipes of various sizes, contours, fittings, fasteners and inclusions.The assembly process is quite simple and, with the necessary skills, is fast.
The set of elements can be customized the way you want, so that the result is a completely unique system. The complexity and equipment depends only on the preferences and wishes of the customer, that is, you. The only feature that some attribute to the disadvantages of polypropylene is the welded connection method. After welding, it is no longer possible to separate the pipes and correct the error. Therefore, you need to think over everything in advance and try to avoid inaccuracies in actions.
If we break down the pipe welding process into separate steps, it will look like this:
- With a soldering iron for polypropylene, it is necessary to heat both parts that you want to attach to each other.
- After you need to connect the heated parts;
- After a short period of time, remove the already fastened elements from the apparatus.
Welding provides the elements with such a strong connection that it is almost impossible to separate the parts without breaking them. That is why polypropylene pipes are considered to be of high quality, durable and able to withstand almost any pressure.
Main stages of work
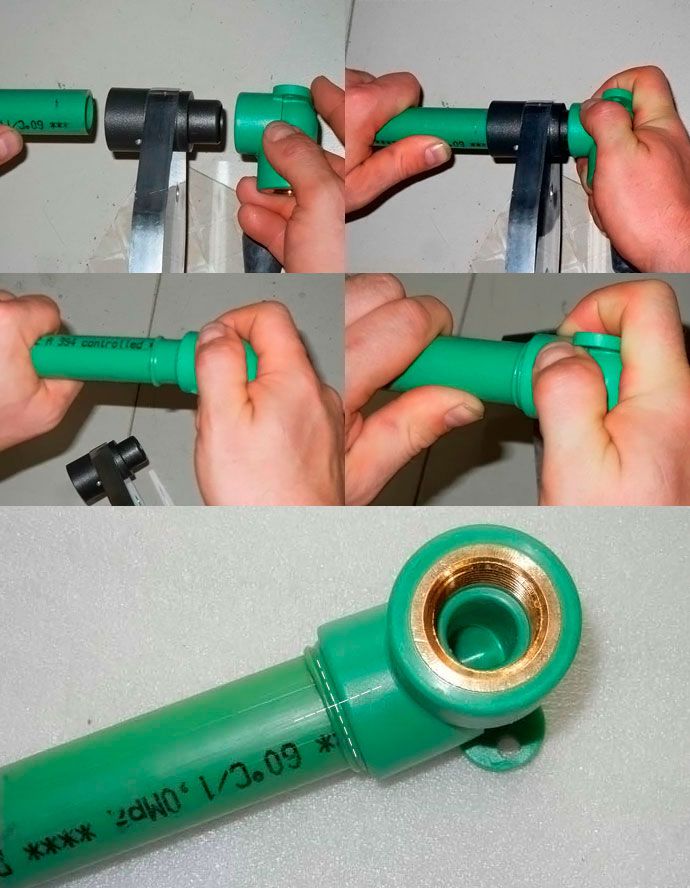
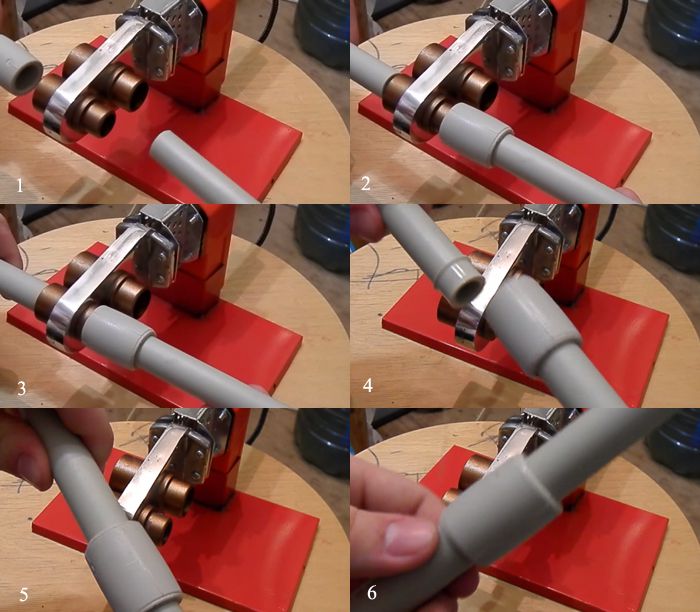
1. We take a pipe of the right size.
2. We clean its edges from burrs formed during cutting with a file or beveler.
3. We mark with a pencil at the end of the pipe (see photo) which section we need to melt, that is, we outline the place where the fitting will be put on.
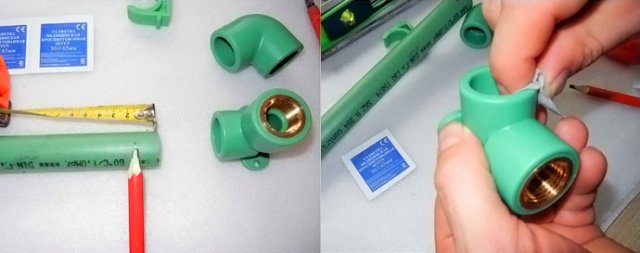 We outline the place of soldering with a pencil
4. We process the pipe and fitting with a degreasing agent.
5. Firmly fix the welding machine to the table.
6. Its kit includes nozzles of different diameters. We take the required nozzles (one for the fitting and one for the pipe) and fasten them on both sides of the device.
7. Set the temperature to 260°.
8. As soon as the lights go out (this means that the device has warmed up enough), you can start working. The average heating time is 2-3 minutes.
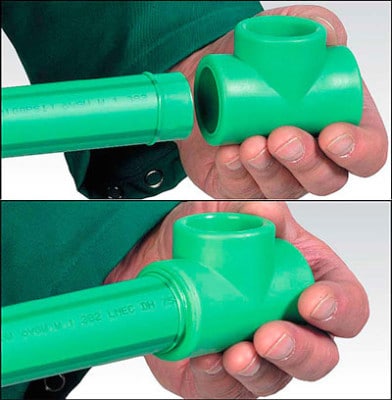
9. We put on hot nozzles (there are two of them) a fitting and a pipe to a pencil mark. Too much pressure on the parts to be welded or rotate them should not be.
 Butt welding machine. Fitting and pipe are put on hot nozzles
10. We count the prescribed amount of time. The heating time is always indicated in the instructions. For example, for a 25 mm pipe it is exactly 7 seconds).
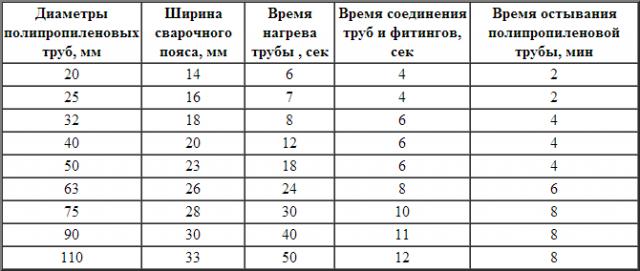 The heating time of the device depends on the diameter of the pipe
11. Quickly and accurately remove the heated parts, slightly holding the welding machine.
12. We connect them with each other. Excessive pressure on them or rotation is also unacceptable.
13. We are waiting for a few seconds.
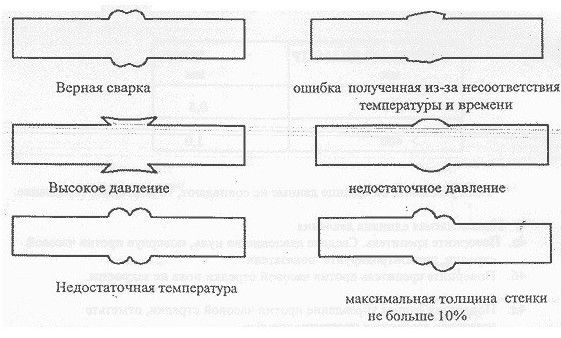
14. If we did everything right, we get a perfectly even, homogeneous connection.
The reinforced layer on the segment of the connection must be removed, otherwise the connection will be inhomogeneous and fragile;
When buying a device, it is not necessary to spend extra money and purchase a model with a thermostat, because we need a single temperature regime of 260 ° C; using other modes may result in a poor connection;
Water must flow freely through the pipes; so that an obstacle in the form of frozen plastic does not form at the place of soldering, do not put too much pressure on the melted parts when connecting; however, low pressure is also unacceptable - the length of the connection for reliable fastening will not be enough; this can lead to the formation of turbulence and pressure drop in the system;
The basic rule of such soldering is: the fitting is put on the nozzle first, and only then the pipe; the countdown starts when both parts are on the machine;
Polypropylene seizes in 4-8 seconds, but you should not immediately release it - in order for it to completely freeze, you need to wait 20-30 seconds;
Parts during cooling must be motionless, the slightest shift can break the tightness of the connection; therefore, before soldering, it is better to prepare special clamps for fixing them; you can make them from any bar of wood or strong wire;
Cooling the resulting node with water or a jet of cold air is prohibited - the connection will be fragile;
Do not heat up the pipe and fitting more than the allotted time - polypropylene will be deformed; with less time for heating, the connection of parts will be difficult;
With proper welding, part of the plastic should form a slight influx on the sleeve;
You can check the quality of your work by cutting the connected section in half; you should see at the junction an even monolithic connection without deformations and voids.
Sewer system from PP pipes
As noted earlier, polypropylene pipes are actively used today in the arrangement. The installation procedure in this case has its own nuances.
Internal sewerage
There are a number of rules that must be observed when installing sewerage in a house.
- The pipeline is laid at an angle in the direction of the sewer riser (about 3 cm per linear meter).
- If the room is not heated, then the pipes are additionally insulated with mineral wool.
- Do not make sharp turns at an angle of 90ᵒ, so-called half-bends are used instead.
- Fan-type ventilation is a mandatory component of the sewer system, which will prevent the penetration of an unpleasant odor into the home.
- The toilet is connected only after the sink, otherwise the water seal will break.
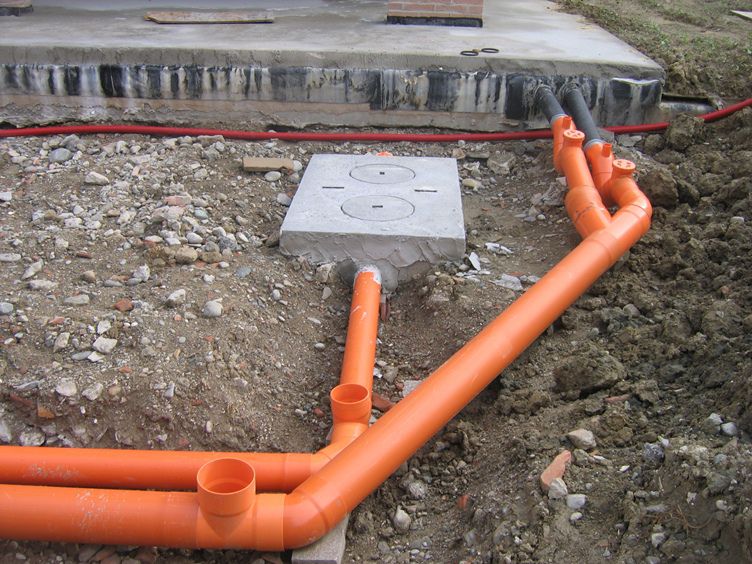
Outdoor sewerage
Step one.
The diameter of the pipes is determined, depending mainly on the number of people living in the house.
Step two.
A trench is dug from the sewer riser to a septic tank or cesspool. At the same time, a slope is observed, depending on the soil freezing line, or the pipeline is insulated with mineral wool.
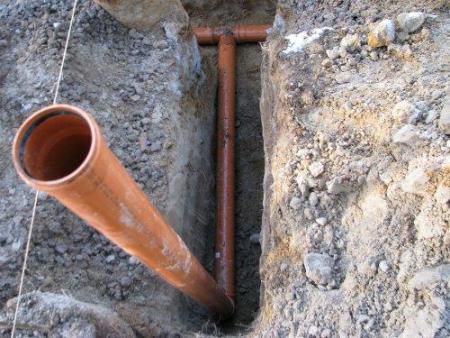
Step three.
The bottom is covered with a "pillow" of sand. Its thickness should be at least 20 cm.
Step four.
Pipeline is being laid
It is important to avoid possible sagging, otherwise the connections will soon collapse.
Drilling takes place using a steel cone-shaped tip. Similar technology is used in the construction of:
Horizontal drilling of a trench for the pipeline is carried out using special equipment with pressure-action jack-pumps. Drilling takes place using a steel cone-shaped tip. Similar technology is used in the construction of:
- auto and railway roads;
- pipelines to basements;
- highways to working wells.
Do-it-yourself installation of a PP pipeline will help save a lot, but only if it is done correctly.
Products made of polypropylene are used, as a rule, when creating drainage and irrigation systems, as well as when laying a water supply system or arranging a heating system. Polypropylene belongs to the class of polyolefins, which means that all products made from this material are distinguished by a high degree of environmental safety.
In addition, polypropylene drainage systems can last a very long time, while the cost of their operation will be minimal. However, when working with such products, you need to know how to weld polypropylene pipes in such a way as to avoid their deformation
and prevent leakage.
DIY welding
Work should be done in a well ventilated area. Polypropylene, when heated, can release toxic substances, and they can be harmful to health, causing poisoning.
Step by step instructions for welding:
- First, the necessary nozzle of the correct size is installed on the soldering iron;
- To melt polypropylene, a temperature of 260 degrees must be reached;
- Prepare parts for connection, carry out their cleaning and proper placement;
- Then the soldering iron is put into operation;
- It is necessary to wait for the required time for heating, and this is indicated by the green color of the sensor.
 When soldering, it is better to place the device in such a way that it stands steadily
Then the pipe and fitting are simultaneously put on the blank and the soldering tool. The pipe is inserted inside the blank. The fitting is placed on the outside. It is pushed in all the way, and the pipe is pushed in to the finished mark. The main thing is to keep the time right.
If the tool warms up badly, then the level of diffusion will be small, and this will violate the quality of the alloy. A high temperature will lead to overheating of the parts. The optimal time depends on the diameter of the pipe and fittings.
After heating, it is important to immediately dock. The main rule of procedure is compliance with tolerability
The first few seconds allow for a correction, but no turning is allowed. At the same time, it is required not to rush and not to pull, adhering to the golden mean.
Stage three. Pipeline installation
When laying the highway you will need:
- pipes;
- tees;
- Ball Valves;
- plugs;
- adapters;
- bends;
- couplings;
- detachable connecting elements;
- threaded fittings;
- plastic clamps.
First of all, the installation of the main elements of the system (plumbing, radiators, boilers, etc.) is carried out, after which, in accordance with the drafted project, the future highway is marked. The elements of the pipeline are interconnected by means of couplings.
If we are talking about heating or hot water, then thermal expansion is taken into account. To compensate for the latter, it is desirable to use mobile connections. When installing a closed pipeline, the walls are first ditched (a groove is made in the appropriate places with a width of two pipe diameters).
The pipeline may only be filled with liquid after one hour has elapsed from the end of installation. A hydraulic test can be carried out only after a day.
Why polypropylene
Today, pipe manufacturers provide a huge range of products for laying water supply, sewerage or heating systems. You can purchase metal-plastic, metal, or polypropylene pipes. Today, an increasing number of consumers prefer to choose polypropylene pipes, which have a lot of advantages:
- do not corrode;
- easy to install;
- do not require constant repair;
- durable and reliable in operation;
- can be laid inside a wall or floor;
- are significantly cheaper than metal pipes.
Polypropylene pipes can be used to install heating systems, for water pipes and for sewage.
Which pipes are right for you
To choose polypropylene pipes you need to know:
- the conditions under which the pipes will be operated;
- fluid pressure in the system and its temperature;
- the required throughput of the product, which determines the working diameter.
Polypropylene pipes have a special marking depending on the purpose of the product.
- PPH
- ventilation, cold water supply. - PPB
– systems of cold water supply, heating. - PPR
– systems of hot and cold water supply, heating.
Pipes with PPR marking
- are universal. Therefore, they are the most in demand. They are highly resistant to both high and negative temperatures.
Stage one. Drafting a project
Installation work should begin with the drafting of the future highway. An important criterion here is ergonomics, so that the number of turns and connecting elements should be kept to a minimum.

When arranging the heating system, a well-designed project is especially important, in which the location of such elements as:
- couplings;
- adapters;
- fasteners;
- corners;
- heating equipment.
The line is connected to the radiators in a one- or two-pipe way, from the side or from the bottom.

Plumbing
Here, the highway is connected to a centralized system in order to supply the necessary plumbing fixtures - a toilet bowl, sinks, a boiler, etc. There are two ways to perform wiring.
Method number 1.
Open option. Horizontal pipes are installed slightly above the floor level, and vertical pipes are installed exclusively at the corners. All this makes the pipeline less noticeable.
Method number 2.
Closed option. It is extremely difficult to perform, since it involves preliminary carrying out the most accurate calculations. Pipes (necessarily solid) are immured into the walls, and there must be free access to each joint.

In addition, plumbing can be:
- sequential type (the most budgetary and easiest option to implement);
- collector type (a collector is used when supplying water);
- with through sockets (little popular).
Stages of work welding process
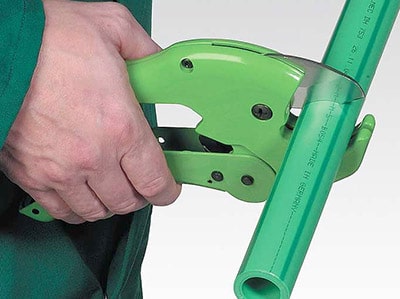
Having measured the required length of the pipe, make a mark on it with a marker. With a pipe cutter or scissors, cut the product at an angle of 90º to the axis. The tool must be sharp enough so that the pipe does not deform.
The pipe is cut at an angle of 90º to the axis
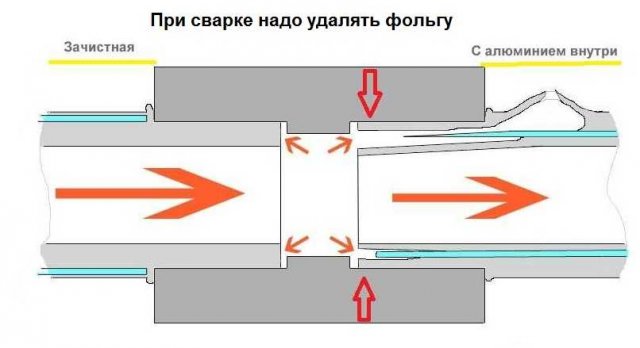
The edge of the reinforced product must be cleaned, getting rid of the top layer and foil. Without this stage, the aluminum foil, which is part of the pipes, will come into contact with the liquid during operation. As a result, corrosion of the reinforced layer will lead to a violation of the integrity of the seam. Such a connection will leak over time.
The edge of reinforced pipes is cleaned
For non-reinforced products at the end of the pipe, the depth of welding is indicated, focusing on the length of the fitting sleeve. Another important point in preparing pipes for welding is degreasing the surface. Treatment of the junction with alcohol will provide more reliable contact of the parts.
Preparing the Welding Machine
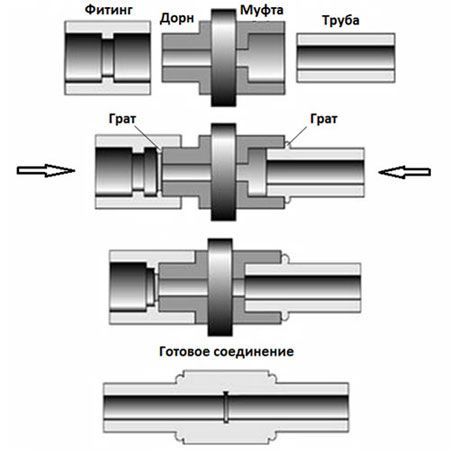
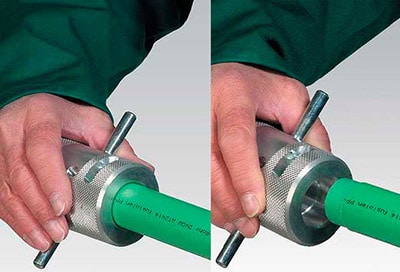
Before welding plastic pipes, it is necessary to prepare the welding machine. The handheld device is fixed on a flat surface. Machine parts must be clean and free of defects. Clean them with a cloth soaked in alcohol. The heating elements are put on when the tool is off. A mandrel is used to fuse a fitting, a sleeve is used to fuse a pipe.
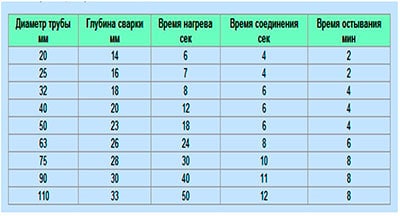
The heating time of parts for welding is determined according to the table
Then the device is connected to the network. At the same time, the indicators located on the unit body should light up. One of them signals that the device is connected to the network. The second, after reaching the required heating temperature, should go out. After the indicator goes out, it is desirable that five minutes pass and only then start the welding process. This time depends on the ambient temperature and lasts from 10 minutes to half an hour.
What is the welding process?
After heating the apparatus, put the fitting on the mandrel, and insert the pipe into the sleeve. This is done at the same time and with little effort.

After heating the device, put the fitting on the mandrel, and insert the pipe into the sleeve
To know how to properly weld polypropylene pipes, it is necessary to take into account the heating time. The correct period will allow the parts to warm up to the required temperature and not melt. It depends on the diameter of the pipe.
After the required period of time, the parts are removed from the apparatus and connected. In this case, the pipe must enter the fitting strictly up to the mark. During this process, it is forbidden to rotate the parts along the axis.
In the process of connecting parts, it is prohibited to rotate products along the axis
After joining the parts, mechanical action on the seam is not allowed until it has completely cooled down. Subject to technology, the result should be a strong and tight seam.
The article gives the necessary recommendations on how to properly weld pipes, with a detailed description of each stage. By putting these tips into practice, you can independently conduct a pipeline for water supply or heating. The main thing is to choose the right pipes and follow the process technology. Only then the polypropylene pipeline will serve for a long time and uninterruptedly.
Cast iron has not been used in modern water supply and heating systems for a long time. It was replaced by light, easy-to-install and non-corrosive plastic. Today we will talk about welding polypropylene pipes with our own hands for beginners - the main stages of this process and its intricacies.
Why polypropylene is better for welding than metal
A variety of elbows and fittings, as well as profile and round bends made of polypropylene, are deservedly popular because:
- After properly welded, they form monolithic parts that can last more than fifty years.
- During operation, they do not reduce their throughput.
- They have a very high resistance to various household chemicals.
- The cost of such products is several times lower than the cost of similar products made from metal.
In addition, if the product is selected correctly and the welding is done with high quality, then we can say that polypropylene pipes in many cases are simply an ideal element of the corresponding system, including.