Installation of a drainage system
How to make a drain from sewer pipes? The work on the installation of the gutter system is preceded by a planning stage, which includes drawing a detailed diagram containing marks on the installation points of the funnels, brackets, the length of the gutters and their slope, the most suitable docking points for the gutters, as well as the location of the drains. According to the calculations made, structural elements are purchased, after which you can proceed with the installation.

Sewer tees
Instructions for installing a drain from sewer pipes
Do-it-yourself plastic pipe drains are installed according to the developed scheme and should include the following steps:
- Two side brackets are installed on the frontal board of the eaves - the longest and the shortest. After that, a rope is pulled between them with a slope of 3 mm for every half meter. It should be remembered that the overhang of the roof should fall on the first 2/3 of the gutters from the side of the building. Water should flow into the center of the gutter.
- Accordingly, the stretched rope is fixed with the remaining brackets using self-tapping screws.
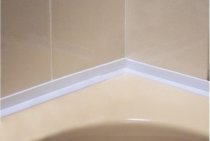
The distance between the gutter and the wall must be at least 10 cm.
- Sewer pipes must be dissolved in length so that two identical gutters are obtained from each. To do this, the pipe is laid on the boards, and its lower wall is fixed with a self-tapping screw. Then, self-tapping screws are screwed into the upper part of the pipe from both ends, and a thread is pulled between them. A cutting line is marked along the thread with a marker.
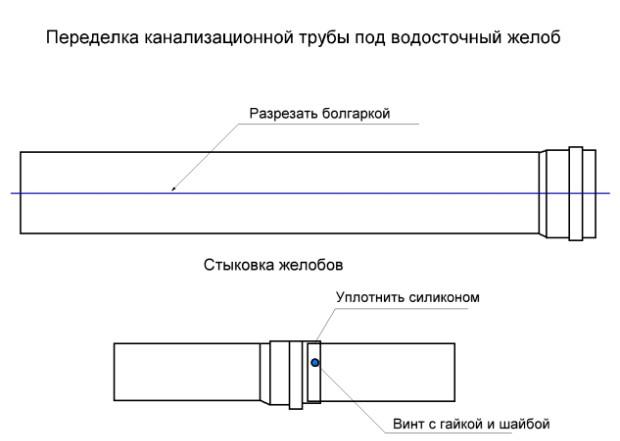
Converting a sewer pipe to a gutter
- The thread is removed, after which the grinder cuts the pipe.
- Similarly, the pipe opens on the opposite side. At the same time, the pipe is fastened from below with two self-tapping screws - on both sides of the cut.
- Pieces of pipe 5 cm long are cut off - they will replace the connectors.
- According to the design scheme, the gutters are interconnected. To do this, two gutters are inserted into the connector and fixed with self-tapping screws. The mount should be additionally lubricated with silicone sealant.
When fixing the parts, it is important not to overtighten them, as the structure will “walk” a little under the influence of temperatures. It should be a little mobile.
- The resulting structures are fastened in the brackets with self-tapping screws. In order to prevent the gutters from curling up into a pipe from the sun, they should be fixed with the help of special antennae available on the brackets. In their absence, you will have to put spacers or fix them with self-tapping screws.
- Having completed the installation of horizontal gutters, proceed to the installation of branch pipes.
- Since the pipes are fixed to the wall, and the gutters to the brackets, an overhang of 20-80 cm is formed between them. In order for the transition between them to be smooth, a tee and an elbow are used. If the bevels are very wide, pipe sections of the required length are additionally used.
When fixing the structure with self-tapping screws, a piece of rubber and plastic should be placed under them - so that they do not let moisture through. You can also use additional sealant.
- Do-it-yourself drains from sewer pipes are attached to the wall using special brackets with clamps. For each linear meter there should be two fasteners.
- A drain elbow is installed at the bottom, directing water into a receiving tank or storm sewer. It should be 30 cm from the wall.
- The highest end parts of the gutters are covered with plugs cut in half.
To prevent snow from breaking the gutter, the product should be installed 1.5-2 cm below the roof overhang.
In some regions where winters are harsh and snowy, it is recommended to place a heating cable inside the gutter. This completes the installation of the drainage system from the sewer pipes.A detailed video instruction of the process can be found by watching the video.
https://youtube.com/watch?v=-fGEZnHlI0U
What pipe color to choose
Gutter systems are of two types: internal - for flat roofs and external - for sloping. Accordingly, pipes are used for an internal drain or for an external one. Sewer pipes are produced by manufacturers in various colors. This is done to make it easier for customers to navigate among them. So, sewer pipes are gray, white and brown.
gray pipes
They are the most popular and widespread. Manufacturers recommend using them for organizing internal communications. The composition of the material used for the manufacture of these pipes is designed for operation in positive conditions, therefore such pipes can withstand high temperatures, but are very sensitive to negative ones. In addition, these tubes are less adapted to physical activity.
The use of gray pipes in the organization of drainage is possible in regions with a mild climate, which are not characterized by harsh winters. Such pipes are afraid of mechanical stress, so the gutters of them should be regularly cleaned of accumulated snow.
white pipes
Like gray ones, these pipes are designed for installation of sewer systems inside the house. Their distinctive feature is that they are able to withstand very high temperature loads, and also perfectly absorb the sound of flowing water. Otherwise, such pipes are no different from gray ones.
A drain made of white plastic pipes will serve for a long time in regions with mild winters, however, such pipes are not ready for high negative loads, as well as sudden temperature changes.
red pipes
These pipes are intended for installation of external sewer systems. Their fundamental difference from gray and white pipes is in a thicker wall. The material from which these pipes are made is resistant to negative temperatures and high pressure, but is sensitive to high temperatures.
Gutter systems made of red pipes are ideal for regions with harsh winters with sudden temperature changes. Ways to withstand high loads in the form of snow and ice. In the south, it is not recommended to make water outlets from them, since being under the scorching sun can make them fragile.
Calculation of drainage elements
Before purchasing pipes, you should draw up a diagram of the drainage system, indicate the necessary elements and their number. The traditional drainage system uses:
- gutters - needed in an amount equal to the perimeter of the roof;
- brackets - for every 10 meters of eaves, 17 brackets are required;
- pipes - for every 10 meters of the gutter, one drain pipe is required;
- bends - the required number is equal to the number of drain pipes;
- funnels - required in an amount equal to the number of drain pipes;
- plugs - the required amount depends on the drainage scheme;
- corners - the required number is determined by the configuration of the roof;
- couplings - connecting parts for gutters, they need 1 less than gutters;
- knees - their number depends on the complexity of the drainage scheme.
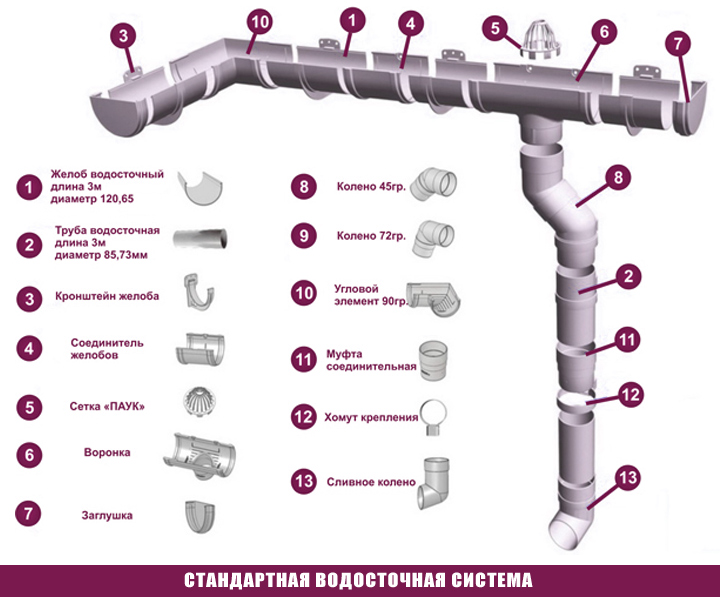
Standard drainage system
It is quite simple to select the desired section of pipes - for this you should take into account the area of \u200b\u200bthe roof slope. In the construction environment, it is customary to focus on the following calculation scale:
- the diameter of the drain pipes to the roof slope with an area of up to 50 m² - 80 mm;
- pipes with a diameter of 90 mm go to a roofing slope with an area of \u200b\u200bup to 125 m²;
- on a roof slope with an area of more than 125 m², pipes with a diameter of 100 mm are used.
Funnels, sockets and adapters are selected according to the diameter of the pipes used as gutters.