Scope of application
This type of fastening, like minifixes, is used when it is necessary to hide fasteners, for example, on a furniture facade. Due to the peculiarities of drilling grooves for the screw and the eccentric, this method is common mainly for factory installation of furniture. But knowledge of the basic principles, the availability of specialized equipment and small skills will allow a novice home master to master this type of fastening.
The main purpose of the eccentric coupler is to connect parts at a right angle. Such a connection is:
- L-shaped;
- T-shaped.
The mechanism for connecting furniture elements using a minifix without a sleeve is as follows:
- A screw is screwed into a hole with a diameter of 5 mm on the surface of one of the connected elements.
- A second element is put on the screw with an 8 mm hole located in the end part.
- An eccentric is inserted into the groove on the surface of the second element, with a diameter of 15 mm.
- Using a screwdriver, the eccentric is rotated 180 degrees clockwise, fixing the connection. A simple screwdriver, flat or Phillips, or a hex wrench can be used.
The principle of fastening parts with a coupler with a sleeve is similar. The difference lies in the fact that the hole for the base of the screw is made with a 10 mm drill, in which a plastic sleeve is fixed to the PVA glue, where the screw is screwed. The remaining steps are the same as when using a minifix without a sleeve.
Assembling furniture with this method, with experience in such work, is simple and quick.
Let's analyze how this type of attachment works using the example of assembling a drawer for a chest of drawers and the dresser itself.
Advantages and disadvantages
The furniture connection has its indisputable advantages, which are appreciated by the craftsmen. Namely:
- Rapidity. With it, you can assemble the product without any extra effort. To work, you just need to prepare an ordinary flat screwdriver.
- This is the most reliable type of connection. Withstands heavy loads. Ideal for frequent assembly and disassembly. At the same time, the quality and strength of the connection is not lost.
- Absolutely does not spoil the front side of the product. When it comes to assembly, aesthetics matter. They will be visible only from the inside of the products.
It has good positive qualities, but there are also some disadvantages. Consider them:
- High price. In contrast, ordinary confirms are considered budget elements. If a large number of connections are expected, then the presence of eccentrics will increase its price several times.
- Sophisticated installation technology. It's much easier to use confirmation. It only needs two holes. With a minifix, everything is much more complicated. They will need three.
- Precise equipment is required. Without it, it is difficult to make accurate markings perfectly evenly. Otherwise, you will not be able to assemble the furniture.
Such fasteners do not have serious shortcomings. If you want the products to be strong and durable, then you should choose only such an element.
Do-it-yourself furniture eccentric installation
Eccentric screed (rasteks, minifixes, eccentric clamp - whoever calls it) is one of the most common types of furniture fasteners.
Minifixes are good because the parts tightened with their help can be disassembled and reassembled many times without loss of rigidity, which would not work when using confirmats, where the mount will lose rigidity with each assembly / disassembly.
There is only one minus for a furniture minifix - this is the painstaking work of installing it.If you do not have expensive filler equipment, for do-it-yourself installation, you need to very carefully mark and accurately drill three different holes in three different planes, which usually takes a lot of time and effort.
This work does not tolerate oversights in markup. After all, you will not be able to adjust the connection in the end.
Also, its cost cannot be called very cheap. The price of a minifix is usually 3-4 times more expensive than a confirmation.
Therefore, it should be used in the most necessary cases.
Where applicable
An eccentric clamp is used in places where parts are fastened (T- or L-shaped), the connection of which must be hidden from prying eyes. For example, they are attached:
- Table tops of computer and other tables made of chipboard
- Dresser tops
- The bottom and roofs of sliding wardrobes and other parts where it is not possible to drill holes on the front of the part.
The installed rod of the minifix of the eccentric clamp is completely hidden in the body of the chipboard, and only the eccentric remains visible, which is installed on the inside of the product.
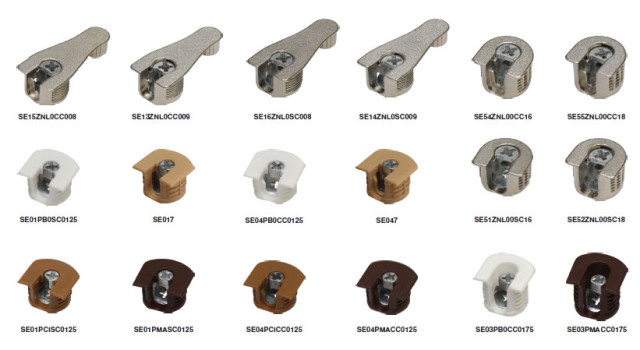
Types of eccentric screed
Depending on the manufacturer, there are several modifications of the minifix, which includes:
- Stock (rastex)
- Eccentric (minifix)
- Plastic or metal sleeve (depending on the manufacturer)
- Minifix stub (optional)
There are also corner (hinged) and double-sided ties. But to use them, you need to be a complete pervert, as well as think carefully about where they can be applied. In our time, they have practically ceased to be used due to uselessness.
The eccentric clamp remains popular today, the stem of which is already threaded for chipboard, without a plastic sleeve. That is, it consists of only two parts: a rod and an eccentric.
But, just in case, in this article we will analyze the installation of two types of this fastener - both with and without a sleeve.
Installation instructions for eccentric tie (without bushing)
- screwdriver
- Mill "Forstner" 15 mm
- Drill bit 7 mm (for stem body)
- Drill 5 mm or confirmed (for screwing in the stem)
- Ruler, awl, pencil
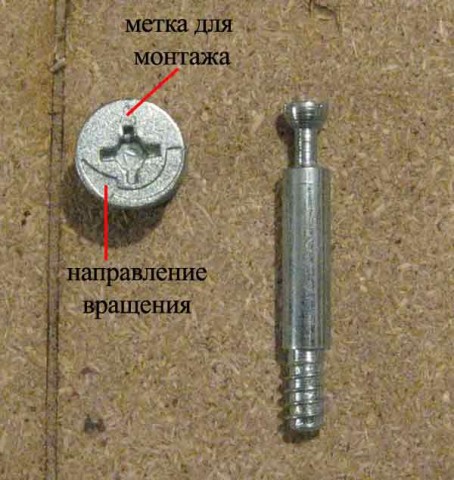
The standard thickness of the screed rod body is 6 mm, and the length is 44 mm. The diameter of the eccentric is 15 mm and its depth is 12.5 mm. Photo of the eccentric and stem:
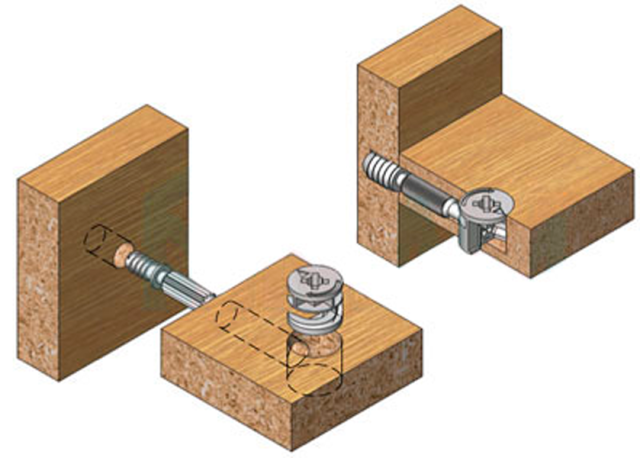
As mentioned above, to install a minifix in the parts to be joined, you need to make three holes of different diameters.
So let's start building.
For a quality assembly, in order for the eccentric to capture the stem head, it should look out by 6 mm:
A hole is made for screwing the rod into the chipboard with a 5 mm (or confirmed) drill, if it is a sidewall, its center should be located at a distance of 8 mm from the edge, 10-11 mm deep (the rod must be screwed tightly and to the very end, according to the mark, this can be seen on the picture).
In another part, markings are made for two holes.
The first - at a center distance of 34 mm from the edge, under the hole with a Forstner cutter with a diameter of 15 mm. Its depth must be equal to the thickness of the eccentric (about 12 mm) so that the eccentric enters the part “flush”.
The second hole is made at the end of the part, strictly in the center, with a 7 mm drill (1 mm more than the stem body).
Further, the eccentric rod is screwed into the 5 mm hole, the second part is mounted on it, and the structure is clamped with a minifix.
Installing a tie with a plastic sleeve
The principle of assembling a minifix with a sleeve is exactly the same as when installing a metal minifix, with the only difference - you need a different hole for the stem.
It is done with a 10 mm drill, then a plastic sleeve is attached to the hole using PVA glue, and all other steps are repeated.
Usage
Eccentric ties are used in fastening L and T-shaped elements. Namely:
- tables;
- countertops;
- wardrobes;
- in any furniture elements where drilling holes on the front side is neither possible nor desirable.
In all these cases, connections must be hidden.The stem is hidden inside the part, and the eccentric is only visible from the inside.
Fastening without sleeve
To learn how to use fasteners, we prepare the following tools:
- cutter with a diameter of approximately 15 mm;
- drill 7 mm;
- drill or confirmation 5 mm;
- ruler;
- screwdriver or drill;
- awl;
- pencil for marks.
Before work, remember that when installing on the surface, you need to make three holes.
Now you can start installing:
- The height of the protrusion of the stem head should be 6 mm. In this case, an eccentric can be installed on it with high quality. To screw in the stem, make a passage for it with the smallest drill.
- We make two holes in another part. We mark the first at a distance of 34 mm from the edge using a cutter. The second is done exclusively in the center using a medium diameter drill.
- We screw the rod into the hole of small diameter. We install the second part on it and fix it with a minifix.
Sleeve mount
The whole procedure is identical to the first. To work, you will also need tools and materials. The only difference is that a hole of a different diameter is needed for the stem. A 10 mm drill is used. Using PVA glue, a plastic sleeve is fixed.
Installation instructions
An eccentric screed with all the work with your own hands requires a minimum amount of technical equipment. To install, you will only need a drill with different drill bits, a simple screwdriver and a small ruler. When purchasing these items, the manufacturer inserts an insert into the box with detailed instructions for installation. Therefore, you can easily cope with such work on your own. The kit consists of bolts, with which the tightening and an eccentric are made.
It is worth noting that there are two types of bolts:
- Some are mounted in an already completed product using dowels.
- Others use without dowels. They are screwed directly into the surface itself.
It is also worth paying attention that the bolts are distinguished by their appearance, size and their threads. It all depends on where exactly you want to use them, if they are used in the sofa corner mechanism, then it is worth choosing large and medium bolts
First you need to drill holes of the required length and diameter. Since it is quite difficult to determine these parameters on your own, the masters manage to do little tricks: on the drill itself, mark the desired length and mark it with electrical tape. With this method, you will not only be able to control the length of the hole, but you will also save yourself from drilling through the panel.
Next, you need to insert dowels into the finished holes if you use special bolts in your work. The next step is to tighten the bolts and eccentrics to some depth. The shape of this mechanism has a helical slot. When installing, the tip of the screw should get into it so that when the eccentric is turned, the panel is securely fixed.
To mask traces of bolts and holes, special caps made of plastic are often used. They should be selected according to the color of the finished part. With their help, you will have a beautiful image of the finished mechanism. Such a device is great for screeding parts during the manufacture of a do-it-yourself wardrobe system.
With the help of an eccentric tie, you will not only get an aesthetic and beautiful appearance of the part, but also reliability in that it is fastened sufficiently.
Installation of stretch ceilings
How to work with drywall
Choice of paints for ceilings and walls
How to level walls with drywall
Cable ties
Cable ties are fasteners used for fastening wires, cables, corrugations, wire banding and other electrical installation operations. Initially, cable ties were developed and introduced for use for the needs of the aviation industry (easy and reliable fastening of electrical mains of aircraft). Later, cable ties were refined, modernized and widely used in many areas of use.
Due to the simplicity and speed of use, reliability of use, this type of fastener is widely used in industry, in construction and for domestic purposes, and the scope of cable ties by "craftsmen" simply defies description :).
Modern cable ties, depending on the conditions and application, can be metal or nylon. Within the framework of one article, it is quite voluminous to talk about all types of cable ties / clamps, so this article only touches on the topic of nylon ties.
Depending on the purpose of the application, nylon ties are divided into types: - standard cable ties
Structurally, a standard cable tie consists of a toothed band and a locking head. The teeth of the tape have a sawtooth profile, when the free end of the tie is inserted into the head, the teeth engage with the ratchet latch / lock (the movement of the tape is only in one direction - for tightening).
- reinforced cable ties with metal teeth
according to the principle of operation, a reinforced screed is similar to the standard one, however, there are structural differences - the tape is without teeth, and the retainer is made of stainless steel
- all-weather cable ties with double nylon lock
ties of this type are made of Nylon 12 material, which has a special strength and resistance to various adverse weather conditions, and a double lock provides a secure fixation at various temperature characteristics.
- cable ties with screw mounting device
the head of this type of couplers is made with a mounting hole for attaching the coupler to the working / bearing surface using self-tapping screws / screws
- cable ties with dowel
ties of this type have a detachable lock (you can add and remove wires) and a dowel, which facilitates quick and convenient installation of electrical wiring lines on the walls
- cable ties with dowel-piston
couplers with a dowel and a piston allow you to mount electrical wires on metal bases up to 2 mm thick
— cable ties with a platform for dowels
has a dowel with a platform screwed onto it, which allows you to mount electrical wiring lines on concrete, brick and wooden bases without the use of self-tapping screws / screws.
- detachable cable ties with ball lock
reusable ties, characterized by the presence of a ball tape and a flat lock with a groove for fixing the tape
– detachable cable ties with a horizontal lock
reusable ties for mounting and bundling wires, provide quick and convenient installation, with the possibility of further correction of the line by quantity, or replacement of wires
— detachable cable ties
reusable ties for mounting and bundling wires, the lock has a lever device for opening and unlocking the fixation.
In addition, nylon ties may be of other types and differ in the color of the product.
xn--itbbuhggciegvg.xn--p1ai
What is an eccentric screed
An eccentric coupler consists of parts of fittings that must be connected using special fasteners. The eccentric tie is the most economical option as it can be used multiple times.
An eccentric coupler consists of a drain, which has a T-shaped head, and a special retainer called an eccentric. The eccentric can have a different diameter:
- 12 millimeters;
- 15 millimeters;
- 25 millimeters.
The eccentric coupler is characterized by invisibility from its outer side, which provides a lot of convenience during its use. Thanks to the use of minfix, the number of used products is significantly reduced.
The composition of the eccentric coupler includes a cylinder. Its installation is carried out in a special hole, which is located in the part.This part must be attached to the main part of the screed.
Also, the eccentric coupler consists of a plug, with which the end surface of the eccentric is closed.
What it is
This is the most common type of furniture fastener, which consists of the eccentric itself, the rack and the futor. The latter plays the role of a nut. All of them are divided into the following types:
- diameter and size;
- the length of the rack itself;
- rack mounting type (screw or self-tapping screw);
- futorka type.
Similar fasteners are used for products made of chipboard or chipboard
"assembly-disassembly" type. If you are making furniture for yourself and you know that it will often move from place to place, then it is better to use just such elements.
These connections are preferably used in assembly where no traces of fasteners should be visible. Only the eccentric itself will be visible, and then only from the inside. In the future, it can be hidden with an additional plug.
How best to fix the cable with your own hands in a house or apartment
March 19, 2014
Wiring and its connections
23084 views
This article will discuss the best and most practical ways in which you can independently fix an electrical cable or pipe to a wall, ceiling or floor.
Over my many years of practice as an electrician, I have met quite a few different methods of fastening, but now I will tell you about the most convenient, fast and practical of them.
When installing an electrical cable, it is necessary to retreat from 40 to 60 centimeters between its fasteners. And also follow the generally accepted rules of electrical installation set forth in this article.
What is the best way to fix the cable in houses and apartments.
Fixation in the strobe with alabaster, gypsum or other quick-drying mortar. Many electricians lubricate every half meter of electrical cable or pipes in a strobe using any quick-setting mortar. What are the advantages of this method:
A narrow strobe with a small margin in cable width is enough.
Work speed.
Low price.
There is no need to look for and buy additional special fasteners.
No punch or drill required for installation.
The solution needs to be diluted frequently.
More than two cables in one strobe is very difficult to cover up.
It is difficult to fix pipes with this method.
An inexpensive and practical method that allows you to fix the cable will be fastening with dowel-clamps, which are available for both flat and round cables. When buying, it is necessary to select the size, depending on the expected cross-section and the number of electrical cables. Before installation, we drill a hole of the required diameter with a puncher or a drill, grab a bundle of wires and hammer in a dowel-clamp. I do not use this method in my work due to the lack of versatility or the need to select the appropriate fastener size for each specific case.
A more universal mount on the dowel - screeds. With its help, you can easily fix both flat and round cables, each individually or several together. It is simply inserted into the drilled hole, after which the expandable plastic peg is hammered.
A cable tie with a hole for a dowel-nail or self-tapping screw allows you to quickly fix the cable, pipe to the wall and ceiling with your own hands. We drill a hole, nail the eye of the tie with a dowel-nail, and all that remains is to insert and fasten the wires by simply pulling the tip into the self-locking lock.
To fasten the second cable to the already fixed cable, a simple plastic tie with a lock allows. They come in different sizes - colorless or black. The latter can be used outdoors because they are UV resistant.
Plastic dowel for clamp. We drill a hole, hammer it in and insert a simple clamp of the required length and thickness.My favorite method used for fixing electrical wiring lines on walls or ceilings, due to its versatility, you can always quickly insert any required size screed into a plastic dowel, add another one or replace it with another.
For fixing pipes made of metal or HDPE in the floor, as well as a metal hose, the best option would be to use metal brackets of the appropriate diameter. For fixing in the floor, the variant with one hole is sufficient.
Clips I use for fastening metal, PVC smooth and corrugated pipes to the ceiling and walls
The clip is attached to the surface with a dowel, and the pipes simply snap into place, so it is important to accurately select the size of the clip for the diameter of the pipe. Otherwise, you won’t be able to snap it in or the pipes simply won’t hold.
Nail clips are commonly used to attach television, telephone, or computer cables to a wall. They are available separately for flat and round cables.
A mounting platform with a self-adhesive base will be useful for fixing not only walls, but also furniture on ready-made surfaces
It adheres securely to the surface, which is not damaged. You can always peel off the pad, after which there will be no traces left.
For fastening on drywall or PVC panels, special screw-in screws or butterflies are used, which are inserted into the hole and fasteners are screwed to them using a self-tapping screw. The picture below shows how to attach with butterflies.
I recommend reading our article "How to ditch the walls".
jelektro.ru
Dresser assembly
To properly make a chest of drawers, you need to follow the mounting instructions given in the design drawing. Basically, the screed with an eccentric is advisable when attaching the chest of drawers, so as not to disturb its appearance with holes.
The order of assembly of the dresser is as follows:
- In the holes on the side parts of the chest of drawers, fix the guides for the drawers with self-tapping screws. The right and left guide are marked with the letters "R" and "L" respectively
- To assemble the base of the chest of drawers, insert euro screws into the holes in the sidewalls to attach the base. Then pull off the sides and plinth. Close the exit points of the euro screws with plugs in the color of the sidewalls.
- Flip the chest of drawers so that the base is on the bottom.
- Insert the dowels into the upper end of the sidewalls.
- Insert the eccentric rods into the holes on the edges of the chest of drawers.
- Install the cover in such a way that the rods and dowels occupy their grooves.
- On the inside of the chest of drawers, install eccentrics and twist the coupler.
- Supplement the drawers with guides, insert them into the chest of drawers.
- Attach the back wall.
Thus, thanks to the eccentric tie, it is possible to ensure the invisibility of the connection on the fronts of the drawers and on the lid of the chest of drawers.
Advantages and disadvantages of such mounts
The main advantages and disadvantages of using eccentric couplers include:
- Adds rigidity to the finished product.
- Their installation is quite simple, you can easily handle it yourself.
- Eccentric ties for furniture can be used repeatedly. This is very economical.
- Creates a beautiful image of your design. Does not leave any visible damage that was used with the installation.
The disadvantages of using this type of structure include:
- This kind of compression needs high-tech equipment in the manufacture of its elements.
- It is quite an expensive pleasure.
- Over the period of operation, furniture eccentric screeds may weaken.
- Installation takes place immediately in 3 planes, which creates a lot of trouble
Types of eccentrics
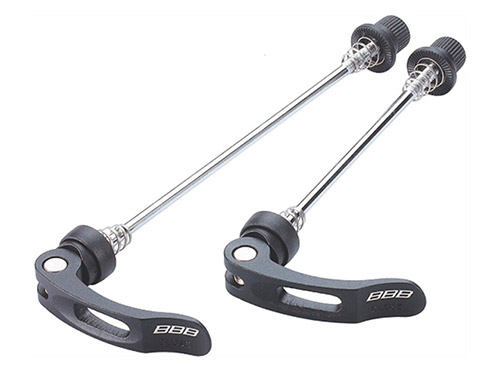
The variety of bicycle eccentrics is amazing - there are two of them:
- Traditional.
- Adjustable (clix).
The fundamental design of both types is similar - it is a combination of the following:
- Shaft axle inserted into the wheel hub.
- Adjusting nut. Calibrates the required axis length.
- Pressure disk. The working unit through which the fixed element (wheel, seatpost) is fixed.
- Eccentric. Locking lever equipped with an offset pressure roller.
The traditional eccentric differs from the Clix in the absence of additional structural elements: a locking button on the adjusting nut, a pusher and a cup.
How to fix the wheels on the eccentric
Installation of wheels, depending on the method of fastening, is carried out in different ways. Mounting methods for traditional and adjustable eccentrics are largely similar, but will be discussed separately.
Wheel fastening with a simple eccentric
- The fastening lever is transferred to the open state "Open".
- The wheel is installed in dropouts so that the hub fits snugly against the inner area of the bicycle fork legs.
- We translate the eccentric lever into the adjustment state: intermediate between “Open” and “Close”.
- Do not tighten the adjusting nut tightly, leaving a small gap.
- Move the eccentric to the “Close” position.
- When manipulating the lever tactilely, a certain resistance should be observed.
- If the resistance is insurmountable, then it is necessary to unscrew the adjustment nut one turn.
- If the growl closes without effort, then the adjustment nut must be tightened.
The applied force to close the eccentric must not be less than 5-6 kg (54 N) and more than 20 kg (200 N).
When closing the eccentric, make sure that the levers in the closed state do not touch or interfere with other elements of the bike (shields, trunk, etc.).
After fixing the wheel, it is necessary to perform diagnostics:
- The eccentric lever must not rotate around its axis.
- The wheel must spin strictly in its own plane and be securely fixed.
To check the fixation, lift the bike and hit the wheel from above.
To dismantle the wheel, you need to open the eccentric, i.e. move it to the “Close” position, unscrew the adjustment nut a few full turns (3-4) and remove the wheel from the bike dropouts.
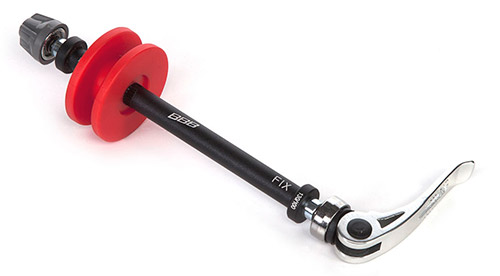
Fastening the wheel with an eccentric type “Clix”
Unlike a traditional mechanism where the force clamp must be adjusted every time it is dismantled, the “Clix” system with its design allows you to use an adjustment once made, always.
However, this design feature of the mechanism does not allow the use of a once adjusted eccentric on other bicycle forks or with other wheels.
How to install the wheel using the “Clix” method
- Move the eccentric to the “Open” position. We press the cup of the mechanism with the eccentric lever and firmly insert the wheel into the dropouts of the bike.
- We translate the eccentric into the locking position “Close”. When closing the fastening mechanism, the eccentric lever must not be rotated, as this may lead to a deterioration in the quality of fastening.
In advance, i.e. before fixing the eccentric, set the lever in such a position that, after closing it, it does not interfere with and does not come into contact with other elements of the bicycle.
Check the reliability of the wheel fastening, in the same way as when fastening with a traditional eccentric.
Summing up, it should be mentioned that the development of bicycle eccentrics is not over.
The main disadvantage of them, as practice shows, is the increased risk of removal of bicycle equipment by ill-wishers. However, there are anti-theft bicycle eccentrics.
In some designs, hex keys are used instead of levers to ensure safety, while in others, the locking lever is equipped with secrets, for example, opening the eccentric only in the upside down position (bike on the handlebar and saddle).
Dismantling
Replacing the eccentric in the bathroom begins with the dismantling of obsolete or unusable equipment.Performing work in this sequence will allow you to correctly select a new device, taking into account all the features of the pipe supply and the wishes of the customer.
How to unscrew the eccentric? The work is recommended to be performed in the following sequence:
- shutdown of the water supply. If you do not first shut off the flow of water to the mixer, then replacing the eccentrics will lead to flooding of the bathroom and neighbors living on the lower floors;
- disconnecting the shower hose from the mixer;
- dismantling the mixer. To perform this work, it is necessary to loosen the nuts securing the device using an adjustable wrench or wrench of the appropriate size;
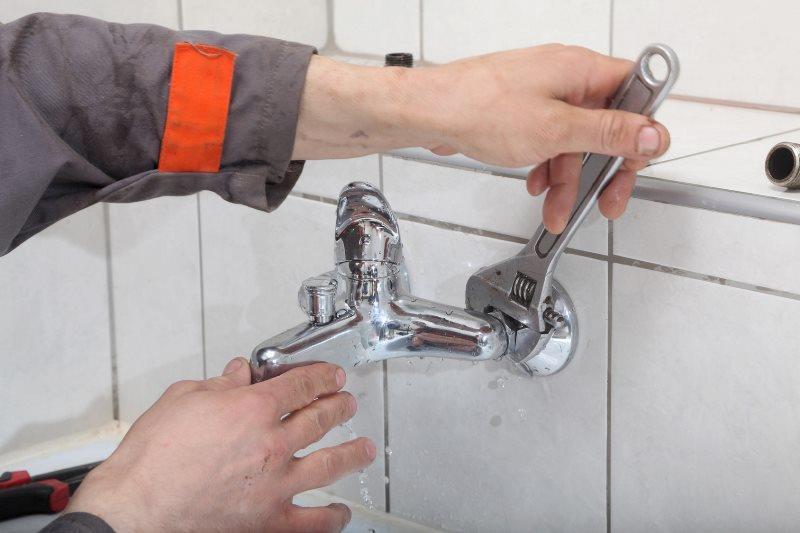
Dismantling the faucet in the bathroom
- removal of the reflector - a special decorative device that covers the junction of the pipes and the mixer. The reflector is installed by screwing onto the eccentric. Therefore, to dismantle it, it is enough to unscrew the device;
- dismantling (unscrewing with a wrench) eccentrics.

Unscrewing the device from the pipe
It is required to unscrew the eccentrics from the pipes very carefully so as not to damage the threads on the pipes.
After performing work on the removal of eccentrics, it is necessary to clean the walls, pipes and other components from accumulations of dirt, rust and other types of contaminants.
Selecting a new eccentric
When choosing new eccentrics, the following parameters should be considered:
- Production material:
- the most common are eccentrics made of brass. They are characterized by low cost, corrosion resistance and durability in the absence of external mechanical influences;
- it is recommended to purchase solid brass products. Eccentrics can also be made of bronze, copper and other alloys. The use of such devices is advisable when installing a mixer and pipes made of similar materials.
- Adapter sizes:
- a short eccentric, having a length of 3 - 4 cm, is able to level the gap, the size of which is not more than 8 cm.
- an elongated eccentric 4–5 cm long is selected when the gap is 8–10 cm.
- a long adapter (more than 5 cm) is installed to compensate for larger gaps or the need to move the mixer above or below the specified level.
If for the installation of the mixer it is not necessary to move the pipes, then a straight eccentric is installed.
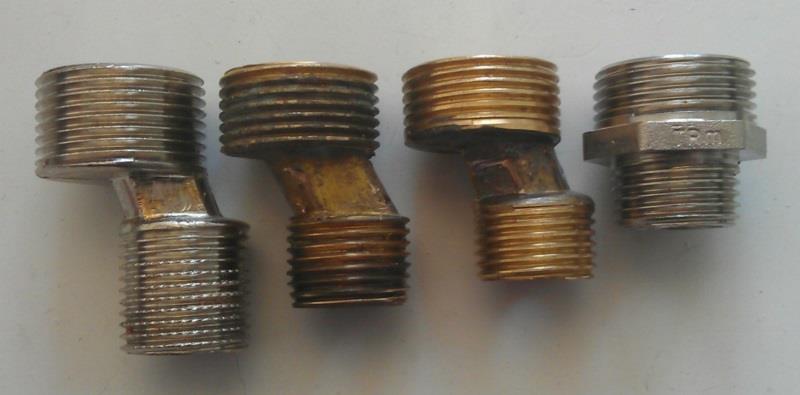
Varieties of eccentrics depending on the size
- Input diameters. The standard eccentric has a diameter of ¾ inch, designed to connect the device to water pipes and ½ inch to connect the device to the faucet. On sale you can also find products with other sizes in accordance with similar parameters of pipes and a mixer.

Eccentric with standard parameters
Drawer Assembly
It is recommended to assemble the box with an eccentric coupler in the following sequence:
- Screw the eccentric screw into the front surface of the drawer.
- Insert dowels into the recesses on the sides of the screw hole, seal them with a hammer.
- Insert the side of the box onto the dowels and the stem.
- With a hammer, help the sidewall to take place tightly.
- Insert the eccentric into the groove in the sidewall as far as it will go.
- Without exerting great effort, turn the eccentric to the stop.
- Repeat all steps on the other side.
- Insert the bottom of the box into the grooves.
- Screw the knitting of the box with euro screws.
- Fix the bottom with a stapler.
- On the side, tighten the euro screws with a wrench.
- Attach a handle.
What is a bicycle eccentric
The eccentric type of fastening appeared relatively recently, but has firmly taken its place. It found its main application in the fastening of bicycle wheels, seatposts and in the construction of folding bike frames.
In addition to their main duties, eccentrics are used in mounting various additional bicycle accessories, where clamps are present.
The principle of operation of this clamping mechanism is that the used cylindrical shaft with an offset axis converts its rotational movement into translational. In other words, when the shaft rotates, the pressure necessary for fixing is created at the point of attachment contact.
Advantages and disadvantages of eccentrics
The main reason for the appearance of this fastener is the convenience and ease of use. In order to dismantle or fix this or that equipment, wrenches are not needed, and in time it will take several seconds. In terms of reliability and tightening force, the eccentric is not inferior to traditional nut fasteners.
Advantages of eccentrics:
- It is difficult to underestimate them on the road, when there is a need to quickly dismantle the wheel for its repair.
- When adjusting the saddle in height with simultaneous centering relative to the bicycle frame, this fastener is indispensable.
- Not everyone likes to carry sets of wrenches with them. It's not as hard as it's not aesthetically pleasing: to drive with rattling keys in your pouch.
Cons of an eccentric design:
Unlike a conventional nut, this design is more complex, and therefore more susceptible to shock absorption.
With prolonged use, the eccentric springs weaken, and the mount becomes unreliable.
In practice, of course, no one lost the wheels, but the consequences will not be slow to declare themselves. The main of which is a violation of the adjustment of the brakes, primarily disc brakes.
You can identify the loosening of the fastening by changing the course of the wheel - a play appears.
The ease of handling fasteners makes life easier not only for the owner of the bike, but also for other unscrupulous citizens.
Arriving at the parking place of a two-wheeled "horse", you can find only a fastened frame with a steering wheel. Good wheels and a high-quality saddle with a seatpost are an excellent trophy for “unclean” colleagues.
Therefore, saving on the weight of wrenches will not work, since anti-theft locks and blockers will take their place.
Conclusion
The review shows the most common types of fastening and tie furniture fittings. However, to ensure the strength and rigidity of both individual elements and the product as a whole, it is necessary to accurately mark and strictly follow the technology of preparatory and assembly work.
From the video tutorial, you will learn in more detail how to use confirmation correctly to connect furniture elements.
https://youtube.com/watch?v=aSe80rh9kkc
Read more on the topic:
- Eccentric coupler: types, application features and mounting options
- Types of furniture hinges and their purpose: how to choose a reliable option
- Types of furniture fasteners: categories and special options
- Full extension ball guides: let's study in detail the characteristics
- Furniture fittings - support rollers. Features and selection options