The nuances of installing overhead sinks
The method of installing an overhead sink in a countertop has a number of features. Installation is carried out on a separate module so that it covers its entire upper part.
Such work is simple, since L-shaped elements with an oblique slot are used for fixation. You should first prepare at least 4 - 5 fasteners. Before you put the sink in the countertop, you need to connect the mixer, which allows you to not experience difficulties during installation in the future.

Overhead sinks are fixed in the following sequence:
- Fasteners are applied to the inside of the kitchen cabinet and appropriate marks are made.
- Self-tapping screws of 15 millimeters are screwed in the intended places so that they are at least 5 millimeters above the markings.
- The end of the cabinet is treated with a sealant to simultaneously protect the furniture and increase the reliability of the sink attachment.
- The structure is placed on screwed screws and moved to the fullest possible fit.
- Next, the fasteners are fixed and excess sealant is removed, after which the sink is connected to the water supply system and the wastewater drainage system.
Preparation of tools and materials
Before you engage in inserting a sink into the countertop with your own hands, check its completeness with fasteners. Usually they are clips. They are placed on both sides, placed on the cut end and on the inner surface of the sink. The kit should include a tubular seal used to seal the joints.
Next, prepare the tools:
- electric jigsaw or hand tools and a set of files for woodworking;
- drill with a 10 mm metal drill;
- self-tapping screws;
- measuring tools - level, pencil, ruler, tape measure;
- Phillips screwdriver and knife;
- silicone colorless sealant.
Marking
The following describes the procedure for installing a rectangular mortise product. To figure out how to cut a countertop for a round sink, you will need to familiarize yourself with the nuances of this work in addition.
Perform markup like this:
With a pencil, in the place where the location of the sink is planned, two perpendicular lines are drawn - the drain will be located at the point of their intersection.
The sink is turned over and laid on the countertop with a bowl upside down and aligned according to the markings, while the intersection is visible through the drain hole.
With a simple pencil, outline the outer edges of the product along the perimeter
It is important not to forget to take into account the parameters of the sink and the mutual location of its boundaries and the remaining free area of the countertop. So that the mortise bowl does not interfere with the closing of the doors, it should be placed inside the nightstand.
Then they measure the width of the side of the product and, in accordance with it, apply an internal contour, a cutting line will pass along it
On average, this value is about 12 millimeters.
Before installing a round or other shaped sink into the countertop, it is necessary to act so that it freely enters the hole, while a deviation from the marking is allowed, not exceeding 3 millimeters.

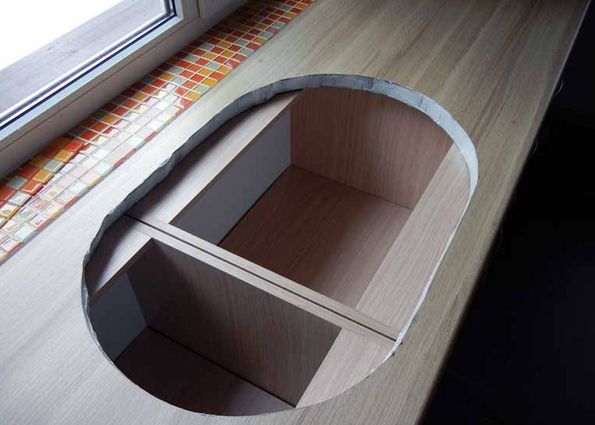
Creating a hole in the countertop
The work related to how to properly cut the countertop under the sink is performed with an electric jigsaw, adhering to certain rules:
- Before the saw of this tool enters the material to its full depth, it is required to create technological holes in the corners of the internal marking using a drill or screwdriver. They will make the job easier. In this case, the corner holes are placed in the inner plane of the cut material, and their edges can only come into contact with the cut line.
- In order to prevent the appearance of chips on the laminate flooring, all work on how to properly cut the sink in the countertop should be done on its front surface.
- After holes are created at the corners of the plane to be cut, a place for washing is cut out with a jigsaw along the inner border of the cut. To prevent the cut off part of the tabletop from falling, self-tapping screws are screwed along the line of movement of the jigsaw to ensure its fixation.
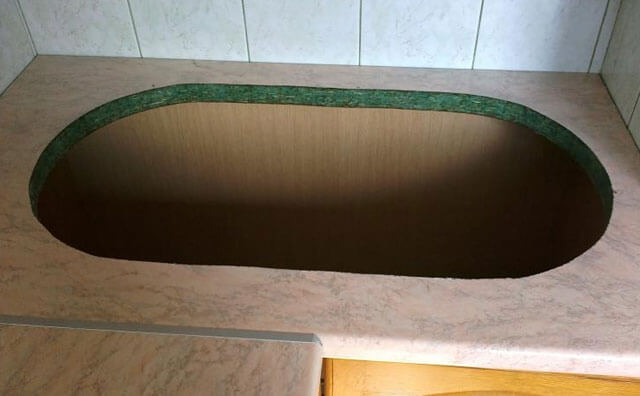
- After the hole is prepared, the fasteners are removed and the cut is cleaned of dust. The sink is pre-placed in place to make sure it fits the size of the product. The sink in the finished hole must be mounted freely. If you have difficulties with how to insert a sink into the countertop, cut the edges using a jigsaw.

Materials for surface-mounted and mortise-type models
These products are made from stainless steel. Today, both of them are the most popular. Externally, mortise options may look different. Often there are stainless steel products with a smooth texture and imitating linen texture.
In addition to traditional stainless steel or enameled steel sinks, mortise options made of stone and composite materials are popular. Likewise, bowls are in demand artificial stone. Sinks made from composite materials have a spectacular granular structure and look like polished stone.
Mortise structures made of artificial raw materials are kitchen accessories. They have excellent aesthetic and performance characteristics, including resistance to scratches, abrasion and sudden temperature changes.
The shape of sinks is diverse: in addition to products with one, there are also those that have 2 - 4 bowls, which are shallow, deep and equipped with additional dryers.
Fixing a sink sink in a countertop
You need to know not only how to embed the sink into the countertop correctly, but also how to securely fix it:
- A layer of silicone is applied to the place between the outer marking line and the cut.
- Fasteners are mounted on the inside of the sides of the bowl and, after making sure that they are not completely fixed, proceed to the installation of the product.
- The process begins with the deepening of the side where the location of the crane is planned. The rest of the structure is gradually lowered into the hole until the sides and the inner surface of the tabletop come into contact.
- During installation, you need to work on the entire surface of the sink, which will remove excess silicone from under its sides.
- Using the building level, you need to make sure that the installation is correct and then proceed to the final stage, during which the final fixing of the fixing parts is carried out.
Further installation work is carried out in the following sequence:
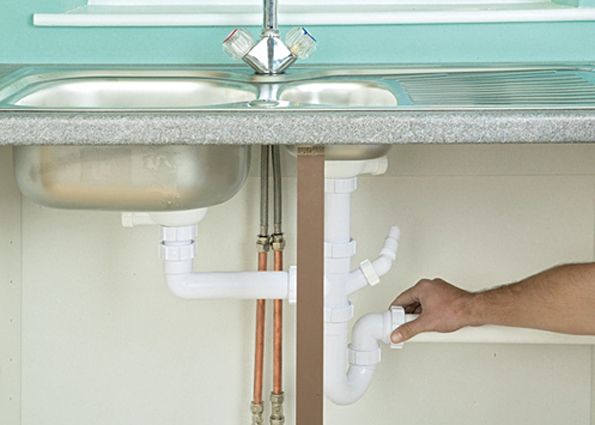
- a siphon outlet is introduced into the sink, experts recommend using its S-shape;
- a pipe is connected to the siphon - either soft corrugated or hard corner;
- the tube from the siphon is led into the sewer;
- All connections are checked for leaks.
The nuances of installing overhead sinks
The method of installing an overhead sink in a countertop has a number of features. Installation is carried out on a separate module so that it covers its entire upper part.
Such work is simple, since L-shaped elements with an oblique slot are used for fixation. You should first prepare at least 4 - 5 fasteners. Before you put the sink in the countertop, you need to connect the mixer, which allows you to not experience difficulties during installation in the future.
Overhead sinks are fixed in the following sequence:
- Fasteners are applied to the inside of the kitchen cabinet and appropriate marks are made.
- Self-tapping screws of 15 millimeters are screwed in the intended places so that they are at least 5 millimeters above the markings.
- The end of the cabinet is treated with a sealant to simultaneously protect the furniture and increase the reliability of the sink attachment.
- The structure is placed on screwed screws and moved to the fullest possible fit.
- Next, the fasteners are fixed and excess sealant is removed, after which the sink is connected to the water supply system and the wastewater drainage system.
Installing a recessed sink in a countertop
The following will describe how to install a recessed sink in a countertop made of chipboard and covered with plastic on the outside. If you need to find out how to do this work when the countertop is made of other materials, you can familiarize yourself with the product passport, in which the sink manufacturer gives appropriate recommendations.
The process of how to embed a sink into a countertop has several stages:
- Preparation of a set of tools and purchase of building materials.
- Applying markup.
- Creating a hole in the tabletop.
- Cut processing.
- Mounting in the countertop of the mortise sink.
Fixing a sink sink in a countertop
You need to know not only how to embed the sink into the countertop correctly, but also how to securely fix it:
- A layer of silicone is applied to the place between the outer marking line and the cut.
- Fasteners are mounted on the inside of the sides of the bowl and, after making sure that they are not completely fixed, proceed to the installation of the product.
- The process begins with the deepening of the side where the location of the crane is planned. The rest of the structure is gradually lowered into the hole until the sides and the inner surface of the tabletop come into contact.
- During installation, you need to work on the entire surface of the sink, which will remove excess silicone from under its sides.
- Using the building level, you need to make sure that the installation is correct and then proceed to the final stage, during which the final fixing of the fixing parts is carried out.
Further installation work is carried out in the following sequence:
- a siphon outlet is introduced into the sink, experts recommend using its S-shape;
- a pipe is connected to the siphon - either soft corrugated or hard corner;
- the tube from the siphon is led into the sewer;
- All connections are checked for leaks.
Creating a hole in the countertop
The work related to how to properly cut the countertop under the sink is performed with an electric jigsaw, adhering to certain rules:
- Before the saw of this tool enters the material to its full depth, it is required to create technological holes in the corners of the internal marking using a drill or screwdriver. They will make the job easier. In this case, the corner holes are placed in the inner plane of the cut material, and their edges can only come into contact with the cut line.
- In order to prevent the appearance of chips on the laminate flooring, all work on how to properly cut the sink in the countertop should be done on its front surface.
- After holes are created at the corners of the plane to be cut, a place for washing is cut out with a jigsaw along the inner border of the cut. To prevent the cut off part of the tabletop from falling, self-tapping screws are screwed along the line of movement of the jigsaw to ensure its fixation.
- After the hole is prepared, the fasteners are removed and the cut is cleaned of dust. The sink is pre-placed in place to make sure it fits the size of the product. The sink in the finished hole must be mounted freely. If you have difficulties with how to insert a sink into the countertop, cut the edges using a jigsaw.
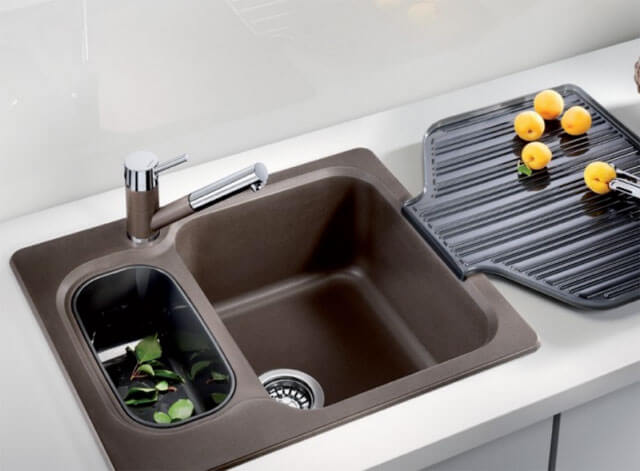
Types of sinks and their design features
There are a number of requirements on how to properly install a sink in a countertop. This process must be carried out according to technology. The choice of a specific solution regarding the method of installation depends on the design of the washbasin.
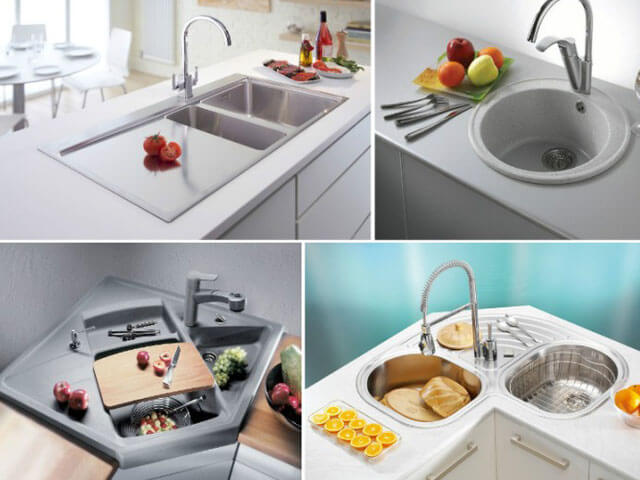
The following types are the most popular:
- overhead products. They are considered the most budget option, which is distinguished by the ease of mounting the sink into the countertop. This installation principle is based on the fact that the sink is placed on a stand-alone cabinet, as a result of which it is a continuation of the countertop. Sinks of this type have disadvantages - insufficient thickness of the material of the products and the presence of a gap between them and the countertop, which causes inconvenience. Experts recommend choosing an overhead sink when there are several separate sections in the kitchen set. If they are united by a common countertop, the best option would be to use the built-in model.
- Mortise sinks. Installation of these products is carried out directly on the countertop. Installation work should begin with the preparation of a hole in it. The technology of inserting the sink into the countertop provides for attaching the structure to the inside of the module using special brackets and clamps. Built-in models of this type are distinguished by their solid appearance and convenient operation. Despite the fact that they have a high cost, specialists with extensive experience give preference to them because of their practicality and the ability to prevent moisture from accumulating between the bedside tables.
- Undermount sinks. The price of these innovative models is so high that it makes them inaccessible to most consumers. The principle of installation of such sanitary wares involves fixing them below the level of the countertop and therefore they form a single whole with it. Undermount sinks are aesthetically pleasing and sound-absorbing. Thanks to effective sealing of joints, these products are characterized by hygiene and durability.
Types of sinks and their design features
There are a number of requirements on how to properly install a sink in a countertop. This process must be carried out according to technology. The choice of a specific solution regarding the method of installation depends on the design of the washbasin.
The following types are the most popular:
- overhead products. They are considered the most budget option, which is distinguished by the ease of mounting the sink into the countertop. This installation principle is based on the fact that the sink is placed on a stand-alone cabinet, as a result of which it is a continuation of the countertop. Sinks of this type have disadvantages - insufficient thickness of the material of the products and the presence of a gap between them and the countertop, which causes inconvenience. Experts recommend choosing an overhead sink when there are several separate sections in the kitchen set. If they are united by a common countertop, the best option would be to use the built-in model.
- Mortise sinks. Installation of these products is carried out directly on the countertop. Installation work should begin with the preparation of a hole in it. The technology of inserting the sink into the countertop provides for attaching the structure to the inside of the module using special brackets and clamps. Built-in models of this type are distinguished by their solid appearance and convenient operation. Despite the fact that they have a high cost, specialists with extensive experience give preference to them because of their practicality and the ability to prevent moisture from accumulating between the bedside tables.
- Undermount sinks. The price of these innovative models is so high that it makes them inaccessible to most consumers. The principle of installation of such sanitary wares involves fixing them below the level of the countertop and therefore they form a single whole with it.Undermount sinks are aesthetically pleasing and sound-absorbing. Thanks to effective sealing of joints, these products are characterized by hygiene and durability.
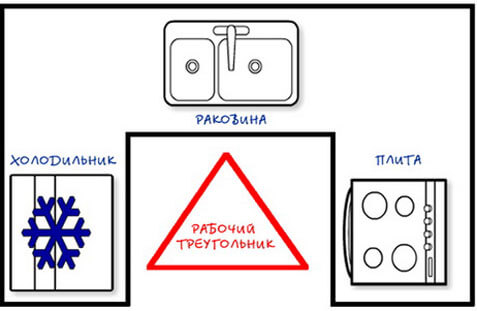
Purpose of a modern kitchen sink
In order to maximize the optimization of the cooking process, it is necessary to correctly place furnishings and various appliances in the kitchen. According to the existing principles of ergonomics, the placement of furniture and equipment in this room is carried out taking into account the sequence of work.
For this reason, furnishings are placed in the direction from left to right, and in a specific sequence: refrigerator - then dishwasher (if any) - kitchen sink - gas or electric stove. Between them should be placed modules with working surfaces.
It is also necessary to observe the minimum gaps between the above objects:
- the distance from the sink to the stove, as well as between it and the refrigerator, should be about 40 centimeters;
- the refrigerator and stove are installed so that there is 40 centimeters between them.
Before you embed the sink into the countertop in the kitchen, you need to choose the right one, taking into account the following characteristics:
- Functionality. It depends on the intended type of kitchen work, the number of bowls in the sink and the wings intended for drying. These objects will be used when the user is used to performing several manipulations at the same time.
- capacity. When determining this parameter, you need to take into account the number of dishes that have to be washed daily.
- Durability and stability. They mainly depend on the material of manufacture of the structure.
- Design. The design of the sink must ideally match the surrounding interior so that it is a full-fledged object of the created concept.
- Convenient use. Its configuration should ensure comfortable performance of kitchen work.
How to embed a sink into a countertop with your own hands

How to properly and easily embed the sink into the countertop? This question is faced by everyone who started a renovation in their kitchen. We will tell you in an accessible and detailed way how to make the installation competently and quickly.
How is the countertop sink installed?
Often the installation of the sink is carried out by the manufacturer. But it happens that this service is not registered in the price list. Then this care is placed on your shoulders. But don't worry. You can install the sink yourself, armed with the necessary tools and professional advice.
The sink insert includes several stages. At the initial stage, you must make a hole in the middle of the array, then process the edges. The next stage is this insertion of the sink, fixing its back side and sealing the distance between the worktop canvas and the sink. The final stage is the supply of water and sewer communications.
The key to a high-quality sink installation is: reliable fastening, sufficient fit and high-quality sealing. Moisture is a rather aggressive factor influencing the kitchen worktop, especially if it is made of chipboard. High-quality installation will not allow the countertop to dry out or swell, which will extend the service life many times over.
Garden sprayer: types, tips on how to choose, do-it-yourself assembly
Markup execution
This is quite a responsible stage. Place the sink in the center of the countertop. Remember that the gap from the edge of the countertop to the edge of the sink must exceed 50 mm. If this distance is less than 50 cm, then the sink must be deepened.
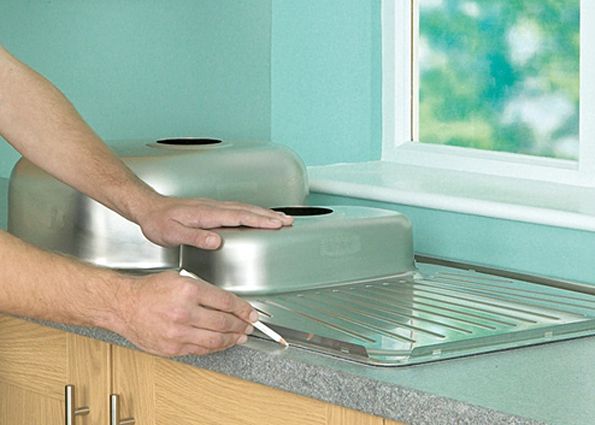 The distance from the corner plinth should be more than 30 mm in order not to create problems during cleaning. If the dimensions of the countertop allow, then it is better to leave some space on both sides for household chemicals and a sponge.
If the manufacturer attaches a template for the sink insert, then the task is greatly simplified.The template is glued to the tabletop and makes marking easier.
 In the event that the countertop is without a template, it should be installed on it, turning over, the sink and circled around the contours with a washable marker. If in one block there is a sink and a drying compartment or a waste tray, then one common hole is cut out.
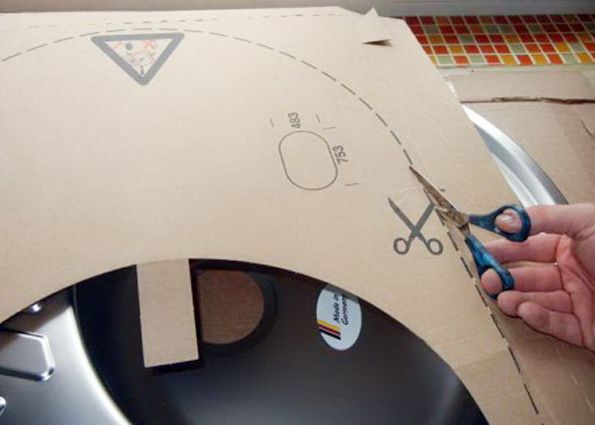
How to make a hole for a sink?
In order to make a hole in the countertop, you need an electric jigsaw. It is suitable for wood and chipboard countertops. If the countertop is made of durable materials, then the jigsaw will not cope. First, prepare 4 holes with a diameter of 1 cm at the corners of the rectangle, without crossing the marking line. Then a file with the required tooth length (2 mm) is put on the jigsaw. To avoid chipping on the front surface, choose the opposite direction of the tooth.
Apron for the kitchen (photo): choice of design and material
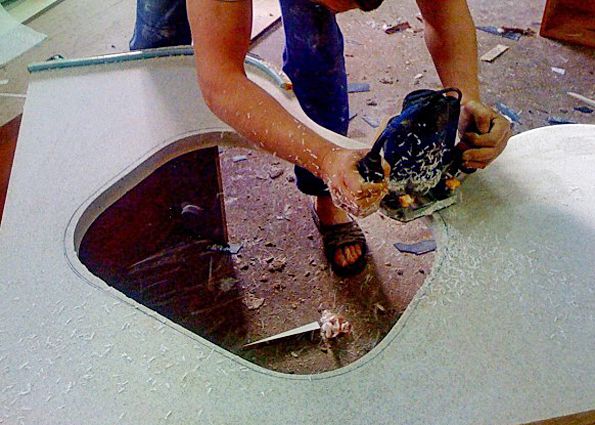 Holes are made on the left and right, and then the wooden plank is pulled with self-tapping screws across the sawn lines so that the cut-out part does not fall prematurely under gravity. The cut out part is carefully removed, and the exposed edges of the hole and irregularities are coated with liquid silicone.
Installation of a sink and connection of communications
Here again, liquid silicone is required. Stepping back a couple of millimeters from the edge of the hole, we apply silicone with a flagellum in thickness just above the side of the sink. Stepping back from the first one by another centimeter, we apply another flagellum.
 After half an hour, the silicone will dry and stop sticking to your hands. Then the sink must be inserted into the hole and the edges are pressed firmly so that the silicone bundles take the shape of the sink, and leave for a few minutes. Then the sink is removed and the silicone is checked. If it is not broken, then everything is in order, and the sink will have a reliable additional side.
 We attach fittings to the countertop for installing the mixer and hose. It is more convenient to fix the siphon to the installed sink. On many sinks there are special loops for screw clamps in the form of legs. They help tighten the sides to the countertop more tightly.
Painting with hearts in the technique of "thread"
Tips from professionals
The hardest part is getting the hole right. If it turns out to be more than it should be, then the paws will not be able to hold the sink. Cut out the hole, almost reaching the markup, and if the sink does not fit, it will help to fit the hole to the size - a rasp.
Different silicone hardens differently. Before pressing down the edges of the sink, check how long the drop drags on in minutes. If you rush, the silicone may burst.
Do not tighten the screws too tight. Otherwise, the sides of the sink will bend upwards.
How to embed a sink into a countertop with your own hands? updated by: author:
This is interesting: Do-it-yourself supply and exhaust ventilation of a private house - device and diagram
Mounting a recessed sink in a countertop
The following will describe how to install a recessed sink in a countertop made of chipboard and covered with plastic on the outside. If you need to find out how to do this work when the countertop is made of other materials, you can familiarize yourself with the product passport, in which the sink manufacturer gives appropriate recommendations.
The process of how to embed a sink into a countertop has several stages:
- Preparation of a set of tools and purchase of building materials.
- Applying markup.
- Creating a hole in the tabletop.
- Cut processing.
- Mounting in the countertop of the mortise sink.
Installation of a mortise kitchen sink
Diagram of a washing machine.
In today's markets, there is a huge variety of all kinds of built-in countertop, inset kitchen sinks, differing in shape and color and made of various materials. The most popular sinks for installation on a stainless steel countertop, as they are characterized by a price-quality ratio.Below we give an example of how to install a stainless steel kitchen sink with your own hands using elementary household tools. Any other mortise sinks are installed according to the same principle.
As an example, let's take the most common type - a chipboard countertop, protected from above with a plastic coating, and we will install a sink into it. If you want to install a sink in an artificial stone countertop, you should more carefully read the recommendations of the countertop manufacturers.
To carry out the installation of the sink, we need:
- Ruler, tape measure, pencil, #2 Phillips screwdriver, construction angle, sharp knife.
- Electric jigsaw with a file for a "clean cut of chipboard".
- Electric drill with a drill with a diameter of 10 mm.
- Self-tapping screws 4*30.
- Colorless silicone sealant (sanitary or universal).
Slicing Order
Experienced experts advise: since in the process of creating a hole along the inner border of the cut, roughness and small chips often form, you need to get acquainted with the rules for processing the cut, the failure of which leads to a number of problems:
- Since it is impossible to ensure absolute sealing of the unprotected chipboard surface, its insufficient degree causes moisture to penetrate into this part of the countertop. As a result, activation of the processes of decay can occur and a fungal plaque appears.
- In the future, the cutting edge becomes brittle and the stability of the shell decreases, which ends with its skew.
- As a result of tabletop decay, its aesthetic, strength and performance qualities decrease, and then replacement will be required.
To avoid the above troubles, you should:
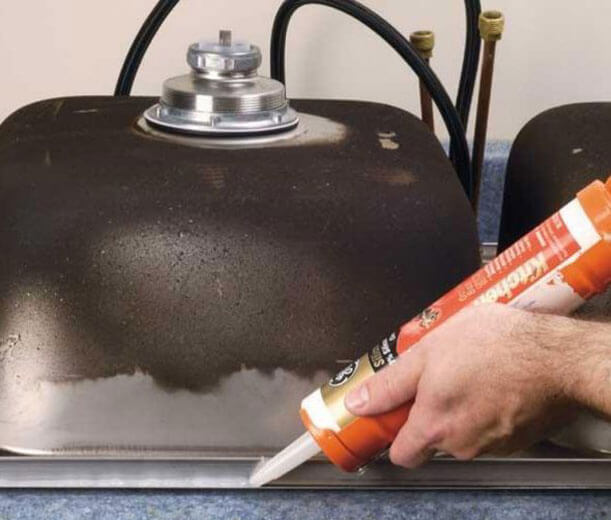
- Treat the end surface of the cut with fine-grained sandpaper and treat with high-quality sanitary sealant. Professionals recommend using a spatula to perform this work, in the absence of which the composition can be applied with a finger. The implementation of protective measures helps to prevent wetting and subsequent swelling of the cabinet surface.
- If, when performing such work as cutting a sink in a countertop, chips are found on its front side on the plastic, they are carefully treated with a sealant, and there is no need to apply it in a thick layer, since in this case the thickness is not important.
- There is another way to protect the end side of the cut - it consists in processing with PVA glue. Despite the complexity of this process, it is reliable, like the previous version. The applied layer of glue to enhance the protection effect should dry for about 30 - 50 minutes.
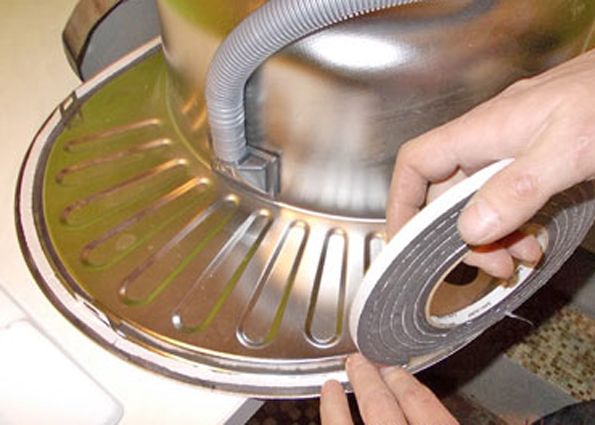
- Next, glue a polyethylene foam sealant, it is usually included in the sink package. This material is fixed on the side of the sink along its perimeter. When, after attaching the seal, it can be seen, the material is carefully cut with a knife. If this is not done, the edges of the sink will not fit snugly against the countertop and water, falling into the gaps created, will cause swelling and further decay of the butt.
Since the process of attaching the sealant directly affects the performance and durability of the kitchen set, attention should be paid to it:
- It is necessary to take the material and degrease it with a rag soaked in gasoline and solvent.
- Then a sealant is applied to the sealant in a continuous thin strip so that glue does not protrude during compression and press it to the outer edge of the sink.
Purpose of a modern kitchen sink
In order to maximize the optimization of the cooking process, it is necessary to correctly place furnishings and various appliances in the kitchen. According to the existing principles of ergonomics, the placement of furniture and equipment in this room is carried out taking into account the sequence of work.
For this reason, furnishings are placed in the direction from left to right, and in a specific sequence: refrigerator - then dishwasher (if any) - kitchen sink - gas or electric stove. Between them should be placed modules with working surfaces.
It is also necessary to observe the minimum gaps between the above objects:
- the distance from the sink to the stove, as well as between it and the refrigerator, should be about 40 centimeters;
- the refrigerator and stove are installed so that there is 40 centimeters between them.
Before you embed the sink into the countertop in the kitchen, you need to choose the right one, taking into account the following characteristics:
- Functionality. It depends on the intended type of kitchen work, the number of bowls in the sink and the wings intended for drying. These objects will be used when the user is used to performing several manipulations at the same time.
- capacity. When determining this parameter, you need to take into account the number of dishes that have to be washed daily.
- Durability and stability. They mainly depend on the material of manufacture of the structure.
- Design. The design of the sink must ideally match the surrounding interior so that it is a full-fledged object of the created concept.
- Convenient use. Its configuration should ensure comfortable performance of kitchen work.
Preparation of tools and materials
Before you engage in inserting a sink into the countertop with your own hands, check its completeness with fasteners. Usually they are clips. They are placed on both sides, placed on the cut end and on the inner surface of the sink. The kit should include a tubular seal used to seal the joints.
Next, prepare the tools:
- electric jigsaw or hand tools and a set of files for woodworking;
- drill with a 10 mm metal drill;
- self-tapping screws;
- measuring tools - level, pencil, ruler, tape measure;
- Phillips screwdriver and knife;
- silicone colorless sealant.
Marking
The following describes the procedure for installing a rectangular mortise product. To figure out how to cut a countertop for a round sink, you will need to familiarize yourself with the nuances of this work in addition.
Perform markup like this:
With a pencil, in the place where the location of the sink is planned, two perpendicular lines are drawn - the drain will be located at the point of their intersection.
The sink is turned over and laid on the countertop with a bowl upside down and aligned according to the markings, while the intersection is visible through the drain hole.
With a simple pencil, outline the outer edges of the product along the perimeter
It is important not to forget to take into account the parameters of the sink and the mutual location of its boundaries and the remaining free area of the countertop. So that the mortise bowl does not interfere with the closing of the doors, it should be placed inside the nightstand.
Then they measure the width of the side of the product and, in accordance with it, apply an internal contour, a cutting line will pass along it
On average, this value is about 12 millimeters.
Before installing a round or other shaped sink into the countertop, it is necessary to act so that it freely enters the hole, while a deviation from the marking is allowed, not exceeding 3 millimeters.
Materials for surface-mounted and mortise-type models
These products are made from stainless steel. Today, both of them are the most popular. Externally, mortise options may look different. Often there are stainless steel products with a smooth texture and imitating linen texture.
In addition to traditional stainless steel or enameled steel sinks, mortise options made of stone and composite materials are popular. Similarly, bowls made of artificial stone are in demand.Sinks made from composite materials have a spectacular granular structure and look like polished stone.
Mortise structures made of artificial raw materials are kitchen accessories. They have excellent aesthetic and performance characteristics, including resistance to scratches, abrasion and sudden temperature changes.
The shape of sinks is diverse: in addition to products with one, there are also those that have 2 - 4 bowls, which are shallow, deep and equipped with additional dryers.
Washbasin fixing
To install the sink into the countertop and fix it steadily and securely there, you need to go through two steps.
Creating a landing hole in the countertop
Sink measurements.
Using a drill (10 mm), we make a through hole in the countertop in one place (if we are talking about a round sink), or in several places (in case of a rectangular sink, we make markings in the corners). The hole should be made so that it is as close as possible to the cut line, but in no case touches it. You need to drill from the front surface. Thus, we have a hole (s) for the file to enter.
Using a jigsaw, clearly along the cut line, we make a closed cut. From time to time we screw self-tapping screws into the slot, they will play the role of temporary fasteners so that the inside of the countertop does not fall down and does not change its position, which could interfere with work. We attach the sink to the cutout, check whether it was done correctly: the sink should enter freely, with a slight backlash. If necessary, we additionally perform hole correction with a jigsaw.

Scheme of installation of a sink.
Next, we clean the cut from dust and, using a small rubber spatula, generously cover its surface with silicone sealant. This is necessary so that in case of water ingress, the countertop does not swell. If chips are formed on the plastic during sawing, it is recommended to lubricate them as well. It is not necessary to apply a thick layer of sealant to the cut.
Along the entire perimeter on the side of the sink we glue a sealant made of foamed polyethylene (sold complete with a sink). If, during the gluing process, the seal protrudes beyond the outer contour of the rim by more than 1 mm, then it should be cut (with a sharp blade or the tip of a mounting knife). If this is not done, then the sink may not be pressed tightly against the countertop. We moisten a clean cloth in acetone or gasoline and degrease the connection line of the sealant and the countertop and the surface of the sealant. We apply sealant to the sealant with an unbreakable strip, the strip should not be thick. In some cases, you can find the installation of a sink without the use of a sealant, where the entire space is filled with sealant. However, such installation is not entirely practical, as it leads to a large consumption of sealant, and an increase in drying time, and in the case of not entirely successful installation, it greatly complicates the process of dismantling the sink.
Staged fixation of the sink
Double wash plan.
We put the sink in the hole made in the countertop, carefully align it with the markup (apply the markup so that it is preserved after cutting the countertop).
With the help of 2-4 fasteners, we first fix the sink, periodically monitoring its position on the markings. Installation of fasteners should be carried out at an equal distance from each other, do not tighten the fastener to the end. We install all the fasteners, for this you can turn the countertop face down. We evenly and consistently tighten all the fasteners completely, we do it manually, without resorting to the help of a screwdriver, so as not to strip the threads in the plastic nuts. In order for the spikes of the fasteners to stick well into the countertop, you can process them with a file.
Next, the sink is attracted to the countertop by tightening the self-tapping screw.The result is considered positive if the ends of the metal part of the fastener are securely fixed in the tabletop. Then tighten the fasteners with a screwdriver.
We evaluate the installation: the sink should be firmly pressed against the surface of the countertop around the entire perimeter, it should be installed according to the marking lines. An additional confirmation of the snug fit of the sink can be the protruding sealant. With a clean cloth, remove excess sealant and markings from the surface of the countertop. Let the sealant harden overnight.
https://youtube.com/watch?v=r-k7MDckjU0
Installing a mortise kitchen sink is a responsible matter. If it is not performed with sufficient quality, then later it can not only quickly disable the countertop during operation, but also pretty spoil the appearance of the kitchen.