How to remove the cartridge from a Canon printer
For many users of modern office equipment, the problem of replacing consumables is not a problem. However, for beginners, as well as those who purchase a new model of a printing device, certain difficulties arise when servicing the device. Therefore, the question "How to remove a cartridge from a Canon printer?" considered one of the most important. And you can find the answer to this question in this article.
So, in order to pull out the cartridge from the printer, you should first decide on the model name. For those who own Canon printing devices, the process of removing the consumable will not be difficult. And before you remove the cartridge from the Canon printer, you should read the attached instructions, in particular, the location of the corresponding buttons. Although the procedure for ejecting the cartridge is different for each printer, the carriage with the ink containers moves out automatically in any case.
So, for example, for those who are interested in how to remove the cartridge from a Canon printer, you should first open the cover. The carriage with consumables containers can move out by itself, or after pressing the corresponding button. In other models of Canon MFPs, the removal of cartridges from printers occurs in almost the same way. First, the printer cover is opened, then a key is pressed, after which the part is removed by a special ledge.
In general, before removing a cartridge from a Canon printer, it is imperative to clarify the features of your device model. And if there are special marks-indicators, when removing containers of consumables, you must follow them. Usually, such a procedure is necessary to refill the Canon cartridge.
Video advice on the topic is below:
You will be able to pay 30-50% less for electricity, depending on which electrical appliances you use.
How to insert / replace a cartridge for a Canon printerReplacing a cartridge in a Canon printer
Step 3 Insert new cartridge
We got the old toner bottle. Now you need to correctly install the new cartridge that you purchased from the store or refilled with ink yourself. To do this, we recommend considering the following:
- The cartridge is in your hands. It is without packaging. You also shook it a little to distribute the ink better. Now we insert the cartridge into the printer, be sure to get into the appropriate grooves.
- At the same time, we do not make significant efforts. Otherwise, the cartridge may be broken or the mechanisms holding it in place may be damaged. It should move freely, smoothly and easily along special guides. If you feel that the cartridge does not go further or is not properly fixed, then pull it out and repeat the procedure.
- Make sure that the consumable is not placed upside down or backwards.
- Many printer models (especially inkjet printers) have a stop mechanism. In this case, you need to make sure that the cartridge has been firmly inserted. This will tell you a characteristic click when pressed.
- Next, you need to close the lid. Then wait until the device enters the operating mode. You managed to change the cartridge yourself!
- At the end we print a test page. This is done to make sure that the cartridge and printer are working.
Faucets with a single rotary handle are increasingly replacing traditional two-valve designs in bathrooms and kitchens. The main arguments in favor of a single-lever faucet are convenience and durability. But sooner or later, such a mixer also fails.
Faucets with a single rotary handle are increasingly replacing traditional two-valve designs in bathrooms and kitchens.
If the faucet starts to leak, the reason is most likely in the cartridge. It is unlikely to be repaired, but it can be replaced.The device is inexpensive, and the installation process is simple and does not require special skills.
Instructions for replacing the cartridge Canon MF4410, MF4430, MF4450, MF4550d, MF4570dn, MF4580dn. Canon 728 cartridge
If for the first time you ran out of cartridges in one of the Canon MF4410, MF4430, MF4450, MF4550d, MF4570dn, MF4580dn multifunctional devices and you have a question about how to do it right, then this article is for you.
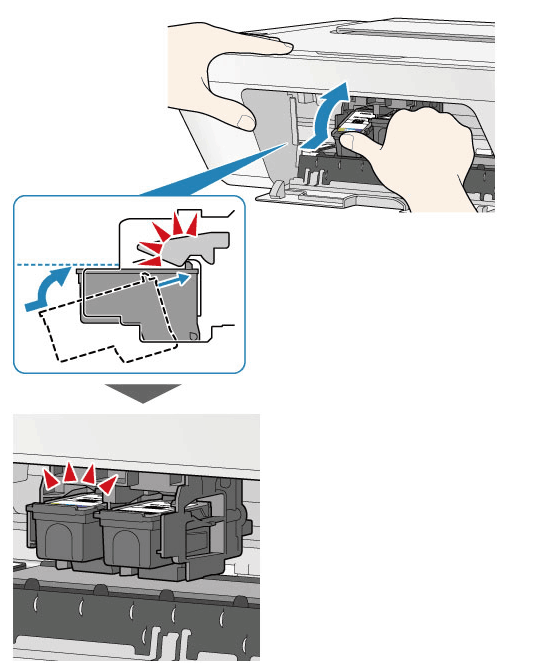
1. First of all, to replace the cartridge with a new one, you need to remove the old one. To do this, we need to raise the upper part of the MFP, i.e. the scanner, up. We take as indicated in Fig. 1
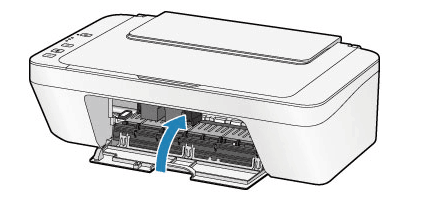
2. Open the cover of the MFP by gently pulling up fig. 2.
3. Having lifted the MFP scanner, we still need to open the cover of the compartment where the Canon 728 cartridge is actually located fig. 3.
4. On the lid there is a special place for the fingers for which we pull the rice. 4.
5. Pull out the cartridge by the special handle, pulling it towards you and up fig. 5.
6. Remove the new cartridge from the packaging fig. 6.
7. Shake the cartridge several times around the axis and in the horizontal plane (right and left) fig. 7.
8. Using a smooth but strong motion, tear the seal tape out of the cartridge. Pull on its protruding edge on the left
The tape should stretch the entire length of the cartridge, and then it must be pulled out completely! Let us draw your attention to the fact that it is better to tear out the tape, and not cut it off, so that a situation does not turn out in which part of the tape remains inside the cartridge. Then it will not allow the cartridge to work normally, and if you have already cut it off, you will have to disassemble the cartridge to remove it.
8.
9. Install the cartridge in the device (MFP, printer). On the sides of the compartment where the cartridge is installed, there are guide grooves, and there are corresponding protrusions on the cartridge. You need to combine them and smoothly, pressing on the cartridge, push it all the way fig. 9 .
11. Close the scanner top cover of the device fig. eleven .
10. Close the top cover of the cartridge compartment by pushing it down. The MFP will buzz characteristically, scrolling the gears of the cartridge fig. 10 .
If you use a printer, then be prepared that one day this device will need to replace the cartridge. By itself, this procedure is not so difficult or complicated. Although many owners of office equipment prefer to seek the help of specialists. But is it possible to replace the cartridge in the printer yourself? Certainly. The main thing is to know the whole technology, take into account various nuances and avoid mistakes that can adversely affect the operation of the printing device.
The first step is to remove the cartridge from the printer. To do this is quite simple. However, before proceeding with the removal of the part, we recommend that you wear gloves and clothes that you do not mind getting dirty. The fact is that the remnants of toner often wake up from the old product.
When you're ready, you can start. The following instructions will help you remove the cartridge from the printer:
- Turn on the printer. Only on some printer models, the replacement is done with the power turned off.
- Now you need to get access to the "insides", where the ink tank is located. This usually requires opening or sliding the front cover. Be careful - many models have special latches. For some devices, you even need to press the corresponding button.
- What to do next? If you have an inkjet printer, then the carriage with the cartridges must be "relocated" to the so-called replacement position. After that, the user can easily reach them with his hand. In laser printers, the cartridge usually does not go anywhere. As soon as you open the lid, you will immediately see it. At the same time, for some printers (the same HP LaserJet Pro CP1025), to remove an ink cartridge of a certain color, you need to press a special indicator key. Only in this way will the carousel scroll and stand in the correct position for replacement.
- Next you need. This is done in different ways. It all depends on the manufacturer and model. After all, each device is equipped with its own mechanisms that hold the cartridge. For example, many inkjet printers need to lower the lever. Then it remains only to slightly press on the cartridge so that it falls out of the grooves. Some toner containers should be removed differently - by taking the upper part with your hand and pulling upwards at an angle from the attachment point. Some other printers require you to press the reset button on the side of the carriage to remove the cartridge.Epson FX-890 is considered one of the most complex devices in this regard. To remove the cartridge from this printer, you need to open the cover, remove the protective flap and remove the guide tape.
- Take out the consumable carefully! When doing this, try not to touch other internal parts. It is also not recommended to touch the photoconductor or the moving parts of the toner cartridge.
Replacing the cartridge in the faucet how to change the cartridge in the faucet with your own hands
How to change the cartridge in the mixer: tips from experts
Replacing the ceramic cartridge in the mixer sooner or later becomes necessary for all owners of single-lever mixers. To date, it is this type of plumbing that is confidently replacing well-known valve structures. Therefore, each owner must know the algorithm for how to change the cartridge in the mixer.
The principle of operation of the mixer
The cartridge is the main element that ensures the operation of a single-lever mixer. It makes it possible to control water flows not with two usual valves, but with the help of just one handle.
A device such as a cartridge greatly facilitates the process of switching water. This plumbing fixture deprives you of the need to adjust the optimal proportion of hot and cold water.
Now all you have to do is select the correct position of the mixer lever.
The cartridge consists of two plates, each of which is ceramic. These plates are located close to each other. About the breakdown and the need for replacement they say:
- inability to completely shut off the water supply
- moisture seepage from below
- unpleasant foreign noise
These and other signs indicate that your faucet cartridge is out of order and needs to be updated. The cost of replacing a cartridge in a faucet is often not cheap, so you'd better learn how to change it yourself.
Why does the cartridge break?
The use of a ceramic cartridge today is justified as such by the popularity of ceramic products. Ceramics tolerate friction exceptionally well, they are not afraid of corrosion processes. It is these characteristics of the mixer that enable the manufacturer to voice the impressive cost of the goods, while providing a long warranty period.
However, the mixer cartridge is not eternal. Breakage can be caused by such reasons as:
- water quality often does not meet the requirements set by the manufacturer
- oxidized metal as impurities in water
- a large number and high frequency of cartridge hydraulic shocks
- the presence of a large amount of salt precipitation
- completion of the declared service life
- underestimated quality of the design of the ceramic element
A faucet cartridge will serve you for a long time if:
- do not save on buying goods from well-known companies
- install a filter that protects the cartridge from salt deposits
Many manufacturing companies install a filter for the mixer and consider its presence a prerequisite for fulfilling warranty obligations.
However, not only water and the manufacturer can be to blame for the failure of your cartridge. Excessive pressure when pressing the lever, careless handling of the mixer can also cause damage.
How to replace the cartridge?
The task of replacing the cartridge in the mixer is much easier to solve than it seems at first glance. You will need these simple tools:
- wrench
- hex key
- two screwdrivers
Replacing an old ceramic cartridge is a lot like replacing an old worn gasket in a standard valve design.
The procedure will be as follows:
- turn off the supply of hot and cold streams
- remove the decorative cap located on the mixer
- unscrew the fixing screw located under this plug
- remove mixer tap
- unscrew the ring located under the handle
- remove the nut with a wrench
- pull out the faulty faucet cartridge
After all the steps you are left with:
- install a new working cartridge
- do the previous steps in reverse order
- turn on the water, check the operation of the mixer
Replacing the cartridge in the faucet is easy if you follow the instructions above. In order to choose the right part, it is recommended to clearly know what model your faucet is, and it is better to have an example of a faulty cartridge with you.
Leave a request now!
And get the best offers from trusted craftsmen and teams.
- Compare prices and choose the best conditions
- Responses only from interested specialists
- Do not waste time communicating with intermediaries
Leave a request More than 10,000 performers are waiting for your orders!
How to change your own hands instruction
It is not necessary to call a plumber to replace the cartridge in the faucet. Its installation will not cause any special difficulties. The complexity of the task is only to choose the right new cartridge. And this is easier to do, having an old one on hand, which will need to be shown to the seller as a sample. But first, the broken part must be removed from the mixer.
Tools you will need:
- flat screwdriver or hexagon (depending on the type of lock screw);
- wrench or gas wrench.
Before disassembling the faucet, shut off cold and hot water at the inlet. Raise the lever and release the remaining water.
Video: Cartridge device and its replacement
Problems detecting refilled ink tanks in Canon printers and MFPs
Depending on the model of the device, cartridge chips (and “diapers” of devices) can be: reset, reset using the programmer, or disable tracking of the counter in the device menu or device driver settings. In this article, we will tell you how to deal with chips on Canon cartridges.
Do not confuse the ink counter in the cartridge and the waste ink counter - the so-called diaper counter. They are dropped differently.
Resetting the cartridge chip PGI-5Bk, CLI-8, PGI-520Bk, CLI-521 using the programmer
Disabling ink level monitoring in Canon Pixma printers and Canon MP MFPs
The ink level information of chips installed in Canon Pixma printer cartridges that use separate ink tanks, such as iP4200, iP5200, etc., cannot be reset or reset.
In order not to block the operation of the printer when the ink level in the cartridges reaches zero values according to the chip data, it is necessary to disable the printer's control system for the level of ink in the cartridges. To do this, after the printer displays a message stating that some cartridge has run out of ink, you must press the paper feed button (the middle button with a triangle and a blinking indicator) and keep it pressed for 10 seconds
.
This will disable the printer's ink level monitoring system for that ink tank. Now the printer will not block work.
If you occasionally receive messages that the cartridges are low on ink, just ignore them.
Resetting the ink counter using IPTool and MPTool
IPTool 1.1.5
— resetting ink counters in Canon iPxxx printers The program is designed for service work with Canon iP-series printers in Normal mode.
- Extended information about the printer, ink levels in cartridges and waste ink containers.
- Printing test samples for checking SG nozzles.
- Cleaning and deep cleaning of the PG printer, cleaning of the tray and cleaning of the rollers.
- Change the drying delay value.
- Change printer model.
- Read and reset printer EEPROM.
After turning on the printer and installing the “syringe cartridges”, select the required brand CHANGE Model, alternately press RESET Black (black ink reset), RESET Color (color ink reset), the remaining ink level Ink Level as a percentage will change its value to 100. Among other things in the future, the problem of overflowing the “sump” or exceeding the level of waste ink will come up.means of the specified program, a similar problem is solved according to a similar scenario. Optionally, you can use the service functions to clean the "head".
MPTool 0.9.6
The program is designed for service work with Canon MP-series printers in Factory mode.
- Extended information about the level of ink in the cartridges (the readings are correct for the 40th series of cartridges, for the 30th and 50th series they will be respectively overestimated and underestimated) and waste ink containers.
- Read, write and reset the EEPROM of the printer.
- Resetting the black and color ink level counters.
- Resetting the "main" and "secondary" waste ink box full counters.
Refueling problems Canon Pixma 3600, 4600, MFP MP540, MP630
Recently, all mid-range and high-end Canon inkjet printers and MFPs use separate ink tanks, each of which contains ink of only one color, and a single print head is mounted on a carriage.
This technology is more economical - it allows you to manage each color separately, regardless of their number, the amount of remaining ink in each of the ink tanks and replace any of them separately. In addition, the new single print head allows you to control the size of the drop applied to the paper - from 2 to 1 pl! It also has a positive effect on print quality and color mixing. However, each ink tank has a chip used as a page counter. Due to the fact that the ink tanks are chipped, after the end of the ink, the machine stops and does not allow printing further until the ink tank is replaced. Such ink tanks are marked PGI-520Bk, CLI-521. They replaced the PGI-5Bk and CLI-8. The PGI-5Bk and CLI-8 ink tanks were successfully refilled, and the ink counter in the ink tanks was turned off by the user so that the device would not give an ink replacement error.
Canon Pixma iP4600 printer with new cartridges
Do not confuse the ink counter in the cartridge and the waste ink counter - the so-called diaper counter. They are dropped differently.
Such ink tanks are marked PGI-5Bk, CLI-8, PGI-520Bk, CLI-521.
How to replace a cartridge in an MFP (printer) Canon MF4410, MF4430, MF4450, MF4550d, MF4570dn, MF4580dnReplacing a cartridge in a Canon printer
Faucet cartridge replacement
Like the handle of the joystick, it allows you to perform any operation: open-close the water, make the water colder or hotter.
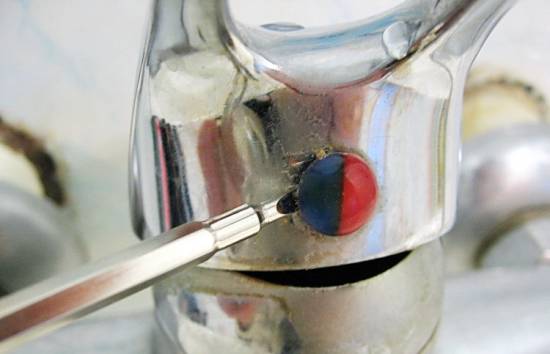
2 - Plug
There may be two barely noticeable spots on the plug - red and blue, indicating hot and cold water, but the main purpose of the plug is to close:
3 - fastening bolt
A bolt secures the handle to the cartridge stem.
4 — Decorative overlay
Its purpose is to create the appearance that the mixer in the assembled state is a single whole.
5 - fastening nut
Securely presses the cartridge to the mixer seat. If the nut is not tightened, then the mixer may leak water and then water may flow from under the handle. In some models, not a nut, but a bracket, which is screwed to the mixer body with long bolts, may be used to fasten the cartridge.
6 - Cartridge
The heart of the cartridge mixer.
7 - Casing cartridge mixer
Well, now you can start replacing the cartridge, but first you need to turn off the supply of cold and hot water and, just in case, plug the drain in the washbasin, bathroom or sink, small parts tend to fall, and according to the law of meanness, they fall so that they fall into the siphon and then pulling them out of the siphon is quite difficult. It would also be good to drive away children, women, parrots and other commentators.
First, remove the handle (1), and to do this, you must first remove the plug (2). Usually, the plug can be easily removed with a fingernail, but you can also use a simple screwdriver, in extreme cases, an awl. Then unscrew the screw (3) that secures the handle to the cartridge stem. In some models, this will require a hex, but sometimes a simple or Phillips screwdriver is enough.
It is not necessary to unscrew the screw (3) to the end, usually it is enough to unscrew it by 4-5 turns, after which the handle (1) can be easily removed. Well, now everything is simple: you need to remove or unscrew the decorative trim (4), this is done by hand, after which access to the cartridge fastening nut (5) will open.
To unscrew this nut, you will need a 27-30 wrench or an adjustable wrench, and after the cartridge fastening nut will be unscrewed, we can see the cartridge in all its glory (6). However, in some models of cartridge mixers, the cartridge can be attached with a clamping bracket and then no keys are needed at all; The screws securing the bracket can be unscrewed with a Phillips screwdriver.
Sometimes, especially if many years have passed since the installation of the faucet or cartridge, it is not so easy to pull out the cartridge and this is the most crucial moment when replacing the cartridge. Make sure that all of the above fasteners are unscrewed or removed, and then you can jerk the cartridge sharply. If this does not help, you can try to pull the cartridge out by the rotary stem.
If this does not work, then the emergency option remains - turn on the water supply. If the pressure in the water supply network is good, then the cartridge will fly out of the mixer.
Perhaps the video below will help you replace the cartridge with a minimum of loss. In the video, the inclusion of water to remove the cartridge is not shown (I took pity on the video camera).
But most importantly, if the cartridge does not fall into place, then during operation it will scroll, and there will be no adjustment of the water, and the water will flow very well. After the cartridge is inserted and securely pressed with a nut or bracket, it is advisable to check the tightness of the joint between the cartridge and the housing.
To do this, turn on the water supply, if water flows only from the spout, then you can safely screw the remaining parts.
Tip: For branded faucets, it is better to purchase cartridges in branded stores. Cartridges that are sold at the nearest hardware market or the nearest hardware store usually only work well with Chinese faucets.
And cartridges designed for branded faucets have a number of additional options. In such cartridges, it is possible to set the water pressure; for this, there is a special screw on the rotary stem. In this case, the handle will not rise to the maximum height, but to the height that you set.
And good cartridges have a special ring that allows you to adjust the angle of rotation of the rod. If there are no problems with hot and cold water, then you can set the cartridge so that it almost does not turn left or right, and the handle will only go up or down.
However, in any hot water supply system there are technological interruptions associated with the repair and maintenance of equipment, so you need to use this option carefully.
Replacing the cartridge in the printer
Each model of printing equipment from different manufacturers has its own design, and the method of attaching the ink container is also different. Below we will describe a general example of replacement, and you, taking into account the features of the technique used, repeat the instructions given.
Before performing this procedure, we recommend that you read the following notes
Owners of FINE cartridges should pay special attention to them, since they are the most vulnerable, and the mechanism has its own subtleties:
- Never touch the electrical contacts and nozzles on the cartridge with your hands. They are easily distinguished from the base, so there should be no problems with their detection.
- Do not operate the printer without the missing cartridge. Replace immediately.
- After installing the container, do not remove it back unnecessarily and, moreover, do not leave it open. Such actions provoke drying of the ink and equipment failure.
Now that you are familiar with the basic notes, you can proceed directly to replacing the ink tank.
Step 1: Gaining access to the holder
First you need to access the holder. This is easy to do, just follow a few steps:
- Connect power and turn on the device.
- Close the paper output tray according to its design.
- Open the back cover. Now wait for the holder to be moved to the state to replace the cartridge. Do not touch it while moving.
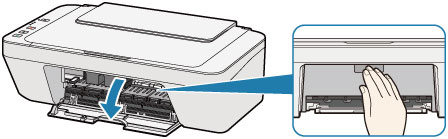
If the lid is left open for more than ten minutes, the holder will snap into place. It will move back only after re-closing and opening the lid.
Step 2: Remove the cartridge
During this step, you need to remove the ink tank, the mount of which is close to the rest of the device.
It is important not to touch the metal components, not to touch them with the cartridge. If paint gets on them, just gently remove the liquid with napkins
The removal of the ink tank itself is as follows:
- Press the cartridge until you hear a click.
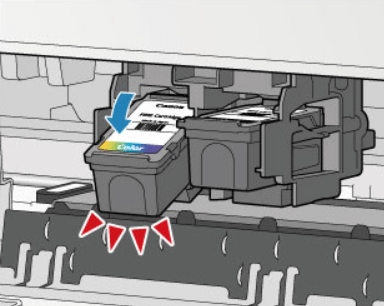
Carefully remove it from the socket.
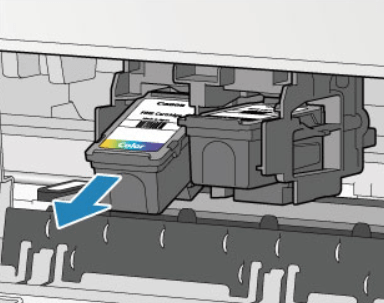
Depending on the model and manufacturer of the printer, the mount may differ. Often there is a design with a special holder. In this case, you must first open it, and then get the container.
Each locality has its own laws and regulations regarding the disposal of consumables. In accordance with them, dispose of the used cartridge, and then proceed to install a new one.
Step 3: Installing a new cartridge
It remains only to insert a new ink tank and prepare the device for further printing. All actions are performed quite simply:
- Unpack the cartridge and remove the protective film, otherwise the ink will not enter the printer.
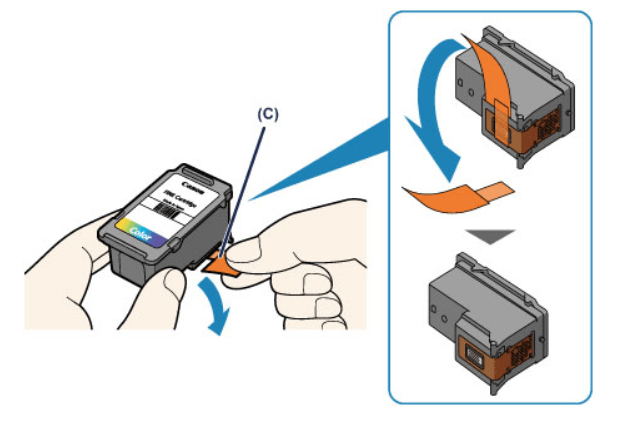
At a slight angle, insert the container into the holder, while making sure that it does not touch the electrical contacts near the mount.
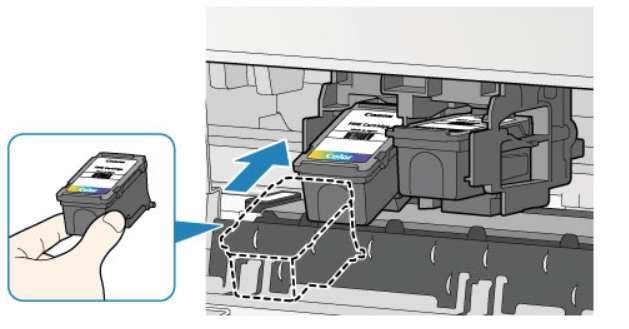
Press the ink tank body until a characteristic click appears. Be sure to check that all components have been installed.
The last step is to close the lid.
This completes the cartridge replacement. We hope you managed to cope with the task without much difficulty, and the printing device again produces high-quality documents and images.
Describe what didn't work for you.
Our experts will try to answer as quickly as possible.
Stage two preparing the cartridge for replacement
The hardest part is left behind. Now let's prepare the cartridge for replacement. To do this, you need to either fill it with ink, or purchase a new one. At the same time, you can buy both the same consumable model and a non-original one that is compatible with your printer.
If you have chosen a new cartridge, the first step is to carefully remove it from the shockproof and sealed package. Just open it and remove it from the consumable. Moreover, when performing this procedure, try not to touch the contacts, nozzles and photoconductor.
Keep in mind that even with a new cartridge, toner sometimes wakes up. Therefore, replace it on a surface protected by newspapers or film. Special clothing will also come in handy.
Also, do not forget to remove the protective tape and safety tape that is located on the contacts of the cartridge (as a rule, these are tab stickers with a color index). Then rotate the ink bottle back and forth several times while keeping it horizontal. This is done in order to evenly distribute the ink inside the cartridge, which could stagnate during transportation or long-term storage.
Features of refilling and replacing inkjet cartridges in Canon Pixma and MP
Recently, all Canon inkjet printers and MFPs in the middle and upper ranges use separate ink tanks
(cartridges) (excluding cheap PIXMA iP1800/1900/2600 series printers), each of which contains ink of only one color, and a single print head is mounted on a carriage. Each ink tank (cartridge) has a chip used as a page counter.
This technology is more economical - it allows you to manage each color separately, regardless of their quantity, the amount of remaining ink in each of the ink tanks (cartridges) and replace any of them separately. In addition, the new single print head allows you to control the size of the drop applied to the paper - from 2 to 1 pl!
It also has a positive effect on print quality and color mixing. However, due to the fact that the ink tanks are chipped, after the end of the ink, the device stops and does not allow printing further until the cartridge is replaced.
Many users refill ink tanks, but after refilling such a cartridge, the printer still does not detect it as full.
What does the cartridge look like and where is it located
The cartridge is the core of a single-lever faucet. Thanks to it, the streams of hot and cold water are mixed in a given proportion and, under a certain pressure, rush into the spout (spout) of the tap. The working elements of the disk cartridge are enclosed in a plastic case.
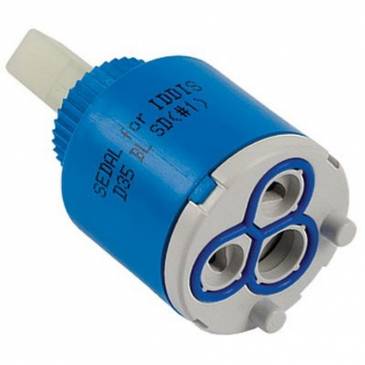
The disk cartridge is encased in a plastic case
There are three holes in its lower part. At the top is a rod - a rod connecting the mixer lever and the upper ceramic disc, hidden inside the body. This disc is set in motion by turning the mixer handle. The second disk is always motionless and fits snugly against the first. Both plates have special holes through which water enters and pours out.
When the faucet handle is lifted and turned, the stem is actuated, which, in turn, displaces and rotates the upper disk. Its displacement regulates the power of the water pressure. And when the upper disk rotates, its slots are partially aligned with the holes in the lower disk, as a result of which cold and hot water are mixed.
Single-lever faucet device: 1– lever; 2 - spout; 3 - ceramic cartridge; 4 - body; 5 - fixing bracket; 6 - flexible hoses for water supply
Disabling ink level monitoring on Canon printers
The ink level information of the chips installed in Canon Pixma printer cartridges that use separate ink tanks cannot be reset or reset. In order not to block the operation of the printer when the ink level in the cartridges reaches zero values, as well as after replacing the cartridges, according to the chip, you need to disable the printer's ink level monitoring system in the cartridges
. To do this, after the printer displays a message that some cartridge has run out of ink, you must press the paper feed button (the middle button with a triangle and a blinking indicator) and .
The PGI-520Bk, CLI-521 cartridges have their own characteristics, and you may not be able to turn off the ink level control using the method described above.
In this case, you need to disable it programmatically in Windows. This works like this: Start => Control Panel => Printers => right click on your printer => properties => on the ports tab, uncheck "Allow bidirectional communication".