Replacing cistern fittings
Replacing the fittings of the toilet cistern may be necessary if one of its constituent parts fails. The whole design of the fittings as a whole, as a rule, is quite reliable. It consists of:
- holes for draining water into the toilet;
- overflow pipe located next to the hole;
- valve cover, equipped with a wide rubber band;
- water intake (filling) fittings;
- the mechanism of the water release button (drain valve).
Replacing modern cistern filling fittings
Necessary materials and tools
If the replacement of the toilet drain fittings often comes down to just replacing the rubber bulb that closes the drain hole, then it may take some time to replace the fittings responsible for filling the tank with water. This work can be easily done on your own, without resorting to the services of a professional.
It does not require the use of complex tools and equipment. You will need:
- roulette or ordinary ruler;
- 1 or 2 wrenches;
- spanners;
- new fitting kit.
Water in the drain tank from the sewer pipes can be supplied in two ways: from the side and from the bottom. Consider how the fittings in the toilet bowl are replaced in both cases.
Replacing the mechanism for filling the toilet bowl
Side water supply to the toilet bowl
Work is performed in the following sequence:
- Determining the diameter of the water intake pipe.
The standard inner diameter of sewer pipes supplying water is 10 or 15 mm. This corresponds to 1/2 or 3/8 inch. The correct determination of this value will allow you to buy suitable fittings.
The easiest way to determine the inner diameter of a pipe is to measure its outer diameter and compare it with standard values. So, 15 mm, measured with a ruler along the outside of the pipe, will correspond to 3/8 inch of its internal diameter, 20 mm - 1/2 inch.
- Selection of the necessary fittings.
Visually, the type of suitable fittings can be determined by lifting the lid of the toilet bowl. It remains only to purchase the same design (it is sold already assembled), and you can begin to repair.
Traditional and modern cistern fittings
- Installation of new water intake fittings:
- Shut off the water entering the toilet.
- Remove the lid of the tank, drain all the water.
- Dismantle the old water intake fittings. To do this, it is necessary to unscrew the nut of the flexible hose with one hand, while holding the fitting with the other hand. You may need two wrenches. If the nut is tightened, as they say, to the conscience, the fittings must be held with the second key. (If the replacement of the drain valve is not yet required, it may somewhat interfere with dismantling.)
- Inspect the old gasket to see if it can be reused. If necessary, replace the gasket with a new one.
- Install the new water intake fittings in such a way that its parts do not come into contact with either the walls of the tank or the drain fittings.
- Connect water.
Scheme for installing a new cistern valve
- Checking the correct installation.
After starting up the water system, some adjustment of the installation of new equipment may be necessary: a slight tightening of the diaphragm valve nut, or a slight adjustment of the location of the fill valve float.
A more complex and lengthy adjustment is required in the case of using valves with a stem valve.
Water supply to the tank from below
Unlike the option of a lateral water supply to the toilet bowl, in this case you will have to tinker a little more with the replacement of the filling fittings that have become unusable.
The main obstacle may be that the toilet is located close to the wall, and there are also sewer pipes that supply water to the tank.In order to qualitatively and reliably attach a new water intake fitting, you will need the same tools as in the first case (when water is supplied to the tank from the side).
The technology itself is practically no different from the above. As you can see, replacing the cistern fittings is quite feasible and not too long in time. One has only to take into account that such an operation may have to be repeated about once every 5-10 years.
Shut-off valves
The long and accurate operation of pipeline shut-off valves mainly depends on the timely and properly organized set of measures for scheduled maintenance and preventive maintenance.
The scope of work can include the following activities:
- inspection with a check of the operability of all parts and mechanisms that make up the shut-off valves of pipelines, these include gate valves, dampers, taps, valves, filters and valves. Technical dust and dirt constantly accumulate on their cases. All this must be removed, and even washed, and then lubricated mechanisms such as valves. Water and other technical liquids are filled with varying amounts of sand or other solid impurities. All this slag settles on the sealing surfaces of the pipe valves, violating the tightness of the overlapping parts. In addition, such impurities lead to mechanical damage in the working elements of the reinforcement in the form of scratches, scuffs and dents.
- current repair of pipe valves directly at the installation sites of parts and mechanisms, without their dismantling. In this case, the pipeline section is disconnected from the entire system. In practice, the sealing surface is cleaned and the sealing material is replaced.
If on-site repair is not possible, dismantling must be carried out. A temporary insert of the water pipe is installed in place of the dismantled mechanism, this will not allow interrupting the operation of the system.
Such a water supply insert is assembled from threaded pipes, couplings, locknuts and flanges. And it performs the functions of a mounting insert. Usually, in practice, the so-called "coil" is used, a pipe segment with two flanges welded to it of the required length.
The first step to eliminate the leakage of the stuffing box seal is to tighten its cover. If this action does not lead to a positive result, the gland packing should be changed. At the time of repair, to avoid leaks, an elliptical plug is inserted into the pipeline.
But you can replace the packing without blocking the pipeline with an elliptical plug. To do this, a gasket made of sheet rubber 15 mm thick in the form of a ring is installed on the valve spindle under the housing cover. The valve spindle rises all the way up, the rubber ring is pressed against the cover and closes the gap, stopping the flow of water from the pipeline to the stuffing box. After that, the fasteners are removed, the cover is lifted and the old packing is removed from the stuffing box.
Stroy-spravka.ru
Heating, water supply, sewerage
Navigation:
Home → All categories → Installation of refrigeration units
Shut-off and safety valves are repaired on site without dismantling the housing or in the mechanical repair shop after the valves are removed during the repair of the refrigeration unit. In case of centralized repair of fittings, all work is carried out in specialized areas equipped with equipment and mechanization. The main groups of equipment in the mechanical repair shop: benches for disassembling and assembling fittings, machines for machining sealing surfaces, lapping devices, benches for testing density and strength, benches for testing springs and adjusting safety valves, devices for cutting and punching gaskets , welding area with the necessary equipment for surfacing and welding of bellows.
The procedure for disassembling, checking, grinding and testing for strength and density after repair is the same as for the revision of reinforcement.
The designs of laps for grinding the sealing surfaces of valves are varied. The working surface of the stuffing box valve spindle (work area in the stuffing box) is cleaned of nicks and scratches and polished in a shoe-type device with an abrasive cloth or paste.
To avoid burning through the thin-walled bellows when repairing bellows fittings (thickness 0.1-0.2 mm), the bellows skirt is placed between the valve parts and the specially pumped out rings. Welding of three parts is performed simultaneously.
In the process of repairing safety valves, special attention is paid to the condition of the springs. During disassembly, the springs are carefully examined and, in the presence of cracks and other visible defects, are rejected.
The springs are subjected to three static load compression to detect permanent deformation and, in addition, loaded with a static load equal to the maximum working load while monitoring the compression of the spring in the fixture. The safety valves are adjusted to the opening pressure on the stand by the pressure of nitrogen or air generated by the compressor, or using a compressed gas cylinder. After adjustment, the valve is sealed and recorded in a journal, where the type of valve and its position according to the technological scheme, parameters, a list of repair and adjustment work carried out, the date of adjustment and the date of its next check (i.e., service life) are given. Then the valve is marked with paint on the body or on a special tag and handed over to the repair team for installation in place.
Repair work on pipelines constitutes a significant part of the repair work during the repair of a refrigeration unit and can be reduced to the actual repair of the pipeline (insertion of coils, replacement of bends, bends, welding of flanges,
chasing fistulas in welds or welding them) or to replace sections and the entire line. For inflaming flanges and ease of measuring the angles between pipelines, devices are used.
The main defects characteristic of pipelines of refrigeration units are as follows: oiling of pipelines (eliminated by washing with solutions), deposition of silt, soot and hardness salts G (also by washing); corrosive wear, erosive wear, especially at high speeds or contaminated environments in elbows, bends (replacement of parts is necessary); defects in welds (welding or embossing); fatigue cracks that appear due to increased vibration or due to marriage during pipe rolling (the causes are found out and eliminated, and the pipeline section is replaced).
The main preventive measure is a systematic check of the characteristic places of categorical pipelines according to the schedule for a change in the thickness of the pipe wall with the preparation of an act. The inspection is carried out by the flaw detection laboratory of the chief mechanic service.
When repairing, attention is paid to the accuracy of manufacturing sealing gaskets in flanged pipeline connections and apparatus connectors. The gasket must completely cover the sealing surfaces and must not protrude into the flow path of the pipeline
For cutting and punching gaskets, drilling machines, presses and various kinds of devices are used (Fig. 5).
Drain assembly problems
Restoring a secure locking of the drain hole can be done in various ways. One of them is that you need to remove the membrane and put it on the other side.
If all that has been done has not brought results, then most likely the leak is due to insufficient pressure. You can change the clamping force if you increase the stroke length of the rod. Usually it is limited to an emphasis in the lateral ribs. To do this, you need to do the following:
- The movable part of the drain column is turned counterclockwise to the floor.
- The design is removed from the clamps.
- The stops on the ribs need to be sharpened by shortening them by a couple of millimeters.
To increase downforce, you can give more weight to the piston. To do this, it is necessary to fix several heavy nuts on it.
If all the efforts made do not help, it remains only to change the fittings.
Valve repair
There are a number of reasons why pipe fittings fail. All of them can be conditionally divided into three groups:
The production causes and types of shut-off valve failures are associated with the insufficient technical level of technological processes used at the enterprise that manufactures individual parts and assembles valves. The technical control of all production stages and ubiquitous technological discipline allow reducing the number of rejects of stop valves. Industrial safety services are the prevention of dangerous emergencies at the enterprise of absolutely any kind of activity and the guarantee of confident work.
The use of standard assemblies and parts also has a positive effect: glands, electric drives, gearboxes, fasteners, rods, etc.
Structural (structural) causes of failures and malfunctions of shut-off valves are directly related to the design of the valve itself. The timeliness and speed of repair work depend on how competently it is executed and how well its design is thought out for maintenance.
The operational reasons for the failure of shut-off valves are related to the ability of the valve to maintain its performance during operation within the limits specified in the technical documentation. The operational parameters of the fittings are:
flywheel torque, or force on the control handle;
tightness of gaskets, seals, valves;
throughput of the safety valve;
If one of the parameters does not correspond to the norm defined for it, then a parametric failure occurs. Hydraulic testing of shutoff valves and stands for testing shutoff valves can prevent and reduce the risk of further failure of shutoff valves during their operation at the enterprise.
Shutoff valve failure - its failure due to the breakdown of one or a whole group of elements. Failure can be partial, in which further operation is possible, and complete, in which case urgent repair work is required.
A complete waiver may be of the following nature:
1) in shutoff valves. The inability to raise or release the locking body to open or close it. In this regard, it becomes impossible to adjust the flow of the working medium and refuse to operate the equipment on which the shut-off valves are installed.
Leakage of fluid through leaks in the connection or fistulas in the housing. In this case, the wear of the equipment increases significantly and there is a risk of injury to the operating personnel.
2) in safety fittings. Shut-off valve inoperability: does not work when the pressure rises or falls within the established limits. As a result, there is a danger of damage to the main equipment, due to the lack of proper protection from negative factors. Increased wear occurs, operating personnel are at risk of injury.
3) in control valves. Any malfunction that results in the impossibility of performing adjustment, respectively, the complete loss of control over the flow characteristics. Loss of tightness due to the destruction of sealing materials and the appearance of fistulas on the body.
Partial failure of valves can be of the following nature:
In safety and shut-off valves - partial passage of the working medium through the shut-off device, which allows the operation of the equipment, but leads to a decrease in the efficiency and quality of the operation of facilities.
In adjustable valves - any malfunctions that lead to a partial change in the control parameters. The loss of smooth running and the occurrence of play at the articulation points cause a decrease in the efficiency of work.
Typical malfunctions that occur in pipeline valves and electric drives can be found in the following table.
Types of fittings
The fittings for the drain tank consists of the following main elements:
- valve (drain) mechanism, driven by pressing a button or drain lever;
- a float connected to the filling mechanism and determining the water level in the drain tank;
- systems of levers connecting all elements into a single whole;
- a tap through which water is supplied to the tank;
- sealing gaskets installed on all attachment points of the main devices of the system.
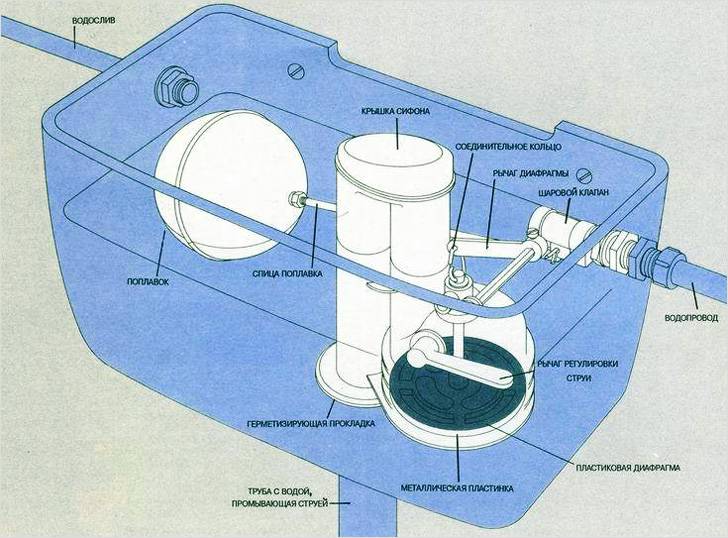
The main elements of the cistern fittings
All fittings differ depending on the method of water supply. Distinguish:
locking devices with bottom water supply. The system is quiet in operation, but requires careful sealing of the connection between the hose and the filling mechanism;
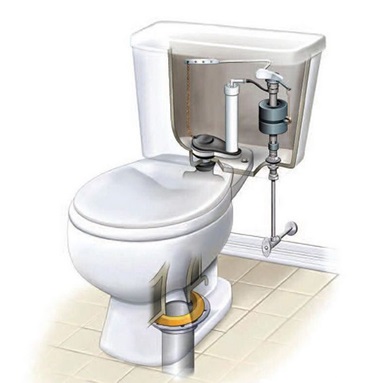
Fittings with water supply from below
mechanisms with lateral eyeliner. The side fittings are characterized by increased noise when filling the tank capacity. You can fix the problem by extending the inlet hose.
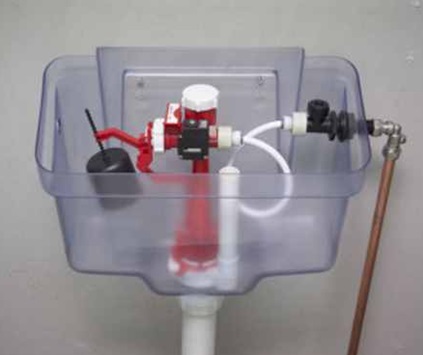
Fittings with water supply on the side
Before buying a new toilet fitting, you need to find out in which area of \u200b\u200bthe cistern the supply is made.
Replacing the fittings of the toilet bowl
Most toilet problems are easily solved by replacing the old fittings with new ones. There is nothing difficult in this. If you do everything carefully and correctly, then you can handle it yourself and not spend money on calling the master.
Dismantling of the old structure
If we break down the dismantling of reinforcement into stages, then it will look like this.
The water supply to the tank is shut off. The water supply hose is disconnected.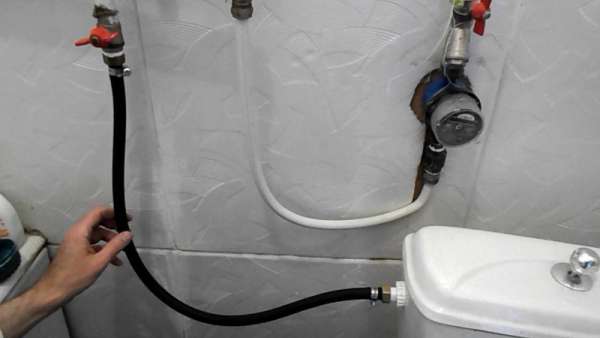
After the water supply tap is closed, you need to empty the tank and dry it.
The tank is disconnected from the drain pipe (if it is an old model) or directly from the toilet in new type devices. For the first case, you need to unscrew the nut that is on the pipe.
The second case involves unscrewing the two nuts under the toilet platform. When working with an older model device, dismantling may be difficult because the mount is rusted and cannot be unscrewed. If such a nuisance occurs, then the nuts can simply be cut off.
The drain tank is removed. It must be laid on a flat and stable surface of the required width. Then the float and the water supply pipe with the valve are removed. The drain system is dismantled.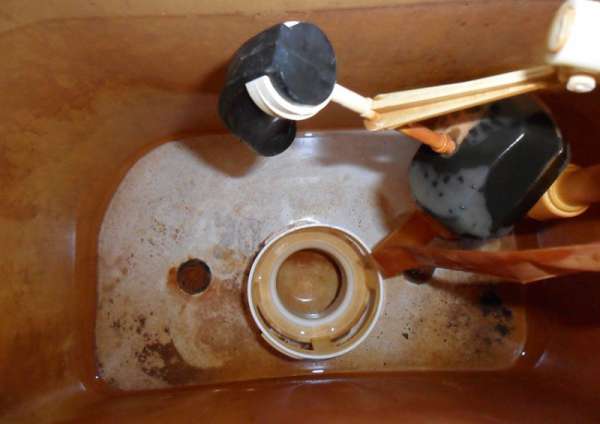
After the old fittings are removed, the tank should be rinsed and dried, and checked for chips and cracks.
Installation of new fittings
Old-style models have large holes for fittings. It does not play a big role if the old part is replaced by a new one of the same type. But it often happens that there are no new parts for older toilets on sale. We'll have to install modern fittings
This needs special attention
- In devices of the old modification, we fix a bracket with a rod and a pear on the bottom of the tank with a metal fastener. In the devices of the new sample, the drain system is installed in the center of the tank and is fixed with a plastic nut. When working, be especially careful. Handle plastic fasteners with care. Excessive force during fixing can damage the fastener.
- Install a water supply pipe. To him in the old models we fix the float on the spoke.In products of a new type, the nozzle can be equipped with a system that controls the water level. In other words, both the float and the nozzle are made in the form of a single structure. We put everything together.
- Now the tank, along with the drain system, must be placed on the toilet.
- Older models have an oblong rubber pad that acts as a shock absorber. It is installed between the toilet and the tank. The gasket covers the drain hole and the overflow hole. If you have to install modern fittings on the old device, then the hole for the overflow tube must be closed. In toilet bowls of modern modifications, the shock-absorbing pad has an annular shape.
- A drain tank is installed on top of the gasket. It must be fixed on the toilet with fixing bolts.
Installation completed.
Repair of fittings in the drain tank
If your toilet has a leak, you should pay attention to the following:
- whether the drain tank is hermetically fixed;
- whether the seal is worn or damaged.
The first step is to tighten the bolts that secure the toilet tank. Do not over-tighten them, as you can damage the toilet itself and the drain tank. If the leak has not stopped, remove the drain tank and replace the seal on the drain channel. Replace the washers that are on the tank. Seal all joints with silicone sealant.
Drain tanks with a bottom water supply are more difficult to repair. In them, a leak can also be formed from the wear of the seal at the point of entry of water. In this case, the seal should be replaced with a new one and fixed with sealant.
Repairing the valve on the drain tank can also solve the problem. The purpose of the valve is to ensure the dosing and movement of water in the toilet. The basic principle of the toilet is as follows: when water enters, the float rises to a predetermined level, after which the water stops flowing. After draining, the float lowers and water begins to accumulate again.
Plumbing work
Plumbing work is a separate area of activity of housing and communal services organizations related to ensuring the functioning of water supply, heating and sewerage systems. Based on practical experience, we can safely say that the services of a professional plumber are becoming more and more in demand among the residents of Sevastopol. This is due to the serious deterioration of communications in old buildings, unskilled repairs, the use of cheap materials and poor quality structures in installation work.
The Yugstroymontazh company performs plumbing work in Sevastopol in private and apartment buildings, office centers, public and commercial institutions. Experienced specialists, using certified equipment and consumables, provide the following services:
- elimination of leaks in pipes and taps;
- installation of sinks, bathtubs, toilet bowls, boilers;
- installation of hydroboxes;
- fastening of metering devices;
- replacement of heating radiators;
- insertion of filtering systems;
- emergency clearing of blockages in pipes;
- replacement of worn parts;
- cleaning of water heating boilers;
Our plumbers are able to choose the best types of equipment for each specific facility, taking into account the design features of communications, customer requirements for aesthetics and functionality of plumbing
Price list for plumbing work
A guarantee is provided for all technological operations performed and materials used in the work. Affordable prices for plumbing work and prompt order fulfillment determined the growing popularity of our company. If you need a plumber, call the contact number or send a request through the website. The manager will contact you within a few minutes.
Construction company "Yugstroymontazh" offers a wide range of construction and repair work throughout the Crimea.Our specialists have extensive experience in providing quality construction services. Working with us you get a great advantage over time.
Specialist Page
The page was created to discuss the problems of valve building.
Specialist's page » REPAIR, MANUFACTURING, PROCESSING METHODS OF INDUSTRIAL INSTRUMENTS.
Valve repair.
Valve repair.
Faulty pipeline valves bring a number of problems to operating organizations, which, in the event of an accident or other emergency, cannot completely block or turn off a section of the network. The most common cast iron parallel valves shut off or control the flow of fluid using two parallel disks that are pressed tightly against the outlets with a wedge.
In hot water supply valves are used, additionally equipped with bronze sealing rings. They provide high tightness at elevated temperatures. Such rings are installed both inside the body (by pressing or shrink fit) and on parallel disks.
One of the reasons why valves lose their effectiveness is debris, in the form of welding scale, sand, and other small objects that get inside the pipeline during installation.
Contaminants settle on the surface of the sealing rings, gradually cutting grooves in it, which violate the tightness. This can be avoided by thorough flushing of the main network and inputs to the building before its operation. In case of failure, the valves are repaired in specialized workshops equipped with lapping machines. They allow you to remove the upper damaged layer from the surface of the sealing rings, restoring their former density. Grinding is carried out with abrasive powder (emery or glass) with the use of lubricant in the form of oil.
Assembly of the body of the repaired valve is as follows. The lid sits on a gasket previously lubricated with a mixture of graphite and oil. It provides not only additional tightness, but also prevents the two halves of the valve from sticking together tightly during long-term operation. Further, by stuffing, an asbestos gland and an additional rubber ring are installed. After tightening the bolts, which were pre-washed from rust and lubricated with oil, the valve is subjected to hydraulic tests on the stand. The valve is connected to the test press only on one side, therefore, before starting the operation, it is necessary to release the air by loosening the gland bolts. After that, the pressure rises to the test pressure, and the commission observes and finds out if there are any leaks. If everything is in order, then an acceptance certificate is issued and the valve is recognized as serviceable.
Approximately in the same order, repairs of valves and taps are carried out. When assembling a repaired valve, all parts are lubricated with oil. The cover is put in place strictly with the valve raised (the spindle is in its highest position). The lapping of the tap is carried out using a special adjustment cylinder. Its surface is covered with oil, sprinkled with lapping powder, and then inserted into the tap, previously fixed with a vise. By rotation, the locksmith doing the work achieves the required density.
The duration of operation of a repaired valve, first of all, depends on the quality of care. It is necessary to periodically check the tightness of the stuffing box, lubricate the spindle and move the sealing rings to the extreme position to prevent them from sticking.
All photographs used in illustrations for articles belong to their authors. The administration of the FLANTSY.RU portal does not claim to be the author of the photographs. All photos on the site are taken from open sources on the Internet.
Device and main components
The drain fittings of modern models are quite compact and lend themselves well to repair. Even if we take into account that models from different manufacturers differ in the layout of parts, we can identify common factors:
- Most of the drain fittings can be easily disassembled.
- All devices work on the same principle.
The drain valve consists of two assemblies: an inlet valve and a drain valve. The nodes responsible for the water inlet can have an upper or lower connection. The difference is not so significant - only the place of installation of the float and the scheme of the locking force change. From the old models with a pear-shaped float, which had a tendency to depressurize, the new ones differ in that a double glass is installed on them.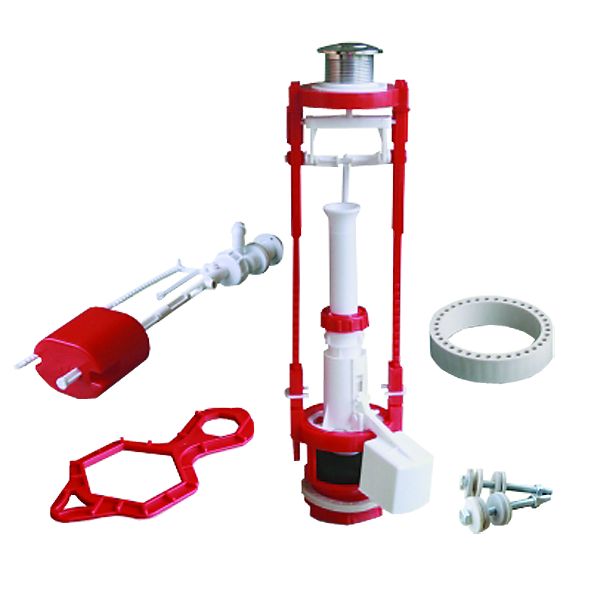
Drain valve - has the form of a column installed vertically in the center of the tank. The lower part is equipped with an annular seat, which is covered by a cuff. The force to shut off the water occurs due to the own weight of the rod, as well as the mass of water. The valve is opened by raising the stem, which is connected to the release button.
Repair of pipelines and fittings
In pipelines during operation, cracks and fistulas, leakage of refrigerant and brine in flanged joints, kinks and cracks in brackets can occur.
Cracks and fistulas are eliminated by gas welding, electric welding, or damaged areas are cut out and new ones are welded in. These works are carried out in compliance with safety regulations, i.e., after disconnecting the repaired section of the pipeline from the refrigeration system, releasing it from the refrigerant, brine or water and subsequent purging.
When repairing pipelines, a pipe cutter is used, which allows cutting pipes in hard-to-reach places without dismantling. The pipe cutter (Fig. 166) consists of a body (5) in the form of a figured glass, a conical core (4), a handle (6) and brackets (3) with circular knives mounted on them (2). The conical core is screwed into the body, while the arms of the brackets resting against its surface are moved apart, and the circular knives located on opposite arms are pressed against the pipe being cut (1). By rotating the body with the help of the handle (6), in which the ratchet mechanism is mounted, the brackets with knives are rotated, and, consequently, the pipe is cut. The vertical feed of the knives to the depth of cut is carried out by further screwing in the conical core. The position of the knives at an inclination to the axis of the pipe provides a chamfer at the place of the cut.
Rice. 166 - Diagram of a pipe cutter
When separating pipe flanges, do not remove all bolts. Two bolts are left in place and removed after installing the remaining tested bolts. To facilitate the separation of the flanges, a special tool is used (Fig. 167). The jaws of the grippers (3), hinged in the body (2), are inserted into the holes of the flanges (6), the expansion wedge (4) is directed into the gap between the flanges and tightened with a screw with a handle (1). By turning the screw handle, the flanges are opened to the required distance, after which the old gasket (5) can be removed and a new one put in its place. By turning the handle in the opposite direction, the wedge is released, as a result of which the flanges converge. When approaching the flanges, it is necessary to ensure that the gasket does not fall out and is not warped.
Rice. 167 - Flange release tool
For the manufacture of gaskets, sheet paronite 2.3 mm thick is used for ammonia pipelines and 0.5 ... 2 mm for freon ones. Gaskets for ammonia pipelines are lubricated with graphite paste (graphite diluted in engine oil), for freon pipelines - with glycerin. Laying of brine pipelines is made of sheet rubber 3.5 mm thick. Gaskets made of paronite, rubber or special cardboard can be used in the connections of water pipelines.
The process of repairing valves includes cleaning valves and gate valves from contamination, turning seats and support seats, scraping and wiping valves, replacing stuffing box seals, restoring or replacing damaged or worn spindles and nuts.
The most critical operations in the repair of shut-off valves are the restoration of seats and sealing bands at valves and valve spools. Worn-out sealing babbitt belts of valves of shut-off ammonia valves are restored by refilling, followed by turning on the machine or filing by hand. Slightly worn sealing parts of spool valves are repaired by lapping the spool collar against the seat support ring by hand or using a special tool. Spindles with bent or damaged threads are repaired or replaced.
Proper packing and tightening of the stuffing box is of great importance. Rings for stuffing glands of ammonia valves are made of burnt cotton cord of square section with side dimensions of 10, 12 or 16 mm. For oil seals of brine and water valves, a cotton cord impregnated with a special composition or hemp stuffing is used, for oil seals of freon valves - asbestos cord impregnated with graphite and glycerin. To make the joints of the gland rings tight, the measured pieces of cord are cut off with a sharp knife at an angle of 45 °. When installed in the stuffing box, the joints of the rings are spaced apart.
After repair, check the tightness of the valve at operating pressure. If the fittings were dismantled for repair, then their tightness is checked on a special stand with air at operating pressure before installation in the car.
At the end of the repair, the pipeline is well cleaned and dried. Areas operating at low temperatures are covered with hydro- and thermal insulation, and then painted with oil paint.