Production of a bailer for drilling
Step by step we will consider the creation of a ball and petal bailer.
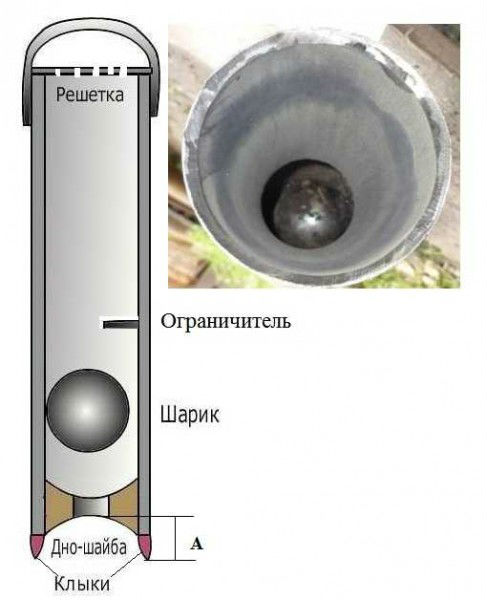
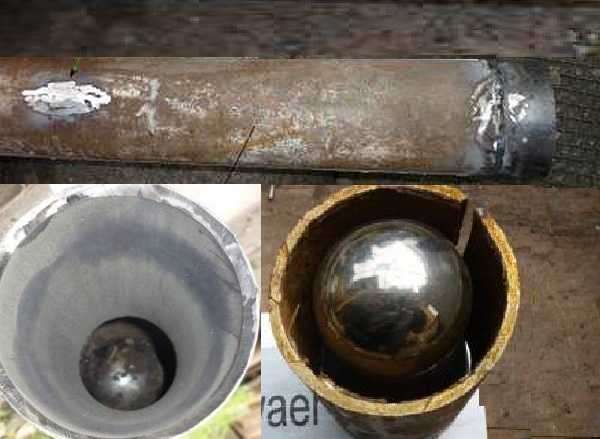
For Assembly ball fixture
you will need a metal ball, the diameter of which must be at least 2/3, but no more 3/4 of the diameter of the inner cavity of the pipe segment. You can either buy it or make it yourself. In the latter case, prepare a rubber ball of the required diameter, cut it in half and fill the halves with a mixture of fine shot with a waterproof adhesive, and after the composition dries, sand the hemispheres and glue them back into the ball. Next, the bailer is assembled according to the following scheme:
- Weld a washer around the bottom of the pipe section in a circle - it will act as the bottom.
- Drop the ball into the tube.
- Install a limiter at the level of 3 ball radii - drill two parallel holes in the pipe and thread the pin through, welding their ends to the walls of the segment.
- Weld a steel grate to the top of the segment - it will hold the ball in the bailer.
- Weld an arc-mount on the grate to fix the cable.
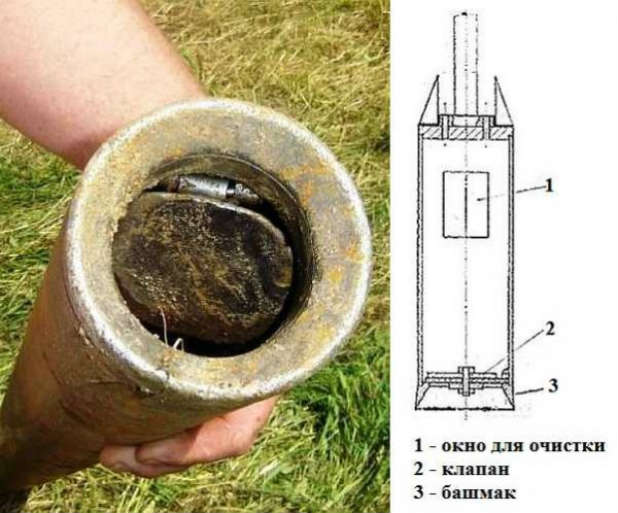
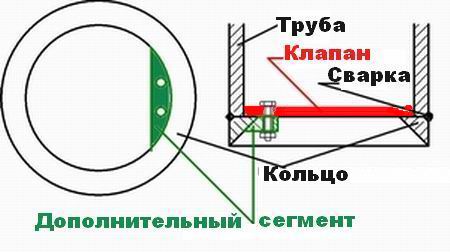
reed valve
manufactured using the following technology:
- At the bottom of the pipe at a height of 1 cm, make two holes for the bolts and insert them, but do not tighten.
- Screw the valve onto the bolts - an elliptical plate. Secure the valve with wire at two points. In this case, the fixation must be free so that the "petals" can move.
- After adjusting the position of the plate, bend it slightly and tighten the nuts of the bolts.
- Weld a steel grate to the upper end, and an arc for the cable on it.
well drilling
Gelling scheme with a pump
It is very difficult to take out the bailer for cleaning the well, even with the help of a winch. Considerable time is spent not on working in the well, but on lifting-cleaning-descent of the bailer. A small upgrade will optimize the performance of the device. The reverse side of the body from the pipe should be tightly welded.
A branch is made from it and a special fitting is placed there, designed for the discharge hose. A pump is attached to the hose, which is designed for pumping liquids with significant mechanical impurities.
This scheme allows you to abandon the constant lifting of the bailer to the surface and its repeated lowering.
Contaminants from the bailer chamber in this case will be removed using a pump. The bailer, equipped with a pump, simply needs to be raised and lowered to loosen and move the contaminated liquid into the chamber.
This method of cleaning is effective in case of strong silting or sanding. For normal cleaning of the well, a bailer without a pump is suitable.
Image gallery Photo from Digging a hole before drilling Drilling the first meters with a bailer Homemade drilling rig Winching in a bailer
Features of use on soils of different types
When drilling sandy soils with a bailer, it is necessary to use casing pipes - without them, the well will collapse. When drilling in such soils, it is necessary to ensure that the projectile does not penetrate into the sand without a casing pipe by more than half the length. This can lead to a collapse, the bailer will fall asleep, you will not be able to pull it out.
To make it easier to pass the sand, water is poured into the well, it prevents collapses and facilitates the work. If during operation the sand is rammed and not captured, a chisel is used.
They work with quicksand only by constantly deepening the casing pipes. And only if the aquifer is below the layer of quicksand, otherwise the well may be inoperative.
For the passage of quicksand, a bailer is used with a length of at least 2 meters. It should have a flat, well-fitting valve with a leather seal.You need to work with at least two people: when pulling the bailer out of the quicksand, the casing pipe must be turned, lowering it down. The faster the casing is lowered at this point, the faster this layer will be passed. At first, the casing is lowered easily, then it becomes more and more difficult. Sometimes there comes a moment when they completely stop moving. At the same time, almost the entire pipe is filled with sand. In this case, the pipes are lowered under pressure. To do this, a platform is installed on the pipe, on which the load (sandbags) is laid. And it all rolls together. Usually this method is quite effective.
When passing pebble and gravel layers, a chisel is used together with a bailer. First, a chisel is lowered into the barrel, crushing the rock, then it is taken out with a bailer. The bailer on such soils rises by only 5-10 cm, the impacts are small and frequent.
For faster passage, a platform is made on the casing pipe, the worker does not get up on it. It is located above the well, gradually raising and lowering the bailer. As the soil is collected, the casing pipe, under the weight of the worker, lowers.
In viscous clay soils, it is possible to work without casing pipes. If the clay is too dense, first a chisel is also used, loosening the soil by about 50-70 cm. Then it is removed with a bailer. A flat valve with a rubber or leather seal is also used.
If the clay is dry and dense, each time the bailer is pulled out, several buckets of water are poured into the well. After the water from the aquifer soybeans appears, it is not necessary to add it from above.
If the rocks are very soft, sometimes the valve is removed. And they drill only with the pipe itself, raising it 2-3 meters above the bottom and dumping it.
Features of use on soils of different types
When drilling sandy soils with a bailer, it is necessary to use casing pipes - without them, the well will collapse. When drilling in such soils, it is necessary to ensure that the projectile does not penetrate into the sand without a casing pipe by more than half the length. This can lead to a collapse, the bailer will fall asleep, you will not be able to pull it out.
To make it easier to pass the sand, water is poured into the well, it prevents collapses and facilitates the work. If during operation the sand is rammed and not captured, a chisel is used.
They work with quicksand only by constantly deepening the casing pipes. And only if the aquifer is below the layer of quicksand, otherwise the well may be inoperative.
For the passage of quicksand, a bailer is used with a length of at least 2 meters. It should have a flat, well-fitting valve with a leather seal. You need to work with at least two people: when pulling the bailer out of the quicksand, the casing pipe must be turned, lowering it down. The faster the casing is lowered at this point, the faster this layer will be passed. At first, the casing is lowered easily, then it becomes more and more difficult. Sometimes there comes a moment when they completely stop moving. At the same time, almost the entire pipe is filled with sand. In this case, the pipes are lowered under pressure. To do this, a platform is installed on the pipe, on which the load (sandbags) is laid. And it all rolls together. Usually this method is quite effective.
When passing pebble and gravel layers, a chisel is used together with a bailer. First, a chisel is lowered into the barrel, crushing the rock, then it is taken out with a bailer. The bailer on such soils rises by only 5-10 cm, the impacts are small and frequent.
For faster passage, a platform is made on the casing pipe, the worker does not get up on it. It is located above the well, gradually raising and lowering the bailer. As the soil is collected, the casing pipe, under the weight of the worker, lowers.
In viscous clay soils, it is possible to work without casing pipes. If the clay is too dense, first a chisel is also used, loosening the soil by about 50-70 cm. Then it is removed with a bailer.A flat valve with a rubber or leather seal is also used.
If the clay is dry and dense, each time the bailer is pulled out, several buckets of water are poured into the well. After the water from the aquifer soybeans appears, it is not necessary to add it from above.
If the rocks are very soft, sometimes the valve is removed. And they drill only with the pipe itself, raising it 2-3 meters above the bottom and dumping it.
Using a bailer when drilling
When arranging wells in loose, clastic, loose rocks filled with water, a bailer can also be used. True, in this case, the tool is made longer (up to 3-4 m) in order to capture and lift more rock up in one go. The valve is made of steel plate.
For sealing use leather or rubber. Instead of a cable, drill rods are used, for the manufacture of which gas pipe rods are taken, the diameter of which is 33, 42 or 48 mm. There are cases when the drilling of a well with a bailer was carried out using wooden rods equipped with metal tips. For the manufacture of drill rods, thin-layered spruce, ash, oak or larch were used.
As you can see, it is possible to make a bailer for periodic cleaning of a shallow well on your own. Although there are also factory models on sale. With this device, you can maintain the well in good working condition and not leave the house without water. Remember that constant water intake prevents the well from silting up, which means that it will have to be cleaned less often.
If it is not possible to bring water supply to a country house, a well is used for water supply. But it is not limited to its drilling alone, the well must be periodically cleaned.
Otherwise, silting, sand and rust deposits will reduce its performance, i.e. debit. If there is no desire or opportunity to use special equipment, then a bailer for cleaning the well will be the best solution. What's more, it's easy to use.
How to properly clean a well with a bailer
With the help of a long and strong cord (cable), a bailer is lowered into the well, reaching the very bottom. Then the tool is raised half a meter from the bottom surface up, and sharply lowered. At the same time, the ball, jumping up under the influence of a water hammer, opens a hole in the bottom of the bailer, through which water mixed with sand and silt enters the pipe. The ball then descends and closes the hole. For a more complete filling of the bailer, such movements are repeated three or four times, after which they begin to slowly and smoothly, avoiding jerks, lift the tool up. The contents of the bailer are poured out, and it is again lowered into the well. To facilitate the work of lifting the bailer, a gate can be designed.
According to the above method, a bailer for a well is made, having a ball valve. This design of the valve allows you to lift up water with fine suspensions of silt and sand, as well as small pebbles and pieces of rust.
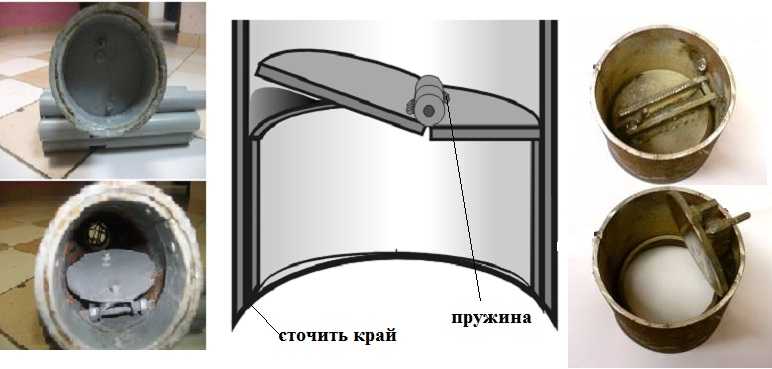
There are, however, other ways of making the valve. For example, a flat valve:
The design of a flat valve of a homemade bailer - everything was also done independently and from improvised means!
Welding of fittings for fastening a cable, with the help of which the bailer is lowered and raised from the well
To construct such a flat valve, you will need welding and a tool that any craftsman has. Some manage to make a valve even from a plastic bottle.
Features of drilling with a bailer
Bailer drilling is a popular, albeit rather time-consuming, way to create a well. Not every device of this type, suitable for cleaning a well, will cope with the excavation of a large amount of dense soil. For drilling, a sufficiently long bailer should be used - about four meters.
For drilling a well with a bailer, rather large devices are used, up to four meters long.The use of such heavy devices requires special lifting equipment.
Here, a kind of petal valve is more appropriate, which is a plate that is fixed with a special spring. With its help, a gap is created in the body, the area of which is almost equal to the area of the bailer cut. This allows you to pass the maximum amount of soil into the body of the bailer for each dive.
Removing dense soil from a long and narrow bailer is not always easy. To simplify this task, a special window is made in the upper part of the pipe, designed for more efficient and faster cleaning of the device. If sandy rocks are to be drilled, it will be easier to free the bailer.
To drill a well with a bailer, you need a device with a large clearance at the bottom and a body long enough to take out a lot of soil in one go
When drilling with a bailer, different types of rocks have their own characteristics. Here are some helpful tips:
- On sandy soils, the bailer should not be sunk more than 10 cm without casing. In general, the casing is supposed to be 10 cm ahead of the bailer.
- When drilling sandy soil, water is supplied to the borehole to further strengthen the walls.
- If wet sand is over-compacted during the work and does not fall into the bailer, a special chisel is used.
- The immersion of the casing pipe during drilling is performed constantly.
- For quicksand, a bailer with a length of two meters or more with a reliable flat valve and a leather seal is used.
- Raising the bailer on a quicksand, you need to not only lower the casing, but also turn it, it is more convenient to do this work with two or three people.
- If the casing does not enter the shaft, it is lowered under pressure, for which a platform is placed on top, on which the load is placed.
- When drilling layers of gravel and pebbles, sometimes the use of a chisel, which breaks large inclusions, and a bailer to excavate broken soil are alternated.
- On dense deposits, the bailer is raised by only 10-15 centimeters, and movements are made often.
- When drilling tight formations, the casing is deepened by hydraulics or someone periodically stands on the platform installed on the casing pipe.
- Dry layers are softened by supplying water to the mine.
- On very soft plastic soils, the valve is not always needed, the rock remains in the bailer without it.
- The bailer must be raised after driving every 0.5 - 0.7 m, so as not to tear when lifting the body filled to the limit.
As with other drilling methods, using a bailer, one should take into account the individual characteristics of the soil on which the work is performed.
The right strategy and timely casing of the wellbore usually allows you to create a working well quite successfully.
You may also be interested in information on how to flush a well after drilling.
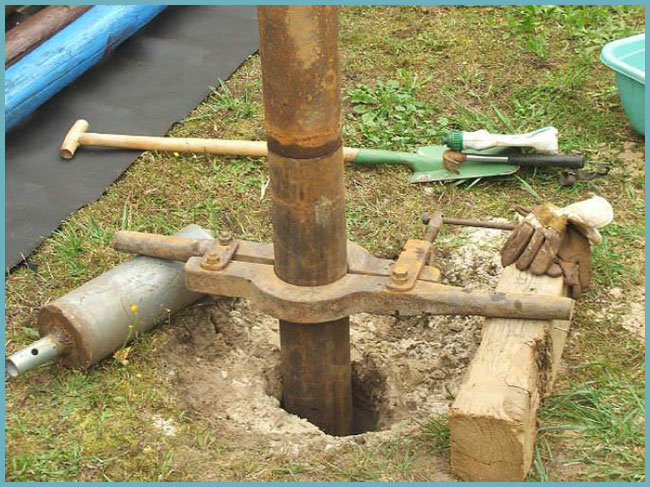
Features of the manufacture of the bailer
Much depends on the diameter of the well. When drilling a well with your own hands (this is most often practiced in the local area or suburban areas), a model with a ball valve is sufficient. If the section of the trunk is large, then the bailer must have a shoe. A flap valve is usually installed in it.
It is advisable to articulate the shoe with the main pipe not by welding, but by a threaded connection. This will greatly simplify the cleaning of the bailer from accumulated dirt.
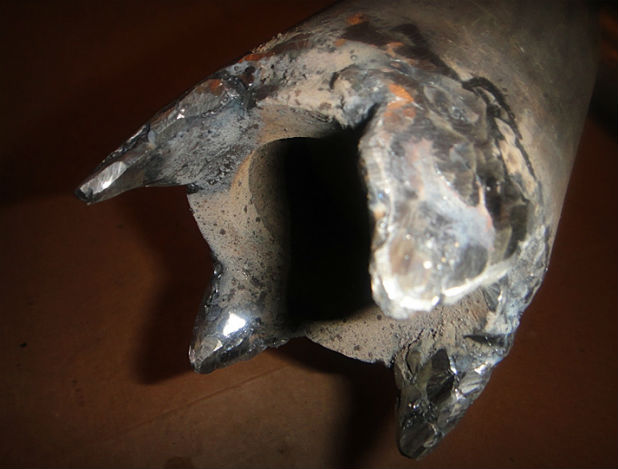
There should be teeth on the bottom end of the fixture. They are either cut out or welded on (to models with a shoe). They are designed to loosen the silt layers when lowering the bailer to the bottom of the well. Without them, it is impossible to achieve complete cleaning of the trunk and proper water pressure. It should be taken into account that the height of the teeth should not be large (up to 10 mm), otherwise a lot of soil will not get into the bailer, and the maintenance work of the trunk will be delayed for a long time.
If the soil in the area is clayey, then it is advisable to make the window for excavation of the rock narrow, but long, almost along the entire bailer.Otherwise, it will be very difficult to remove the viscous dirt accumulated inside during the cleaning of the well through the top.
To prevent the ball from moving too far from the bailer inlet, a plate stop is welded on the inside of the pipe. Otherwise, the entire loaded mass will begin to fall out of the pipe, since the inertia of the valve will not allow timely blocking of the “inlet” of the device.
Sometimes a do-it-yourself bailer is not heavy enough.
How can you increase its mass?
- Install a baffle at the top of the bailer. For example, weld a metal “penny” to the inner walls. And pour a portion of concrete solution on top.
- Select a pipe for the bailer with a wall thickness of at least 8 mm. As a rule, this is enough not to engage in artificial weighting of the device.
- Hang on a rope, in front of the bailer, a weight. The only thing to consider is that all connections must be movable.
Do-it-yourself bailer
With a welding machine and some skills in working with iron, a do-it-yourself bailer is done in a few hours.
Do-it-yourself bailer with a ball valve (without turning)
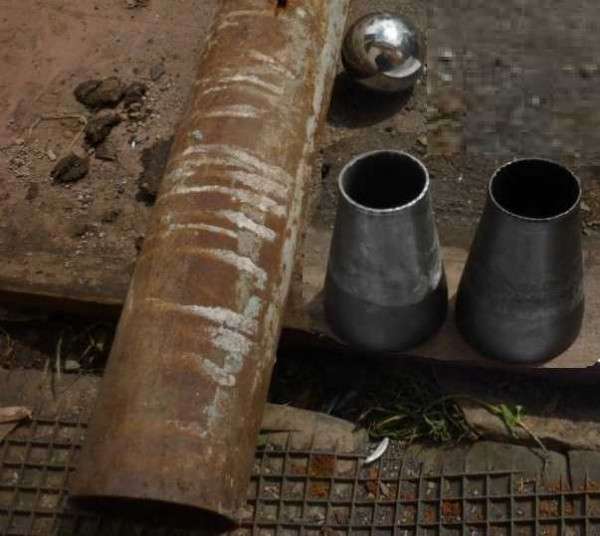
This version of the ball valve is assembled from spare parts that can be bought in stores. For manufacturing, a water pipe with a diameter of 89 mm was used. I also bought a concentric adapter 89 * 57 mm, and a ball from a bearing with a diameter of 60 mm.
Everything you need to make a ball valve bailer
The ball fits perfectly inside the adapter and gets stuck there. But it doesn't fit snugly. To fit everything better, the inner surface of the adapter is sanded - it fits almost perfectly.
This is what it looks like half assembled. At the bottom right, a ball is photographed in the transition - this is how it will be inside
The narrow part of the transition is inserted into the pipe and welded. The ball is thrown inward, the stopper is welded. And the final touch is to make a mount for a cable or twine. Everything, the do-it-yourself bailer is ready.
You may be interested in reading about how to purify well water.
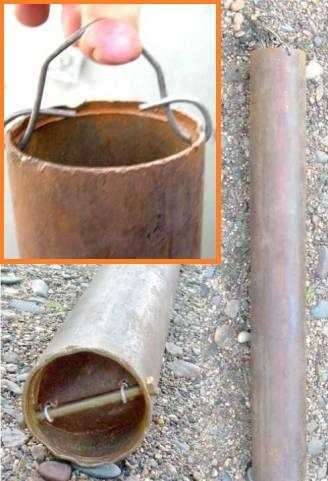
How to make a bailer yourself at home
If you need to clean the well, but there is no sheet metal and welding for serious work at hand, there is a way out: a bailer with a valve from a plastic bottle.
Homemade bailer with a valve from a plastic bottle
This option is suitable for cleaning the well, but not for drilling. You need a bolt, the length of which is slightly larger than the diameter of the pipe for the bailer and a nut. Stepping back two or three centimeters from the edge of the pipe, one opposite the other, two holes are drilled. Their diameter is the same as the diameter of the bolt.
The valve is cut out of plastic. It is an ellipse. The smaller diameter of the ellipse is equal to the diameter of the pipe. It must be cut very precisely so that when inserted inside it fits snugly against the walls. The cut-out valve in the middle will be attached to the bolt; for this, four holes are made in the plastic through which the wire is threaded. How it all comes together is shown in the photo below on the left.
Only such a mount, as in the photo above, is very unreliable. After a few hits, your projectile may come off and you will have to decide how to get the bailer out of the hole. The best mounting option is one-piece, without seams and twists. How to do this will become clear if you watch the video. By the way, there is an important thing there - how to make hooks so that, if necessary, you can pull the bailer out of the well.
Making a do-it-yourself bailer for cleaning a well
The basis of the bailer design is a pipe, the correct selection of the dimensions of which affects the efficiency of the well cleaning process. How to choose the right pipe for the bailer:
The main dimensions of the pipe for the bailer are its outer diameter and cut length, because the smaller the gap it enters the well pipe, the better the walls will be cleaned, but at the same time, an insufficient gap between the walls of the well and the bailer can provoke its jamming. The length of the bailer for the well is an equally important dimension, because. a short pipe will move with large distortions, and its excessive length significantly burdens the structure and can cause jamming of the bailer when distortions of the intake pipe are detected.
The outer diameter of the bailer for cleaning wells must be selected a couple of centimeters less than the diameter of the well, and the length of the bailer can vary from 60 cm to 1.5 m, depending on its outer diameter.
The wall thickness of the pipe for the bailer is an additional size, which can be 2-4 mm, but it significantly affects the cleaning process, because. the thicker the wall, the heavier the bailer, which significantly increases the penetrating inertia. But, a thick pipe with a significant length of it can lead to excess weight for trouble-free lifting, because you must not forget that the bailer for cleaning the well will be filled with silty liquid.
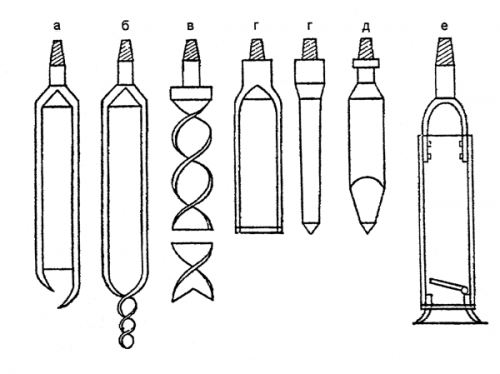
The bailer for the well can be manufactured with different structural valve systems:
- The ball valve is the most reliable design, the manufacture of which will require the search for a metal ball of a suitable diameter (at least 2/3 and not more than ¾ of the internal diameter of the bailer). Such a ball is either specially sharpened on a lathe, or “extracted” from a suitable bearing, scrap metal. For the manufacture of the valve, the front (punched side) is muffled with a powerful metal washer with a conical seat for the ball. The washer is securely welded in the recess of the pipe from the working (punching) edge at a distance of 3-5 cm.
- The petal valve is quite effective, but short-lived, because. due to the large mass of garbage being lifted, it can be damaged. The reed valve can be made of thin spring metal or polymer. The easiest way is to make such a valve with the principle of operation of shutters, i.e. the plate located inside the pipe is cut out in the form of an oval, due to which the “blind”, arching from the center to the edges, rests against the walls of the bailer. The “shutter” of the valve is attached to the pipe in the center, and its elliptical edges ensure the passage of the mud flow in only one direction.
 The bailer for the well must not only be exactly matched in overall dimensions to the water intake pipe being cleaned, but also have some design features:
- It is recommended to sharpen the penetrating edge of the pipe in such a way that the sharpening is one-sided from the inside, which will provide easier cutting of build-ups from the walls and easier penetration into the depth of the silted section of the pipe.
- The bailer on its way can collide with hard inclusions, which can quickly dull the sharpened edge, so it is recommended to thermally harden the working edge of the bailer.
- So that the ball valve and large debris, which can cause the bailer to jam in the well when it is raised, do not come out from the back side of the bailer, it is necessary to securely fasten a large mesh or a fine grid there.
- To control and lift the bailer for the well, a powerful (large diameter) rod is welded inside from its back side, to which a lifting cable is securely attached.
- In cases of expected large silting of the well, to speed up and facilitate the cleaning process, the bailer for the well is modernized: the back side is tightly welded with a tap (fitting) for the hose of a vacuum pump for pumping sludge or thickened liquids with mechanical inclusions. Such a system makes it possible not to carry out multiple lifts of the bailer, but only to raise and lower it, while the softened sludge is removed from the well in a timely manner, which allows high-quality cleaning of the water intake.
Separately, it is worth noting that before the initial descent of a long bailer, in order to avoid jamming in the well, a visual study of the integrity of the structure of the water intake pipe is carried out for the absence of severe deformations.
Do-it-yourself bailer
With a welding machine and some skills in working with iron, a do-it-yourself bailer is done in a few hours.
Do-it-yourself bailer with a ball valve (without turning)
This version of the ball valve is assembled from spare parts that can be bought in stores. For manufacturing, a water pipe with a diameter of 89 mm was used. I also bought a concentric adapter 89 * 57 mm, and a ball from a bearing with a diameter of 60 mm.
Everything you need to make a ball valve bailer
The ball fits perfectly inside the adapter and gets stuck there. But it doesn't fit snugly. To fit everything better, the inner surface of the adapter is sanded - it fits almost perfectly.
This is what it looks like half assembled. At the bottom right, a ball is photographed in the transition - this is how it will be inside
The narrow part of the transition is inserted into the pipe and welded. The ball is thrown inward, the stopper is welded. And the final touch is to make a mount for a cable or twine. Everything, the do-it-yourself bailer is ready.
You may be interested in reading about how to purify well water.
How to make a bailer yourself at home
If you need to clean the well, but there is no sheet metal and welding for serious work at hand, there is a way out: a bailer with a valve from a plastic bottle.
Homemade bailer with a valve from a plastic bottle
This option is suitable for cleaning the well, but not for drilling. You need a bolt, the length of which is slightly larger than the diameter of the pipe for the bailer and a nut. Stepping back two or three centimeters from the edge of the pipe, one opposite the other, two holes are drilled. Their diameter is the same as the diameter of the bolt.
The valve is cut out of plastic. It is an ellipse. The smaller diameter of the ellipse is equal to the diameter of the pipe. It must be cut very precisely so that when inserted inside it fits snugly against the walls. The cut-out valve in the middle will be attached to the bolt; for this, four holes are made in the plastic through which the wire is threaded. How it all comes together is shown in the photo below on the left.
Only such a mount, as in the photo above, is very unreliable. After a few hits, your projectile may come off and you will have to decide how to get the bailer out of the hole. The best mounting option is one-piece, without seams and twists. How to do this will become clear if you watch the video. By the way, there is an important thing there - how to make hooks so that, if necessary, you can pull the bailer out of the well.
We read about the organization of autonomous water supply from a well or a well here.
Bailer design
A bailer is a piece of pipe up to 4 meters long. A shoe with a valve is installed at the bottom of it. In large-sized shells, flat valves are placed, cut out of a steel sheet with a rubber seal, strips of leather, sometimes without a seal. In those that are smaller in size and diameter, ball valves are used. These devices are also called mechanical bailers - the work is due to gravity.

This is a homemade bailer with a flat valve - one of the options for its device
Rocks are taken out through a window in the upper part of the body, which are packed there during drilling or cleaning. When drilling viscous rocks - clay or loam, you have to make the window long and narrow - almost the entire length: it is very difficult to drop such a load through a small hole.
Flat valve designs for homemade bailers
The ball valve is easier to make. The diameter of the ball should be approximately half the diameter of the pipe (maybe a little more). A washer is installed in the lower part, the inner diameter of which is smaller than the diameter of the existing ball. At a certain height inside the bailer (three or four ball radii), a limiter is welded - it prevents it from rising too high. If this is not done, most of the soil that has got inside can spill out (poured out). This is due to the too long time it takes for the load to sink and close the hole in the bottom.
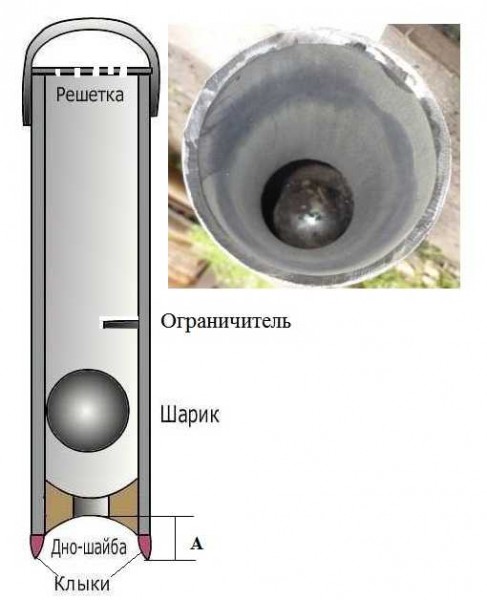
Bailer design with ball valve
At the bottom of the pipe in both versions, sometimes fangs are welded or cut out, or the edge of the pipe is grinded, making it sharp. So the soil or silt breaks better. But due to too high fangs, too little soil gets inside. When using a ball valve, the length of the fangs must be such that the ball does not protrude. The same picture - a small amount of soil collected at a time - can also be observed in bailers with a flat valve. In this case, reduce the depth of the shoe.
Too small an internal hole in a washer installed on the bottom with a ball valve can lead to the same result. The way out is to squander it.
In the upper part of the bailer, a loop or bracket is made, for which it will be possible to fasten the cable or rope. For this rope, the projectile is taken out of the well, and on it it is lowered back.
You may be interested in reading "How to make an antenna for a summer residence with your own hands."
Do-it-yourself bailer for a well device, options and manufacturing schemes
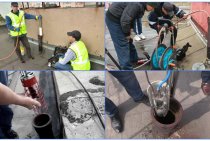
The lack of a centralized water supply is pushing residents of private houses to drill wells on their own plots. Agree, because without water in the house it is difficult to call staying in it comfortable. But well drilling services are quite expensive. Well, at least there are devices that allow you to drill a well on the site on your own.
One of these devices is the bailer. This is an efficient and relatively uncomplicated drilling tool for cleaning private water sources from bottom pollution. With its help, you can even independently drill a well that is quite suitable for exploitation. Such a hydraulic structure will require a minimum of funds. And if it is also done with your own hands, then the costs will not shake the family budget at all.
In this article we will talk about the device and the principle of operation of the bailer. Let us dwell in detail on what tools and materials will be required for its manufacture. In the article you will find step-by-step instructions for assembling the bailer, as well as videos that clearly demonstrate the device and the principle of operation of the bailer.