Stages of installation of the exhaust unit
How to fix the hood? First of all, you need to mark up for mounting the hood on the wall or ceiling. To perform markup, use the building level. Then it is necessary to make holes for the holders on which the device will be installed with a drill with a drill bit.
Drywall cannot withstand the weight of the unit structure for a long enough time without additional fasteners. Therefore, spoilers are provided as additional mounts. They are required when installing the exhaust unit on drywall.
Then you need to install the corrugation. Sometimes, when installing the hood on your own in the kitchen, the question arises: what is better to use corrugated or special air vents made of plastic, which has high strength and resistance to high temperatures? The difference lies in the cost of the products.
In the case of installation of corrugations and the use of special air outlets, strong bends, sharp corners or narrowing of the air outlet system are not allowed.
Installation of the corrugation is performed in the following order. First, insert the panel with the socket into the ventilation hole. The panel socket must match the diameter of the corrugation. Then perform the fastening of the panel. Fastenings are carried out in 4 places using dowels. Dowels are installed with self-tapping screws.
After that, the corrugation is installed to the outlet of the hood on one side and to a special protrusion of the ventilation grille on the other side.
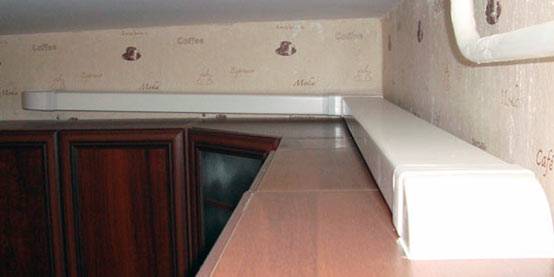
Then fasten with clamps. Clamps collect the required sizes. After that, install the casing, which is included in the hood kit. If the hood was not supplied with a casing, it must be ordered separately.
It is also possible to order an air vent with a system of hanging cabinets. Sometimes these lockers are made independently. Part of the corrugation should be in the locker. This completes the installation of the exhaust system for the kitchen. The unit is ready for use.
Before you start using the hood, you need to check how it works. To do this, you need to turn on the test device, while on the gas stove you can put a mug of boiling water. If the steam is removed correctly, then you can start operating the unit.
Installation of a chimney hood 2 key steps
Stage #1 Chimney
Installation of a chimney hood begins with the installation of a chimney. When creating a smoke outlet can be used:
- Brickwork, inside of which there is a pipe for the removal of smoke, erected on the base. It can be a load-bearing wall or a foundation. A brick chimney needs to create anchors in increments of 30 cm and lay a reinforcing belt. Reinforcement with cells 150x150mm is mounted through 3 rows of masonry. Thanks to it, the chimney acquires strength and reliability. The main disadvantage of a brick chimney is the short-lived period of operation, which is no more than 10 years. You can extend the service life if you insulate the chimney with mineral wool.
- Light weight stainless steel elements.
- Ceramic pipes for chimneys, interconnected with vertical reinforcement. Such materials have unique technological characteristics, such as low weight, the possibility of choosing a diameter, ease of maintenance, provided by the presence of a special hole.

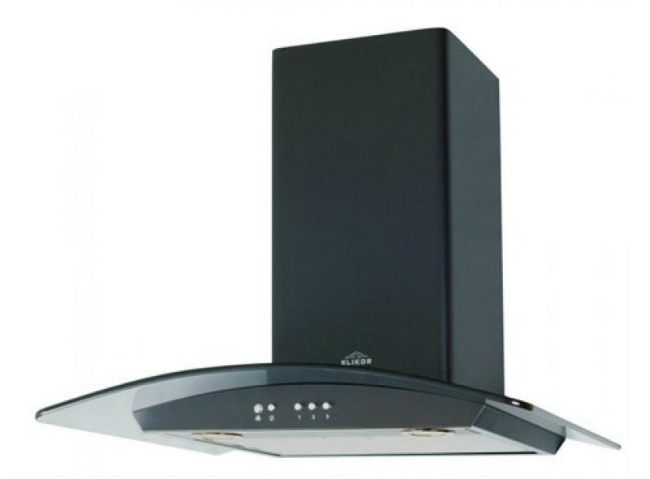
Dome hood design
The chimney must be insulated to retain heat and prevent condensation. The height from the chimney to the firebox with insulation should not be less than 13 cm. When using a chimney without insulation, the figure increases to 30 cm.
Stage #2 Hood
The chimney does not always cope with the removal of smoke.To improve its performance, the installation of a hood is required.
Do-it-yourself installation of a fireplace hood requires the presence of the hood itself and tools to perform the work:
- roulette and level;
- drill, drills;
- dowels and screws;
- screwdriver;
- pencil for marking.
The hood should protrude beyond the dimensions of the fireplace by 2-3 cm
Installation order
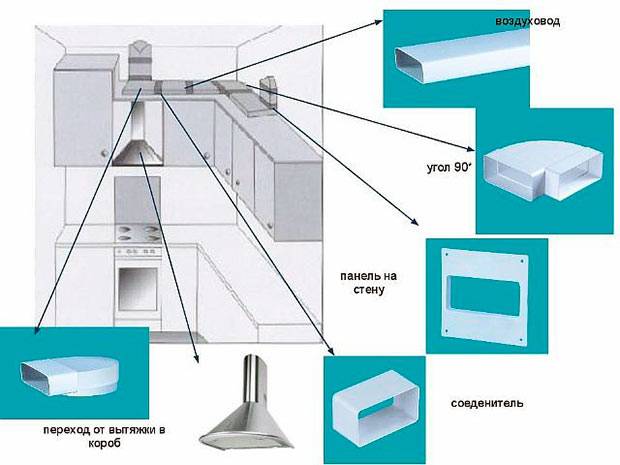
Installation of equipment is recommended to begin after the repair is completed, when the place for the kitchen set, stove and other furnishings is determined. In this case, it is easy to mark the place for placing the air cleaner. Before marking, a corrugation or air duct is installed on the vent, after which the main equipment can be hung.
The use of corrugations
This is a flexible corrugated pipe made of aluminum or plastic. It is recommended to use it when the ventilation opening is located directly above the installation site of the hood. Along with the corrugation, the kit should include clamps, a ventilation grill with a mounting flange.
The order of work is as follows:
- a grate with a flange is placed at the entrance to the ventilation shaft;
- the corrugation, preferably in the expanded state, is fixed on the flange with a clamp using silicone sealant;
- in the same way, the lower end of the pipe is attached to the air cleaner flange.
Duct application
The corrugation is easy to install, but will be too noisy at maximum speed of the ventilation equipment. It is not suitable for use when the outlet of the barrel is removed from installation locations. In this case, the hood in the kitchen is mounted using an air duct. This is a set of plastic pipes with a round, square or rectangular section.
To extend pipes to the required distance, connectors of the same material are used. Turns when laying the duct are performed using elbows. The design is more rigid than the corrugation delivers significantly less noise, requires fewer additional fasteners with a long routing length. As in the previous case, all connections are made using silicone sealant.
Main device
In addition to the listed structural elements, for operational work you will need a set of tools that should be at hand:
- tape measure, building level and marking pencil;
- drill for drilling holes with drills;
- screws, dowels and a screwdriver for final fastening;
- joint sealant.
After preparing everything you need, you can begin to work, which is performed in the following sequence:
- In accordance with the named parameters, marking is carried out along which a horizontal line is drawn, and points for drilling holes are marked.
- With a four-point fastening, the distance from the lower pairs of fasteners to the upper ones is measured, and using the same tools, a line is drawn with drilling points for the second pair of fasteners.
- If the height of the appliance is higher than intended, the excess chimney is cut off.
- According to the markup, the required number of holes are drilled, where the dowels are carefully hammered.
- The final fastening with screws is carried out starting from the top pair of fasteners with alignment along the intended horizontal.
- The work is completed by connecting to the corrugation or air duct.
Duct selection
There are several types of kitchen ducts for household ventilation:
 Plastic air duct is more compact and inconspicuous
- PVC plastic air ducts are strong, light and silent, as they create almost no air resistance due to their smooth surface. There are both rigid narrow plastic boxes and flexible pipes.
- Corrugated aluminum pipe is a fairly simple material for do-it-yourself installation, it can be freely bent to the desired size. Another quality of corrugations is the absence of hum or vibration, unlike hard boxes.However, an important drawback of such an air duct is an ugly appearance, so figure out where to hide the ventilation, for example, in a plasterboard ceiling.
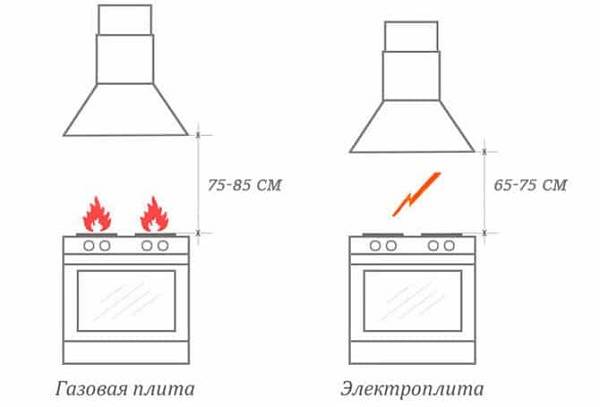
Correct location
The dimensions of the hoods are calculated depending on the dimensions of the stove or hob. It must be remembered that ideally the hood should be 10-15 cm wider than the hob. If the device has a smaller width, this negatively affects the quality of ventilation. Grease and dirt constantly accumulate on the kitchen set, and the smell of food is felt in the air.
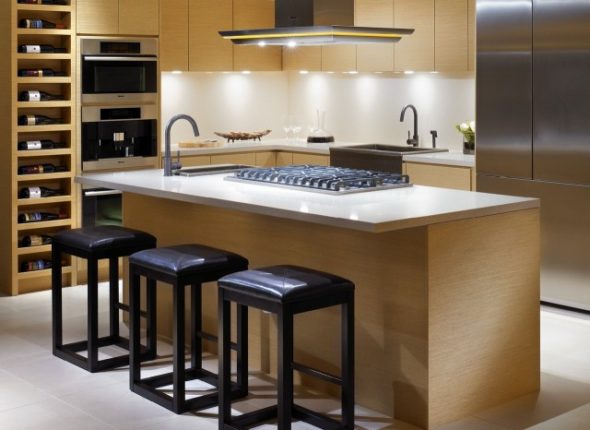
Self-installation of the hood does not require special professional skills
The mounting height of the device varies between 65-80 cm from the plate. The absorption of fatty impurities and steam directly depends on this value. Heights less than the specified values are not used, as there is a possibility of ignition of fats that have settled on the filters for a long time. Yes, and working on a stove with a low-hanging hood is inconvenient. The device is not recommended to be installed above 80 cm, since in this case the lion's share of combustion by-products will pass by.
The device is installed near a grounded outlet. Therefore, already during the repair, you need to worry about the location of the electrical wiring and outlets. The cord should not hang over the stove and burners, otherwise it will either overheat or burn out. The wire is hidden in a special cable channel, which is attached to the wall.
In order for the device to work with maximum efficiency, good ventilation is provided in the house. To do this, install forced ventilation devices or use the ventilation function on metal-plastic windows. In extreme cases, open the window (but not in the cold season).
What does a chimney hood installation mean?
The fireplace hood is an air cleaner that works on the principle of the familiar exhaust system. Waste air masses entering the domed body are removed from the room through the air duct into the ventilation shaft - the chimney. The hood of this form has an exquisite appearance and can become a real decoration of the room. It will perfectly complement any style of decoration and will suit any fireplace.

The chimney hood is delivered unassembled
Features of extracts for a fireplace:
- modern appearance, thanks to which the hood becomes a decoration of the room;
- effective air purification achieved through the installation of two engines and reusable filters;
- affordable and quick installation - ordinary self-tapping screws are used.
Determining the dimensions of the hood
The dimensions of the hood should be as close as possible to the geometric dimensions of the fireplace. Installing a larger hood helps to remove polluted air more efficiently and quickly. The most optimal option is when the dimensions of the hood are 2-3 cm larger than the dimensions of the firebox.
Noisiness
The presence of loud noise irritates human hearing
That is why when choosing, you should pay attention to the noise readings. When operating at full power, the noise of the hood should not exceed 60 dB
The best option is a hood, the noise level of which is 40 dB.
Modern fireplace hoods come in a variety of styles, such as modern modern
After some time of use, even the quietest hood can make a lot of noise. The reason for this is the contamination of the filtration system. You can eliminate the noise that has appeared by cleaning the fan and replacing the filter.
How to install a kitchen hood with your own hands
Mounting the hood over the stove is actually not difficult if you have minimal skills in plumbing and repair work. You need to start with the electrical part.
Electrical connection
A regular socket is suitable for connection. But if there are no power points near the installation site, then you need to do the following.
It is necessary to bring an electric cable to the markup for the hood, simultaneously hiding it in the wall. You need to do this in the following sequence:
- First, find the nearest junction box. From it to the planned installation site of the hood, make a channel by chasing with a perforator and a special spatula.
- Lay the new cable into the cavity.
- Switch off the power supply.
- Carefully prying off with a screwdriver, remove the round cover of the junction box. Inside this cavity is a wiring. Determine the "phase" with a tester screwdriver, next to it will be "zero". It is to these conclusions that you connect a new cable, for example, using a terminal block.
- Install an overhead outlet for the hood and insert the bare ends of the cable into its contacts, fix them.
- Assemble the socket. Now you can turn on the power supply.
Grounding for ventilation is usually not used.
How and at what height to install the hood housing
Usually, a forced ventilation device is placed above the stove directly on the wall. Most often, two points of support are sufficient. As a rule, the installation and operation manual is attached to the purchased hood.
The optimal height above the gas stove is about 80 cm (over the electric one, 70 cm is enough). It is necessary to retreat this value from the plate and draw a horizontal line with a pencil. This will be the bottom surface of the hood. Starting from it, you can mark the holes for hanging.
It is enough to measure the distance from the bottom wall of the device to the marks for fastening to a vertical plane with a tape measure. The same values should be noted already on the wall.
Next, drill holes, hammer in plastic dowels, screw in screws and hang the device case on them.
The process of fixing such a product is simple. The case is screwed with self-tapping screws to the upper wall of the wall cabinet in four places. When the door closes, he will remain invisible.
But such devices have a flat panel with filters at the bottom. She just needs to be visible. Most often, it has a retractable part and a backlight.
The marking for fixing the body is made according to the template, which must be included in the set of documents for this hood. Check it out when buying.
The choice of air duct for the hood and its installation
Without a connection to the common house channel, the operation of the hood is meaningless. Although, if the device is supplemented with a special carbon filter (some models with a recirculation function provide for its internal installation), then for some time you can live like that. But the constant replacement of carbon filters will inevitably lead to additional costs, so it is still better to have a hood that allows the installation of an air duct.
There are three options for manufacturing a ventilation duct from standard parts:
- from a corrugated soft foil pipe;
- from plastic channels of rectangular section;
- from PVC pipes.
The corrugation is easy to install, but looks unaesthetic.
Most often, channels with a rectangular cross section are used to install an air duct, since they have a large number of advantages:
- They can be easily cut (to shorten) with a file.
- They are quite aesthetic, able to fit into any kitchen interior.
- There are a large number of different convenient transitional elements - angular, curly and others.
Finally, plastic pipes. They are somewhat inferior to rectangular channels in terms of the variety of transition elements.
How to install air ducts
Installation of the air duct involves preparatory work:
- First you need to measure the distance from the outlet of the hood to the opening of the common house channel. It is also necessary to take into account all the turns of the planned line.
- Then make a list of the items you need to purchase.
Suppose that the distance from the plane of the hood hole to the level of the lower line of the grate of the common house channel is 1 meter.In this case, a left turn is necessary, after which another 50 cm remains to the ventilation shaft of the house. So you will need:
- rectangular channel 1 m;
- channel with a diameter of 0.5 m;
- knee with a right angle;
- adapter from the hood to the rectangular channel;
- adapter for the grate of the mine at home with a right angle turn.
Installation of the air duct is carried out in the following sequence:
-
First you need to install the adapter on the top outlet of the hood. Check the tightness of the connection, making attempts to loosen the part. The output diameter is from 100 mm to 150 mm, for each size you can pick up the appropriate adapter in the store.
-
Next, substitute a rectangular channel on the side and mark the cut line along the bottom of the ventilation duct with a pencil, since the pipe will have to be shortened a little. Cut off the unnecessary part with a metal tool. You can also use an electric jigsaw.
- Next, insert a rectangular duct into the adapter, and install an elbow on top to turn the duct. These parts are easily connected to each other due to the fact that they have expansion links at the ends. It is enough to put a little pressure on the part to be inserted from above with your hand, and it will go into the hole of another element. It is not necessary to lubricate the joints with sealant.
- Insert the last channel, and from the other end drive an adapter for the grate in the kitchen wall.
- Check the effectiveness of the hood, for which you turn it on and put your hand on the connections. Air must not leak.
The rectangular ducts used stay in place well without being attached to the wall. But to be sure, you can install at least one fastener.
Usually there is no ventilation grill in the apartments. In this case, it is necessary to select it when buying parts. In addition to the line cells, it must have a hole to secure the round end of the adapter.
On the wall, the grate is fixed with dowels and screws.
If we talk about a cone hood, then it always comes with its own decorative air duct in the form of a shiny metal box. Inside such an element, a practical part is still installed - a corrugation for ventilation, which connects the upper opening of the cone to the apartment ventilation duct.
The decorative box is built according to the telescopic principle. Its upper part slides out of the lower part and is fixed according to the attached installation instructions.
The disadvantage of such designs is that they can only be used when the opening of the kitchen ventilation duct is located strictly above the stove. If it is strongly displaced to the side, the installation of such a device will be difficult.
If there is an additional ventilation duct on the kitchen wall, then it can be closed with a regular grate without a hole. Let it serve simply for natural ventilation of the room.
Cleaning performance
In this case, these are the volumes of air that the equipment can clean per unit of time. To determine what the level of performance should be, it is necessary to calculate the product of the kitchen volume and the air exchange rate. As a quantitative indicator of the last parameter, it is recommended to use the average air exchange rate per minute, equal to 12. It should be taken into account that the cleaning efficiency is affected by the number of elbows of the ventilation duct and the rate of filling the room with harmful substances. It is known that one knee in 90 means a loss of 10%, and the filling rate of small rooms is higher than that of larger ones. Therefore, performance should be selected with a margin.
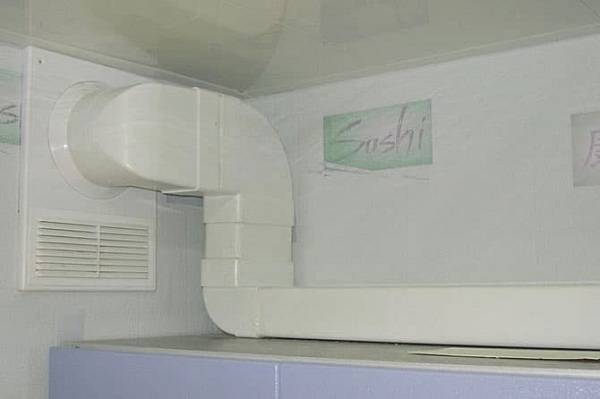
Exhaust pipe installation
The kitchen hood is connected to the ventilation duct using corrugated or plastic pipes. The requirements for the duct are quite important:
- The optimal length of the pipe for the exhaust hood in the kitchen is no more than 3 m. If the duct is long, with each meter the efficiency of the device decreases by 10%.
- The minimum number of swivel elbows, adapters and bends. The more knees, the worse the ventilation. The resistance of the system increases sharply, and the exhaust air hardly comes out.
- Bends and turns - exclusively at an obtuse angle. An angle of 90 degrees reduces efficiency by 10%. The air duct should smoothly move from one wall to another.
- Smooth inner surface. In this case, ventilation will be efficient, as air resistance will decrease. The best option is round plastic pipes. The corrugated air duct is ribbed, which creates additional obstacles for the outgoing air.
The process of installing the exhaust pipe - carefully read the instructions
Almost all models of devices are connected to a round air duct made of corrugated or plastic. Rectangular pipes look better, as they fit more harmoniously into the space between the cabinet and the ceiling. The diameter may be different, but the cross-sectional area must be at least 0.1 m2. All connections are hermetically sealed to prevent the possible ingress of exhaust air back into the kitchen.
Plastic air ducts are strong, light and do not create additional noise during operation. Corrugated products also have many advantages: they are flexible, light, do not vibrate and do not make noise. But in terms of aesthetics, they are inferior to plastic counterparts.
The air duct is hidden in the free interior space of walls, furniture or ceiling. Two-level ceilings are convenient in this case: the pipe can be easily hidden above the lower level. If such options are not suitable, decorative boxes are used that match the style and color scheme to the kitchen set or walls. With your own hands, you can make a drywall box in the kitchen for the hood. On sale there are also boxes for the hood in the kitchen made of stainless steel.
https://youtube.com/watch?v=Lcr1lSIzEJY
WATCH VIDEO
Extractor installation instructions are included with each model. The hood for the kitchen burning has detailed instructions with drawings for installing the device. Therefore, you can find an exhaustive answer from the manufacturer to the questions that have arisen.
Installation of the ventilation duct
There are several types of air ducts for domestic ventilation on sale:
- PVC (plastic) air ducts. They have good strength and light weight. Due to the smooth coating, they do not create noise when streams move along them.
- Aluminum corrugated duct - free to bend, stretch and easily fit to any size. It does not create vibration and hum, but it has an unaesthetic appearance, therefore, it is usually hidden in a closet, a special box or hidden by a false ceiling.
Before you install the hood in the kitchen, make sure that you do not cover the only regular vent in the room with a pipe. In the case of one outlet, they often break through another exit from the mine and put a check valve that will close the flow into it when the device is turned on.
In the figure, the installed valve is shown in red. With the fans turned off, it lies horizontally, and air can freely pass through the box in a natural way. When the fans are turned on, the valve rises and closes the air outlet back into the room, thereby directing it to the shaft. The material can be some lightweight material such as plastic or aluminum. But this option is not suitable if a built-in hood is being installed, since it is mounted in a wall cabinet.
For private houses, the best option would be to punch an additional hole in the wall for the channel and not affect the existing vertical one. In an additional hole you need to bring the air duct from the device. But at the outlet, a check valve must be installed to prevent air from entering from outside.
If there is no additional channel in an ordinary apartment, and it is not possible to punch a hole in the outer wall, then this channel can be expanded and a special adapter with two holes can be used.
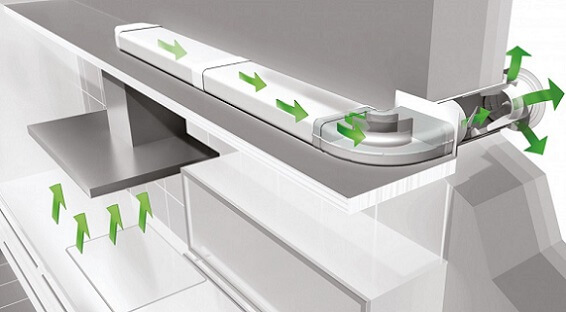
Through the lower grate, air from the room enters the shaft due to natural draft. At the same time, there is a visor in the upper opening, which prevents the air flow from the unit from escaping through the grille back into the room. Although there is, of course, back leakage, it is minimal compared to the outgoing flow.
The figure below clearly shows how the duct is connected to the adapter, while maintaining natural draft.
Thus, do-it-yourself installation of a kitchen hood can only be done by home craftsmen. Completing a task requires accuracy and care. Well, for those who do not have skills in handling tools, or do not have free time, the best option would be to invite a specialist to resolve this issue.
Installation of hoods by type
The installation technique of the device directly depends on the type of the selected unit. There are such types:
- suspended (they are also called standard, visor or flat) - they are fixed above the hob under the cabinet;
- built-in - mounted inside a wall cabinet (the cabinet is made specially, based on the dimensions of the device), thus becoming invisible in the interior;
- wall-mounted (chimney or dome) - you can install such a kitchen hood on the wall, directly above the hob;
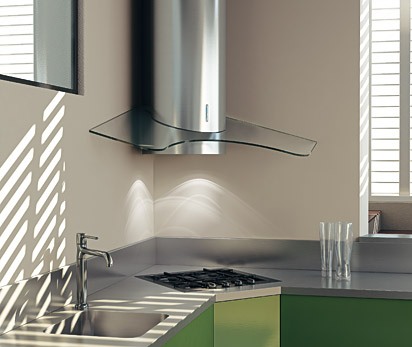
- inclined (a type of wall-mounted apparatus - have an inclined panel);
- corner - this type of device is mounted in the corner of the room;
- island - can be fixed to the ceiling in any place where the plate (island) is installed.
Hood types
The type of exhaust device is selected depending on the technical conditions and the availability of access to the ventilation shaft. The most popular are filtering, exhaust and combined models.
Filtration devices operate on the principle of recirculation. The exhaust air mass is drawn into the structure, passes through the filter system and returns to the room already cleaned of odors and grease. Installing them is a breeze as these devices do not require a vent hole.
Exhaust models are flow type devices. A metal exhaust fan sucks in the exhaust air mass and throws it out into the street through the ventilation duct. Their installation is more difficult, since it is necessary to bring the air duct to the street.
Depending on the design features, exhaust devices are divided into 4 types:
- Dome (wall). These wall-mounted appliances are inexpensive, easy to install, but do not always look appropriate in kitchens decorated in a certain style. To get out of the situation, you can install a hood for the hood in the kitchen.
- Built-in hoods. These devices cut into the upper cabinets of the kitchen set and provide the room with a presentable look. These hoods in the closet are not striking and do not attract attention, as they are more like a piece of furniture design. Mounting the built-in hood is not difficult.
- Island (ceiling). Such models are attached directly to the ceiling above the kitchen island. The scheme for installing the hood in the kitchen is much more complicated.
- Desktop. These model structures are installed together with the hob. They have a high quality of air purification, as they are located directly above the sources of steam, grease and pollutants.
Each type has its own type of installation. It is easiest to install wall-mounted devices, the heavier ones are ceiling-mounted.
The installation process of the hood
Of course, the installation of a kitchen hood with your own hands depends on its type and the location of the ventilation shaft. First, we will consider installation using the example of a built-in device in a cabinet.
Anti-return mechanism
- The anti-return valve will not allow air to return back to the kitchen
- If you decide to do everything in good faith, then start by making a cracker box. The body can be made of aluminum, galvanized sheet or tin according to the scheme that was given above. Or, in order not to suffer, just buy an anti-return valve that opens like a butterfly. It is placed in front of the ventilation shaft.
- For convenience, install the case on a wall cabinet above the stove. Then fix it more tightly by sealing all the cracks with mounting foam and gluing it to the cabinet to avoid resonance.
- At first, just try on the cracker body and make markings on the cabinet for the hole. After that, you can remove the cabinet from the wall and cut a hole for the frame in the bottom wall with a jigsaw. To do this, drill a hole inside the marking area with a large drill, and then insert a jigsaw blade into it and start cutting the shape you need in the cabinet.
- Next, in the same way, make holes in the inner shelves (if any) for the air duct. In the upper wall, you need to make a square hole with a margin of 3-5 mm for a cracker.
Duct connection
- The next step is to connect the duct. Insert the corrugation into the holes made, and in the upper wall of the cabinet, give it the desired square shape. Cut the corrugation with a small margin, cut the corners and bend them outward.
- Now the cabinet with corrugation can be hung on the wall. Be sure to seal all duct joints with silicone sealant so that power is not lost.
- Fasten the homemade box to the cabinet so that it connects the corrugation to the ventilation shaft. We also glue it on silicone, and close up large gaps with foam.
- After that, you can fix the hood in the cabinet. Screw it on self-tapping screws, or on dowels - if the mount is intended for the wall.
- Securely fasten the corrugation to the hood and secure with a clamp. In this place, it is not necessary to coat the joint with sealant.
- If you connect the hood directly, then simply connect the duct to the ventilation shaft. To make it convenient to dock them, use a special grill with a round hole, which is shown in the photo. Attaching the corrugation to the ventilation
- When using PVC air ducts, the installation is similar: we simply connect the pipes with the component corners and carry them out to ventilation.
 Accessories for plastic air duct
Wall mount without cabinet
- Not everyone has wall cabinets above the stove, fearing their quick damage from steam and high humidity. Moreover, wall cabinets are usually narrow, which does not allow mounting wide hoods inside. If there is no built-in mount, then for this a U-shaped frame is attached to the wall from the corners on the dowels. This mount acts as a support for the body.
- And how to install a kitchen hood, if it cannot be fixed to the wall with ordinary dowels? Such problems often arise for owners of gas stoves when the pipe interferes with normal fastening.
- In this case, you can buy long plumbing self-tapping studs, which, on the one hand, look like a self-tapping screw, and on the other, have a thread with a nut. You simply screw them into the wall like dowels, and attach the hood body to them at the required distance from the wall.
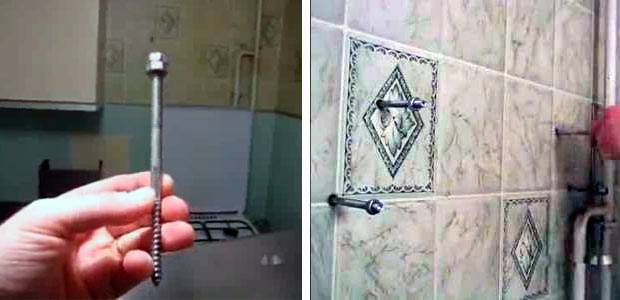 Mounting the hood next to the gas pipe
Installing the hood in the kitchen - video instruction:
And in the end, it remains only to connect the hood to the network, through a socket, or by permanently connecting it through a fuse. Do not forget to connect the grounding first, it will remove possible voltage from the case when the fans are running.
If everything works, you can put on a decorative cap and enjoy the fresh air while cooking!
Types of hoods
It is not always easy to choose a hood for a gas stove. There are different types of kitchen hoods, and they differ mainly in the method of installation. There are such types of equipment:
- suspended;
- embedded;
- wall;
- corner;
- island.
above the stove and the features of the room will directly affect the choice of model for the kitchen. The hanging system is usually placed under the shelves, and the built-in system is “hidden” inside cabinets or shelves located directly above the stove.
Wall systems are attached directly to the wall at a certain level above the stove. When the gas stove is located in the corner of the room, it is necessary to install a corner exhaust system. Such a hood is specially made in such a shape that it fully copes with its functions in a given place in the room.
Island exhaust systems are usually attached directly to the ceiling. They are used in places where the plates are located in the center of the room and it is simply impossible to fix the hood in a different way. Most often, this arrangement is found in professional kitchens, for example, in canteens or restaurants, or in large kitchens in residential apartments with a non-standard layout.