How to set beacons for floor screed
 Before laying the final floor covering, the subfloor must necessarily be leveled and have a strictly horizontal arrangement. For this purpose, a wet or dry screed is carried out, with the help of which the irregularities of the concrete bases on which the floor is laid are eliminated.
To simplify and facilitate the work of floor screed, so-called beacons are used. These are special elements installed at one strictly adjusted horizontal level within the same room at the same distance from each other. Structurally, the beacons represent a linear solid structure, along the upper edge of which a screed will be installed. In fact, they actually determine the level of the new floor. The appearance of the finishing decorative coating and its performance characteristics depend on the correctness of their installation.
How to correctly expose, install and fix
The base must comply with the technical strength indicators
Before you decide how to correctly set the beacons for floor screed, you should perform a full range of preparatory activities, design work, preparation of equipment and materials.
As a tool and materials, you will need the following to install the guides:
- Perforator and drill;
- Roulette and level;
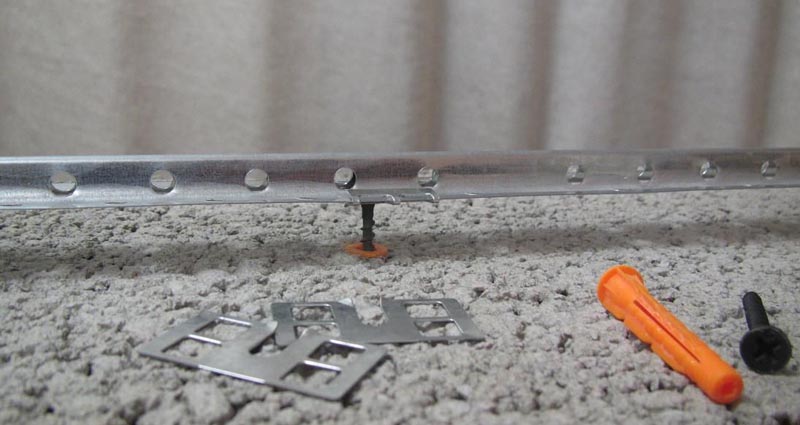
- U-shaped profile 60 × 27 mm;
- Cord, dowels and screws.
With a small thickness of the concrete mixture, the 60 × 27 mm profile can be replaced with a 28 × 27 mm one or a plaster T-shaped analog of 22 × 20 mm in size can be used. When using timber, it is better to use material with a cross section of 50 or 60 mm.
Beacons for floor screed - the main stages of installation and pouring the mixture
The sequence for installing beacons for liquid concrete screed will look like this:
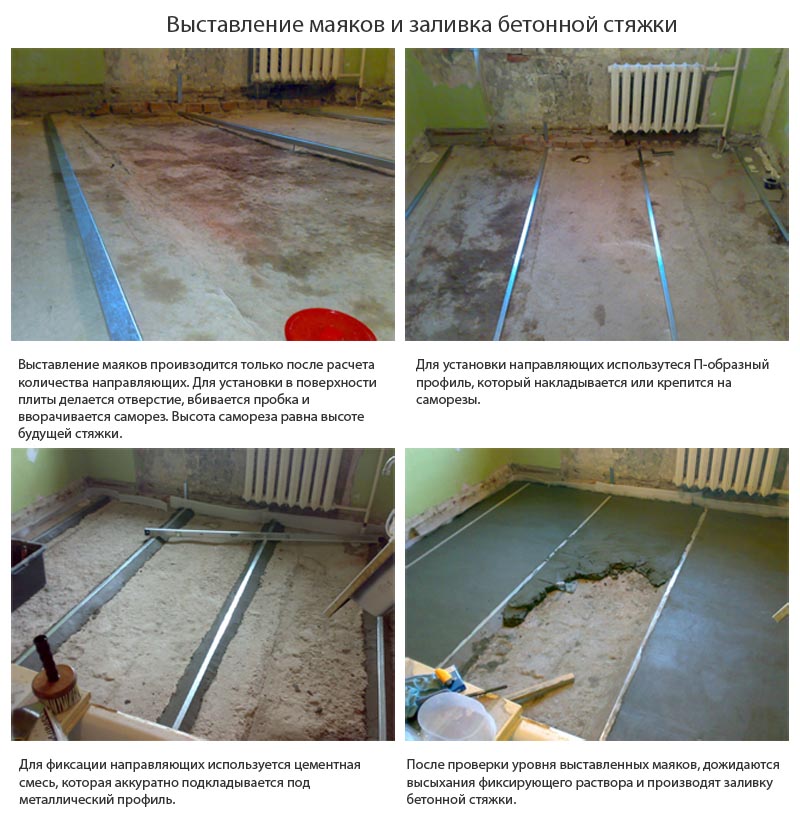
- The mounting point is the highest point on the floor surface. In this area, using a perforator or drill, we drill a recess for the dowel. At the other end of the room, the exact same recess is made. A plastic dowel is inserted and hammered into the holes obtained;
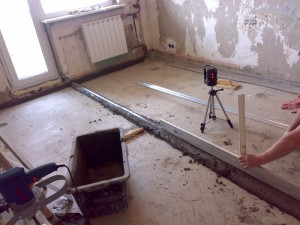
- We carry out the necessary calculations, according to the length of the room and in compliance with the basic rules. According to the data obtained, a schematic marking is made on the floor surface, using a level and a pencil;
- At the beginning and end of each line, a hole is drilled and dowels are hammered, as was done in step 1 .;
- Marking is made for self-tapping screws, in the center of the U-shaped profile. For this, a pencil and tape measure are used. After marking, the self-tapping screw is twisted into the profile to its full length;
- The profile with self-tapping screws is installed in hammered dowels and slightly fixed with a drill. Further, at the beginning and end of the room, a cord or wire is pulled along the “zero level” line;
- Adjustment is carried out on a stretched cord. To check, it is advisable to use the building level. Then repeat the operations for the remaining guides;
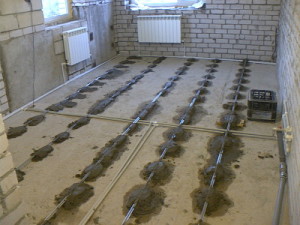
- Carry out the preparation of a cement or concrete mortar with the addition of alabaster. Next, the required amount of the mixture is placed under the profile so that it can be freely pressed into the solution, while maintaining the required level along the upper face;
- After fixing all parallel guides, perform a final check according to the level. Remove the stretched cords, wait for the cement mortar to dry.
For fixing, it is recommended to use a mixture of cement, sand and alabaster. The drying time of the mixture is usually quite long, and the addition of alabaster will help to reduce it to a minimum.
When setting guides for other types of screed, you can use a similar method.The stages with the preparation and tightening of the screws can be generally omitted and guided by a stretched cord. But this approach requires experience in setting beacons and is not recommended for beginners.
What is zero level
 The zero mark is the level that will control the horizontal of the finished floor surface. It is determined on the wall using a building level (bubble or laser), starting from the highest point of the surface being poured.
The zero level is drawn on the wall, at a height of up to 1 m along the perimeter of the entire room, moving from the doorway. By measuring the distance from this line to the floor level, the highest and lowest points of the surface are determined. For convenience, a cord can be pulled around the perimeter at the level of the finished floor. Thus, the base level of pouring the solution at the highest point is displayed.
If the protruding surfaces are in the center of the room, they are aligned with a stretched cord, which is advanced along the markings made. A single protrusion or unevenness must be leveled with a hammer or chisel.
The smallest thickness of the solution is 3 cm. With a dry screed, the zero mark rises by 3-5 cm, with a team - up to 7, and wet - up to 10 cm.
Installation of beacons under a cement-sand screed
 How to set beacons on the floor for screed? The guide profiles are laid out perpendicular to the longest wall at a distance of 20 cm from each other less than the length of the rule. The extreme rows should be 30 cm from the wall. Based on these requirements, by simple calculations, you can determine the number of beacons needed for installation in a given room and install them parallel to each other.
1st option. The lighthouse (beacon profile) is raised to the level of the marking cord and at the highest point is fixed with screws to a wooden cork embedded in the concrete base. This procedure is performed at several more points of the lighthouse, controlling the accuracy with a level and a square, until it is firmly fixed. The beacons are fixed with building gypsum, checking the position of the guide by the level. The gypsum is smoothed on the sides with a spatula.
2nd option. For the guide, a wall is prepared from the solution, into which the profile is “embedded”, adjusting its position along the stretched cord.
3rd option. The guides are formed from mounds of lime mortar and cement (in equal parts) when the mortar is thrown under the rule. The top of such a “wall” is smoothed by the cord tension rule. After the tie device is completed, such a beacon remains in her body.
4th option. Self-tapping screws are screwed into the dowels along the guide lines. A solution is thrown onto each of them above the stretched cord. And then the U-shaped profile is put on the screws, pressed into the solution for greater strength.
Another video on how to put beacons on the floor.
Last tips:
- adding alabaster to the composition of the solution will speed up the process of preparing the lighthouses up to half an hour;
- the solution must be prepared for only one lighthouse;
- places for placing beacons for floor screed must first be moistened;
- to avoid deflection of the beacons, 2 hours before pouring, you need to fill the voids under them with a solution;
- lighthouses made of wooden bars, due to the absorption of water and, as a result, deformation, are subject to mandatory extraction;
- with a screed layer thickness of more than 10 cm, a metal mesh or expanded clay backfilling is required under the beacons;
- beacons and self-tapping screws are removed when the screed is not fully set, while moving along the flooring from the boards;
- the upper surfaces of the beacons are promptly cleaned of the adhering solution.
From this video you will learn how to put beacons on the floor for screed.
Filling the screed
After completing the process related to how to put the beacons under the screed, the pouring of the concrete floor begins.
This work is performed in the following sequence:
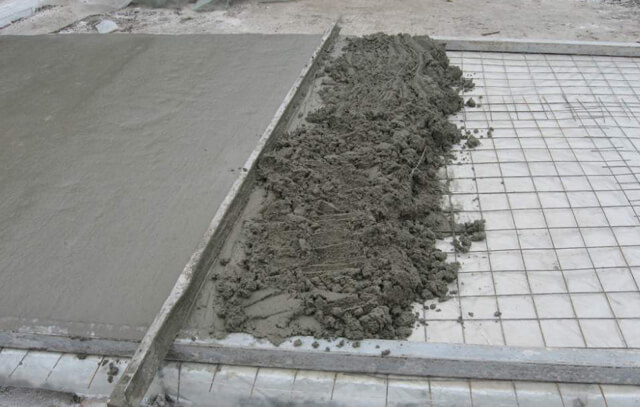
- prepare a solution and place it between the beacons;
- level the surface using the rule, which is moved with smooth movements along the guides from the far wall in their direction. The excess solution is smoothed along the screed into the zones of further pouring;
- when the concrete surface sets, the plates are removed, and the recesses are sealed with mortar and smoothed with a spatula.
- When the pouring of the screed is completed, subsequent actions with the surface can be performed no earlier than a month later.
Thus, when arranging a concrete floor, the most difficult process is the installation of beacons. If you follow the technology and know how to install beacons for the screed correctly, you can do this work yourself.