How to arrange the junction of the roof Ondulin to the chimney
How to arrange the adjoining of the roof Ondulin to the chimney How to properly arrange the adjoining of the roof Ondulin to the chimney The intersection of the roof and the chimney is one of the most difficult roof nodes. During operation, the linear dimensions of the structure change and gaps appear at the junction of the ondulin, requiring reliable sealing. Our video clip will help you properly arrange the connections and prevent leaks.
September 15th
Roof repair requires a serious approach. There are many vulnerabilities on the roof, where roofing materials are adjacent to vertical structures and leaks often occur. One of these nodes is the intersection of the coating and the chimney. Ondulin's specialists have filmed a video that will help you correctly arrange the connections and securely seal the chimney exit to the roof.
For work you will need:
— insulating tape Oduflesh-Super;
- Ondulin covering the apron;
- apron side connection;
- lumber for additional crates.
Making the junction of the roof to the chimney
1. Mount an additional crate around the pipe for attaching additional elements. The width of the crate at the rear and side walls of the pipe must be at least 15 cm, at the front wall - 25 cm.
2. Adjacency to the front wall of the pipe is made with an Ondulin covering apron. Cut the apron so that the width of the vertical shelf is equal to the width of the chimney, and the horizontal (wavy) shelf has a margin of 1 wave on each side.
Lay the apron on the roof close to the pipe and nail it to the crate along each wave except the extreme ones.
Seal the junction of the apron to the corners of the pipe with Onduflash-Super tape.
3. The junctions of the roof to the side walls of the pipe are made out with aprons of the lateral junction. Cut the vertical flange of the apron so that its width is equal to the width of the side wall of the pipe.
Lay the side apron over the top wave of the cover apron and nail it to the batten with 3-4 nails.
4. The junction of the roof and the back wall of the chimney is sealed with Onduflash-Super tape. Cut a piece of tape along the width of the wall with a margin of 2 waves on each side, lay it on the joint and press it firmly against the pipe and ondulin.
Insert the resulting valves onto the side walls and seal the junction of the apron at the corners of the pipe.
5. Seal the cover apron against the front wall of the pipe. Cut a piece of Onduflash-Super tape 10-15 cm wide with a margin of 2 waves on each side, lay it on the junction and press firmly against the front wall of the pipe and the covering apron.
Put the resulting valves on the side walls under the aprons of the lateral connection.
6. Along the perimeter of the pipe, press the top of the lateral aprons and the Onduflash-Super tape with metal strips. The strips are installed slightly below the bend line of the aprons and are attached to the pipe with self-tapping screws.
Slightly bend the aprons along the fold line, fill the gaps between the aprons and the pipe walls with polyurethane sealant.
7. On top of the Onduflash-Super tape lying on the roof behind the back wall of the pipe, install and nail an additional sheet of ondulin to the crate.
By sealing the junction of the pipe roof according to the proposed technology, you will reliably protect the roof from leaks even with significant changes in the linear dimensions of the structures.
After the pipe is completed, you can continue to repair the roof - lay the remaining roof, install tongs and a ridge.
Ondulin properties
Before talking about any ventilation, you need to understand the properties of the main coating.
It is very important to find out about the degree of waterproofing and the accumulation of condensate.If a large amount of moisture accumulates in the roofing cake, then you will have to take some measures, and if it is almost always dry there, then there is no need
Ondulin is a good and high-quality roofing, but its service life is extremely short. The composition of the material includes a large amount of natural cellulose. In the process of manufacturing a sheet product, it is impregnated with bitumen, and it falls under its protection. However, heavy precipitation can immediately deform the surface. To prevent this from happening, a qualitative foundation is created. This role is played by a continuous crate, on top of which the litter is laid. It makes the surface as smooth as possible and creates additional resistance to moisture.
IMPORTANT: When installing ondulin, it is very important to monitor its stretching. If you do not have enough a couple of centimeters to the end of the roof slope, do not stretch it, this will completely lead to a rupture of the canvas already during frost
The bitumen sheet gained such great popularity due to its similarity with asbestos slate. It was produced in France in the 40s, and some developers have since called this material euroslate. Externally, it is a bit like slate due to its wavy structure, but even in their number there are many differences. The dimensions and weight of the bitumen sheet are significantly lower than asbestos, which allows you to carry out installation work yourself, and save on laying work.
pros
ondulin are as follows:
- High waterproofing. Despite this parameter, an excessive amount of moisture will deform the material, so often such a coating can be found in dry, but not hot countries.
- Low material weight
- Ease and speed of installation
- Relative cheapness

- High sound insulation. Due to the soft and rough surface, extraneous noise will not penetrate into the attic, therefore, the house will always be quiet.
- Resistance to chemical and biological influences. Due to the large amount of bitumen, no vegetation will ever appear on the surface.
Minuses
:
- Increased degree of ignition, which does not correspond to fire safety. Ondulin cannot be laid on public buildings.
- Low service life. Severe frost and heat adversely affect the material. When frozen, it becomes brittle and shrinks in size. As for the heat, it melts it, and it practically flows. In addition, excessive precipitation quickly destroys the bituminous protection and is taken as a "paper" basis.
IMPORTANT: The material can be laid on top of the old coating without dismantling it.
This makes the material special and attracts the attention of many developers.
Expert answers
Ivan Pupkin:
Tin plate material is universal
rytti lola:
ruberoid
belinov:
Bituminous sealant for such purposes.
Dislike:
fiberglass material and rubberized with special rubber mastic
Roman Shved:
buy a ready-made metal "apron" according to the size of the pipe.
Truculentus:
Covering apron Ondulin and self-adhesive insulating tapes Onduflash.
Mikhail Rudnev:
ASPID:
Olga:
The pipe is wrapped with a heat-insulating non-combustible material and a galvanized apron is placed on top
Bolshevik cats:
If the pipe does not heat up, then the bituminous sealant, if it heats up, then it is high-temperature, you just need to look at the compatibility of the materials.
Vladimir Petrov:
Silicone only. And there are also rubber linings for pipes.
Novel:
what is the pipe made of? cement;
BANNED:
aquaset betek, through the fabric in two layers
Alexander:
What kind of pipe, stove or ventilation - special aprons are sold for ondulin roofs, ventilation duct outlets ... self-adhesive onduflash tapes. Or Russian ingenuity: ondulin is a bituminous sheet.Anneal the fiberglass cloth from the wax and glue it with bitumen, only necessarily roofing. Stick the last layer of fiberglass on bitumen and oil paint to match the color of the sheet for beauty. And for the future, do not take overseas materials on curved roofs / walls - you are tormented by the configuration. It’s not for you to crooked a tin under a slate sheet and cover it with cement with liquid glass.
Anatoly Bondar:
Mastic automobile rubber-bitumen (anti-noise). Not expensive, but very useful in the household for puttying such problems. You can reinforce with fabric.
Druid:
Just today a man was talking about it. Six years ago, his roof began to leak, he climbed in, foamed the cracks and seams with mounting foam. And now for six years no problems. ))
Installation of ventilation on the laid ondulin
Very often there is such a situation in which you have to deal with installation on an already finished roof. No need to be afraid, as this work is also simple. Usually, the ondulin sheet is dismantled and all the previous steps are performed. However, sometimes this is not possible. In this case, proceed to radical actions:
- First you need to make a hole for ventilation. The roof covering (ondulin) is cut. In this case, the incisions are made using the cruciform method.
- The edges of the resulting cutout are brought down, bent and fixed on the inside of the roofing cake. Staples or small cloves can act as fixing elements. Some people use tape.
- An adhesive composition and a film are applied along the cut so that moisture does not get into the heat-insulating layer. In our case, you need to buy a pipe with a special transition apron. Its edges are tucked under the ondulin sheet, and the gaps in the junction area are closed with an adapter tape.
- The apron is nailed to the slats through a sheet of ondulin and reinforced with an overlay inside the roof.

That's all, ondulin ventilation is done. Now the under-roof space, thanks to the deflector, will be ventilated and dry, preventing rotting of materials.
Creating a ventilation pipe outlet
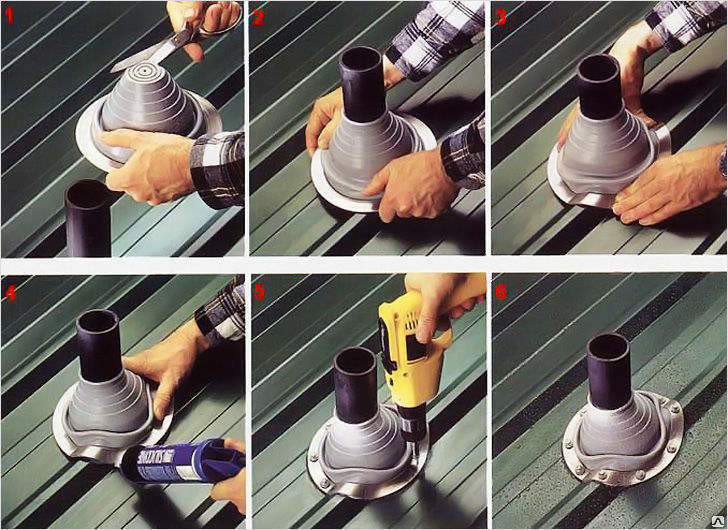
In most cases, pipes are made from metal pipes with a diameter of 12.5 cm if they are intended for the first exit, and 11 cm if for the second or third. The main requirement is the optimal placement of the exit point of the ventilation system. For example, if its cap is lower, then the operation of the device may be difficult due to the wind blowing in the opposite direction to the slope. There are cases when the exit is made in inaccessible places. Some developers self-isolate system release points. For example, joints can be additionally waterproofed, which will increase protection from precipitation. The installation of this design is very easy to reproduce:
- First, lubricate the area around the pipe with a special degreaser;
- Then with a brush we will make the first layer of waterproofing;
- We wrap the pipe with a special fabric for reinforcement and wait until the waterproofing agent absorbs it as much as possible;
- After 15 minutes, we can continue to work. Again with a brush we smear a layer of waterproofing - this time we do not remove the fabric. Let the substance dry.
Best Answers
Laola:
Here is information about Ondulin components. There are also special Onduflash self-adhesive tapes, which are used for waterproofing the joints of the roof with a chimney, a roof window and roof superstructures. Also, ONDUFLESH tapes can improve the waterproofing of the eaves and can be used in the design of roof valleys. .unikma /tiles/onduline_teh2.shtml
Alexsej Teslenko:
It is necessary to make an overlap of Ondulin on the pipe at least 15 cm, and glue it on the bituminous mastic! Or if the ondulin is already laid, make a surface layer with a call to the pipe and the existing ondulin by 10-15 cm, fix everything with the same bituminous mastic.
Avanez Kirpikin:
This is a typical node, look in any roofing system it is. You need to make a type of metal apron where you need to run under andulin or from above, or use andulin instead of an apron.
Features of the installation of the ventilation system
Many people know the fact that ventilation can be natural or forced. Natural ventilation does not have any special devices on the roof surface, since the process is based on physical laws. Air enters under the cornice overhangs along the perimeter, where the air vents are located. These are small gaps, which are calculated depending on the area of \u200b\u200bthe roof slope. The larger the slope, the higher the gaps should be. After that, the air exits through the ridge element. It is also called the cold triangle.
It also happens that natural ventilation cannot cope with the ventilation process: air treatment and removal of moisture from the attic. In such cases, devices are installed that create forced ventilation. Most often, such devices are bought together with roofing material, in our case it is ondulin. Thanks to this, maximum docking is achieved. In fact, making ondulin roof ventilation is not so difficult.
It is only important to understand how it works. Roofing material and ventilation pipe must be combined with each other
If this is not the case, then small gaps cannot be avoided. Then moisture will get under the roof through them, waterproofing and the roofing cake will begin to collapse.

If we talk about pipes for forced ventilation for ondulin, then they are made in a standard size of 0.7x0.48 m. The main raw material is ABS copolymer. An example of such a ventilation system for ondulin can be seen from the video.
We will consider in more detail how to carry out all the work on arranging a ventilation pipe for onldulin below. It should only be noted that the process is carried out with great care and with strict adherence to the instructions.
It is important to prevent depressurization and leaks that will affect building materials and the roofing pie as a whole. At the same time, work on creating ventilation in one line may differ.
For example, the installation of a ventilation pipe can be carried out at the stage of creating a roof from ondulin, or after all sheets of ondulin have been laid for a long time. In this case, the algorithm of actions will be different. Just before we start looking at the instructions, let's look at what ventilation can be used for.
How to bring the chimney through the roof of the bath covered with ondulin
What is a chimney for?
The traditional material used for the furnace of the sauna stove is wood. When it burns, gases dangerous to humans are formed. They must be removed during combustion. For this, a chimney is necessary.
What is the difficulty of running a pipe through an ondulin roof
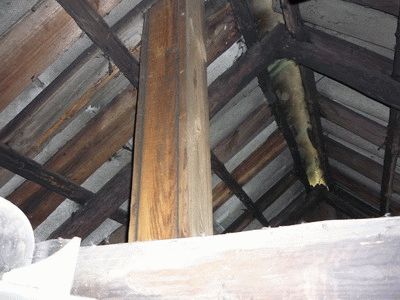
It would seem - what is it like to run a pipe through the roof ?! But no! There are problems. The reason for all the problems that arise during the removal of the chimney through the roof from ondulin is the composition of the roofing pie. Most types of thermal insulation are made of synthetics, and hydro and vapor barriers are polymer films. Obviously, they are all combustible materials.
As a rule, the roof frame and ceiling slabs in the baths are made of wood, which is also a combustible material.
Meanwhile, the relevant SNiP prohibits the placement of flammable roof elements closer than 130 mm in light from brick, concrete, or ceramic pipes in thermal insulation. For pipes without thermal insulation, the distance is even greater - 250 mm. Considering that this distance must be maintained on all sides of the pipe, a very rather big hole in the roof is obtained.
The presence of such a large hole in the roof can lead to moisture entering the insulation, both from the atmosphere and from the bathhouse.In addition, the organization of ventilation of the under-roof space becomes problematic.
How to solve the problem
There are two ways to minimize the problems that arise when the pipe is removed from the ondulin through the roof, or even avoid them altogether.
The first way is to arrange your own truss system around the chimney.
The gap between the pipe and this system must be filled with any non-combustible insulating material (for example, basalt mineral wool).
With this method, the chimney is, as it were, placed in an insulated channel. Around the rafter system created for the pipe, layers of vapor and waterproofing are tucked up and fastened with brackets or nails. For reliability, it is worth sealing the joints with sealing tapes. The Ondulin company produces high-quality Ondufresh tapes.
In order to avoid disturbing the air circulation under the roof, it is necessary to install the necessary ventilation parts above and below the pipe outlet.
The second way is to install on the roof of special metal kits produced in series. However, there are a number of limitations here:
1. Steel pipes for furnaces can be used if the temperature of the exhaust gases does not exceed 500 degrees Celsius.
2. The use of metal pipes for coal-fired stoves is prohibited.
3. Chimneys must be equipped with spark arresters.
Advice. Do not fasten the pipe rigidly to roof structures. Any deformation of the roof can destroy the pipe.
There are technical solutions on how to bring a chimney through the roof of a bathhouse covered with ondulin. It remains to choose the one that suits you.
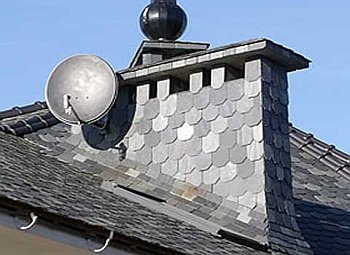
Finishing the chimney choice of materials
Among the negative factors affecting the chimney are:
- atmospheric influences (wind, precipitation, ultraviolet radiation);
- ambient temperature difference;
- high temperature workloads.
Due to the difference between the temperature of the working pipe and the air temperature in the chimney, condensate forms, which provokes the destruction of the pipe during the combustion of heating oil. To avoid the formation of condensate and protect the pipe from external influences, it is required to provide reliable insulation of the chimney due to the cladding.
Various materials are used for sheathing the protruding part of the pipe. When choosing, consider:
- resistance to external factors, wear resistance;
- appearance and color scheme (corresponding to the roofing or wall decoration of the building).
Finishing the chimney on the roof is most often done using:
- clinker bricks or tiles;
- plasters;
- cement fiber boards;
- roofing material (corrugated board, slate).
Characteristics of finishing materials
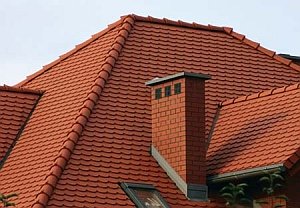 Clinker bricks or tiles are a practical option for finishing the chimney, since dirt is not noticeable on such material. The advantages of clinker materials also include the aesthetics of the masonry; such a chimney goes well with any type of roofing. It is worth noting the resistance of tiles and bricks to weather conditions, temperature extremes, as well as the strength of the material. For facing the chimney, only full-bodied clinker bricks are used, laid on a clinker mortar, special compounds are used for grouting. Thin, light clinker tiles are usually used for lining tall pipes.
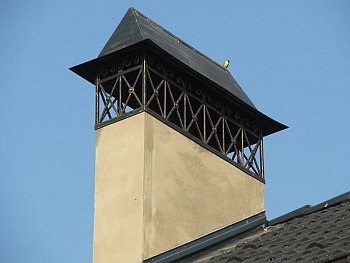
Finishing the chimney on the roof with plaster is characterized:
- affordable cost;
- simple installation;
- versatility (suitable for any roofing);
- the ability to implement any color solutions (plaster can be painted with silicone paint).
Plastering of pipes is carried out using the same technology as the finishing of facade walls. Traditional cement or lime-cement mortar can be used, but a more durable option is to use mineral, silicone, silicate or acrylic plaster.Painting the dried surface increases the wear resistance and durability of the finish.
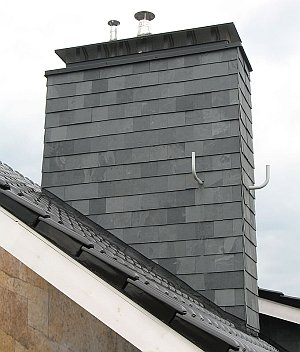
Small format fiber cement boards are durable, resistant to ultraviolet, moisture, temperature fluctuations, and are light in weight. It is an environmentally friendly, non-flammable material. For lining the chimney, you can use smooth or structured plates, the material is on sale in a wide range of colors.
If slate is used for roofing, the chimney lining on the roof is usually made from the same material. Slate slabs can be in the form of an arc, scale, rectangle or octagon. The color of this natural material depends on the deposit. It is usually graphite, green or magenta in color.
A fairly simple and budget option for finishing the pipe is the use of corrugated board. It is used if the roof covering is made of the same material. A chimney finished in the color of the roof looks aesthetically pleasing.
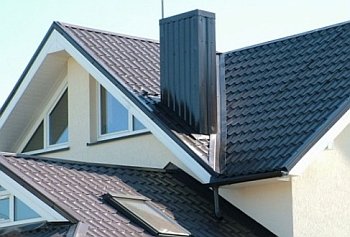
Prefabricated chimney elements for the roof passage have an aesthetic appearance and are quite easy to install. They are equipped with a steel chimney channel and can have a ready-made external cladding of any material, or be prepared for self-finishing so that the chimney externally harmonizes with the roof. The modular steel structure is not additionally finished, it is enough to mount it at the point of passage through the roofing pie.
What are Ondulin and Onduvilla ventilation pipes for?
There is ventilation - you need a pipe
The ventilation pipe is the final element of the ventilation system in a residential building and at the same time an additional roofing element. The pipe removes exhaust air and condensate from residential premises, forms a ventilation outlet through the roof and protects the air duct from precipitation and debris. Also, the pipe can be used for ventilation and cooling of the under-roof space.
The pipe attachment point is one of those roof nodes that, due to their design features, are most vulnerable to leaks: different roof elements adjoin each other here, snow and dirt accumulate
Therefore, it is important to choose the right pipe itself and be able to arrange its connection with the roof.
First, at the place where ventilation passes through the roof, a passage element is installed - the base, on which the pipe itself is then attached. It is more practical to use ready-made kits designed specifically for various types of roofing: they take into account the characteristics of the coating, and therefore more effectively protect it from leaks. In addition, the ready-made kit has an aesthetically finished look and at the same time eliminates the need to adjust the pipe to the base if it turns out that separately purchased elements do not quite fit together.
What is the advantage of using branded pipes?
For the installation of roofs from Ondulina and Onduvilla, the manufacturer has developed proprietary additional elements. So, with Ondulin roofing sheets, which we wrote about in one of the previous articles, Ondulin pipes are used (base size: 0.45 * 0.7 m), and with Onduvilla tiles - Onduvilla ventilation pipes (base size 0.45 * 0 .51 m).
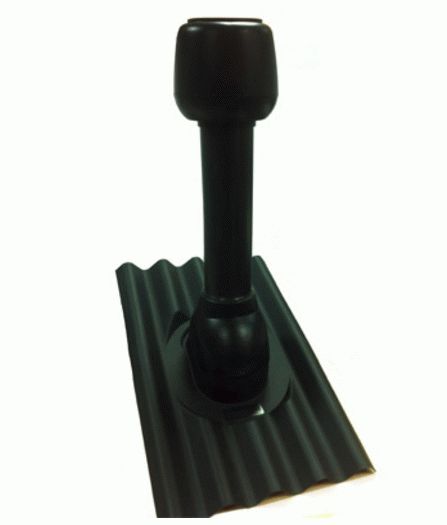
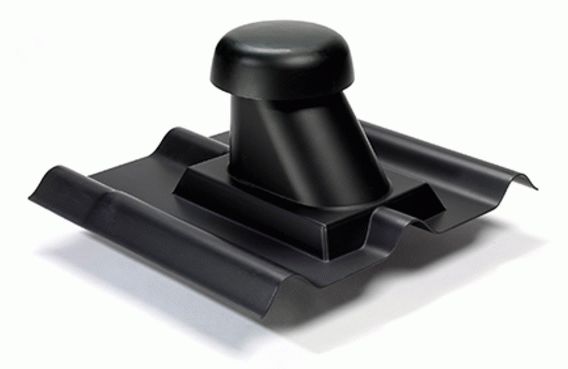
- The base of the pipes is fully consistent with the profile of the coating. Therefore, the Ondulin ventilation pipe is not suitable for the roof from Onduvilla, and vice versa. But with its native coating, the base of the pipe matches perfectly, which ensures high tightness of the connection.
- The pipes have a cap-deflector that protects the ventilation duct from the penetration of precipitation and litter and improves air draft under the influence of wind force.
- Pipes are made of impact-resistant thermoplastic ABS copolymer. This is a high-quality plastic, characterized by durability, resistance to heat, moisture, chemicals.The light weight of the material and the "friendliness" of bitumen avoids roof deformation, ensures the durability of the connection (up to 15 years or more).
- Ease of installation. The pipes are easy to move, and the material is easily pierced with nails using a conventional hammer. Clear instructions (there is also a training video) will help even a beginner to cope with the installation. Installation of the Onduvilla pipe is facilitated by the presence of a hydraulic lock - special guides that need to be combined with the same guides on the Onduvilla sheets.

Where and how to buy roof ventilation pipes from Ondulina and Onduvilla?
Orders are delivered throughout Russia by the official dealers of Ondulin
Please note that the cost of delivery depends on the region of residence of the customer, but not on the quantity of the ordered goods. Therefore, we advise you to think over the order in advance and form it in full, so as not to pay separately for the delivery of the missing elements later.
So, for example, before you buy an Ondulin ventilation pipe, calculate the cost of fasteners: it is recommended to use Ondulin or Onduvilla branded nails with monolithic caps to fasten additional elements. Only if the fastening rules are observed, the manufacturer gives a 15-year guarantee for the waterproofness of the roof.
The nuances of installing ventilation systems
There are two types of ventilation systems: natural and forced. In the first case, no special devices will be installed on the roof surface, everything happens naturally. The air enters along the perimeter of the cornice overhangs, under which the air vents are located. They are small gaps and are calculated based on the area of \u200b\u200bthe roof slope, the larger this value, the higher they should be. The air exits through the ridge element or the so-called cold triangle.
If there are heat-insulating plates in the roofing cake, then small bars are laid on top of them and covered with waterproofing.
They create an air gap inside the slope and air masses calmly remove condensate from it.
In cases where natural ventilation cannot cope with the processing of supply air and the removal of excess moisture from the attic, special devices are installed that create forced ventilation. These elements can often be purchased together with roofing material. In this way, maximum bonding can be achieved.
This ventilation system is extremely easy to install, the main thing is to understand its principle of operation. The pipe and ondulin should be combined as much as possible with each other, otherwise small gaps will appear, and through them moisture will enter the roofing pie, gradually destroying the waterproofing.
Pipes for forced ventilation are created with standard dimensions, where the length is 86 centimeters and the height is 47. ABS copolymer is used as the main raw material.
You can install a pipe on an already used ondulin coating using the following technology:
- The cover sheet in which the pipe will be installed is equipped with additional fasteners in order to give it greater stability, and the top sheet is removed.
- A special lining is installed in the cut material, which will serve as the base. We fix it with the help of suitable hardware, in this case, self-tapping screws with a lining are suitable. Hardware should fall on each wave of ondulin, so there will be relatively many of them.
- After completing this work, we proceed to the removed sheet. It is laid back with a slightly larger overlap so that atmospheric precipitation cannot flow under the base of the pipe.

At the last stages, the pipe is mounted and fixed near the base. It is worth noting that its location should be strictly vertical. Special plastic studs are used as fasteners.
IMPORTANT: You can choose a pipe with a higher quality, and carry out the installation work yourself. Thus, you will get a good device for a small amount.
Types of ventilation ducts
Regardless of the roof covering, ventilation systems can vary in their features.
- Exhaust insulated outlet. This method of ventilation is most often found in facilities where ventilation is already present. It can be used in the kitchen or bathrooms. The task of this system is to remove moist air into the attic space. Thanks to this ventilation, neither dust nor any other deposits or odors will accumulate on the walls of the room. After the pipe is removed, a special deflector is put on it. This element contributes to the creation of higher traction and acts as a protective component of the pipe.
- Uninsulated hood. As a rule, there is a bathroom in residential buildings, so this system will have to be installed without fail. With zero construction, most developers do not consider this nuance a big problem and often ignore it. When they encounter a problem, because of the stench, they already have to call in special teams in protective suits, because you can’t just work here anymore.
During the operation of the sewerage, a large amount of stinking gases accumulate there, and when you once again drain the water, the decay of organic matter occurs due to the pressure difference. If ventilation is present, then the pressure quickly returns to normal and at the same time odors quickly disappear.
Fully insulated exhaust system. This type of hood is practically no different from the previous type, except for the insulation itself. It is a polyurethane or plastic casing, the diameter of which is 16 centimeters. This device will reduce the level of condensate on warm roofs, which will allow them to last much longer.
IMPORTANT: All pipes are made from a high quality alloy of plastics that can withstand all sorts of damage and precipitation. The temperature range of use of such materials is from -50 to +90 degrees