Preparation for work
First of all, carefully study the scheme, according to which you will make a stove with your own hands from metal.
Then prepare everything you need for work, namely:
- welding machine and electrodes;
- grinder;
- sheet metal 2-3 mm thick;
- a metal pipe with a diameter of about 15 cm;
- reinforcement with a diameter of 8-10 mm;
- 4 rims;
- crushed stone;
- sand;
- cement;
- refractory red brick.
Fig.2. Metal oven with vault
For a small room, a pipe with a diameter of 10 cm will be enough, for larger rooms - 15 cm. If the pipe is too thin, then smoke and air simply will not have time to pass through the chimney. This will lead to extremely unpleasant consequences. As a result, a smoke plug is formed, due to which combustion products will return back to the room. In the process of designing the structure, it is imperative to choose the most optimal combination of the dimensions of the chimney and the furnace furnace. It is also better not to install a pipe that is too wide, because. this will lead to reduced traction and clogging that requires frequent cleaning.
On fig. 2 you can see what a metal oven with a vault looks like.
Here you can buy a round stove in a metal case.
Often a person who decides to heat his house with a stove is faced with the problem of the high cost of the services of a good stove-maker.
Sometimes in the district there is not a single sensible stove-maker at all.
It's no secret that in many regions stove-makers ask 100-200 thousand rubles only for laying an inexpensive, heat-intensive brick oven.
And together with the necessary materials, the sum of the entire furnace is already more than 300,000 rubles.
At the same time, the customer does not always imagine what exactly he is buying, because. projects are usually rather conditional and incomprehensible.
A person is forced to trust, as they say, blindly, a stove-maker and, with fear and trembling, wait for the result of the money spent.
- Especially for those who, when ordering a furnace, are not satisfied with uncertainty.
- For people who know how to count money.
- For people who want to buy a quality product, not a pig in a poke.
Step-by-step instructions for assembling a metal furnace
Rice. 3. The device of a metal furnace.
Before proceeding with the assembly of the furnace, carefully study the diagram in Fig. 3.
Work begins with the fact that the rim is taken from the wheel, then all holes are welded, except for one central one. At the second wheel rim, you need to cut off the top, then insert the first rim into it and weld this entire structure. Make sure there are no gaps left. Be sure to beat off all the slag from welding, carefully check that the seam is continuous. As a result of such simple manipulations, you will get a case for a future metal furnace.
After that, you need to weld metal rods to the resulting structure. They are welded on three sides and give the product additional stability.
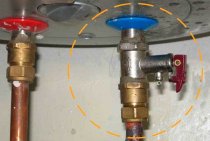
The next step is to create holes. First of all, a hole is drilled in the first rim. The diameter of this hole is 25 mm. In the future, a pipe with a tap for draining water will be connected to it.
2 weeks after pouring the foundation, you can remove the formwork and proceed with the brickwork. In this case, the usual cement mortar for masonry should be replaced with clay. Brick is used to build the foundation. On the second row of masonry, you need to arrange an ash pan for traction. You can then attach the sheet metal door. Continue laying out the firebox, install the grate, and then lay 2 more rows of bricks on top of it.
As a result, you will get a wonderful sauna stove, which is a successful combination of brick and metal. After the stove is installed, it is recommended to leave it for about 2 weeks and wait until the masonry mortar dries.
After it dries, you can proceed with the installation of a metal chimney pipe.After the pipe, a hot water tank is installed. It must be mounted from above. It is best to start the assembly directly inside the bath room, because. the weight of the structure will be large enough.
A metal stove with a chimney must be strengthened. For this, a pair of reinforcing bars is used. They should be tied to metal plates previously fixed on the wall surface.
Round oven in a metal case
Main section: Heating and heating-cooking stovesAdditions to the main section:
- Furnace design w.e. Groom Grizhimailo
- Rectangular heating stove (1)
- Rectangular oven (2)
- Russian oven
- Country stove
- ovenhousekeeper
- Heating-cooking oven design i.f. Volkova
- Heating-cooking oven design K.Ya. Buslaeva
- Small heating and cooking stove
- Small heating and cooking oven with oven
- T-shaped oven
- Round oven in a metal case
- Rectangular channelless heating furnace
- Rectangular heating furnace with three vertical channels
- Rectangular thick-walled heating stove, plastered (opt‑3)
- Rectangular thick-walled heating furnace (opt‑11)
- Small-sized heating and cooking oven with a heat cabinet c. A. Potapova
- Heating and cooking oven
- Heating and cooking oven "Swede"
- Triangular heating furnace
Device (Fig. 63)
Rice. 63. Round furnace in a metal case. Device
There are not so many designs of furnaces that have a round shape in plan. Most of them are provided with a sheet metal case on the outside. As a rule, the case consists of three separate sections (tsarg), which are placed on top of each other. The case makes the walls of the furnace absolutely gas-tight, they warm up quickly and evenly.
The proposed furnace design has a diameter of 650 mm and a height of 2300 mm.
Materials:
- ordinary brick - 195 pcs.;
- refractory brick - 65 pcs.;
- ordinary clay - 0.05 m3;
- refractory clay - 11 kg;
- sand - 0.03 m3;
- furnace door 210 x 250 mm - 1 pc.;
- grate 180 x 250 mm - 1 pc.;
- blower door 130 x 140 mm - 1 pc.;
- cleaning door 130 x 140 mm - 2 pcs.;
- view valve 130 x 130 mm - 2 pcs.;
- roofing steel for the case - 6.5 m2;
- roofing felt for waterproofing device 750 x 750 mm - 2 sheets.
Masonry sequence
Holes are marked and cut out on steel sheets for furnace, blower, cleaning doors and view valves.
First, the first side of the case is installed on the prepared base. With the help of a plumb line, its verticality is carefully verified, then the seams between the base and the tsarga are filled with clay mortar.
Having completed this operation, they begin to perform brickwork in accordance with the order shown in rice. 64 .
Rice. 64. Round oven in a metal case. Masonry sequence
Rice. 64 (continued). Masonry sequence
Other sections from the main section "Laying stoves and fireplaces":
> · Heating and heating-cooking stoves· Cookers
Foundation construction procedure
Foundation for the oven.
First, formwork is created from wooden boards. It should have 1 m in length and width and 20 cm in height. After the creation and installation of the formwork, a reinforcing layer is laid out. Reinforcement with a diameter of 8-10 mm should be laid in squares with a side of 20 cm. At the joints, the reinforcement should be connected using a special wire. Such a grate cannot be laid directly on the ground, therefore, it is first necessary to drive 4 pieces of a metal bar into the ground and tie the reinforcing grate to them on weight.
The next step is pouring the formwork. To do this, you can use a conventional concrete mix, consisting of 1 part of cement, 3 parts of fine aggregate (sand) and 5 parts of coarse aggregate (gravel, crushed stone).After pouring, concrete should be allowed to dry for 2 weeks. To speed up this process, you need to improve the ventilation in the room. To do this, just open the windows and doors. Lay damp rags on the floor and moisten them periodically. This prevents the formation of cracks in the concrete during its drying.
Another option for a metal furnace
Homemade metal stove from a pipe.
Metal stoves can be of various shapes. A good unit can be made even from an ordinary pipe. The main thing is to follow the assembly technology.
Prepare a pipe 65 cm long and 52.5 cm in diameter. Cut a hole 33.5x18 cm at the bottom of the pipe. This is the hole for the grate. Take a welding machine and weld rods or a strip of metal. The bars are welded in increments of 10 mm.
The next step is to make the box. For its assembly, a sheet of metal with a thickness of about 2-3 mm is used. The sheet must be cut into blanks of the following sizes:
- 2 blanks 60x14 cm;
- 1 blank 27x60 cm;
- 1 blank 27x14 cm.
After you finish welding the box, be sure to clean up all the joints and proceed to work with the pipe. Take the pipe and cut the plugs from 2 of its sides. For greater convenience, conditionally divide the pipe in half and cut out 2 circles.
Constructive standards of metal furnaces from a pipe.
Cut 2 holes in the oven body. One hole will be used for the chimney device. It should be located at a distance of 10 cm from the edge of the body and have a diameter of 11 cm. The second hole should have a rectangular shape. It is made for laying stones. Step back 21.5 cm from the edge of the unit body and make a hole 30x25 cm. Be sure to check the horizontal and vertical with a level.
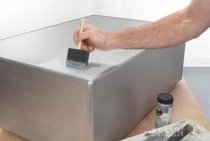
Take a sheet of metal and make a design for a niche for stones. For this, metal with a thickness of about 5 mm is used. To make the box, use 2 sheets 27x30 cm, 2 sheets 27x25 cm and 1 sheet 25x30 cm. Weld the box, clean all the seams and coat with kerosene.
At the next stage, you will need to take a sheet of iron with a thickness of about 4-5 mm and cut out a partition for the shaft from it. This partition will separate the firebox and chimney, so that the heat will leave more slowly.
Assemble the sauna stove from the prepared elements. Insert the baffle, then the stone niche and turn the body over. Install a side panel with a door, which must be welded on one side to the unit body. Below you need to put an ash pan and close the grate. Lastly, a door for the furnace chamber is installed, for cleaning the chimney, and then the legs of the stove.
After assembly, the finished furnace can be installed in the place allotted for it.
At the same time, it is very important to remember that the surface located under the blower of the unit must be laid out with non-combustible materials, for example, ceramic tiles. You can put a thick sheet of metal
This completes the oven. Successful operation!