For which devices is the shield used?
The two most common situations are:
- Acquisition of a metal stove, which is also a fireplace.
- Using a brick hob.
Also, a brick shield is in demand among residents of country houses in which Zhirnov's Swedish stoves are installed. Outwardly, they resemble a fireplace, but structurally they consist of a firebox and a hob: most of the heat is spent on heating, a small part is used for cooking.
Furinger furnaces are also in most cases complemented by a brick wall, which allows them to increase their productivity.
If the heating shield for a metal stove or brick stove is not used, then the heat obtained from the combustion of the fuel literally flies into the pipe. And in the case of its presence, the heat is delayed, which allows you to heat the room.
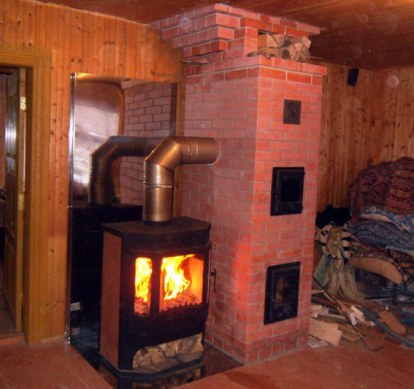
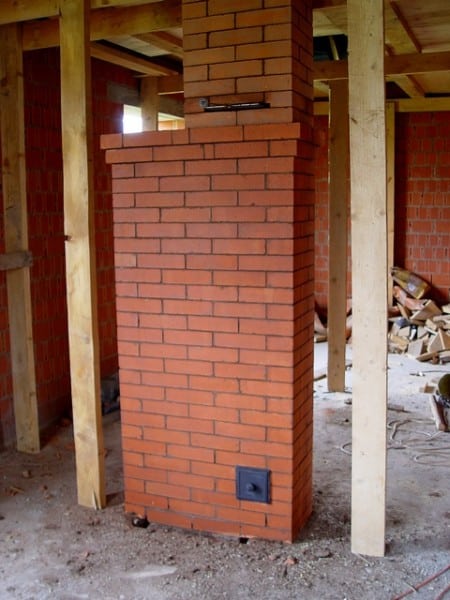
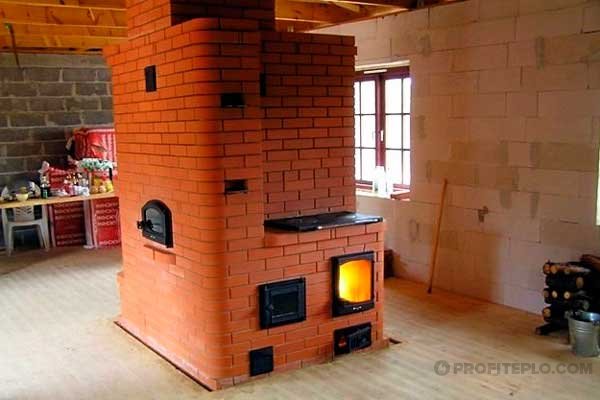 Stove with shield for space heating
A heat shield that looks like a thick brick wall can be compared to a gas-air heat exchanger that is attached to any furnace in order to increase its efficiency. Gas flows under the influence of chimney draft move along vertical and horizontal channels inside the wall.
The principle of operation of this device is based on the intake of heat from flue gases. As a result, the brick structure heats up itself, and then heats the air in the room. Due to the heat capacity of the material, the wall cools down for a long time and continues to give off heat after the fuel burns out.
As a rule, the shield is not equipped with its own combustion chamber, playing the role of only an additional element. But sometimes the design provides for the presence of a firebox.
Brick heating shield.
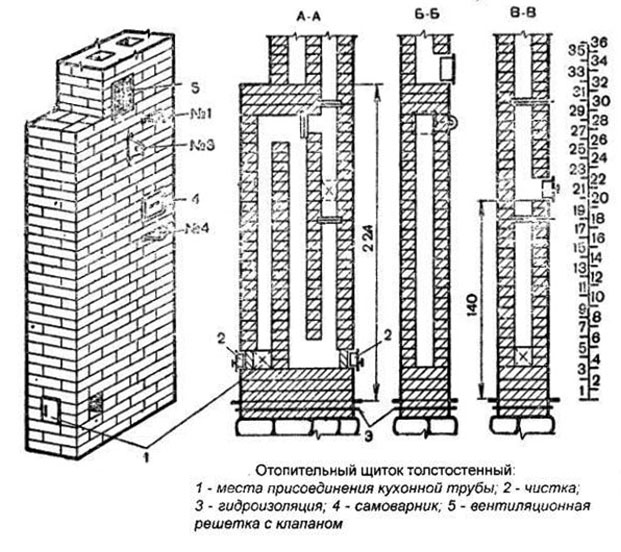
The scheme is the following. As you can see in the figure, smoke dampers are made at the top of the shield. The second valve is responsible for the summer course of gases. The third one is the winter mode (it is open, and the gases go to the chimneys of the shield, the second valve is closed). While the gases pass through the channels, they are cooled, giving off part of their heat to the shield, and in a cooled state they go into the pipe. .
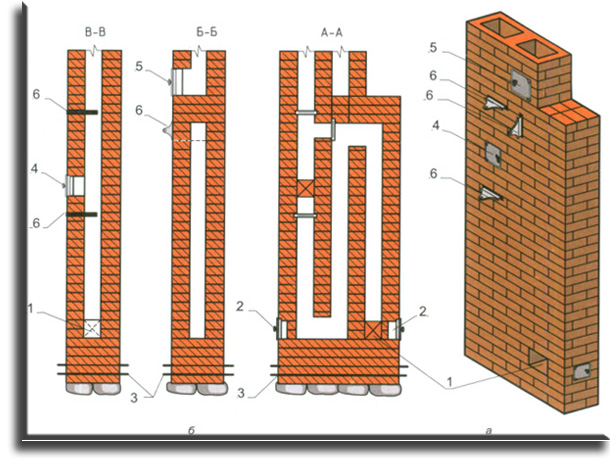
The dimensions of our thick-walled heating shield are 89 x 38 x 224 cm. Weight - 1.2 tons. Heat transfer: one good firebox - 430 kcal / h; two furnaces, respectively - 600 kcal / h. As a rule, shields are plastered or laid immediately from beautiful refractory bricks. Three smoke dampers make it possible to regulate the movement of gases. The operating modes are as follows.
Shield operating modes.
- In winter, the winter valve is closed, the first and second are open. Going through all the passages of the shield, the gases lose their heat giving off the shield.
- In summertime, valves 1 and 3 are open, the second is closed. Gases, bypassing the chimney of the shield, go directly through the pipe. For the best ventilation of the room, a special channel is arranged in the extension pipe. It opens with a grate having shutters (valves). Their presence allows you to operate the ventilation system in 3 modes: open, half open and closed. Next, we will see the laying of the heating shield.
Material for laying the heating shield:
- refractory bricks - 400 pcs.;
- river sand - three to four bags;
- clay mixture - three bags;
- roofing material for waterproofing - 1-2 m.
- cast iron gate valves 13 x 13 cm -3 pcs.;
- ventilation drek with a valve (15-20 cm);
- cast iron doors 14 x 13 cm - 3 pcs.
When laying the foundation under the shield, it is not brought to the level of the finished floor for two rows in height. One row of bricks is laid on top of the foundation, waterproofing is laid on it, after which the figure of the furnace is marked. Next, the laying of the second row is carried out, which goes with the upper surface to the level of the finished floor. After that, you can start laying out the shield.
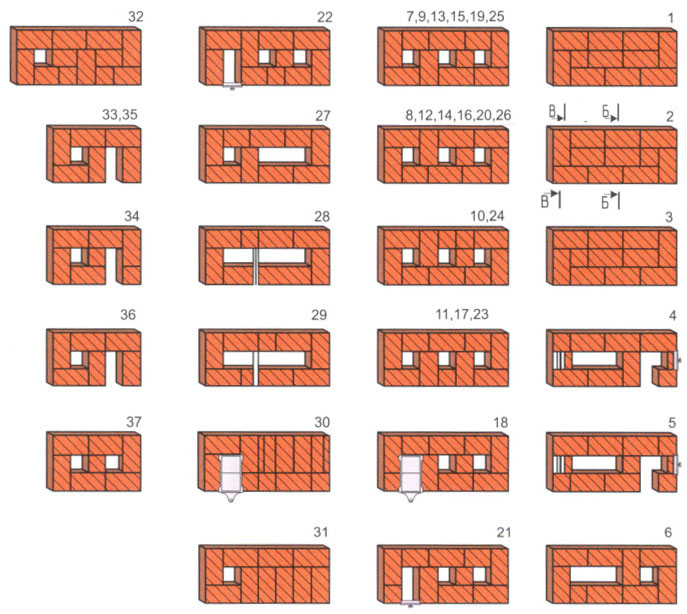
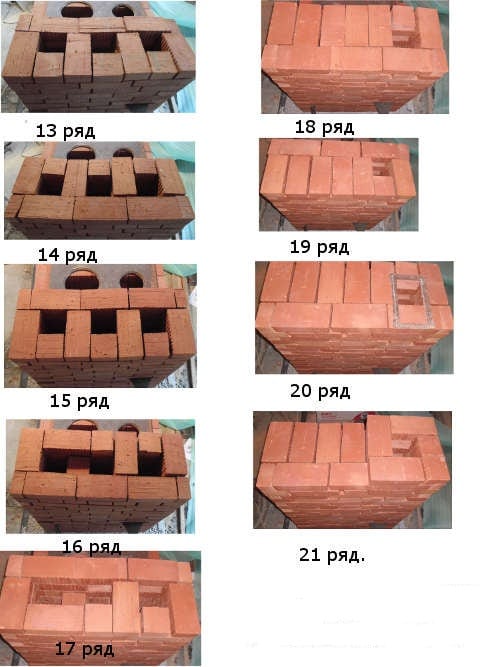
- 1st row - made of solid brick.
- 2nd and 3rd rows - according to the picture.
- 4th row - during the laying process, a window is left for entering to the furnace shield and 2 cleanings are installed.
- The 5th row is similar to the fourth, the dressing of the seams is exact as in fig.
- 7th row and next. odd, up to the 25th - according to the figure with the formation of three channels.
- 8th row and next. even numbers up to the 26th inclusive - according to the drawing in order.
- 10.11, 17, 23 and 24th rows are similar to the previous ones. However, for the purpose of better reliability, ligation of the sutures occurs in a different way.
The 18th row is placed similarly to the 10th and 24th. A valve is mounted in the channel from the right wall.
The 21st and 22nd rows are placed with the installation of a samovar.
27th row - in the process of laying, the two left channels converge into one and overlap. samovar.
28th row - during the masonry process, a cast-iron valve is installed.
29th row - according to the order
Pay attention to the dressing.
30th row - during the masonry, a valve is placed on the right of the shield, on the left it is blocked. channel.
In the 31st and 32nd rows, we do the dressing of the seams differently
The top of the shield - overlap in three rows. This is visible in the figure. Such a scheme is fully made according to the requirements of fire safety.
33, 34 and 35-th rows - by rice.
36th row - during the masonry we make a ventilation and smoke passage
In kitchen wood stoves, most of the heat energy literally flies into the chimney, and only a small amount of heat is spent on heating the stove. To trap hot gases and let them heat the home, you need a heating shield - a brick wall with smoke channels inside. The heating and cooking stove with a shield is ideal for summer cottages and summer kitchens - it does not take up much space, heats the room efficiently and can work in winter and summer modes.
Disadvantages of metal cooking stoves and how to fix them
- The compact dimensions of metal stoves also have a drawback - too small an air heat exchange surface.
- In addition, the gaseous products of combustion have a very high temperature - from + 300 ° C or more. Therefore, you have to think about fire safety and thermally insulate the chimney.
- As you know, the efficiency of stoves is inversely proportional to the temperature of the combustion waste removed. For cooking, however, cooking units use far from all the generated thermal energy.
- In addition, such stoves usually have short chimney channels. Therefore, they also absorb some heat.
- Such heat losses are irrational from any point of view. There is a need to minimize them. One of the most common ways to reduce the energy losses of a furnace is to equip the unit with a heating shield with your own hands.
What is a device
- The shield is a small brick wall attached to the stove, inside which there is a developed system of chimneys.
- With a firebox, such devices are almost never made. The shield heats up due to the gases removed from the stove. Structurally, the wall is not able to emit a lot of heat into the environment.
- There are more complex and convenient designs, the price of which is higher. They are equipped with their small fireboxes. You can make them independent of the hob and attach, for example, to stoves with a fireplace.
- The brick has good thermal conductivity, and most importantly - high heat capacity. Warming up when kindling the stove or cooking, it gives off heat to the room for several hours. So you can get an analogue of a brick stove. Only more simple constructively and for less money.
Varieties and schemes of shields
According to the internal structure, these structures are of 2 types:
- channel: in the body of the shield there is a developed network of gas ducts, which consists of several vertical channels interconnected. Before going outside, the gases make a winding path along these passages, intensively giving off heat;
- bell-shaped: such a shield for a cast-iron stove or stove has one or two chambers with horizontal vaults, where hot gases are retained until they cool down. Only after that they can get into the vertical channel and go into the chimney.
Channel-type heaters are structurally simpler, and therefore it is easier to fold them. Bell shields are more efficient in terms of heat removal, but are much more difficult to implement. It is not recommended for beginners to take on their construction; here the hand of a master is needed. For self-construction, we present to you drawings and sections of a simple channel-type heating shield with three vertical gas ducts:

In order for our heating and cooking stove to be used for cooking in the summer, the design provides for switching the smoke circulation to the summer mode. The transition is carried out using three valves built into the gas ducts. In addition, in the upper part of the structure there is an exhaust ventilation shaft for organizing air exchange in the room. In order to avoid tipping of the thrust in strong winds, a grate with a check valve is installed at the outlet of the shaft.
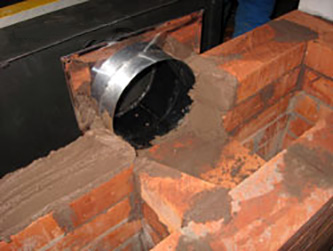
The following diagram below shows a metal hob with a hood-type heating plate. As you can see, here the gases, after exiting the furnace furnace, enter a chamber with a vault, from where 2 channels lead.
Since you can only move down from the chamber, the high-temperature combustion products linger under the roof until they cool down. Then they become heavier and, according to the law of convection, leave the space of the chamber. In this case, in order to increase efficiency, the furnace with a heating shield is equipped with tubular heaters placed inside the gas ducts.
Since it is assumed that most of the interested people have little experience in the furnace business, a simple channel structure is proposed for self-construction, presented in the first drawing of the previous section. Unlike the master, an ignorant person will need to order the heating shield for erection, which we will show in the diagram:
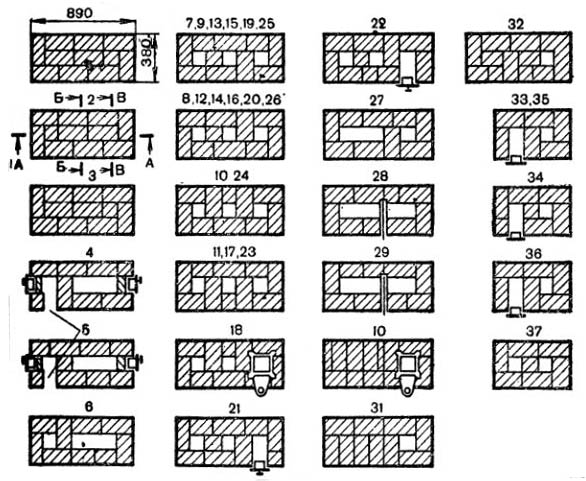
For the construction of the channel shield in this order, you will need the following materials and accessories:
- solid red ceramic brick - 309 pcs.;
- gate valve 130 x 130 mm - 3 pcs.;
- door for cleaning 130 x 140 mm - 3 pcs.;
- exhaust grille with valve 150 x 200 mm;
- clay - 6 buckets;
- sand - 4 buckets;
- roofing material - 2 m2.
It should be noted that the laying of the heating shield is carried out in accordance with all the rules of stove art. First, you need to arrange a concrete foundation that is not connected to the base of the building. Its top should be 150 mm below the floor level. Having laid a waterproofing layer of roofing material on the foundation, laying begins in accordance with the order. The masonry mortar must be thoroughly mixed from pre-soaked and filtered clay and sifted sand.
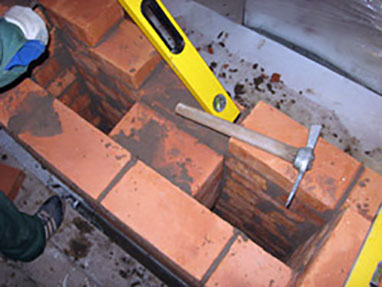
In order to properly fold a brick shield with your own hands, you need to withstand a seam thickness of 3 mm, the maximum allowable layer is 5 mm. After laying the stones, each row must be checked for compliance with the horizontal and vertical using the building level and plumb line. Excess mortar protruding from the joints must be removed, and the inner surface of the gas ducts must also be wiped with a damp cloth after laying 3-4 rows.
A do-it-yourself shield for a potbelly stove or any other heating and cooking stove should dry properly. The resulting small cracks should be carefully repaired with clay. After that, you can heat the stove, starting with a small laying of firewood and gradually increasing the temperature.
Varieties and schemes of shields
According to the internal structure, these structures are of 2 types:
- channel: in the body of the shield there is a developed network of gas ducts, which consists of several vertical channels interconnected. Before going outside, the gases make a winding path along these passages, intensively giving off heat;
- bell-shaped: such a shield for a cast-iron stove or stove has one or two chambers with horizontal vaults, where hot gases are retained until they cool down. Only after that they can get into the vertical channel and go into the chimney.
Channel-type heaters are structurally simpler, and therefore it is easier to fold them. Bell shields are more efficient in terms of heat removal, but are much more difficult to implement. It is not recommended for beginners to take on their construction; here the hand of a master is needed. For self-construction, we present to you drawings and sections of a simple channel-type heating shield with three vertical gas ducts:
In order for our heating and cooking stove to be used for cooking in the summer, the design provides for switching the smoke circulation to the summer mode. The transition is carried out using three valves built into the gas ducts. In addition, in the upper part of the structure there is an exhaust ventilation shaft for organizing air exchange in the room. In order to avoid tipping of the thrust in strong winds, a grate with a check valve is installed at the outlet of the shaft.
The following diagram below shows a metal hob with a hood-type heating plate. As you can see, here the gases, after exiting the furnace furnace, enter a chamber with a vault, from where 2 channels lead.
Since you can only move down from the chamber, the high-temperature combustion products linger under the roof until they cool down. Then they become heavier and, according to the law of convection, leave the space of the chamber. In this case, in order to increase efficiency, the furnace with a heating shield is equipped with tubular heaters placed inside the gas ducts.

How to lay out a shield with an autonomous firebox
Masonry features
The ordering of the heating shield in this design has its own characteristics (the diagram can be found on the Internet by asking the appropriate request). In general terms, the process looks like this:
- 1 and 2 rows are laid out in accordance with the order.
- In the 3rd row, it is necessary to leave an ash pan under the firebox.
- 4th row: two gate valves are installed (one for the summer course, the other for the winter one) and four doors (two blowers + two cleaning ones with brick linings inside).
- The 5th row is similar to the fourth (the ligation of the seams is observed).
- 6th row, all channels decrease, all doors overlap. An oven and a hot water box are installed.
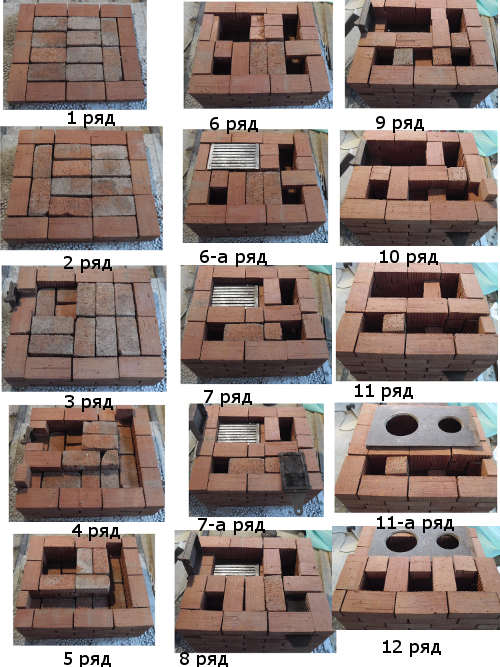
- In the 7th row, two grates are laid (one for the firebox of the stove, the other for the firebox of the shield). Bricks on both sides of the gratings are cramped. The long channel on the left overlaps to form two short channels.
- In the 8th row (placed in order), furnace doors are installed (one smaller size - for the firebox of the shield, the other - larger - for the firebox of the stove).
- Row 9 is laid according to the scheme, also 10, but a steel strip is placed in it above the oven.
- 11 row: the doors overlap, the top of the oven is smeared with clay mortar. To the right of the hot water box, the channel is closed with a brick, to the left it remains unblocked.
- In the 12th row, cast-iron flooring is laid, a frame of steel corners is strengthened around the slab. This row is the final one in the laying of the slab.
 Other orders are the laying of the shield (see the diagram).
- In the 16th row, it is necessary to cut a brick on the right at the second channel.
- At 19, a valve is installed that closes the pipe (from this to the 25th row, inclusive, five of the three available channels are formed).
- In the 22nd row, a samovar is placed, then in the subsequent rows one channel remains - a pipe, and the shield is covered with masonry in three rows.
- In the 31st row, the pipe channel is widened by squeezing the brick.
- In the 32nd and 33rd rows, a ventilation grill is placed (a separate channel is formed for this).
Sizes to consider:
- Length - 1400 mm.
- Width - 1020 mm.
- Height - 2170 mm.
- Weight - 2800 kg.
- The length of the steel strip above the oven is 550 mm.
Types of heating shields
 The design is classified according to different criteria.
By wall thickness:
- in half a brick (thick walls, the best option if regular long-term operation of the plate is planned, as well as protection against potential fire);
- a quarter of a brick (thin walls that heat up faster, but cool down faster, while masonry in this option requires more careful compliance with fire safety rules, as well as laying a shield on a waterproofed foundation and indispensably equipping the furnace with a metal casing).
According to the design features and installation features:
bell type - one or two brick surfaces connected by channels. In each cap, the inlet and outlet of the chimney are placed below its upper plane. The reason is that hot air tends upwards, so that, having heated up and got into the hood, it will remain in it until it cools down, and then, being displaced by hotter gas, it will go up the chimney.
In this sense, a two-bell heating shield is more profitable - it will take more heat from the furnace gases than a design with one cap.
channel type - involves the installation of a coiled chimney channel, which has the same diameter in all sections of the pipe. Such a chimney can be vertical or horizontal, but, in any case, partitions are installed in it. Also, this type involves the installation of jumpers - in summer they prevent unnecessary heating of the entire surface, concentrating heat exclusively on the stove.
By configuration:
- straight - the most common form of the shield;
- corner - less common, but it saves space in the room and gives more heat due to the larger area.
Conclusion
The role of the brick shield is really very important. It turns out that when working with him, even a simple potbelly stove, whose efficiency does not exceed 30-40%, will be effective. The construction allows you to significantly reduce the consumption of firewood and at the same time successfully heat the room. Unfortunately, such construction is not possible in every house and it is necessary to solve the issues of economy in other ways.
Metal cooking and heating-cooking stoves have one undoubted advantage - compactness. Such a unit will not take up much space in your house or cottage. To increase the efficiency of steel and cast iron stoves, a brick heating shield is used.