Laying tile sheets
 proper stacking of sheets
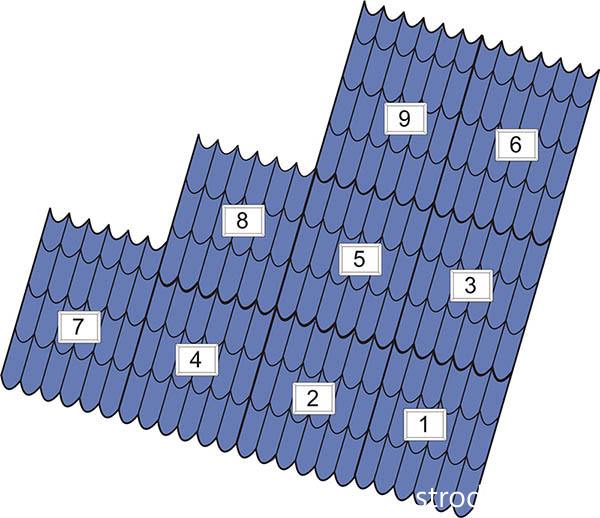
Before starting the laying of the material, the logs are collected, which are necessary to raise the sheets to the roof. It is allowed to lay out a metal tile on both sides of the first sheet. If the next sheet is placed on the left side, then the last wave is covered from above. When this is done on the right side, the subsequent material is slipped overlapped under the previous sheet. Regardless of whether a hip roof is created from a metal tile or it will have a different shape, it is customary to align the sheets of material horizontally along the eaves. There are several ways to lay this roofing material. The order of work is as follows:
- the first sheet is placed on the slope and the material is leveled along the eaves and end;
- this sheet is attached to the ridge with one self-tapping screw - it is screwed into the center of the strip of material;
- the next sheet is laid next to an overlap of 15 centimeters, it is aligned with the eaves and connected with a self-tapping screw to the first;
- similarly, several sheets are mounted and fastened together;
- a block formed from fastened sheets is once again aligned along the cornice and attached to the crate, except for the last of them, which is used to create the following blocks of metal tiles.
The technology for creating a roof covering looks like this:
- the first sheet is placed on the slope and aligned with the cornice and end;
- the second sheet is placed above the first and fastened with one self-tapping screw at the ridge - the screw is placed in the center;
- both of these sheets are interconnected using screws;
- the third sheet is placed next to the first, and the fourth is placed above the third;
- the prepared block, consisting of four sheets, is aligned and mounted to the crate.
To implement it:
- on a slope of a triangular shape, a center is found and a line is drawn along it;
- a similar line is marked on the first sheet in the center;
- the first sheet is placed on the slope, aligning the axes, and fastened with one self-tapping screw at the ridge;
- further installation is carried out on the right and left sides of the first sheet;
- on a triangular slope, when installing a metal tile, the sheets will have to be cut, which will require a special tool called a "devil" - a standard tool for a roofer's tinsmith. It can be made independently from 10 cm boards. A rectangle is assembled from them, the elements of which are held with the help of hinged fasteners. This tool will help you mark sheets of material directly on the roof (see also the article: "Installation of a metal roof - features and rules").
The device and operation of a roof made of metal tiles, in detail on the video:
The method of laying protective materials at the outlet of the pipe
- webs of material are cut in the form of envelopes;
- the material is brought to the edges of the passage from the beams or truss profile, ensuring a tight fit of the materials;
- the canvas is attached to the beams with steel staples or ordinary nails;
- the sealant is additionally pressed against the rafters with wooden bars.
In order to reliably protect the assembly and roof insulation from water, the junction points of the protective material to the wooden elements of the crate of the pipe passage are additionally glued with their own hands until complete tightness is achieved.
It is widely believed among experts that the outer surface of the chimney passage is far enough from the hearth so as not to heat the exit at the roof - metal tiles or a layer of corrugated board - at the point of contact to more than 60 degrees, so protective materials are out of danger. Thanks to this, it is possible to install stone wool close to the chimney with construction tape.
Features of installing a brick chimney
It is recommended to use clay bricks for chimney and lay out each wall at least 12 cm wide. Brick laying for low power stoves is made in four rows, for medium power stoves - in five rows and for high power stoves - in six rows. However, any brick is destroyed under the influence of soot, soot and condensate, in order to avoid this, the brick box should be reinforced by adding a metal pipe. The space that is formed between the pipe and the brick walls must be filled with non-combustible insulating material, thus performing additional insulation of the chimney.
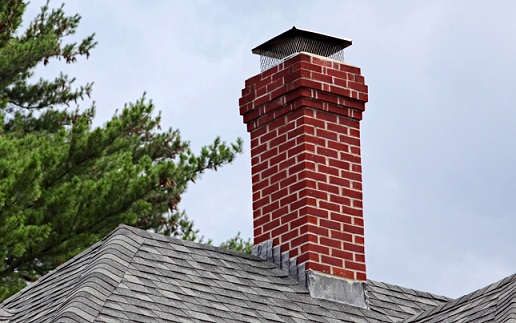
Brick chimney for home
Stages of building a chimney:
- Do-it-yourself brick chimney begins to be installed from the neck. This is the part of the chimney that follows immediately after the stove top pipe. In this place, it is necessary to make a smoke damper, or, as it is also called, a view that closes the pipe after fuel processing.
- Further, the outer diameter of the masonry expands, the so-called fluffing is performed, while the internal smoke channel does not change in size.
Brick laying should be carried out in such a way that the internal size of the smoke channel is the same in any of its places.
After passing the chimney through the ceiling, a pipe riser is laid, which has the same dimensions as the neck.
The next time the outer size of the masonry increases during the passage of the chimney through the roof rafters. This extension is called the otter. It is necessary to mount each otter wall at least 0.1 m wide in order to successfully protect against the penetration of moisture into the attic space through the existing gaps between the chimney and the roof.
After cutting the otter, the outer diameter narrows again - the pipe neck is laid.
After the neck of the chimney, the masonry expands again - this is the head of the pipe.
A special metal cap is installed on the head - an umbrella that protects the chimney from rain and other atmospheric precipitation. In addition to the main function, the umbrella also holds back strong gusts of wind that can disrupt the draft in the smoke channel and serves as a decoration for the chimney and the entire building, giving it a finished look.
The visible part of the chimney can be insulated using a duct.
Sometimes, with a lack of experience, the chimney is laid out the same size from the neck to the head, and then the wall is expanded from the outside, adding fluff and an otter of concrete. Laying a brick chimney is not an easy task and requires certain skills. However, it can be done independently if you study the diagrams and drawings in detail.
We build a brick chimney according to the scheme shown in the figure:
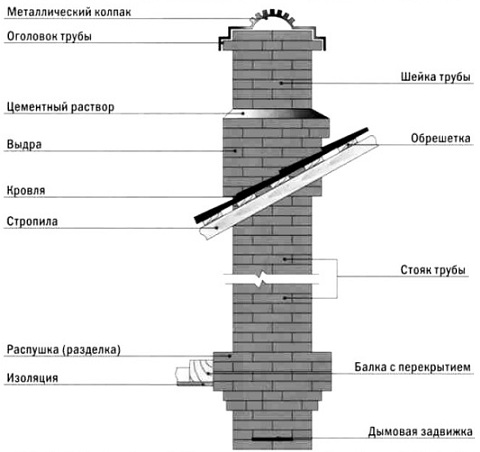
Scheme of a brick chimney
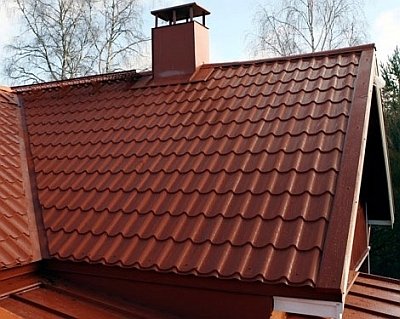
metal tile
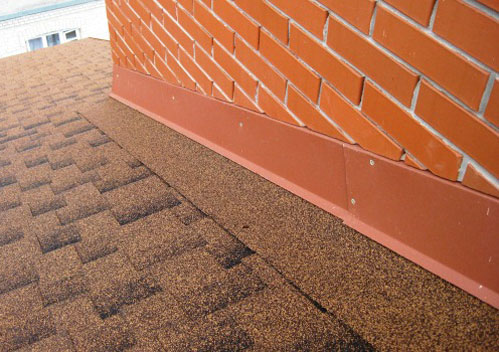
On a metal-tiled roof, a special sealing apron is most often used, which consists of abutment strips for the upper and lower parts.
The lower bar is applied to the walls of the pipe, and then its upper boundary is marked. In this area, a strobe about 1.5 cm deep is made on the chimney. It is cleaned of dust and washed with water. With an overlap of 150 mm, the strips are installed.
Attention! This overlap is necessary to prevent future leaks. The upper edge of the metal element is inserted into the resulting strobe, and sealed with a heat-resistant silicone-based sealant
From the bottom side, a metal sheet with an anti-corrosion coating is wound up, which provides an effective drain of water. He heads down to the roof eaves
The upper edge of the metal element is inserted into the resulting strobe, and sealed with a silicone-based heat-resistant sealant. From the bottom side, a metal sheet with an anti-corrosion coating is wound up, which provides an effective drain of water. He heads down to the roof eaves.
In order for the junction to be completely sealed, waterproofing (5 cm high) is removed on the pipe before mounting the inner apron. The top edge is fixed with construction tape.
The metal tile is laid on top of the inner apron. After the installation is completed, the top layer is installed - a decorative apron, using the upper abutment strips. The upper edges of the elements are attached to the pipe without strobes, and the joint space is filled with sealant.
This process is clearly shown in the video:
By providing a quality connection of the vertical part - the chimney pipe, to the roof surface, you can fulfill an important condition for the reliability of the roof. In this case, there will be no leaks at the junction points, and the snow lingering on the surface will not be able to damage the waterproofing layer
What else to read on the topic?
Do-it-yourself chimney deflector + drawings
Adjacency of ondulin to the pipe
Where should the pipe be located on the roof
According to professionals, the place where the pipe goes to the roof should be as high as possible. The ideal solution is a ridge, as this is the highest point on the roof. Here, the thrust will be maximum, and the installation of waterproofing is easier.
The next point is also important - the farther the chimney is from the ridge, the higher it should be. This circumstance does not decorate the roof and at the same time complicates the design.
Chimneys can have a very intricate shape. An example is the roof of the castle of Chambord, located on the Loire. It is a real masterpiece, because it has a large number of incredibly beautiful chimneys.
The shape of the pipes affects the aerodynamic characteristics. The caps installed on their head slightly reduce the traction force. Any protrusions on the casing of the pipes, located in their upper part, prevent the creation of a normal level of ventilation.
Often there is a need to bring a single ventilation pipe above the roof. For example, ventilation coming from a sewer riser should be placed separately. This is necessary to prevent overlap with air flows from living quarters as a result of back draft.
In this case, the best solution would be to use plastic or metal ventilation outlets instead of brickwork, which are equipped with many types of new roofing systems.
- look aesthetically pleasing;
- differ in tightness and reliability,
- height adjustable;
- protect well from rain.
How to connect to a brick pipe
In addition to the classic sealing method described above by means of chasing and adjacent strips, there is a method that is less laborious and more convenient for self-assembly. This is the sealing of a brick pipe on a metal tile roof with a self-adhesive metal waterproofing tape. It can be matched exactly to the color of the metal tile.
Installation of a waterproofing metal tape is carried out as follows:
- Cut the tape to the size of the width of the bottom side of the pipe plus 4 cm for bending from the sides. It is applied to the pipe in such a way that the middle (determined by the rupture of the protective film) falls at the junction of the pipe and the metal tile. The sides are folded up by 2 cm. Remove the protective film and glue the tape to the pipe and tiles.
- To measure the side segments, apply the tape to the lower edge of the previously glued section, stretch it to the end of the side of the pipe, add 25 cm for overlap. Glued to the metal tile. The lower edge of the side segment is cut along the borders of the bend of the bottom sheet. The places of the bend are glued, bent to the pipe. The upper part is cut off along the border of the junction with the pipe and glued to the tile.
- The upper section of the self-adhesive tape is cut along the boundaries of the side segments and glued onto the pipe. The part adjacent to the pipe is cut off taking into account the lateral overlaps of 2 cm.
- The final stage of sealing a square pipe on a tiled roof will be gluing an additional self-adhesive tape to the junction of the upper segment with the metal tile.
Work on the installation of pipe penetration through the roof requires skills to work at height. If you doubt your abilities, then it is better to entrust them to a professional.
We make a crate
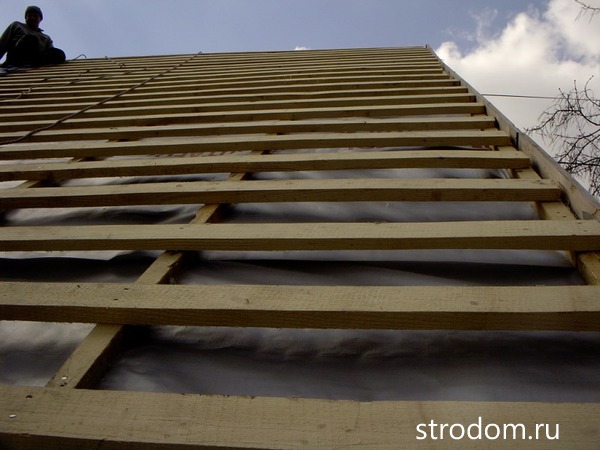 crate for metal roofing
Sheets of metal tiles are mounted on a crate, which is assembled from boards with a section of 30x50 millimeters. The initial, located at the very bottom, the purlin is made a little thicker - by 15-20 millimeters, since it is used to maintain overhangs. The first of the crates is aligned with the eaves. The distance between the first board of the crate and the second should be 280 millimeters, and the subsequent ones are fixed with a gap of 350 millimeters. Thus, it is necessary that the step of the metal tile matches the step of the crate. When a crate is created at the location of the valleys, the location of the chimneys and other elements, additional (reinforcing) strips are mounted.
How to organize a chimney on the roof
When installing a pipe, one must not forget that it is a potential cause of a fire. Therefore, for its manufacture, a three-layer system is selected, where high-quality insulation is provided. That is, a layer of insulation must be present between the outer and inner pipes.
The device of a modern roof involves the use of a variety of materials, because it consists not only of roofing material. We need lumber for the construction of the supporting structure, rafters and battens, insulation to provide thermal insulation, as well as hydro and vapor barrier films, which are mandatory layers of the roofing pie.
Among the listed materials there are also quite susceptible to ignition. That is why the competent organization of the chimney is the key to the protection and fire safety of the house.
Advice
Considering the importance of ensuring the safety of living in the house, it is recommended to buy components and materials for organizing a chimney in special stores where you can check the available quality certificates.
Chimney selection
For a solid fuel boiler, traditional brick pipes are chosen, and not only for financial reasons, as the most budgetary ones. The main reason for this choice is fire resistance: a brick pipe is not afraid of soot igniting with a short-term increase in temperature in the pipe up to a thousand degrees. A thin-walled steel chimney when working with a solid fuel boiler (except for pyrolysis) is not applicable - the steel of the pipe quickly burns out. But brick pipes serve for a long time only if there is no condensate in them, which contributes to the release of compounds that are extremely aggressive for bricks, sulfuric acid and others, from flue gases. In "wet" conditions, brick pipes do not last long. Condensate is formed during the operation of boilers with coal fuel, but many times stronger - during the operation of gas boilers.
All chimneys, according to their technical characteristics, suitable for operation with the formation of condensate (having condensate collectors and condensate traps), can also be used for dry working conditions - for solid fuel boilers. The reverse is excluded.
If it is planned to switch from a solid fuel boiler to a gas one, then brick chimneys are equipped with ceramic or stainless steel sleeves. It is more practical to carry out the sleeve during the construction of the pipe, along with the laying of the walls. At a cost - a brick pipe equipped with a ceramic or stainless steel sleeve is much more economical than a finished factory-made chimney of any design. In terms of service life - ceramic liners are much more durable than steel ones, but also more expensive.
A stainless steel chimney is preferable if the heating of a private house is being reconstructed - for the transition to a heating system with the installation of a boiler, in the case when it is impossible to install a channel for installing a brick chimney in the house structures.
Modern models of boilers operating on the principle of pyrolysis or ultra-long burning, as well as liquid fuel boilers and operating on fuel types: brown and anthracite coal, peat and biobriquettes, various biofuels in granules, pellets - require a modern approach to the chimney. Coaxial and ceramic chimneys are used. In these cases, it is more practical to purchase ready-made kits from the factory, and assemble them on site, according to the manufacturer's recommendations.
If in the heating system of a private house there is not one boiler, but two or more, operating on different fuels and for different types of combustion, and these boilers are connected to a common chimney, then the chimney must be assigned, of course, based on the most severe operating conditions.
Parameters for the correct operation of the device
A properly installed chimney creates natural draft and removes combustion products through the channel, preventing them from entering the room. Sometimes you can even evaluate the operation of the chimney visually - by the presence of smoke in the room or the color of the flame. Excessive thrust is identified by a white flame and a characteristic hum, while a bright orange color of the flame characterizes a lack of thrust. A special device, an anemometer, will help to make more accurate measurements.
If traction needs to be increased, you can use one of the following methods:
- Install deflector. However, keep in mind that deflectors improve traction only in the presence of strong winds.
- Install a special umbrella on the chimney. Using a sensor placed under the hood, the umbrella regulates the combustion temperature.
- Increase the height of the pipe.
- Use a turbine nozzle.
Roof groove CADP 60 for insulated chimney Bofill
Model range of the series Chimney base (roof cutting) CADP 60
Description Chimney base (roof cut) CADP 60
The base of the chimney CADP 60 (roof groove) manufactured by Bofill is used when the chimney passes through the roof in accordance with the angle of the roof to the horizon (internal angle from 45 to 60°). Mounted on top of the insulated chimney pipe passing through the roof. The lead sheet base can be pressed against the surface of the roof covering or placed under the roof surface. Adjustment of the angle of inclination is carried out due to the conical part of the stainless steel roof cutting pipe. The gap at the junction of the base and the chimney is closed with an adjustable apron "VDP" using a sealant.
Double-walled (insulated) chimneys are designed to remove flue gases from boilers, fireplaces, columns, generators, heat generators. They consist of two layers of stainless steel, between which there is a heater (basalt wool with gaskets), which allows you to solve the problem of condensation. The inner walls of the pipe are made of high quality AISI 316L austenitic stainless steel to withstand the aggressive action of acids formed during the interaction of condensate and exhaust gases. The outer contour is made of austenitic stainless steel AISI 304L. The round section of the channel and the smooth surface of the chimney reduce the formation of deposits and blockages. The chimney elements are connected by installing the next one on the previous one, clamped with a clamp.
The main features and advantages of the base of the chimney "CADP 60":
- Diameter: from 80 to 300 mm (over 300 mm on request)
- Roof pitch: 45 to 60°
- Lead sheet base
- AISI 304 stainless steel cone
- Wall thickness: 0.4 mm
- Working temperature: up to 550 °С
- Permissible short-term increase in temperature up to 750 ° C
- Possibility to install a gasket for better sealing
- High corrosion resistance
- No condensation
- TIG butt welding
- Unlimited service life
- Attractive design
- Ease of installation and maintenance
- Fire Compliance
Chimney installation features
The device for adjoining the roof to the pipe can be performed using various technologies, using materials corresponding to the type of roofing. The principle of sealing the junction of the finishing deck with vertical structures, including the chimney, is determined during the work on the roof project. It is required to take into account not only the type of roofing, but also the location of the chimney, its shape and the material from which it is made.. In some cases, it is possible to use prefabricated structures and standard elements for waterproofing adjacencies.
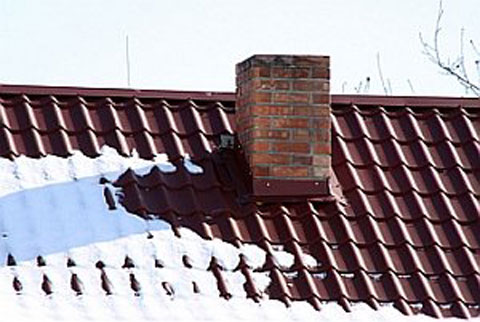
The easiest way is to waterproof the chimney installed at the highest point of the pitched roof - in this case, there is no danger of snow accumulating behind the pipe, which can lead to depressurization of the junction and moisture penetration into the roofing pie. A rectangular chimney passing through the roof ridge can be installed between hanging trusses, or with a break in the ridge beam in a system with layered rafters and the installation of additional supports.
Without any problems, it is possible to waterproof the junction of the roof to the chimney, located slightly below the ridge. The arrangement of the pipe in the lower part of the slope is much more difficult. In this case, to protect the chimney from snow masses and accumulation of snow behind the chimney, it is often necessary to install a special pitched structure with a groove.
 It is not recommended to install a chimney at the intersection with the valley (an inner corner formed by the slopes of a complex roof), since serious complications are inevitable when sealing the joints to the roof.
Finishing the chimney pipe options and work progress
The final finishing of the flue duct is closely related to the insulation work. roofing and pipe wiring through her.
Pipe penetration through the roof
The output of the pipe to the roof depends on the modification of the pipe itself. The easiest way is to bring out a round metal sandwich pipe. No additional material is required for its insulation, since it has one layer of thermal protection inside the sandwich. Protective flanges can be purchased ready-made. They are flexible, making DIY installation easy.
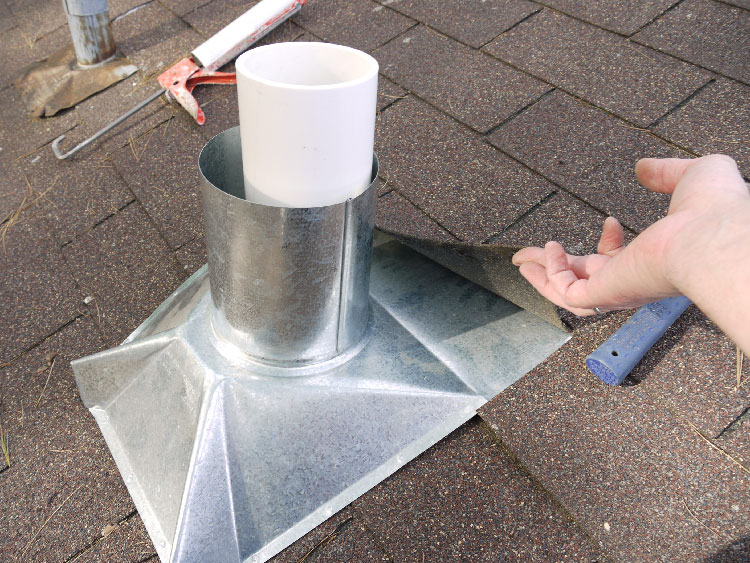
To output a sandwich chimney through the roof, you should:
- Cut a hole for the diameter of the pipe. Why we apply markings from below and drill contour marks. It is more convenient to cut from the side of the roof.
- Put the inner protective flange on the pipe. Install structure. Lubricate the flange with refractory sealant, fix with self-tapping screws to the roof from the attic side.
- Put on a protective, flexible, conical flange on the outdoor part of the pipe. First, cut a hole in it, which is slightly smaller in diameter than the chimney. To make the tensioning process go better, coat the flange and pipe with soapy foam.
- Lubricate the flange with sealant and fasten it with self-tapping screws over the roof.
It is somewhat more difficult to bring a classic chimney through the roof. For its wiring, you will need to purchase or build a protective box with a heat-insulating layer.
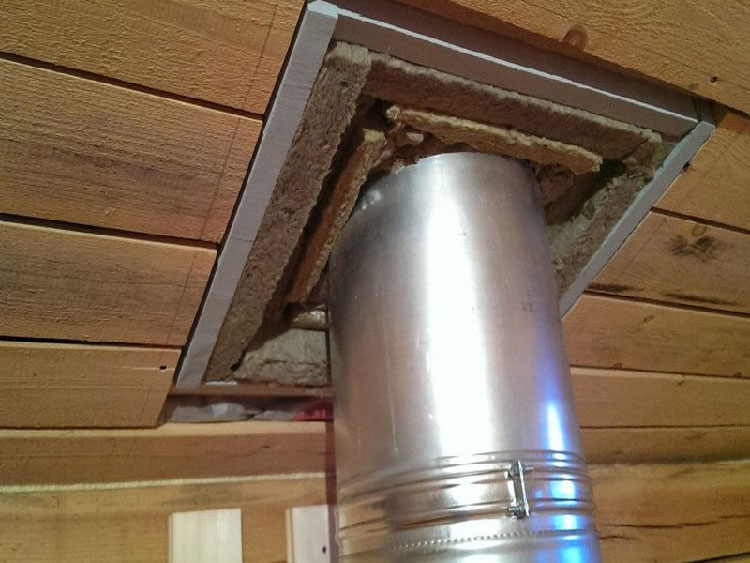
Algorithm for the output of a square pipe through the roof:
- Cut a hole in the roof and roofing cake, 25 cm larger on all sides than the square of the pipe.
- According to the size of the resulting hole, build a protective box. As a rule, galvanized sheet is used for the box. It is easy to work with it on your own, galvanized iron meets the requirements of building codes, you can buy it inexpensively. The resulting box should look like a box, in the center of which a pipe is inserted, and the remaining volume is filled with basalt wool.
- Install the box in the opening.Pull out the pipe.
Next comes the most difficult and important stage in the construction of the chimney - finishing the pipe and sealing the roof.
Cladding options
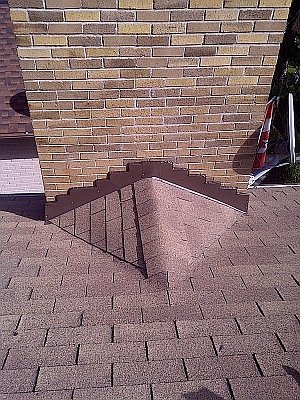
Sealing a brick or plastered pipe:
- Disassemble the roof by 70 cm around the perimeter, remove a little more in the lower part. This is necessary for the construction of a protective inner apron and tie. A tie is an additional protective metal structure, which is made in the form of a long sheet with curved edges.
- At a small height from the roof, pierce the pipe along the perimeter to a depth of 2-3 cm. It is convenient to do this with a grinder.
- Drive a metal wall profile into the recess, lower the end of it onto the roof.
- From all sides, fix the profile to the roof with self-tapping screws with protective washers.
- In the lower part, the wall profile is attached to a tie. The lower part of the tie is displayed on top of the roofing material.
- Lay and fix roofing material.
- Mount the upper protective and decorative apron on top.
Cladding with corrugated board is used to protect both brick, plastered pipes, and to decorate a sandwich chimney, if required by the architectural solution of the house.
A common cladding option is a frame when a double sandwich pipe is removed from two autonomous stoves (for example, a stove and a fireplace). In this case, one rectangular pipe, sewn up with siding, looks more presentable than two iron ones.
Algorithm for mounting the frame finish of the chimney pipe:
- Mount a metal profile frame around the pipe. The size of the frame matches the hole that was made to bring the pipe through the roof.
- Between the pipe and the frame, install rectangles of mineral refractory wool.
- Sew up the frame with corrugated board from all sides using special self-tapping screws with protective press washers.
Finishing the chimney choice of materials
Among the negative factors affecting the chimney are:
- atmospheric influences (wind, precipitation, ultraviolet radiation);
- ambient temperature difference;
- high temperature workloads.
Due to the difference between the temperature of the working pipe and the air temperature in the chimney, condensate forms, which provokes the destruction of the pipe during the combustion of heating oil. To avoid the formation of condensate and protect the pipe from external influences, it is required to provide reliable insulation of the chimney due to the cladding.
Various materials are used for sheathing the protruding part of the pipe. When choosing, consider:
- resistance to external factors, wear resistance;
- appearance and color scheme (corresponding to the roofing or wall decoration of the building).
Finishing the chimney on the roof is most often done using:
- clinker bricks or tiles;
- plasters;
- cement fiber boards;
- roofing material (corrugated board, slate).
Characteristics of finishing materials
 Clinker bricks or tiles are a practical option for finishing the chimney, since dirt is not noticeable on such material. The advantages of clinker materials also include the aesthetics of the masonry; such a chimney goes well with any type of roofing. It is worth noting the resistance of tiles and bricks to weather conditions, temperature extremes, as well as the strength of the material. For facing the chimney, only full-bodied clinker bricks are used, laid on a clinker mortar, special compounds are used for grouting. Thin, light clinker tiles are usually used for lining tall pipes.
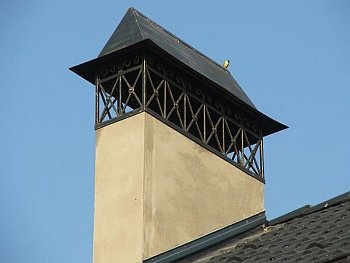
Finishing the chimney on the roof with plaster is characterized:
- affordable cost;
- simple installation;
- versatility (suitable for any roofing);
- the ability to implement any color solutions (plaster can be painted with silicone paint).
Plastering of pipes is carried out using the same technology as the finishing of facade walls.Traditional cement or lime-cement mortar can be used, but a more durable option is to use mineral, silicone, silicate or acrylic plaster. Painting the dried surface increases the wear resistance and durability of the finish.
Small format fiber cement boards are durable, resistant to ultraviolet, moisture, temperature fluctuations, and are light in weight. It is an environmentally friendly, non-flammable material. For lining the chimney, you can use smooth or structured plates, the material is on sale in a wide range of colors.
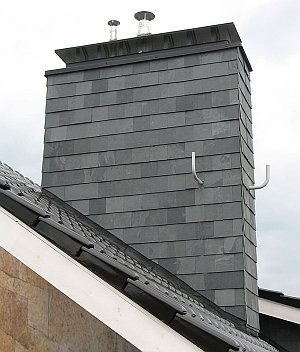
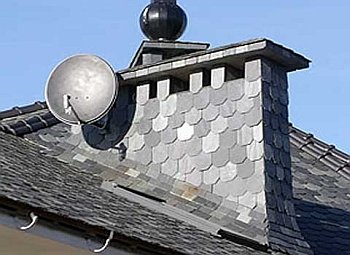
If slate is used for roofing, the chimney lining on the roof is usually made from the same material. Slate slabs can be in the form of an arc, scale, rectangle or octagon. The color of this natural material depends on the deposit. It is usually graphite, green or magenta in color.
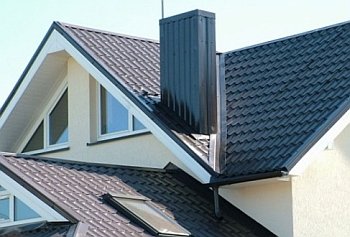
A fairly simple and budget option for finishing the pipe is the use of corrugated board. It is used if the roof covering is made of the same material. A chimney finished in the color of the roof looks aesthetically pleasing.
Prefabricated chimney elements for the roof passage have an aesthetic appearance and are quite easy to install. They are equipped with a steel chimney channel and can have a ready-made external cladding of any material, or be prepared for self-finishing so that the chimney externally harmonizes with the roof. The modular steel structure is not additionally finished, it is enough to mount it at the point of passage through the roofing pie.