Pros and cons of using vibration suspensions
The use of special fasteners, on the one hand, leads to a fairly noticeable increase in the sound insulation of the ceiling, but on the other hand, it has a number of disadvantages:
1. Increase in the cost of construction.
High-quality vibration suspensions (Vibrofix, Vibroflex, Maxforte) cost about 300–370 rubles / m 2. The average consumption is three pieces per square meter, so the increase in the cost of the structure is 900–1000 rubles / m 2.
For reference, this is the cost of special sound-absorbing slabs and all building materials (GKL, GVL, profiles ...) combined.
2. Increasing the thickness of the structure.
Due to the elastic elastomer, vibration suspensions have a greater thickness compared to a conventional suspension. As a result, we get an additional loss of 1-2 cm in height.
3. Unpredictable resonance.
An increase in sound insulation will only be provided by special vibration suspensions (Vibroflex, Vibrofix, MaxForte) with tests carried out and a known dependence of the resonant frequency on the load. The use of self-made vibration suspensions or analogues that do not have certificates can lead to uncontrolled amplification of vibrations (weakening of sound insulation) when the driving frequency of the noise from above coincides with the resonant frequency of the “vibration suspension”!
Therefore, DO NOT try to make vibration hangers yourself, using improvised materials (rubber, rubber inserts)!
4. Complexity of finishing.
The last unpleasant nuance of using vibration suspensions is the high probability of cracking of the joints between the suspended ceiling and walls, as well as at the joints between drywall (if installed incorrectly).
The standard solution in such cases is the use of a stretch ceiling.
Thus, the use of vibration suspensions is justified when the maximum sound insulation of the ceiling is paramount, without regard to the cost, thickness and complexity of the subsequent finishing.
We recommend the use of vibration mounts only when soundproofing all surfaces of the room, the so-called. concept of "room within a room". Noise is cut off from all sides (ceiling, walls and floor) and potentially a very high addition to the original sound insulation. In this case, it makes sense to “compete” for additional decibels on the ceiling.
If partial soundproofing is done, for example, only the ceiling, then it usually does not make sense to make a “bunker” out of the ceiling! Part of the sound will still continue to be transmitted along the walls, and the additional effect of vibration suspensions will not be so noticeable.
Vibration isolation profiles
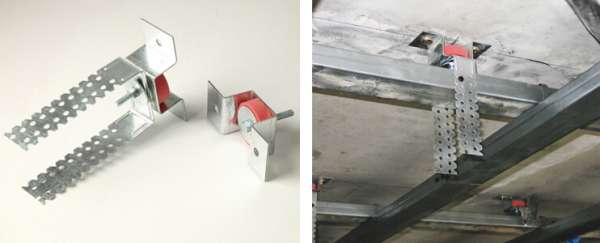
Having decided to use soundproofing with a metal frame, we are faced with the problem of vibration isolation of the places where the profiles are attached to the ceiling and walls. Rigid contact of the profiles with concrete leads to the formation of sound bridges and the sound insulation of the ceiling loses its effectiveness!
Laying damping materials and tapes under profiles and suspensions leads to a certain reduction in vibration transmission, however, some of the vibrations pass through the channel of the dowel-suspension rigid connection, which is illustrated in the picture:
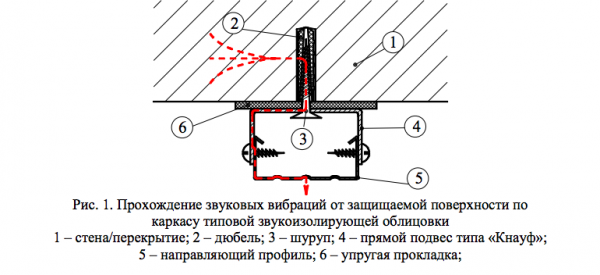
Using special vibration mounts instead of conventional suspensions, you can achieve higher vibration isolation and, as a result, the sound insulation of the ceiling works better, reducing noise more.

In practice, the use of special vibration suspensions allows you to increase the sound insulation of the ceiling by about 6 dB.
Indirect noise transmission depending on the type of house
Depending on the type of house (panel, brick, monolithic, block), the specific series of the house, as well as the quality of the construction of the section, indirect sound transmission may vary. Sometimes the noise is transmitted along the walls weakly, sometimes strongly. Everything is individual here.
Panel house In panel houses, floors and walls are made of concrete, so they have approximately the same mass. This results in a high indirect noise transmission from the upstairs apartment down the wall structures.
As a result, if it is necessary to completely get rid of noise, then soundproofing of the ceiling and walls is performed.
If only the soundproofing of the ceiling is performed, then, in general, only a partial reduction in noise will occur. That is, the task is not to completely get rid of the noise, but to reduce it to a comfortable value (not annoying). If you understand this, then you will like the effect. In addition, the sound insulation of the ceiling leads to a change in the spectrum of penetrating noise, the so-called. signal filtering. The most annoying mid frequencies are completely gone. Therefore, the noise becomes deaf and no longer irritates a person (this is already the field of psychoacoustics).
In any case, the soundproofing of the ceiling is done first, and the walls can always be further soundproofed later.
Monolithic house In houses of this type, the situation with the spread of noise from above is similar to a panel house: from heavy floors, noise is very well transmitted to light internal partitions made of tongue-and-groove and inter-apartment walls made of foam concrete (or aerated concrete).
However, in monoliths it is possible to reduce the transmission of noise from above. Do not build partitions and walls directly to the ceiling. It is necessary to leave a gap of 10-20 mm and carefully fill it with pieces of minplate or tow, seal the resulting joint with silicone sealant and plaster at the end. In this case, the transmission of noise from above to the partitions will be significantly weakened.
Brick house Brick houses stand apart. The brick walls are thick and much more massive than the ceilings. Therefore, noise is either not transmitted to them, or transmitted very weakly. The soundproofing of only one ceiling is usually sufficient to completely cut off impact noise from above.
Although there are exceptions: even in Stalinist brick houses between apartments there are thin walls with very low sound insulation and a high ability to transmit noise from above.
Noise classification
Noises in an apartment are usually divided into two types: airborne noise (voices, screams, barking dogs) and impact noise (steps, jumps, moving furniture, falling objects, squeaks, etc.).
A standard concrete floor slab (multi-hollow, 220 mm thick or solid monolithic, 140 mm thick) will provide airborne sound insulation of about 50 dB. The screed will add another 2-3 dB, so the final sound insulation index will be Rw = 52–53 dB. This is enough to not hear everyday voice noise: for example, conversations or TV. To isolate louder noises (cinema, music center, screaming, barking dogs), additional sound insulation will be required.
In terms of impact noise, none of the floors meets the standards. If the soundproofing of the floor is not made in the apartment above, then even barefoot steps will be clearly audible in the apartment below. To isolate impact noise, suspended soundproof ceilings on vibration suspensions are performed.
For example, consider a typical reinforced concrete floor slab with a thickness of 140 mm. The sound insulation of such a ceiling in terms of impact noise is Lnw \u003d 80 dB, which is 20 dB higher than the norms of SNiP even for houses of category "B". Not to mention more comfortable housing classes!
Do-it-yourself vibration suspensions for the ceiling installation instructions
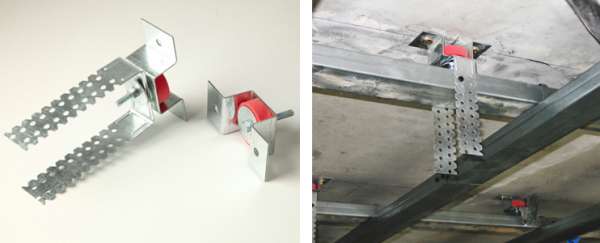
Vibration suspensions for the ceiling are special fasteners that are used to fix various kinds of vibration and soundproof structures to the ceiling surface. The product contains a special elastic element, due to which the maximum possible reduction in the throughput of the element is ensured.
Vibrosuspension Shumanet-Connect
The properties of vibration suspensions allow you to create effective sound insulation.The fasteners in question have a special anodized coating, due to which their strength characteristics increase significantly, which makes it possible to use even heavy materials for soundproofing the ceiling without any fear.
Soundproof mount Vibrofix Protector
Vibration suspensions in combination with mineral wool
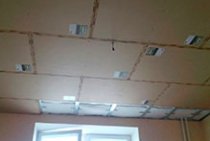
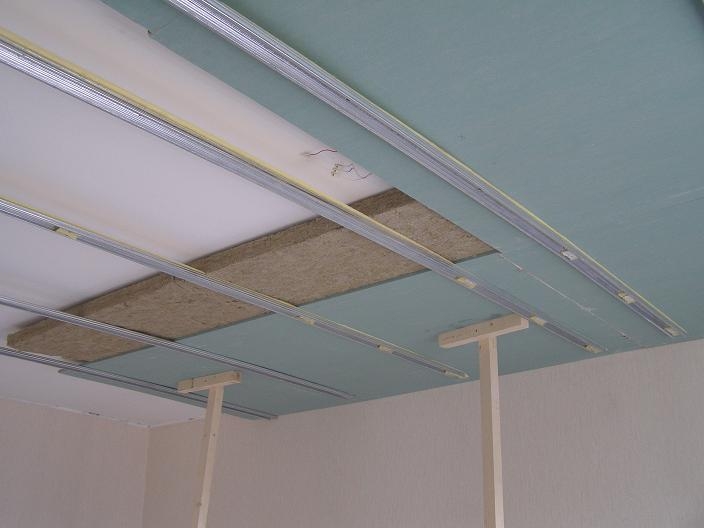
The technology for arranging the considered sound insulation involves attaching a frame to the ceiling from a profile used in the installation of suspended ceiling structures. As a result, a false ceiling with high-quality sound insulation will be obtained.
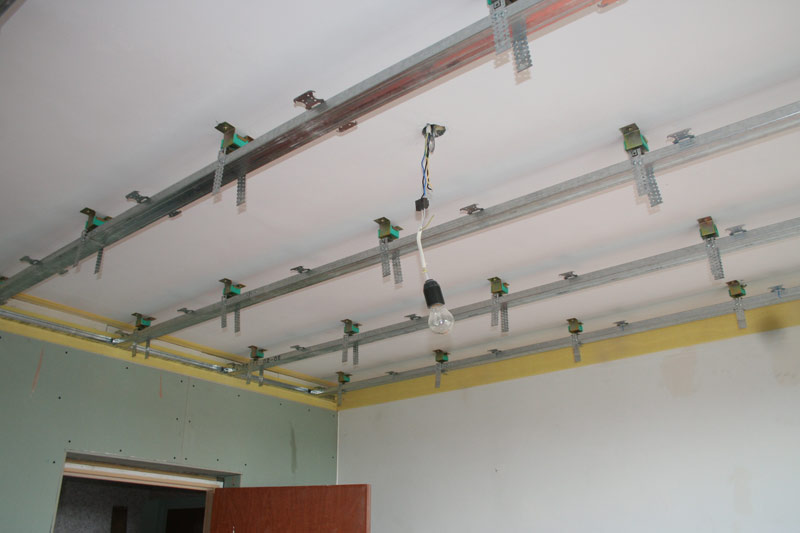
The technology for arranging the considered sound insulation involves attaching a frame to the ceiling from a profile used in the installation of suspended ceiling structures
The frame is placed approximately 15-20 cm below the existing ceiling. The specific distance is selected individually, in accordance with the thickness of the sound insulation layer and the required ventilation layer. You also need to provide free space for placing lighting fixtures.
Mineral wool is not only an excellent insulation, but also an excellent sound insulator. Just a 10 cm layer of mineral wool is enough to provide sound insulation at a level of about 60 dB. In combination with mineral wool, fiberboards are often used. This material also dampens sound well.

mineral wool
First step
Proceed to assembling the frame from vibration suspensions. Pre-lay all electrical wires in a corrugated plastic sleeve. Attach the sleeve itself to the existing ceiling with clamps.
In accordance with safety regulations, each wire must have reliable solid insulation. Examine the condition of the wires and, if necessary, wrap them with electrical tape. It is impossible for the wires to come into contact with the metal elements of the frame.
Second step
Mark the walls with a laser or ordinary water level. The suspended structure, as noted, will be placed 15-20 cm below the main surface. Make sure that the marks on the wall surfaces are strictly on the same level.
Connect the left marks around the entire perimeter of the room.
Third step
Make markings on the surface of the ceiling. Step back 10 cm from any wall and draw parallel straight lines on the surface of the main ceiling at a distance of 6 cm. The distance between the last line and the opposite wall should also be 10 cm.
Fourth step
According to the prepared markings on the walls, use an electric drill to make holes for the dowels with a distance of 500 mm between the fasteners. Attach the guide profile to the walls. Use self-tapping screws for fastening.
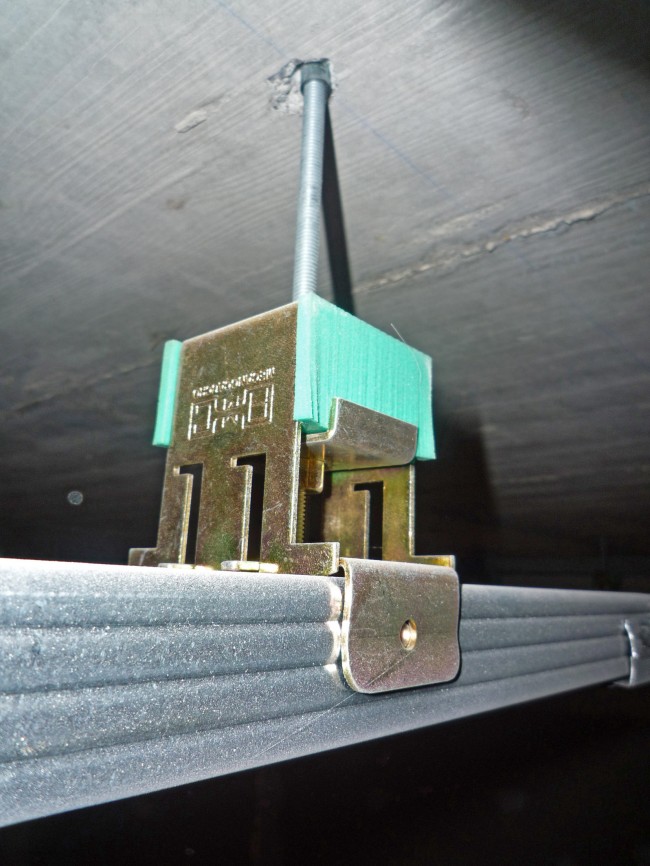
Vibrosuspension mount
Fifth step
According to the markings on the main ceiling, prepare holes in 100 cm increments. Attach straight vibration hangers to the surface. Lower down the products, the well-known perforated whiskers of the vibration suspension. Drop at a right angle.
sixth step
Attach a carrier profile to the lowered elements of the direct vibration hangers. Use 12mm self-tapping screws for fastening. Two self-tapping screws are enough to fasten each side of the profile. If the profile is not long enough, build it up using a special connector.
seventh step
Fasten the jumpers from the ceiling profile already familiar to you between the already fixed ceiling profile and the guide products. Jumpers are placed over the entire surface area with a step of 600 mm. Use crabs to fix elements.
eighth step
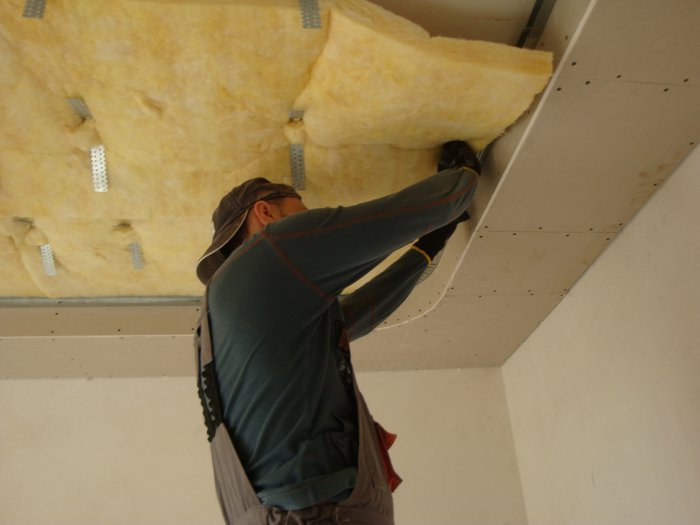
Lay mineral wool slabs over the entire area
Wear protective gloves, secure goggles and a respirator. Lay mineral wool slabs over the entire area. If you are working with rolled insulator, cut it into pieces before installation. Select the sizes of the pieces in accordance with the dimensions of the cells of the finished frame. Fill with insulating material the entire surface reserved for noise insulation.
Soundproofing the ceiling
From above, sheathe the insulated ceiling with fiberboard boards in 2 layers. Fasten the second row of fiberboard with an offset in relation to the first row. First, in the boards, you need to cut holes for lighting fixtures and bring electrical wires through them.
Ninth step
Fasten sheets of drywall to the frame on the ceiling. To do this, use the appropriate screws. Seal the joints of adjacent sheets with a special soundproofing solution. Wait until the sealing solution is completely dry (the time is indicated in the instructions for the specific composition), prime, and then putty drywall.
After the putty has dried, all that remains is to finally connect the lighting fixtures and enjoy the view of a beautiful ceiling with excellent soundproofing properties. If desired, you can apply a couple of coats of paint over the putty.
Soundproofing the ceiling. Mounting sequence
- If possible, inspect the rustication (joints between floor slabs). If there are gaps, they must be filled with pieces of acoustic mineral wool and sealed with neutral silicone at the end.
- The second step is to fix the Vibrofix PU vibration mounts to the ceiling. There are no nuances here, use the standard mounting pitch to the ceiling, as if you were working with conventional direct suspensions (U-shaped suspension).
Two layers of Vibrostek damping tape (or Knauf Dichtungsband) with a standard width of 10 cm should be placed along the walls.
Further along the walls, a Knauf PN 27/28 mm metal profile is installed - this is a conventional guide profile that will fix the edges of the Knauf PP 60/27 mm carrier profile. The profile is attached to the walls with nails through the sealing tape that was placed earlier. Mounting pitch 1–1.5 m. Why such a rare mounting pitch? The fact is that we just need to fix the guide profiles to build a flat plane of the metal frame (and, accordingly, the ceiling).
Support profiles Knauf PP 60/27 are installed with a standard pitch of 600 mm, as well as transverse profiles. The bearing profiles are fixed to the Vibrofix PU vibration hangers using self-tapping screws. At this stage, unscrew the dowel nails from the guide profiles! It is imperative to complete this step because when using any vibration suspensions, the ceiling under the load of the plasterboard lining will sink by about 1-2 mm (depending on the type of suspensions). If you leave the guide profiles fixed to the wall, you get the following situation: the ceiling will sag in the center due to the shrinkage of the elastic element of the vibration suspensions, and there will be no shrinkage around the perimeter (due to the rigid fixation of the guide profiles). The ceiling will be uneven. To avoid such troubles, we remove the nail dowel from the guide profiles, thereby eliminating the rigid connection of the profiles with the walls. As a result, the ceiling will turn out to be even, since the shrinkage will be uniform. This also increases the sound insulation of the ceiling, since we “cut off” the ceiling from the walls, eliminating rigid connections.
The empty space between the profiles is filled with sound-absorbing Shumanet-BM boards. It is not necessary to fix the plates in any way, they are simply installed at a distance between the profiles.
Next, facing is made of massive sheet materials. The first layer is gypsum fiber sheets (GVL) 10 mm thick. The seams between the GVL are passed with a neutral-type silicone sealant. The second layer to the GVL on TN-self-tapping screws is hemmed with sheets of drywall (gypsum board) with a thickness of 12.5 mm. The gypsum plasterboard is fastened apart, so that the joints with the GVL sheets do not coincide. Along the perimeter, the sheathing sheets should not be in direct contact with the walls, the abutment is carried out through the sealing tape, which was previously placed along the walls.
The last step: it is necessary to cut off the excess protruding tape along the walls and pass the resulting joint with silicone sealant. Everything, the insulation of the ceiling is ready!

In the previous materials of the remontofil.ru website, you have already met the basic principles of soundproofing the ceiling, walls and floor in an apartment. This time, we are moving from theory to practice and will start installing a soundproof ceiling in an apartment. All stages will be disassembled as much as possible with even more photos.
If you are annoyed by the noise from the neighbors above, but you still have not decided on a similar level of repair, then I suggest joining me and making effective soundproofing of the ceiling together. So, let's begin.
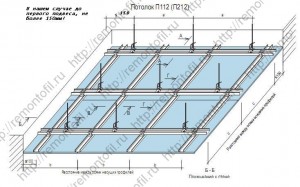
After studying the technical documentation and the recommendations of acoustic engineers, I chose a ceiling soundproofing scheme based on a two-level plasterboard suspended ceiling frame.
But there are significant differences, thanks to which high sound insulation is achieved.
1 We will fix the main profiles through the optimal number of vibration hangers, which will exclude a rigid connection with the floor slabs and the presence of sound bridges. Looking ahead, I’ll say that the ceiling will not have rigid connections with the apartment’s structures at all. 2 The space behind the false ceiling will be filled with special acoustic wool with guaranteed characteristics. 3 We will make the ceiling lining from two layers of materials of different density and thickness. GVL and GKL
How to choose
The most important characteristic of vibration suspensions is their strength. You must be sure that they will withstand the GKL construction. These elements help metal profiles to hold drywall sheets, soundproofing material, and a layer of putty on the ceiling.
The second important characteristic is the degree of sound insulation. The suspension must dampen vibrations well and suppress noise. This indicator depends on the properties and thickness of the soundproofing material on the suspension itself.
Vibrosuspensions differ in the area of soundproofing material. The larger the surface area, the better the noise and vibration isolation. They also differ in the number of mounting holes. If there is one hole on the suspension frame, the installation time is reduced by 50%.
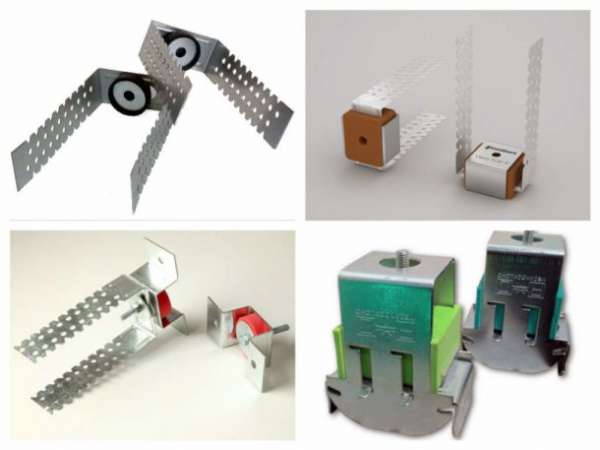
U-shaped plates on the vibration suspension have several holes that allow you to adjust the depth of the frame
But note that these holes may vary in size from manufacturer to manufacturer. Some brands produce hangers that only fit certain screws.
What you need
The standard technology for the manufacture of plasterboard ceilings provides for the assembly of the frame and its subsequent sheathing. Naturally, an air gap forms between the overlap and the sheets themselves. Air is a very good conductor of sound. To reduce noise, this space is filled with insulating materials. Usually it is mineral wool, less often - modern insulators, for example, texound.
The second problem is the sound conductivity of the frame itself. After all, the ceiling is suspended on the ceiling with the help of suspensions, and the metal also conducts sound vibrations perfectly. It is in this case that special vibration suspensions are used, either purchased, or less often home-made.
When everything is ready, you can get to work.
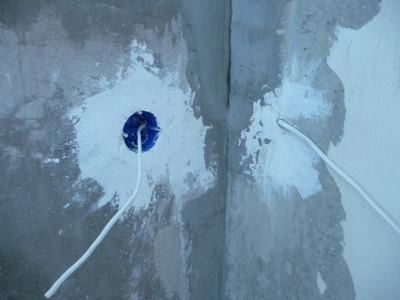
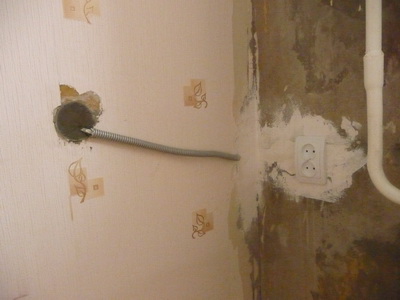
1. We release the walls from old wallpaper in order to see possible cracks and potholes, we close them with gypsum mortar
We pay special attention to electrical sockets, because. in most existing houses, sockets are a window to another apartment, and are an excellent conductor of sound
If you do not have the necessary skill, invite an electrician, turn off the power supply. Then the socket is removed and filled with plaster. And if you want to move the outlet to another place, then first connect the required length of the cable to the ends of the outlet, and seal it with plaster.
 2. Having finished with defects and holes in the walls, we proceed to the manufacture of the crate from a metal profile:
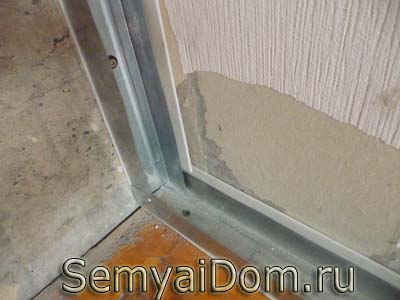
- first, prepare the guide profile PN-2 An important point is the installation of a special soundproof tape under the profile.This is done in order to eliminate rigid fastening and improve sound insulation.
After that, we fasten the guide profile first to the floor, to the ceiling and along the edges to the left and right to the walls, and fasten the profile to each other at the junction points with self-tapping screws.

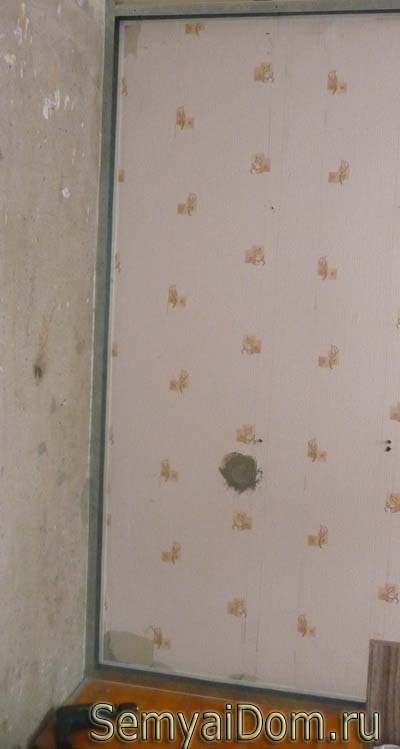
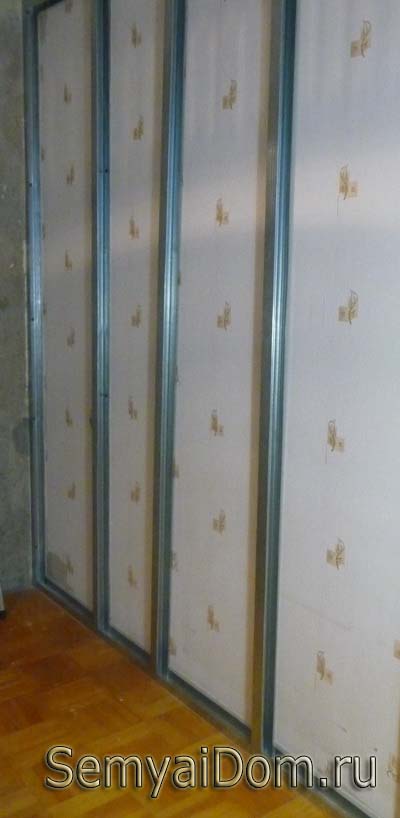
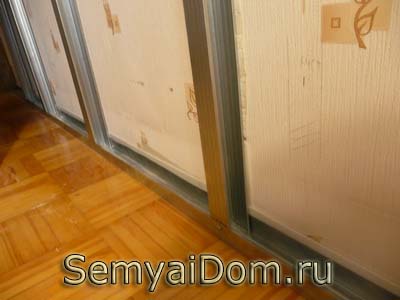
- in the same way we will prepare the rack profile PS-2 with the installation of a soundproof tape on it. We install the rack profile in the guide at a distance of 60 cm from each other (according to the size of the soundproofing material), check it by a plumb line or level and fix it to the wall and the rack profile. We also stick a soundproof tape on the surface of the profiles in order to eliminate the loss of sound insulation when it comes into contact with drywall.
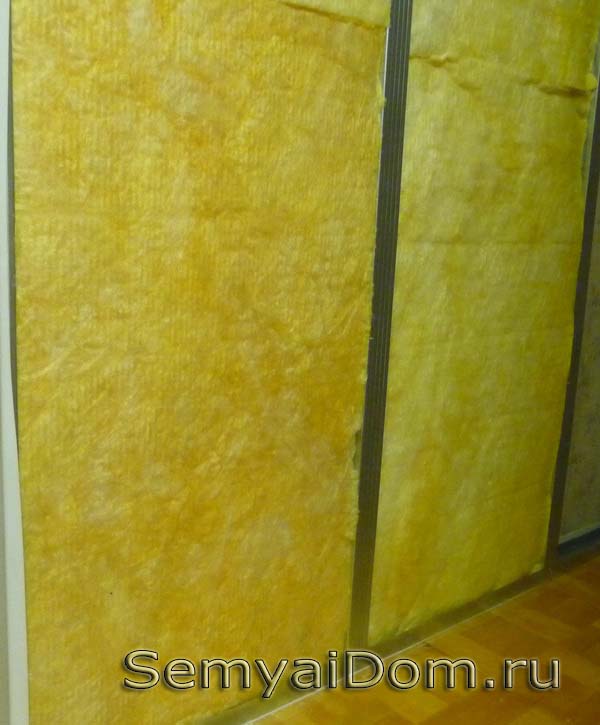
3. The crate is ready, you can fill the space with soundproofing material. We carry out work in rubber gloves and a respirator
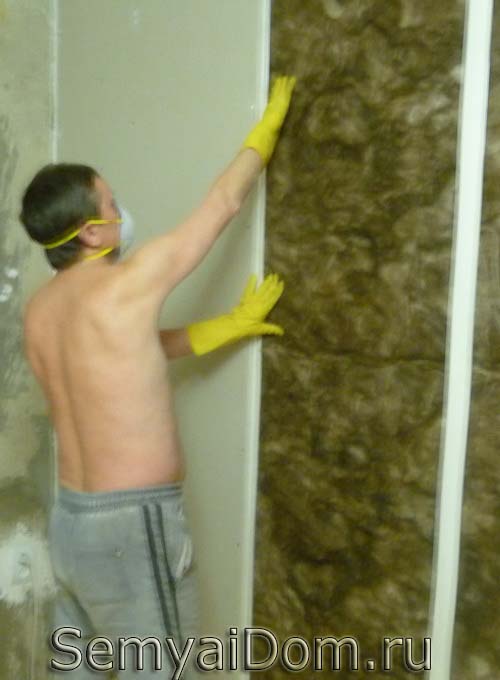
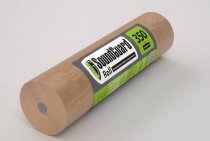
The Knauf Acoustic Baffle was not enough, because I need 21 sq.m. and they are sold only in packages of 18.3 sq.m., so I bought additional URSA plates, they are in a package of 6 sq.m.
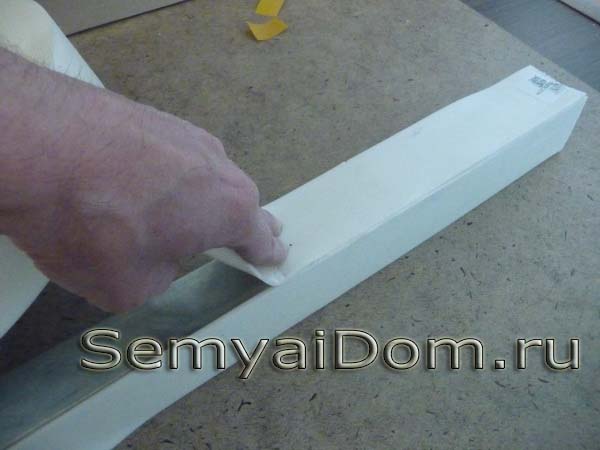
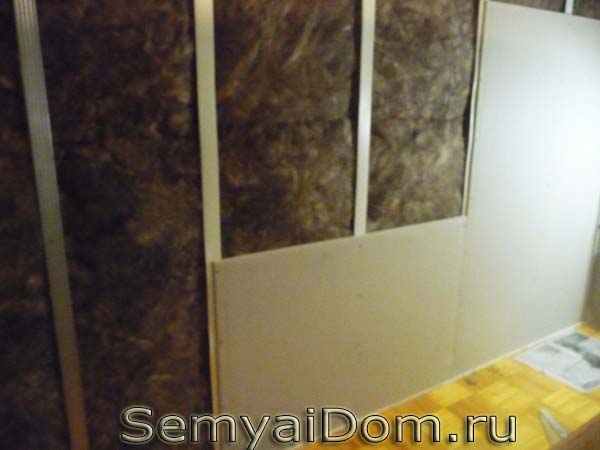
4. We proceed to sheathing the frame with drywall with screws 25 mm long. Let me remind you that for better sound insulation, before fixing the drywall, we glued a soundproof gasket to the surface of the profile.
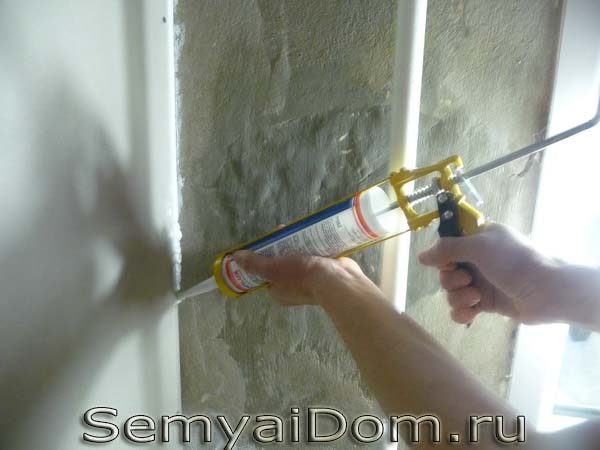
5. Next, we seal the fastening points and joints of drywall with putty, and seal the gaps between drywall and walls and ceilings with plastic sealant. Then we primer for the subsequent pasting of the walls.
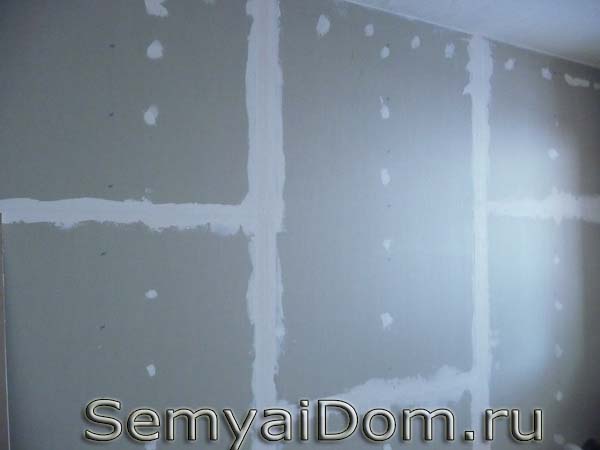
Everything, the work on soundproofing the walls is completed. You can start cleaning the walls.
I think that from this article it becomes clear that soundproofing walls with your own hands is possible, and you don’t have to overpay anyone for work.
Peace to your home! See you soon on the pages of the magazine "Family and Home" SemyaiDom.ru
Where to start repair
Warm plaster
How to paint Canadian doors
Vibrosuspensions and modern polymeric soundproofing materials
To achieve the most effective sound insulation, it is recommended to use vibration suspensions in combination with more modern soundproofing materials, of which Texound is a prominent representative.
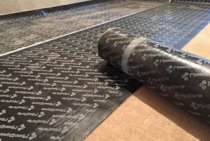
Texound (TECSOUND 70)
The material in question is made of polymeric materials similar in properties to rubber or natural rubber. Materials with similar characteristics are widely used in the construction of submarines - they are used to cover the hulls of modern swimming objects, which can significantly reduce their visibility even in front of the most sensitive sound detection devices.
An additional advantage of the texound material is the possibility of using it to provide the most reliable sound insulation without a significant increase in the thickness of the system. The material is environmentally friendly and practically does not support combustion.
First stage
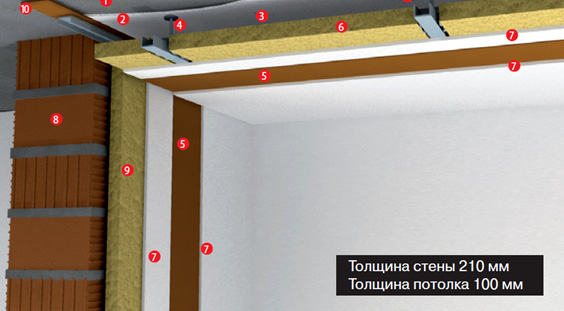
1. Floor slab; 2. A layer of plaster; 3. Air chamber (50 mm.) 4. Mounts; 5. Tecsound (Tecsound 70); 6. Insulation (50 mm; square 60kg/m3)7. Drywall sheet; 8. Hollow brick (13 cm); 9. Insulation (50 mm; area 40kg/m3); 10. Texound (it is possible to use VBI Tape)
Cut the soundproofing material according to the length of the area to be trimmed. Apply glue to the ceiling with a roller. Starting from any corner, glue the membrane to the entire ceiling, carefully smoothing out irregularities and getting rid of air bubbles. Repeat the process until the entire surface is soundproofed. Glue the sheets with a 5 cm overlap.
Second phase
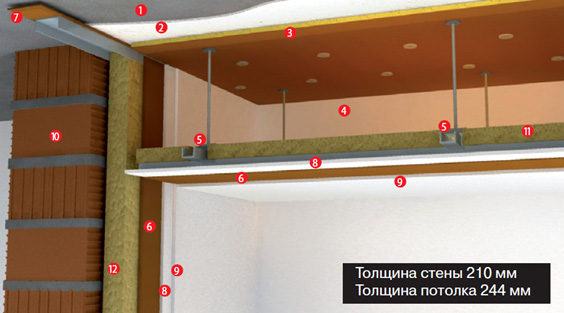
1. Floor slab; 2. A layer of plaster; 3. Sound-absorbing material (it is possible to use TermoZvukoIzol); 4. Air chamber (200 mm.); 5. Fixings; 6. Tecsound (Tecsound 70); 7. Texound (it is possible to use VBI Tape); 8. Drywall sheet; 9. Drywall sheet; 10. Hollow brick (13 cm); 11. Insulation (50 mm; square 60 kg / m3); 12. Insulation (50 mm; square 40 kg/m3)
Increase the tightness of the soundproofing sheets with plastic fungi.An impact drill will help you with this. 5 fungi are enough for 1 m2 of ceiling. Over time, even the highest quality glue begins to lose its original properties, and the fungi will not go anywhere and will not allow the material to fall off.

Fix the glued membrane
Third stage
Proceed with the installation of vibration suspensions. In general, the technology for mounting these fasteners remains the same as in the previous case. Attach hangers in increments of 600 mm. The distance between the vibration suspensions and the main ceiling should be the same 15-20 cm.

Proceed with the installation of vibration suspensions
Fourth stage
Attach a carrier profile to the vibration hangers
At this stage, an important difference from the previous technology appears: the jumpers from the transverse profile must be fixed on top of the installed carrier profile. Stick to 600mm pitch
Arrange the frame around the entire ceiling, and then lay the mineral wool insulation.
Fifth stage
Glue noise-absorbing tape under the profile around the perimeter of the room. It will act as a separator between drywall sheets and the wall surface.
Sixth stage
Attach the initial layer of drywall sheets to the frame. For such work, it is recommended to use sheets with a thickness of 1.2 cm. Treat the joints of drywall sheets with a sealant. Let it dry and fix the second layer of sheet finish with the pre-glued sheet of polymeric soundproofing material.
In the process of gluing the texound, carefully smooth out the bumps and get rid of air bubbles. Fasten the second layer of sheets to the first with self-tapping screws.
seventh stage
Treat the joints with a sealant. Let it dry and putty the ceiling. After the putty has completely dried, you can paste over the surface with wallpaper or paint.
Triple insulation of the ceiling - from mineral wool, gypsum board and "Teksound"
Without a well-equipped soundproofing layer, your stretch ceiling can turn into a huge membrane that amplifies all the noise, and you are unlikely to like it. Therefore, be as attentive as possible to the study of the recommendations received and proceed to the implementation of the plan.
Successful work!