Drywall is one of the most popular and frequently used building materials for interior decoration. With it, you can perform a huge number of repair and construction tasks, getting an excellent result for a relatively small price. But despite the fact that the GKL is very easy to use, certain skills and a set of tools are also needed for its installation and processing. For example, to create even seams and joints without gaps, you will need an edge or peeling drywall planer. Let's figure out how to use this tool, what are its features and how to make a planer for GKL with your own hands.

The purpose of the planer for GKL
This tool is indispensable in the processing of drywall sheets. Since the GKL consists not only of thick cardboard, but also of very fragile gypsum material, the edges of these sheets often crumble or chip off. It is in this case that they have to be processed with a special planer for drywall.
In addition, in order to quality seal the seams when facing plasterboard walls and ceilings, at the junction of sheets, the edges should be chamfered at an angle of 45 degrees. Thus, a recess is created, filled with a special putty composition, and in the future there will be no bulges and cracks on the seams.
In principle, sandpaper can be used to process the edges of the sheet, but its use will not give such a perfectly even and clear edge as when using a planer.

Types of planers for drywall
There are two different types of drywall planers that differ slightly in their purpose:
- Edge planer.
- Roughing tool.
Kromochny
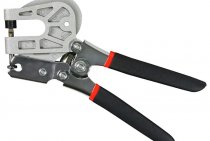
The edge planer is used for chamfering, edge processing GKL, as well as performing a more even trimming of the GKL at the desired angle (most often 45 degrees). The blades of such a tool have a trapezoidal shape and can be displaced, which allows you to process the edge to a depth of 2 to 8 mm.
Tool structure:
- Plastic or metal case with handle.
- Tension screw for fixing the blades.
- Planer blades installed not in the sole of the planer, as in the carpentry tool familiar to everyone, but on the side.

A standard edge planer is designed for chamfering at an angle of 45 degrees. If necessary, you can find a tool for curly chamfering when creating curved structures.
A quality edge planer can be used on softwoods and plastics.
Peeling
The peeling planer is used not only for processing the edge of the sheet, but also for leveling it. It is with its help that the edge is perfectly even, which allows you to fit drywall sheets to each other with even joints to simplify the surface finish.
Unlike the edge planer, the working surface of the peeling tool is located on the sole and is not a blade, but a kind of grater with many holes with sharp edges.

Working with the tool consists in the fact that the master runs it over the surface to be treated, carefully removing excess gypsum filler and cardboard edges from it.
A peeling planer is indispensable when you need to get a perfectly even straight edge (90 degrees), and an edge planer when you need to create an oblique edge.
Criteria for choosing a planer for drywall boards
In order to make the right choice of a planer that is suitable for processing your particular type of drywall sheets, you should pay attention to the following parameters of this construction tool:
- The length of the working surface (for the peeling tool). By default, it is from 14 to 25 centimeters. The larger this parameter, the more surface you can process in a shorter time.
- The width of the working canvas. It is 15–42 millimeters. The value of this indicator should be chosen depending on how thick your gypsum boards are. Some tools allow you to adjust the width, which makes it easy to use them for processing a wide variety of types of plasterboard.
- work surface material. The blade itself is made from both ordinary and tool steel. It is preferable to choose the second option, since such steel is stronger and more durable in use.
You also need to choose a tool that will fit comfortably in your hand. There are many models from which it is easy to choose the right one for you.

An important criterion when buying a planer for GKL is its cost. By this parameter, you can also find models of almost any price category. For example, the price of an ordinary small Russian-made instrument starts at 250 rubles, and for professional models of such well-known companies as Knauf, the price will be 3,500 rubles or more.
How to make a peeling planer for drywall with your own hands
A do-it-yourself drywall planer can be made from improvised tools and materials that are likely to be found in your apartment while finishing the room with drywall sheets. For this you will need:
- Metal guide profile (it is best to choose the Knauf brand, since cheaper analogues will not work in terms of strength and quality of the metal).
- A small piece of wooden board or bar.
- Metal scissors.
- Screwdriver.
- Self-tapping screws.

The process of making a planer for processing drywall step by step:
- The length of the profile is measured so that it is approximately twice the desired length of the working surface of the tool being manufactured.
- We cut the side faces of the profile in such a way that when it is folded in half, a semblance of a box is obtained. But we don't add it to the end yet.
- We apply one of the halves of the profile with the front side (this is the part that will be working) to a wooden surface and use a screwdriver to make through holes in it. The more of them, the better - it should look like a grater.

- Now we fold the profile in half and fix its side edges with self-tapping screws on both sides.
- With a hammer, lightly knock out too sharp protruding pieces of the profile around the holes.
- For ease of use, so that the tool does not slip out of your hand, its side faces and upper part can be wrapped with electrical tape or pasted over with any non-slip material.
Even such a homemade planer will be a good helper if you want to carry out your repairs in the apartment with high quality.