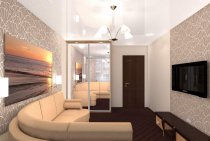
Huge bright images on photo wallpapers in rooms and non-residential premises create a special atmosphere in the apartment, turning the life of its inhabitants into a real holiday and filling it with positive. The decor can take up a small section of the wall vertically or horizontally, one wall from top to bottom, be placed at an angle, or cover all the walls of the room. Many types of photo wallpapers are produced, consisting of a different number of segments or panels - from 2 to 12. Before decorating the interior with a large landscape, images of flowers, animals, birds, waterfalls, stones, you need to carefully study how to glue photo wallpapers of eight or more parts on the wall .

Tools
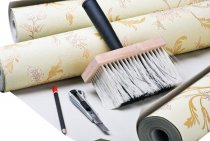
Getting started, you need to check the tools that you may need in the process, and place them in convenient places. For gluing photo wallpapers from 8 parts you need:
- ladder;
- level or plumb;
- roulette;
- long line;
- simple pencil;
- sponge for removing glue from the front side of the photo wallpaper;
- container with water;
- special glue;
- container for glue;
- a piece of old cotton fabric for hands;
- wallpaper knife;
- wide and narrow brushes for applying glue;
- plastic spatula;
- rubber or needle roller for smoothing pasted wallpaper.

Choose and buy photo wallpapers online
 Leroy Merlin has a huge range of photo wallpapers - about 2000 options. You won’t see such a quantity in a regular store - there won’t be enough time or energy.
While buying online convenient and safe: you can buy goods without leaving your home and without visiting the store. All purchases will be delivered to your home. And if something does not fit, you can issue a refund.
In addition, in the online store on each page of the photo wallpaper you can see the exact specifications (dimensions, material: paper, interlining, vinyl, etc.) and real customer reviews.
Surface preparation
Before pasting the walls with photo wallpaper, you should:
- Remove the old coating with a spatula, clean from the layer of dried glue.
- Carefully level the surface - cut off bulges, putty cracks and chips.
- Apply an even layer of primer, then wet clean the room so that no traces of debris and dust remain. Detailed instructions on preparing the walls for gluing eight-part photo wallpaper can be seen in the video.

Markup, numbering, preparation
For photo wallpapers, consisting of a large number of parts, the correct markup is especially important. You need to do the following:
- Lay out on a flat, clean surface - on the floor or a large table - all parts of the photo wallpaper to get an idea on which wall they will look best, which parts and in what places can be cut off without damaging the image, and to measure each panel for wall marking.
- Provide each element with a serial number on the wrong side and, for convenience, fold it in a stack face down.
Important! It is recommended to start gluing from the window, from above. This should be taken into account when numbering.

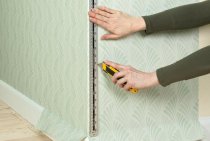
- Mark the wall with a long ruler, a simple pencil, a spirit level, drawing a vertical line from ceiling to floor a few centimeters from the corner.
- Draw a grid along the first vertical line, the height and width of each cell of which should match the size of the panel.
Depending on the size of the drawing, eight fragments can be placed in a vertical or horizontal two-lane grid with four cells in each row. Wall murals can be pasted vertically and horizontally - it all depends on the preferences of the master. Before starting work, it is necessary to check each panel for pattern compatibility.
Fragments of photo wallpaper usually have white margins. For convenience, some of them need to be cut before gluing.
- The field of each fragment is cut off from the side of light incidence (the location of the window).
- If sticking will be done from top to bottom, the top field is cut off, if from bottom to top - the bottom one.

The procedure for gluing wallpaper
The sequence of work will be as follows:
- Following the instructions, dilute the glue in the container, stir thoroughly so that there are no lumps. For each type of photo wallpaper, it is necessary to select a special composition indicated on the instructions for the wallpaper.
Advice. It is not recommended to use universal glue or dubious composition for any photo wallpaper.
- Stick on the first segment and smooth it with a roller.
- Consistently paste all parts of the picture, moving in rows. Segments of photowall-paper are pasted with an overlap. Excess strips can be carefully cut off with a wallpaper knife after gluing all the fragments.

Advice. Adhesive that has stained the front side of the canvas must be carefully removed immediately with a damp, but not wet, sponge. Dried adhesive can be removed with soapy water or water.
Features of gluing paper photo wallpapers
Paper muralsand - the most capricious thin material, which must be handled with particular care, since they are easily torn due to excess glue or careless gluing.
- Each panel should be coated with glue separately, applying a thin layer of the composition immediately before gluing and immediately gluing it into the desired cell in the grid.
- It is impossible to correct the pattern after gluing, so each segment should be very carefully combined with the pasted one.
- It is necessary to smooth the glued fragments with a rubber roller from the center to the edges so that wrinkles do not form, the canvas does not tear, and the pattern is not distorted.

Important! It is impossible to use fabric flaps for smoothing, as villi may appear on the surface.
If the paper photo wallpaper is pasted crooked or with wrinkles, you will have to remove all panels and, after cleaning the surface, start working again.
The nuances of gluing vinyl and non-woven wallpaper
Each type of wallpaper has its own rules for gluing.
- When sticking paper-based vinyl photo wallpapers, the adhesive composition should be applied to each segment of the canvas and to the wall, wait until the wallpaper is saturated, and only then proceed with gluing.
- Non-woven photo wallpapers are not smeared with glue, the adhesive composition is applied only to the wall.
- For non-woven vinyl wallpaper, the procedure is the same as for non-woven fabrics.
Important! Recommendations for gluing each type of such coatings are described in detail in the instructions.

For non-woven photo wallpaper the following adhesives are suitable:
- Kleo (France) - safe glue with antiseptic additives. Sold in 250 g packs in the form of a powder, which is instantly prepared, forming a clear solution.
- Quelyt (France) - composition in the form of flakes, easily soluble in water, perfectly holds photo wallpapers on any basis. The glue is applied directly to the walls at a temperature of + 5 to + 20 ° C and dries for no more than 2 days.
- Metylan (Germany), which contains methylcellulose and antiseptic components, is known for its excellent performance. It mixes well in cold water, does not leave stains or streaks on photo wallpapers, and dries within 2-3 hours.
Get a better understanding of: how to glue wallpaper.