More and more owners, taking care of the insulation of their apartments, prefer plastic windows. However, it is not enough just to replace the old wooden frames, it is important to properly insulate the entire window opening. Therefore, for novice craftsmen and those who want to control the work of installers, it is important to figure out why a stand profile for windows is needed and how to install it correctly.

Stand profile: what is it?
Before deciding whether or not such a detail is needed when plastic window installation, you should understand its device and purpose.
Structurally, the stand (sill, bottom) profile is a profiled bar attached to the lower end of the window frame. It is made of PVC with increased resistance to environmental influences. This material is more durable, successfully resists low temperatures and high humidity.
Why do you need a stand profile for plastic windows
The architectural features of modern and old buildings are such that in the area of the lower border of the window, air is injected under the external low tides. In Soviet times, they fought against this by placing heating radiators directly under the windows. Now they are often trying to remove them from prominent places, so special attention should be paid to the window sill area and to exclude the possibility of cold bridges appearing there. To solve this problem, a support profile is being installed.

The presence of internal air chambers improves the thermal insulation of the window, and the design of the bar facilitates the solution of several issues at once.
Window frame protection during transport
It is the bottom profile that takes on all possible damage and pollution when moving the window frame to the installation site. Given the considerable weight of the structure and narrow, uncomfortable stairwells in most buildings, it is almost impossible to do without them. The window sill profile is stronger than the frame, and it can be replaced without problems.
Simplification of fastening of the ebb and window sill
There is no need to drill holes directly in the window frame, which, by the way, is prohibited by manufacturers. This can lead not only to the ingress of water into the frame profile, but also to the appearance of cracks on the frame.

There are other ways to fasten these window elements, for example, by placing a window sill under the frame and screwing the tide to its outer part facing the street. Also, the drainage system and the window sill can be installed in special grooves, but there are some nuances and difficulties with the location of the linings when installing the window block, clearing the foam joint, etc. The process is greatly simplified with a support bar.
Professionals recommend attaching an external aluminum window sill to a special profile equipped with a “cap”. It will facilitate installation and protect against leaking water.
Improved thermal insulation
It is impossible to qualitatively insulate the seam at the junction of the window frame only with the help of mounting foam, therefore a support bar is necessary.
For high-quality thermal insulation, it is recommended to choose a product with at least 2 air chambers and a wall thickness of 2 mm or more. For regions with cold winters, the best option is 3 cameras. Too narrow and thin profile will be the weakest point of the whole structure.

Practice shows that the stand product itself, even with 3 chambers, does not provide proper thermal insulation. Additional insulation and sealing are required, which will be discussed below.
Correct installation and durability of the window
The window sill is easy to level. This guarantees the absence of distortions of the window frame and the quality of the fittings. In addition, the bottom profile provides a snug fit of the frame to the insulating materials (tape PSUL, waterproofing or mounting foam) and, as a result, their maximum sealing.
Sizes and manufacturers
The standard length of the window sill profile is 6 meters. But other sizes may vary depending on the model and manufacturer.

As a rule, the width ranges from 2 to 4 cm, the height is 2-3 cm.
The largest manufacturers of plastic windows complete their products with delivery profiles. So the need for their separate purchase usually arises in two cases:
- in case of loss or breakage of a part;
- when the product from the kit does not suit the characteristics, for example, the number of cameras.
The most common models on the Russian market:
- KBE. Under the system of plastic windows, this company produces a profile of models 343, 342 and 342R, as well as 142 and Expert.
- Rehau. The Rehau 561013 and 561570 profile model has become widespread. It consists of 5 independent chambers - thermal modules. This German company also offers Blitz, Delight modifications.
- Veka. Produces Softline and Euroline models.

The window sill profiles of firms have proven themselves well:
- Wintech;
- Brusbox;
- enwin;
- Mont Blanc;
- wds;
- Novotex.
The products of the Russian brands "Brusbox" and "Novotex" look more attractive in terms of price than their Western counterparts, but cannot always be compared with them in quality.
Installation
There are 2 ways to install the window sill profile.
Method number 1
With this option, the window sill is installed first, and then the frame.
- A piece of the required size is cut off.
- It is placed in the opening and set using the building level.
- A preliminary fitting of the window frame is being done. If a gap remains between it and the top of the opening, then it is eliminated by raising the stand bar. To do this, you can put pieces of timber under it.
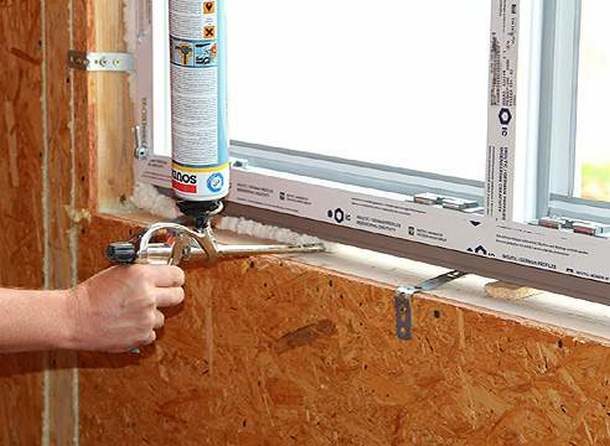
- The space between the bar and the opening is filled mounting foam.
ibuilder.decorexpro.com/en/ recommends that the “bare” bottom profile does not become a weak point of the entire structure in terms of freezing, it must be additionally insulated. To do this, extruded polystyrene foam, cross-linked polyethylene or other insulation in the form of a bar is inserted into one of its chambers.
Method number 2
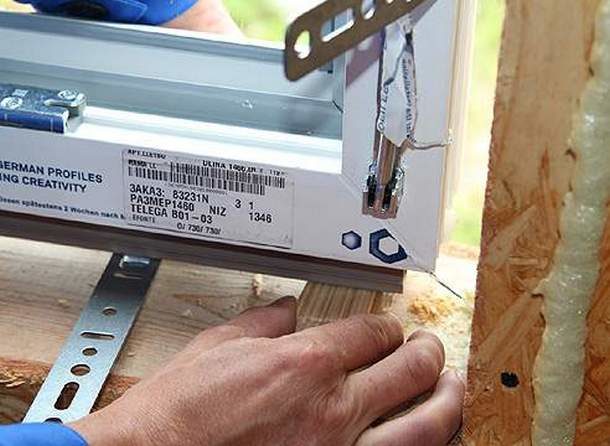
Experienced professionals do it differently:
- Unfasten the support bar from the frame.
- Insert a heater into the profile chamber.
- Glue the sealing tape to the bottom of the frame or apply mounting foam to the joint, as shown in the photo. You can use both at the same time.

Let's say the option using cross-linked polyethylene, which is located not in the chamber, but at the junction of the bar and frame. But at least there must be a heater somewhere!

- The window block is installed together with the bottom profile.
-

- Installing a window block on wooden linings
-
- Seam foaming
ibuilder.decorexpro.com/en/ recommends the second installation option: it is guaranteed to exclude freezing of the joint and the occurrence of cold bridges in the window sill area.
The window sill profile will provide a strong fastening of additional elements of the window block, and its high-quality installation will provide thermal insulation. The video below shows how to achieve 100% efficiency during its installation and not leave a single loophole to the cold, using EPPS insulation, mounting foam and sealant.