How to choose and install an overhead sink
The sink is a very important attribute in the kitchen. There are a large number of types of these products, one of which is an overhead sink. Several methods can be used to secure it. In addition, one cannot do without special knowledge and tools.
The main feature of overhead sinks is their successful combination with various design of the kitchen. Obvious advantages can be considered low cost and ease of installation of the sink.
As for the shortcomings, they include a small thickness and space between the pedestal. The presented products can be used for a headset, which is composed of separate modules, and the sink is not a single part of the workspace. This type of sink should be mounted in the corner of the room.
How to fix the overhead sink in the kitchen set
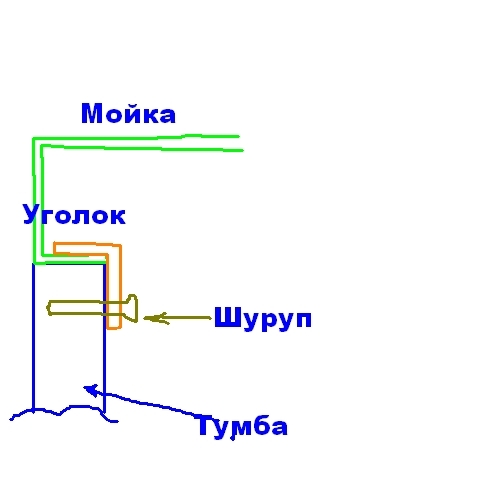
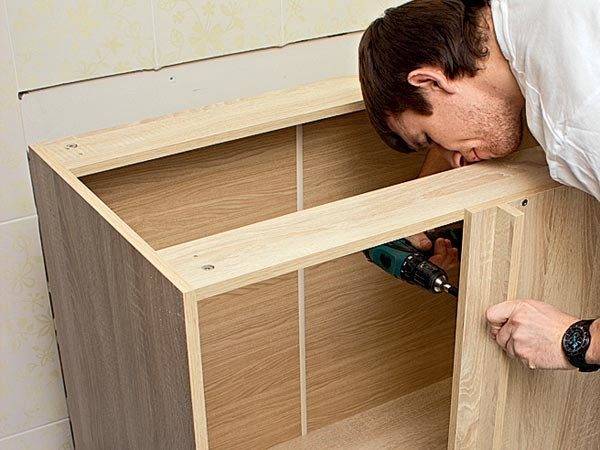
In the beginning, carefully inspect what you have included with the sink.
Should be like this
or similar fasteners, plus screws for them.
Sometimes they are not available, you have to buy separately.
If the underframe is already assembled, then we begin to mount the sink by marking these same mounts.
screws are screwed into the mount in the upper part of the underframe.
Usually 4-5 mounts are enough.
But it’s not worth it to twist “tightly” right away, you need to perform a number of more actions.
I usually install both the siphon and the mixer before attaching the sink, and not after, it’s more convenient.
The corrugation can be inserted into the sewer at the end, but it is better to assemble and install the siphon right away.
Before the final fastening, if there is no sealing tape in the kit (a common occurrence), coat with sealant, then wash at a permanent location and you can finally clamp the fasteners (holders).
The sequence may be different, the work is not at all difficult, it can present problems. or a mixer, or a siphon, but not the sink itself.
Excess silicone should be removed immediately.
Check the sink for leaks (I'm talking about a siphon and a mixer), it's better after 20 minutes when the silicone grabs a little.
moderator chose this answer as the best
Mortise and overhead sinks are mainly installed in ready-made cabinets of a kitchen set, with an empty opening, they do not provide for internal bulkheads, which means that there are no additional stiffeners.
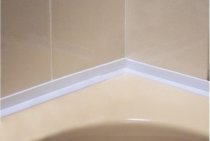
On the sides and front of the overhead sink there are special, slightly protruding sides, they are designed for installing a sink, and there is no side on the back side, instead of its raised edge, so that water does not get behind the cabinet with a sink.
The overhead sink can be fixed in two ways: with a sealant and with self-tapping screws.
If the overhead sink is light, for example from fragranite. it can simply be glued to a high-quality waterproof sealant. It is applied generously around the entire upper perimeter of the hole in the countertop and then the sink itself is installed on top. Support the sink under load for 1-2 minutes, then carefully remove excess sealant from the outside and inside of the sink and countertop. Do not use the sink until the sealant is completely dry.
If the overhead sink is metal and heavy, then this method is not suitable, you need to fix auxiliary bars or furniture corners from the bottom of the cabinet opening. Then the sink will not rely on a thin end, but on auxiliary bars or corners. Be sure to apply sealant between wood and metal.
The kit may contain special fasteners for washing (4 pcs.), They are in the form of an L-shaped plate with oblique holes. First you need to make a mark along the upper edge (on the inside) of the cabinet for attaching the plates. All holes must be the same height. Just below the mark, screw in self-tapping screws about 16 mm long, install mounting plates on them.Before putting the sink in place, apply a layer of sealant around the perimeter of the hole. Install the sink so that the screws are fixed in the recess.
I don’t want to seem very smart if I say that to solve such an extremely difficult task, you will need a screwdriver, a sharp awl, 6-8 screws 16-20 mm long, the same number of furniture corners and 30 minutes of working time. The sink is installed on the workplace, then from the inside the sink itself must be pressed with a corner in an inverted position, and having outlined the place of attachment with an awl, tighten the screw there. Between the sink and the corner, you can and should lay a gasket made of rubber, cork or any other material so that the sink does not deform. This operation is repeated several times, and the sink will hold without fastening visible from the outside.
More tired of painting than fixing the sink. I would be very happy if someone gave me a graphics tablet.
Installing an overhead sink work order
There are several ways to fix the overhead version of the kitchen system. Which one is right for you, decide for yourself.
Mounting with glue is the easiest option. Naturally, the sink is installed on a special cabinet
Please note that it must exceed the width of the underframe, only in this case its sides will completely hide the edges of the nightstand
All ends are pre-treated with silicone sealant, after which the sink is installed and pressed down. Fixation will be reliable only after the end of the drying process of the sealant. Another function that silicone adhesive will perform is protection from moisture.
Mounting using brackets. They may be sold as a set or purchased separately.
The first thing to do is place the self-tapping screws on the inside of the walls of the pedestal and attach the brackets. The screws need to be tightened a little, after which you can install the sink by aligning the mounting angles along the length of the screw.
The self-tapping screw should be fixed in the corner, and the sink should be located tightly enough on the underframe. After these steps, you need to fully tighten the screws on the mounts.
Installation using wooden blocks. It is advisable to use this method if it is impossible to use a standard fastening (with defects in the countertop) or if it is absent.
To install the product, you will need to purchase furniture corners and wooden bars, and then make an assembly platform from these materials.
Wooden bars are placed in the sink box, after which four metal corners are screwed to the rails. After completing these steps, install the resulting design on the cabinet.
https://youtube.com/watch?v=UCgeAS9RMZM
Different sinks are needed, different sinks are important
Indeed, kitchen sinks are produced in the widest range, from which in a specialized plumbing store "eyes run wide". Kitchen sinks can be divided into at least six categories:
- Sinks hinged, cut-in and laid on. The hinged option is now rare, it is more relevant for communal apartments and government institutions than for modern repairs. But mortise and overhead sinks compete with each other in popularity, their long-term reliability and aesthetic appeal are comparable;
- Sinks made of stainless steel alloys, chrome-plated or nickel-plated, sinks made of natural granite or artificial stoneware, acrylic and even glass (!). However, due to practicality, 90% of all models are made of stainless steel and representative porcelain stoneware;
- Sinks angular and standard, round, oval, square, rectangular and curly. The more intricate the shape of the sink, the more difficult it is to give it impeccable cleanliness and maintain a sparkling shine on a daily basis.After all, the sink is used not for beauty in the living room, but for mundane household needs in the kitchen;
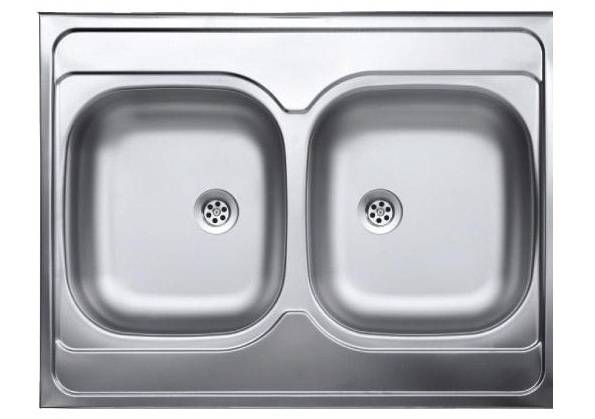
- By design, ordinary single sinks and sinks with two bowls (of the same or different sizes, the same or different shapes, etc.) are distinguished. There are convenient models with an overflow of water from one bowl to another;
- By the location of the mixer - on the wall or on the sink itself (the first option is rare);
- According to the availability of additional options - the ability to install a water filter, outlets for connecting a washing machine, automatic valves for adjusting the drain, additional taps for connecting garden hoses, etc.
Stainless steel sinks have gained overwhelming popularity due to their affordable price, durable functionality, compatibility with a wide variety of kitchen renovations, and ease of sanitization.
Granite and steel sinks are available in overhead and mortise versions, installing a sink in the kitchen with your own hands is possible for both. However, we must first take care of the furniture basis of our assembly efforts.
How to assemble a sink in the kitchen we mount a curbstone
Mortise and overhead sinks are installed in bedside tables and cabinets, with opening (less often sliding) doors in front and an empty opening in the back. The assembly of these elements of a kitchen set has its own characteristic features. The fact is that they do not provide for internal bulkheads, they can interfere with the connection of sewers and water pipes. This means that there will be no additional stiffening ribs inside the cabinet. If an overhead sink is installed, even the countertop is missing, it is replaced by a steel sink panel.
The assembly of the cabinet under the sink should be much more reliable and durable than other parts of the kitchen set. It must be installed on special linings, because. with the best tightness, water leaks are possible. The material itself will not interfere with the treatment with water-repellent compounds. Inside the nightstand, it is necessary to provide fasteners for tightening jumpers - they are installed after connecting the sink to communications for the strength of the entire structure. The jumpers themselves can be made from flat and thick planks, which will serve as additional mini-shelves inside the cabinet.
Ways to install the sink on the curbstone
Stainless steel sinks of standard sizes can be fixed in two ways. Depending on the type of product and the features of the cabinet, choose different options.
Mounting methods:
- with a sealant
- self-tapping fixation.
 When choosing a sealant, factors such as reliability and safe composition must be taken into account. For fixing the sink, a volume of up to 150 ml is suitable. The product must be with the current expiration date. For ease of application, you may need a special gun. Excess should be removed before the product dries completely.
You can take an integrated approach. In this case, the sink is fixed to the cabinet with fasteners, and the joints are coated with silicone sealant. Depending on the model of the sink, you can install it on the cabinet in different ways. Standard fasteners must be available.
A sink with curved sides can be lifted with wooden blocks. The dimensions of the product must allow design changes. In the case when standard brackets are not suitable for mounting, you can cut out the corners from wood or plastic yourself. The cabinet can be installed on legs or fixed to the wall. There are no fundamental features - it all depends on personal preferences.
Description of overhead kitchen sinks
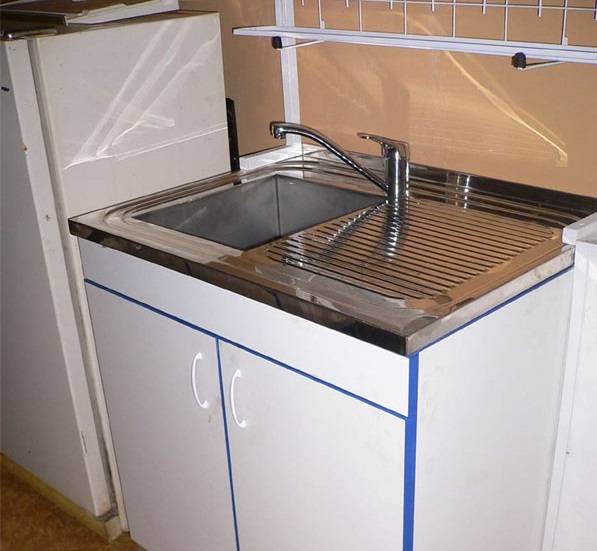
Overhead kitchen sinks got their name due to the installation method. The sink is superimposed on the kitchen cabinet from above and closes it instead of the countertop.
The operation of the overhead sink is impossible without the kitchen cabinet on which it is installed. Therefore, the sink and the supporting cabinet represent a single structure in the kitchen interior.
All overhead sinks on three sides (on the sides and in front) are equipped with sides for mounting on the pedestal. The back side of the overlay structure adjacent to the wall does not have a side, but there is a raised edge to prevent water from draining to the floor (between the wall and the sink).
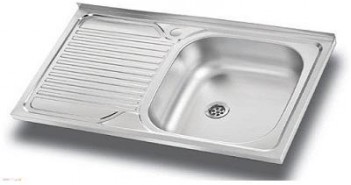
The shape of the sink in the overhead sink is most often rectangular with rounded edges. Smoothing right angles makes it easier to clean the inside of the sink. It is possible that the sink will have two bowls, a main and an additional one.
In addition to the sink, the design may include a countertop, monolithically connected to the bowl. It is designed for storing wet dishes, as well as for laying out fruits and vegetables after washing. The surface of the metal countertop is made in the form of small protrusions and depressions so that dishes or food do not roll back into the sink. It can be located both to the right and to the left of the bowl.
Overhead sink mounted on cabinet
An emergency drain can be provided in the back wall of the sink recess (in case the bowl overflows with water). When installing, the side hole is connected to the main drain. Often the bowl is supplied with a grate for sifting out large food residues, installed in the drain hole. Such a piece provides two functions: it prevents clogging of the drain pipe with leftover food and can close the sink hole as a plug.
The cabinet under the sink is a special furniture design, in which there is no back wall (for connecting the siphon to the drain pipe) and there are no shelves. Often the cabinet space is used to store auxiliary tools: a trash can, a floor bucket with a rag, empty cans, old pots. From the front, the cabinet under the sink is closed with doors, its outer surface can look like any desired material: light or dark wood, marble.
Overhead sink dimensions
The dimensions of the overlapping sinks are standardized to the dimensions of the perimeter of the produced kitchen cabinets. The most common size of an overhead sink is 50x60 cm. Overhead sinks (and, accordingly, cabinets) are most often used in sizes of 50, 60 and 80 cm in various variations.
- 50×50 cm;
- 50×60 cm;
- 60×60 cm;
- 50×80 cm;
- 60×80 cm.
The width of the sink can be 50 or 60 cm (sometimes 55 cm), the size of 80 cm will be too wide and inconvenient to use (you will have to reach for the tap). The length of the sink varies in wider dimensions and depends on the presence of a monolithic countertop. If there is a table for dishes, then the length of the sink reaches 80 cm, if there is only a bowl, the length of the sink will be 50 or 60 cm.
The depth of the bowl can be 16, 18 and 19 cm, while 19 cm will be more convenient for washing, since the walls of the sink will better limit water from splashing onto walls and clothes.
Double bowl overhead sink
Installation of an overhead sink on a countertop types of overhead sinks
Sinks for kitchen overhead type differ in the type of manufacture. Some are stamped and some are welded. There is another type of overhead sinks - bathroom sinks, they are a separate bowl that is installed on the cabinet. The shape of the bowl can be different - oval, round, rectangular.
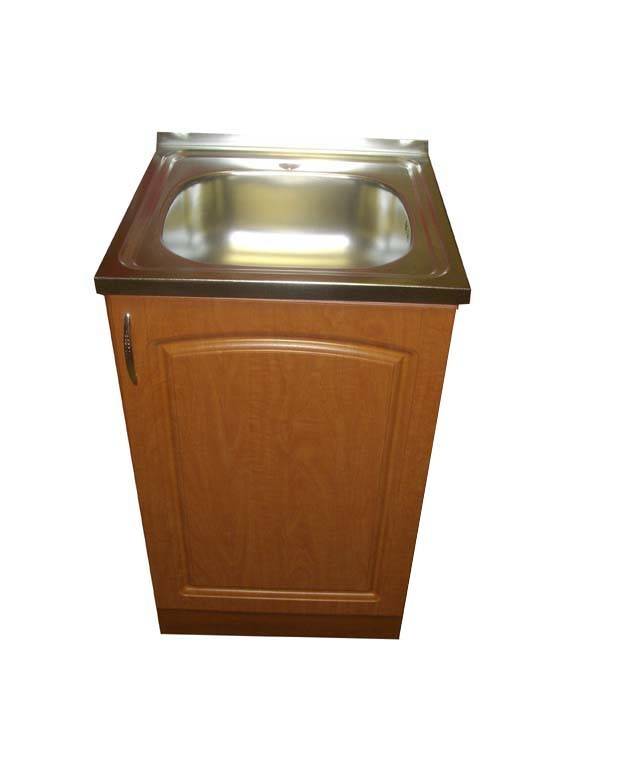 Photo 3. As a rule, overhead sinks are installed in kitchen cabinets.
Stamped bowls are made from sheet steel. The number of seams is minimal. Appearance is attractive. The cost of this type of product is democratic. The production technology allows us to offer sinks with a depth of no more than 15 cm. This characteristic is attributed to the disadvantages of products of this type.
Welded sinks in their design have several parts. Each is made separately, then they are welded together, turning into a single system. The surface of the seam is ground and polished. With this manufacturing method, a deeper shape of the product is obtained. The range of bowls of different depths and shapes. The depth of the bowl reaches 20-22 cm.
Overhead sink installation
How to properly install a countertop sink? Installation of the overhead sink is carried out in two stages: first, the support cabinet is assembled, then the sink is mounted on it.
How to install an overhead sink on a cabinet (video):
Assembling a cabinet for a countertop sink
Like any cabinet furniture, the sink cabinet is delivered unassembled after purchase. The package contains cabinet walls and fasteners (corners and self-tapping screws). The body parts of the pedestal are rectangles cut from a chipboard sheet of the required dimensions with machined edges:
- two sides;
- bottom;
- three tsargi (transverse sticks that ensure the rigidity of the structure);
- two doors;
- fittings (four hinges and a door handle).
Drawers are located between the side panels in the following places:
- front bottom (under the bottom);
- front top (under the sink);
- back in the middle.
To assemble the cabinet, you will need a screwdriver. The details of the cabinet are assembled using metal corners and self-tapping screws. The sequence of actions is as follows:
- Dismantle the packaging, remove the packing material and lay the parts on the floor.
- We assemble the sidewalls and front sidewalls: first, the lower, then the upper sidewall, we fasten to each sidewall at the corners.
- We collect the bottom in such a way that its edge lies on top of the lower front side. The bottom is attached to each sidewall and to the lower front side.
- We install the back tsargu.
Further installation of the cabinet will consist in hanging the doors. It is performed after installing the sink on top of the cabinet.
Installation as a classifying feature
There are several types of kitchen sinks, and they are classified depending on the installation method. This:
- Invoice. This option provides for a method of overlaying on a cabinet, replacing the countertop with its design. I would like to note that this particular type of sink is the simplest and most affordable, their installation will not require you to perform complex manipulations.
- For self-assembly, overhead sinks are most suitable. Installing one with your own hands is not difficult at all. But of the minuses, one can note the insufficient thickness and the presence of gaps between the cabinet and the product.
- Mortise. The name is due to the design - they cut directly into the countertop. The advantages of mortise sinks include their higher hygiene. It is also possible to install such a sink in an independent way.
Integrated. A feature of this type of sink is the level of the side. It can be above, below or at the edge of the countertop. It is difficult to cope with such an installation on your own, since before proceeding with the installation, it is necessary to carry out special preparation of the countertop. The disadvantages of such sinks include complex installation and more expensive cost. To install it qualitatively, it is better to contact specialists.
Undertable. Its installation is carried out in a countertop made natural or artificial stone. The location of the sink in this case will be below the level of the countertop, at a distance equal to its thickness. Stone countertops look quite rich and beautiful. Therefore, in order not to spoil the appearance of the kitchen, seek the help of specialists.
Installation
Lay out the tools and accessories in advance so that they are at hand. It is also desirable to decide on a mixer and a siphon so that everything is installed immediately, otherwise it will be difficult to install later. How to attach a stainless steel sink to a cabinet? This is not difficult if the steps to assemble the frame itself have already been completed.
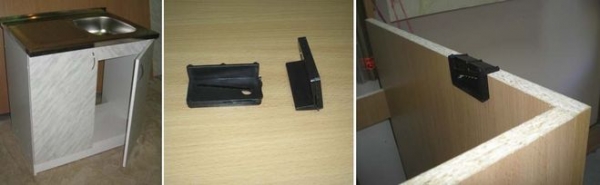
- L-shaped mounts are installed, both in the kit and purchased separately.
- Attach fasteners from the inside and mark under them the places where it is necessary to screw in the self-tapping screw. Drill a hole (not a through hole) 0.5 cm higher from the mark, screw in a self-tapping screw and put the mount.Do the same actions in other places of the structure.
- Next, a sanitary ware is assembled, a siphon with all gaskets is attached to it, and a mixer is fixed.
- Treat the ends of the walls with sealant. It is needed so as not to protect the furniture from moisture.
- Now you can proceed to fixing - put on a furniture frame, where the fasteners are placed on self-tapping screws.
- Do plumbing work to connect the water supply and drain in the kitchen.
- After the attachment of the stainless steel sink to the cabinet is completed, you can check it for leaks. The sink is filled with water. Check if water is leaking from the junction of the sink and siphon.
- Installing doors in the kitchen cabinet is the final stage, which will be the final point in plumbing work.
So the question of how to install a stainless steel sink on a cabinet has been resolved. With proper performance of work, it is able to stand for a long time.
Many attach the sink to the countertop. There are options when, when ordering kitchen furniture, the need for a hole in the countertop for installing plumbing is stipulated. Then there will be little work with the installation of the sink.
- Mark the contours on the surface with a pencil. Take into account the margins from the edges (5 cm). Take measurements under the bowl.
- Make a hole at the corners of the outline.
- Glue masking tape from the outer side of the contour so that the surface around it is not damaged during work. Before cutting the opening, fix the part to be removed from below so that it does not damage the surface under it when it falls.
- Treat the ends of the countertop with sealant, assemble the complete plumbing elements (faucet and siphon) and install. This will prevent moisture from getting under the structure, thereby spoiling the appearance of the furniture by deformation and delamination.
- Fix with clamps (included in its package when buying).
So, having considered how to fix a stainless steel sink on a cabinet with fasteners and on a countertop, you can see that doing this is not as difficult as it seems.
How to fix a countertop sink
You can fix the overhead sink without a pedestal directly to the wall. To do this, you need to use special brackets (sold in plumbing stores or departments with furniture fittings). First, draw the first markup at the desired height from the floor (about 80 cm). Then, just below the first, make a second markup - it should correspond to the wall thickness of the sink at the back - you get a line for attaching the brackets. Then measure the distance between the intended mounting locations of the brackets on the sink. Next, you mark an equal distance on the line of attachment of the brackets. Then drill holes in the wall, screw on the brackets and fix the sink.
The easiest option is to install an overhead sink on a special pedestal (underframe). In this case, it should be wider than the underframe. Those. you simply install the overhead sink between the sides of the cabinet, and its sides will cover the ribs of the cabinet. To do this, treat the end of the pedestal under the sink with silicone sealant, place the sink and press down. After the sealant dries, the sink will fix well.
In regular situations, the overhead sink is fixed with special fasteners (4 pcs), which can be included with it or sold separately. Initially, screw the screws into the walls of the cabinet from the inside. Then put brackets on them (the corner should face the cabinet). Next, you need to tighten the screws a little. Then install the sink and slide the mounting bracket along the screw until the self-tapping screw is fixed in the corner recess. At the end, tighten the mounting surface of the sink to the underframe.
If fixing with standard brackets seems unreliable, fixing the sink with wooden blocks and furniture corners will save the situation. To do this, you need to put wooden slats in the overhead sink box.Then screw four metal corners to the rails around the perimeter of the sink and install it on the cabinet. And only then should you fasten the second part of the corner from the inside to the walls of the underframe.
Installation rules
So, let's move on to the main question of the article - how to install an overhead sink? The whole process is divided into two main stages:
- Assembling the floor cabinets of kitchen furniture.
- Sink installation.
The cabinet itself is a piece of cabinet furniture, therefore it is sold unassembled. So, it will have to be assembled by hand. In principle, there is nothing complicated about this, because the cabinet has only a few assembly elements:
- two side walls;
- bottom;
- two doors;
- three frames, with the help of which the necessary strength of the entire structure is created;
- accessories;
- fasteners.
For assembly, you only need one tool - a screwdriver.
First, two frames are attached to the side walls with screws and metal corners: one from above, the other from below. That is, a kind of framework is created. On the lower frame, put the bottom of the cabinet and fix it in the same way as the side walls. Now the rear frame is installed. It is attached to the sidewalls with corners and self-tapping screws installed in the middle.
Installing a countertop sink Benefits of a countertop sink
Installing an overhead sink on a countertop is easier than installing a mortise sink: unlike it, an overhead sink is mounted on a special pedestal. As a rule, an overhead sink is installed on the countertop of a kitchen cabinet made of wood, chipboard and other materials. Some models are equipped with a wooden side, they increase the rigidity of the product and protect the cabinet from damage.
Overhead kitchen sinks are most often used in everyday life. They are made from high quality stainless steel. During its “life”, a stainless steel bowl interacts with tap water (and it is rarely pH neutral), detergents and various cleaning agents. The higher the quality of the steel chosen for its manufacture, the longer it will serve you.
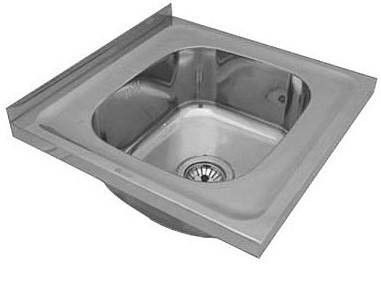 Photo 2. The overhead sink is a convenient and practical solution for the kitchen.
The installation of overhead sinks differs from the installation of mortise bowls and the technology of installing sinks in the bathroom. Installing it is easier and simpler, any man can handle this task. The product is superimposed on a kitchen cabinet, cabinet, table. For installation of additional devices — it is not necessary.
There are 3 main advantages of overhead sinks:
- Ease of maintenance. Stainless steel is easily and quickly cleaned of dirt and retains a presentable appearance for a long time. The metal used for manufacturing does not oxidize upon contact with detergents, and is not afraid of high temperature liquids. The surface of the bowl is easy to clean, it will not fade and retain its original shine.
- Ease of installation. You can install the product yourself. Even if you have never held a tool in your hands, the instructions on how to install a sink will help you to carry out this process quickly and well.
- Price. A countertop model costs less than an inset sink of the same size.
- Multifunctionality. Overhead sinks are equipped not only with a bowl for washing dishes, but also with an additional surface. The plane is used for drying dishes, vegetables and other items.
Fastening methods
Depending on the design of the sinks in the kitchen or bathroom, they can be mounted in different ways.
Each method has both pros and cons, but in order to figure out what to do in your situation, you need to study all the technologies at least in general terms:
Wall mounting is commonly used for wall mounted bathroom sinks and older kitchen sinks. The main disadvantage of this technology is that the siphon in this case is not masked by anything, and therefore significantly worsens the appearance of the sink.
In the next section, we will give a sequence of works on the installation of such structures.
Preparing furniture for sink installation
The cabinet from the manufacturer is usually delivered unassembled, so it must be assembled according to the instructions before installation. The standard kit usually includes: base, side walls, doors and countertop. For the convenience of supplying communications, the back wall in the headset is usually absent. The kit usually contains the necessary fasteners and a hexagon. If the elements are missing, they must be prepared separately. Depending on the model, the assembly method may differ.
Basic assembly steps:
- Initially, you need to prepare the base and screw the legs to it. The cabinet should be leveled.
- Next, the side walls and stiffeners between them are fixed. The more securely the fasteners are fixed, the more durable the product will be.
- If there are drawers and shelves, you need to collect these elements separately and fix the fittings.
- The last step is to attach the doors to the hinges. If necessary, drill holes for self-tapping screws. If there are closers and door stops, then they must be fixed separately.
The tabletop may be absent in the curbstone. In this case, installation will take less time. If the installation of the sink is carried out in a finished headset, then you need to cut a hole for the sink in advance. In order not to spoil the furniture, it is necessary to carry out all actions carefully.
Primary requirements:
Initially, it is necessary to take the necessary dimensions and prepare a sketch of the future hole.
Then it is transferred to the surface of the countertop.
It is important that there is an equal distance on all sides. The more accurately the hole is cut, the more securely the sink will hold.
Depending on the material of the countertop, a hole is cut in different ways.
For wooden surfaces, you need a jigsaw or milling machine. Stone surfaces at home can not be cut.
The tabletop can be treated with water-repellent agents. In this case, chipboard and wooden furniture can last longer.
To make the cuts neat, you need to remove burrs and bumps. To avoid cracks, the joints are coated with sealant for reliability.
When carrying out work, safety precautions must be observed. Cutting and assembly must be carried out with protective gloves. If a grinder is used, then you need to protect the respiratory tract with a mask. It is better to carry out work with a curbstone in the open air.
How to install an overhead sink in a cabinet using brackets
Surface-mounted models are mounted in a cabinet. Usually the cabinet is called the underframe. They are a cabinet of a headset type, in which there is no top cover and back wall. Such a cabinet is quite simple to assemble or make yourself. To simplify the task, they purchase both a kitchen set and a sink according to the size of the table-cabinet for it. Self-assembly of the product takes place subject to a certain sequence.
Stage 1. Before installing the sink, the masters recommend installing a mixer. While the product is not fixed, you can smoothly and securely screw the tap and ensure the tightness of the water supply.
Stage 2.
Prepare your brackets. They come in a set. You can also purchase special mounts separately. To begin, place the L-shaped mounts on the table base. The place of application is outlined with a pencil. Self-tapping screws are screwed into the indicated point. Their length should be 16 mm. The screws protrude no more than 5 mm above the pencil mark.
 Photo 4. Placement of fasteners in the base of the table.
Stage 3. A layer of sealant is applied to the ends of the table or cabinet with a spatula. Silicone plays the role of glue and will protect the wooden surface from water drops.
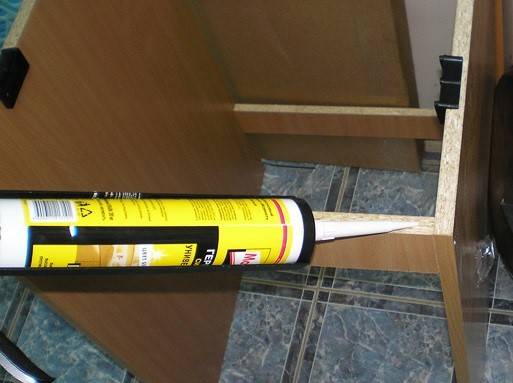 Photo 5. Application of sealant.
Step 4. Place the sink on the attached screws.Tighten the screws until the product fits snugly. Then the fasteners are tightened. The exposed sealant is removed with a knife or a rag.
Stage 5. Connection to the sewer. This is the final stage. To connect, use a siphon with a corrugated hose. It is attached to the screw, through the mesh in the drain hole of the sink. For the tightness of the connecting elements, gaskets and plumbing tape are used.
If you decide to put a countertop sink on the countertop, then you need to study the instructions on how to properly install the mortise-type sink. In this case, you will have to make a hole of the right size for the sink and secure it with double-sided tape and self-tapping screws. The markings on the countertop are made according to the finished template. It is included. The hole is cut with a hacksaw or a jigsaw. In order for the product to sit well in the prepared hole, you need to grind the ends. Before the final fixing of the bowl, do a fitting. The product must be freely hung in a prepared place.
The next step is also to process the sections of the countertop with a sealant. And fasteners are screwed to the inner wall. Fasteners are included with the countertop kitchen sink. If not, please purchase them separately. The side mounts for kitchen cabinets are suitable for mounting the sink. After you screwed the fasteners with self-tapping screws, apply sealant to the edge of the sink, put sealing tape on top of it. Double-sided tape is also suitable for sealing joints. It remains to install the sink and screw it.
As you can see, the installation of an overhead sink is a simple task that does not require special skills and tools. You will cope with it with due diligence no worse than the masters.
How to install a countertop sink
There are several options for mounting a surface sink. The simplest is mounting on a cabinet or a special table. The width of the surface of the sink in this case is slightly larger than the size of the underframe. This is a prerequisite so that the sides well hide the side ends of the nightstand. The complexity of the option is the choice of the desired size of the sink. It is best to purchase furniture and a sink at once. In another case, you need to carefully take measurements and buy a bowl, the inner size of which will ideally match the hole in the cabinet, and the width of the sides of the sink will cover the end walls of the bedside table.
Decided to start installation? Prepare everything you need for this process: a screwdriver, a set of screwdrivers, fasteners, a mixer, a siphon, sealant, plumbing tape, gaskets, flexible hoses for water supply.
First of all, prepare the ends of the cabinet. They are treated with silicone sealant. Use a spatula for easy application. Silicone will protect the furniture from moisture and securely hold the product in the "saddle". Choose a quick-drying sealant. You won't have to wait long before you can start using the sink. For wood and plastic countertops, use an alcohol-based sealant. After applying silicone, install the sink, press it around the entire perimeter. For reliable clamping use a clamp. Then remove the excess sealant. And after it dries, they begin to connect the bowl to the sewer and install the mixer.
To make it easier for yourself, you can install the mixer in advance, immediately before installation. And the siphon will have to be connected later, after the sealant has dried. The choice of a siphon must be approached carefully, especially the owner of a private house. The right choice of siphon and a number of measures will help eliminate unpleasant odors from the sewer. Before starting the sewer drain, check the tightness of each joint. We mount the mixer in a hole specially designated for it. For reliable fastening, use a rubber gasket, its diameter must match the diameter of the base of the kitchen faucet.
Conclusion on the topic
So, several mounting options were proposed that correspond to the topic of how to install a surface sink. By the way, it should be noted that this type of sink can be installed without a pedestal. To do this, you can assemble a frame from wooden slats or a metal profile, which is used in the process of installing drywall. This frame must be attached to the wall with metal dowels, and the sink itself must already be laid on it. This option is well suited for the summer kitchen in the country.
And one more piece of advice. Before installing the sink itself, you need to assemble it completely. That is, install and secure the mixer or faucet with hoses leading to it. You can install a strainer on the drain hole. There is little space inside the cabinet, so it will be difficult to carry out these operations there.