Frame assembly
Installation of the frame for a false ceiling is carried out in two ways and depends on whether the open or closed type of construction is used in each case.
Option number 1. Open design.
It is the simplest option and is easily done by hand. In this situation, there are two installation options:
- embedding;
- making holes;
- hanging the lamp under the ceiling surface. The weight of the luminaire, which is suspended, should not exceed 10 kg.
This is due to the fact that the frame and plasterboard sheathing will not be able to withstand more weight.
At the same time, the frame itself is mounted using standard technology, which we will consider using the example of assembling a ceiling device with a niche.
Option number 2. Hidden design option.
This method is somewhat difficult to do by hand. But if you follow the installation steps, even such a design will be quite feasible.
Here the installation of the frame is carried out according to the following scheme:
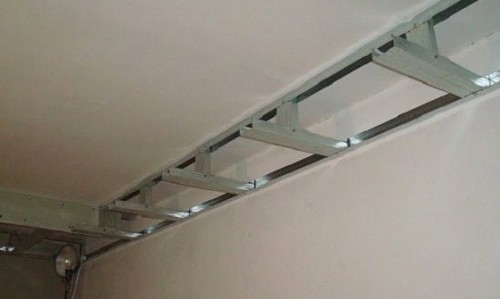
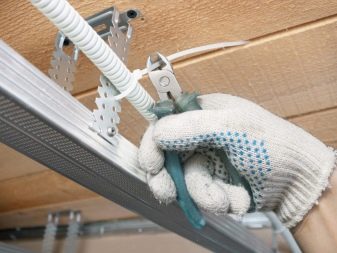
Setting the main profile
- first of all, you need to retreat 10 cm from the ceiling;
- then, using a level (laser or water), we draw a horizontal line around the entire perimeter of the room;
- along the marking line, we attach the starting profile to the wall using dowels. It is necessary to make a fastening step of 50 cm;
- then you need to insert the main ceiling into the starting profile. Its fastening is carried out with the help of spacers (suspensions);
- for this profile, you need to make a fastening step of 40 cm;
The result is the first base level, which at this stage should be sheathed with drywall sheets. According to this scheme, we build an open type of structure. But you must not forget to do one thing - to conduct the wiring of the central lighting. Usually in its role is a chandelier or small spotlights.
Now you can start building a niche for lighting:
- draw a niche markup at the first level;
- retreat 4-6 cm and fix the starting profile. This distance is equal to the width of the eaves;
- we cut the profile into the necessary pieces with scissors for metal;
- after that, insert the main one into the starting profile. It should be equal in length to the height of the second level. He plays the role of a suspension;
- from the bottom side, one more starting profile should be fixed on suspensions;
- then, using the ceiling main profiles, we connect the entire structure.
 Compiled niche
Now the niche is ready and you can start covering it with plasterboard sheets.
Correct connection and installation
In order for the backlight to turn out without flaws and shortcomings, some rules should be taken into account.
Rules:
The tape is sold in five meter spools, and if necessary, it is cut and soldered to the desired size;
The tape is carefully cut exclusively along the markup;
Pieces of tape are soldered according to the scheme;
In order to fix the LED strip, use double-sided tape or self-adhesive tape. Before gluing, the surfaces are degreased, the protective layer is removed, and the tape itself is pressed against the required area. Mounting the tape on the plinth is different from mounting the tape on the wall
Both options are used by the consumer
Mounting the tape on the baseboard is different from mounting the tape on the wall. Both options are used by the consumer.
It happens that the power supply is sold without a power cord. Then you need to buy a cord.
How to solder correctly:
- Plus with a minus when the tape is the same color;
- If the tape is colored (RGB), then V +, R, G and B should be soldered.
After the tape is obtained in the desired size, you need to connect the transformer and controller.
At all stages of work, the main principle is accuracy, caution and thoroughness. Bending radius - not less than 2 cm
Tracks must not be bent more than 90°.
Luminaire selection
The modern lighting market has a fairly large variety of lighting fixtures that can become a backlight for a suspended plasterboard structure.
The following lighting devices can be inserted into this kind of suspension device:
- Spotlights;
- LED Strip Light;
- duralight;
- fluorescent lamps;
- light projectors;
- fluorescent lamps;
- standard chandeliers;
- combined lighting.
 Range
Range
The choice of a lighting device that will act as a backlight on the ceiling should be done according to the following parameters:
- dimensions;
- type of ceiling structure (open or closed);
- the presence of insulation and sound insulation;
- desired level of illumination;
- the cost of the device;
- functional or decorative role of the lamp;
- installation option (do it yourself or a master).
Installation method
It is necessary to rely on these parameters, because each type of lighting device is provided for specific purposes and has different technical characteristics. You can make the right choice only if you evaluate everything correctly. In the above list, you can include a number of other parameters that are relevant in a particular situation.
For example, when using an LED strip, you will need to purchase special equipment: a remote control, a controller, etc.
Installing neon lights
frame for lighting
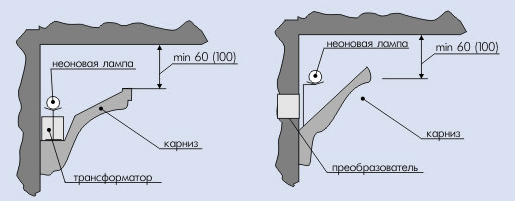
Neon ceiling lamps are mounted, as a rule, either in a special drywall box or in a ceiling plinth - a fillet. In this case, the first option is most often used if the backlight is assembled at the repair stage, i.e. when the walls and the ceiling itself are not finished.
Mounting the backlight in a polystyrene ceiling plinth is convenient because it can be done at almost any time without violating the integrity of the room decoration. Especially in cases where it is not possible to install a drywall cornice along the perimeter of the stretch ceiling.
Plasterboard cornice for neon lighting do this:
- We attach hangers for a metal profile to the ceiling (or to the first level of a suspended ceiling).
- We attach the main profile to the hangers from below, and on the wall along the perimeter of the entire room (where the backlight is planned to be installed) we fix the starting profile.
- We attach a strip of drywall to the profiles, cut out in such a way that the resulting cornice has dimensions of 100-150 mm.
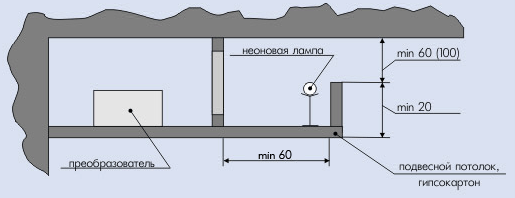
Installation of lighting in a niche
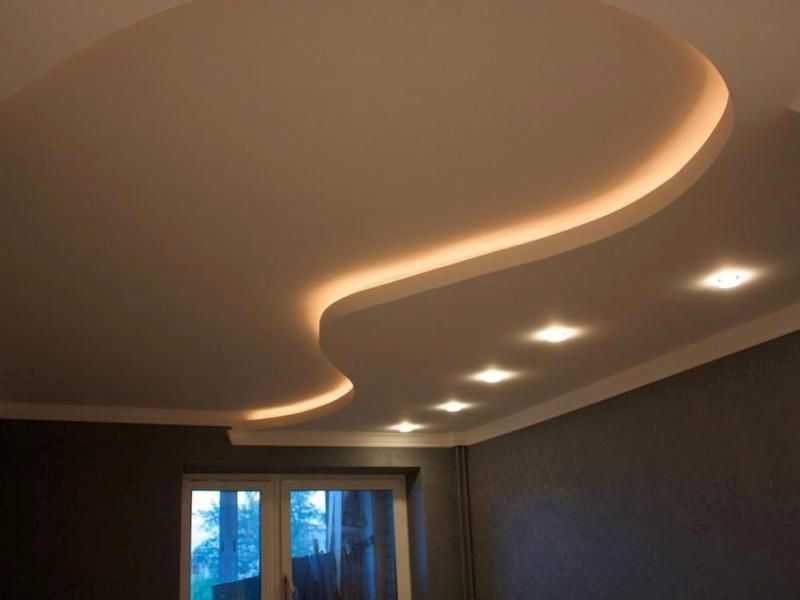
- To obtain a clear contour of neon lighting on the ceiling, we attach a vertical side to the flat part of the eaves. The optimal height of the side is from 20 mm (when laying the lamp directly on the cornice). The higher the edge, the clearer and sharper the contour illumination will be.
- If we want to get diffused light on the ceiling, then there is no need to make a ledge ledge.
Eaves mounting options
When mounting the backlight in the plinth-fillet, you need to choose sufficiently large models, since it is problematic to hide the transformer in a small plinth. However, if it is necessary to install a backlight in a small plinth, the transformer can be “drowned” in a niche in the wall.
Backlight connection
As we noted above, neon lamps work only under high voltage. Therefore, a step-up transformer is needed for neon lighting to work. As practice shows, it is enough to install one transformer for 5-7 meters of illumination.
The converter is installed in the middle of the illuminated area, so you need to take care of its placement in advance.
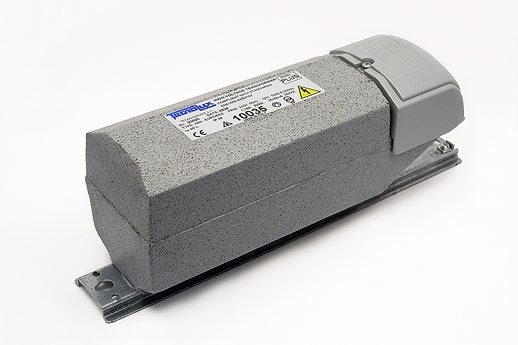
neon transformer
Due to the average power consumption, there is no need to power the neon lights with a powerful cable. As the calculations show. A copper cable 2×0.75 mm2 is enough for a double power reserve when connecting 45 meters of neon lighting with a diameter of 15 mm.
And yet, no matter how difficult neon lighting is to install, the final result is worth the money and effort spent. And all because the ceiling with neon illumination cannot be compared with other design options.
Video installation of LED strip
To clearly demonstrate the work of mounting the backlight, we suggest that you study a small video selection of training materials:
- How to connect an LED strip - important nuances that will help you properly mount the backlight circuit.
- How to make a drywall cornice for hidden lighting is one of the options for arranging a U-shaped box for LED strip.
As you can see, you can cope with the installation of LED backlighting with your own hands. Therefore, the main task is to choose the right material length, transformer and controller, taking into account the configuration of the kitchen ceiling and the expected decorative effect. But if you doubt your abilities or the correctness of the calculations made, it is better to entrust the purchase of components and the installation of the backlight to a qualified electrician.
Before we look at the main options and ideas for ceiling lighting, I would like to spend a little time on the requirements that apply to this issue. It should immediately be clarified that these requirements apply not only to the layout itself, but also to their design, as well as design features.
So, during electrical work, you must consider the following requirements:
- Light should be evenly distributed over the entire area.
- All luminaires (or each specific group) must have the same power, light spectrum and backlight intensity. Otherwise, there will be no harmony and the interior will deteriorate noticeably.
- Lamps must be economical, bright and at the same time durable. The leaders in this case are.
- If the ceiling lighting is hidden, the luminaire housings should be hidden in a special cornice.
- The design of ceiling lamps (or other products) should be combined with furniture and wall decoration.
- Light bulbs should not dazzle the eyes. To create a soft "flood" backlight, point the lamp up. To create a bright light, the lamp must look down.
- All wires must be hidden. When the track is hidden under the wall decoration. When laying the wire open, it is necessary to hide it in special cable channels (most often this option is used in the garage).
Practical Tips
Lighting in the interior plays an important role. Neon lighting is becoming more and more popular all over the world and is used to illuminate apartments, cottages, offices, shopping and entertainment centers. Creating an unusual neon lighting requires imagination and a sense of style.
Neon lighting has many advantages:
a soft, even glow is created without light spots and dimming, there is no heating, there is no noise. Neon lighting is pleasing to the eye. The growing popularity of neon ceilings in the interior of an apartment is due to a long service life (from 10 to 15 years), low energy consumption (66 W are required per 5 meters of neon pipes), as well as the beauty and unusualness that can only be achieved with such lighting. In terms of energy saving, neon occupies a leading position, only slightly yielding to the LED. Light can be of various shades and any brightness. Usually neon tubes are made to order in the desired length and thickness. They are easy to hide in a well-designed interior.
Neon tubes are rarely used as the main source of light, usually their purpose is to emphasize certain interior details, to create lines of any color and length. Neon tubes have an amazing ability to take on the most complex shapes. Usually they are placed in ceiling niches. Placement in an open niche gives the glow a diffuse character, in a closed one - emphasizing the contours. When mounting neon pipes, it is necessary to leave access to the lamps, since over the years of service it will be necessary to change the transformers several times. It should be noted that the help of professionals when working with neon tubes is necessary, since this process is quite complicated and requires knowledge of many of the nuances of neon lamps.
How is neon light arranged?
- Neon gas is pumped into a glass tube, then electricity is supplied to it, which makes the gas glow.
How is power supplied?
- Power is supplied by transformers, the power of which depends on the length of the tubes.
What is the lifespan of a neon tube?
- The durability of the tube depends on its quality and ranges from 10 to 15 years.
Can a broken tube be replaced?
- Replacement is possible, and is not very difficult. The only negative is that neon tubes are usually made to order, and if they fail, you will have to make a new one according to a template or sample.
Which switches should be used for neon tubes?
- Any switches are used, but without dimming. When installing and connecting lighting, it is better to turn to professionals in their field.
What kind of light to choose for residential lighting?
- The choice of color depends on the interior, but it is preferable to use soft diffused light for bedrooms, in the living room the lighting can be made brighter, but not harsh and pleasing to the eye.
What are the benefits of using neon lighting?
— Neon is very aesthetic, allows you to embody the most daring design decisions. Tubes can be of any shape and length. Large selection of shades. It heats up no more than 4o degrees, that is, approximately to the temperature of the human body. Smooth lighting without spots is possible only with neon.
What are the disadvantages of neon lighting?
- The disadvantages include the high fragility of pipes and their high cost. True, the result is worth it.
Design options
With the use of different lighting, you can highlight the necessary parts or objects in the room. Designers have different approaches to design and thanks to the play of light they make extraordinary interiors.
Very often, light is used when dividing a room into different zones, this is useful if you have a small apartment.
There are several main types of lighting applications in the design of an apartment in modern society:
The main or lighting in the apartment for the background. In this case, the light is scattered over the entire room, in most cases the source is a chandelier.
local light. In this way, you can focus on the necessary area of \u200b\u200bspace. Under such circumstances, design objects are used as a source.
Lighting for work. Used to illuminate the area where you work or study. For this option, special lamps with directional light are used.
Decor light. Soft light is used to illuminate paintings, design objects.
For indoor lighting, it makes sense to use these types of lighting devices:
Chandelier. Used for main lighting. Increasingly, this type is abandoned.
Replacing the chandelier are spotlights. They are adjustable and can light up against the background or act as the main lighting.
LED light bulbs. Used in stretch ceilings. Plays the role of illumination.
So, other lamps and elements can be used as lighting devices.
Indoors, you can use one light source or competently combine several types. It all depends on the purpose of the space.
Peculiarities
To date, a wide range of materials for ceiling finishing works is presented. Drywall with built-in lighting fixtures is one of the most popular and relatively budgetary ways to give the ceiling a sophisticated look.When using a drywall construction, you can afford to experiment with different lighting options, for example, adjust the number of fixtures, their configuration, use only those devices that suit your preferences and taste.
The use of a suspended ceiling has several advantages:
- drywall construction will mask all the bumps and defects in your ceiling;
- before installation of a stretch ceiling it is not required to carry out preparatory work;
- under the plasterboard construction it is possible to hide thermal insulation, electrical and sound wiring, exhaust compartment;
- a large space for design ideas, for example, you can build a multi-level ceiling.
Like the positive aspects, any idea has its drawbacks:
- the use of a false ceiling is not recommended for low rooms, its height will be reduced by at least ten centimeters;
- installation of a false ceiling is quite simple and fast, you do not need to resort to the services of a working team, but a specialist must deal with electricity and lighting. Often an incorrect wiring connection provokes a short circuit.
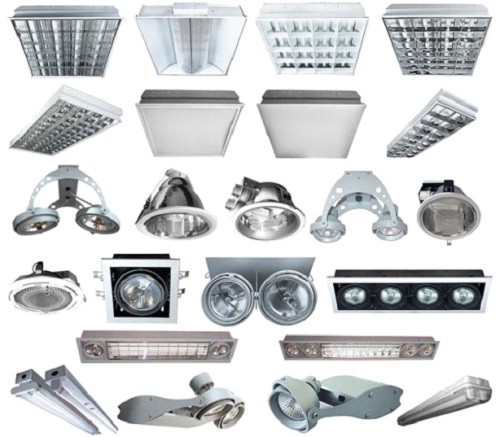
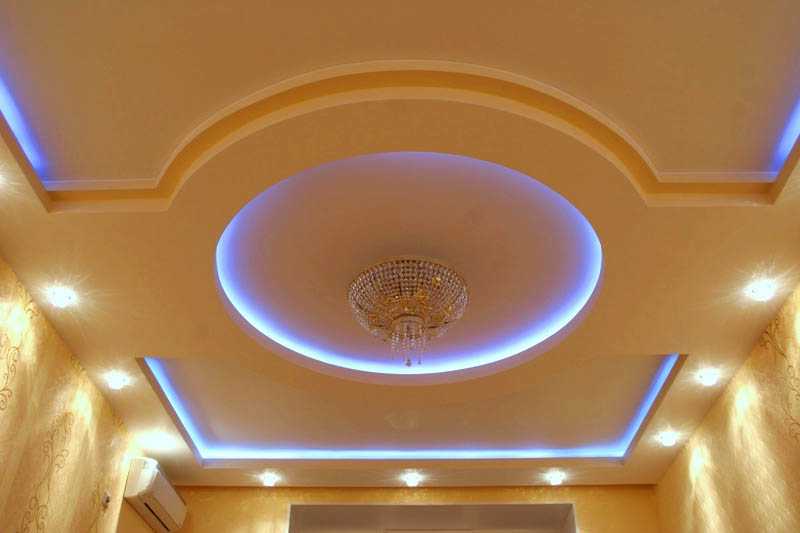
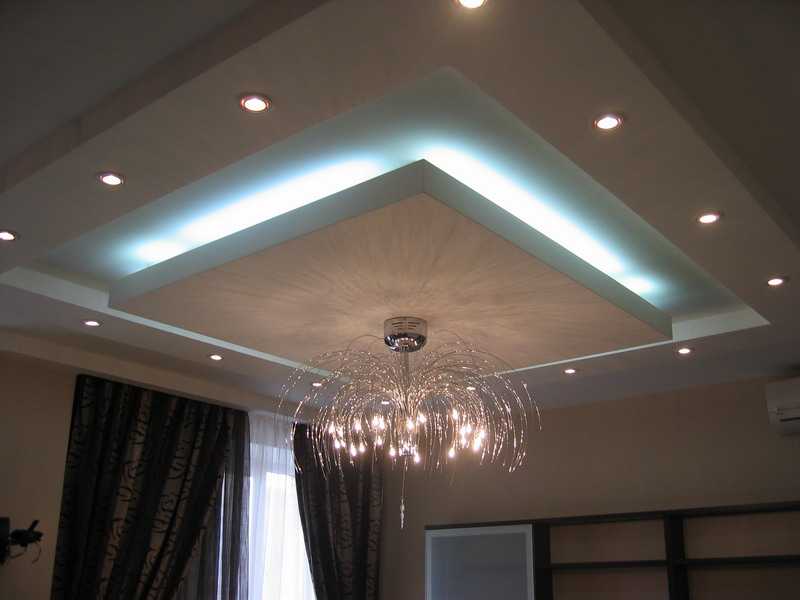
Types of recessed lighting for suspended ceilings
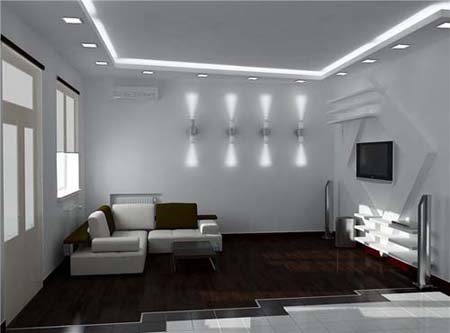
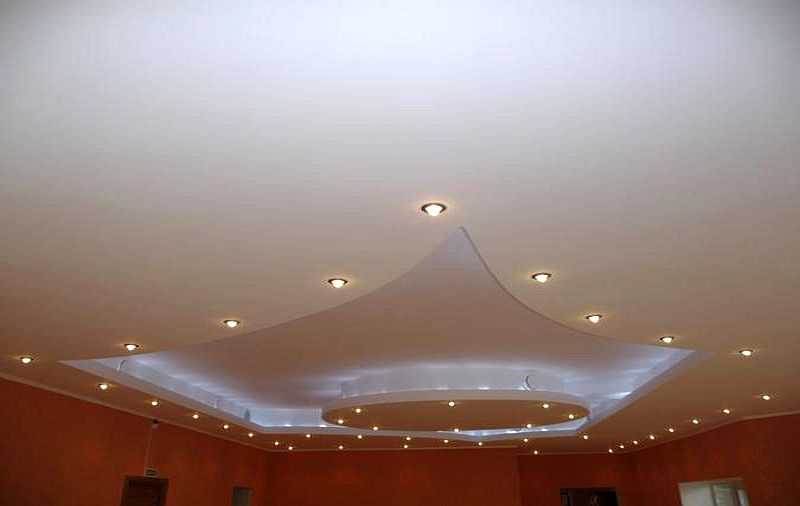
A false ceiling with built-in lighting fixtures is a luxurious, pleasant and elegant option in order to update the interior. For ceiling suspended structures, all modern types of lamps are used.
- A lamp for a spotlight - suitable for illuminating the space at night and in order to separate or highlight functional areas. This is one of the most affordable lighting options.
- LED - has a long service life, gives the room diffused light (uniform, illuminating all objects in the room).
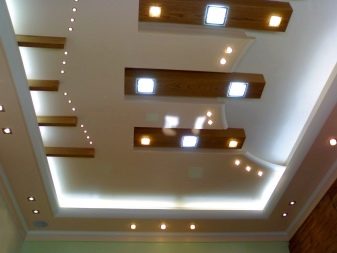
- Classic - these are ordinary chandeliers that do not always fit into the interior with a false ceiling.
- Fluorescent lamps - great for economical and long-term use. Such lamps are often installed in non-residential public premises. The only negative is that they are very sensitive to power surges in the network.
- Fiber optic - this type of lamp will create a spectacular backlight for your room. Its cost cannot be called budget, it is quite expensive.
How to choose and install LED strip
Manufacturers present us with such a variety of Led solutions that it is not surprising for a person who is far from electricians to get confused. But since the correct installation of the diode backlight and its operation depend on the purchase, we will try to sort out the most important technical nuances in order.
Varieties of LED strips
All systems with LEDs can be classified according to several parameters: mounting type, number of diodes, color, power
What exactly to pay attention to depends on the design idea that you want to implement with the help of lighting effects.
For example, for decorative lighting, the most important parameter is the color shade of the glow. And according to this characteristic, the tapes are divided into single-color and multi-color. The first, when turned on, emit light of only one tone. And not necessarily the traditional white, it can be red, green, yellow, purple or bright green color. Of the non-standard options, it is worth noting tapes with ultraviolet or infrared glow.
Ceiling lighting with LED strips
LED lighting is gaining more and more popularity. The LED strip is a flat flexible base with LEDs connected to it, which, when connected, form an electrical circuit.
The market offers a wide range of LED strips with a variety of colors and lighting programs. According to the density of the tape diodes, there are 120, 60, 30 diodes per meter.Which one to choose depends on the desired backlight intensity. The brightest ones can be used as the main lighting. It should also be noted: the convenience of the LED strip is also that you can cut off any required size in a specially marked place on a flexible basis.
Installation of such lighting is as simple as possible. The electrical circuit consists of the LED strip itself, which is attached to a ceiling niche or ceiling cornice with the help of a sticky side. A controller is connected to it, which acts as a switch, and a power supply, which is connected to the mains in accordance with the polarity.
Lighting with LED strips is the most practical, economical and easy to install.
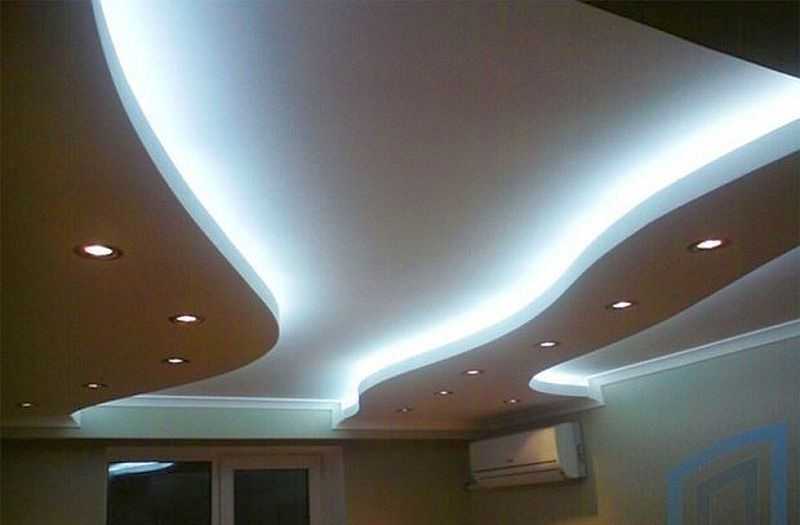
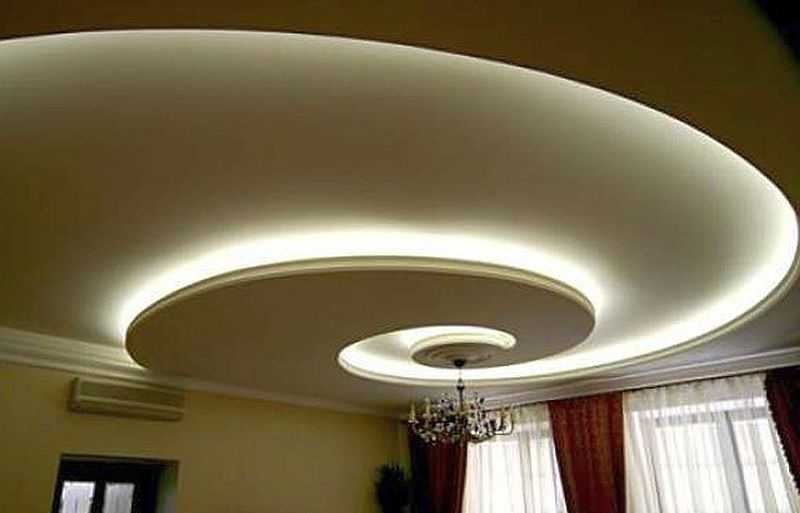
A perimeter illuminated ceiling is a very original solution that looks much more attractive than just a ceiling without illumination. This design solution is simple and very inexpensive. In addition, you can make such lighting yourself, with your own hands, without resorting to the help of a hired team, which, by the way, is quite expensive.
LEDs were adopted not by chance, since LED lighting is not just lamps, but a very thoughtful design solution, which, together with the main lighting, creates a harmonious light ensemble.
In our time of incessant crises, budget repairs have become fashionable, which, by the way, are even more effective than expensive ones, at incomparably lower costs.
Perhaps it is worth considering one of the most common methods, where the LED strip is placed in a drywall box.
Its advantages:
- Since the box is placed in the second level, it seems that the light comes from nowhere;
- The light does not hurt the eyes, and it evenly streams around the entire perimeter of the ceiling.
Installation of such a box, of course, requires some cost and effort in terms of installation. However, there are much simpler methods.
Installation of lighting fixtures
After the above steps, you can do the backlight itself. Consider the installation of lighting fixtures using the example of an LED strip, which is used quite often today.
Its installation involves the following steps:
- we cut the tape in places specially adapted for this;
- we connect the tape using specially designed LED connectors. Instead of these connectors, you can use a regular soldering iron, but very carefully;
- choose a power supply with a 20-30% power reserve;
- we fix the tape along the rim of the niche. In this case, fastening to metal areas should be carried out only through insulating material.
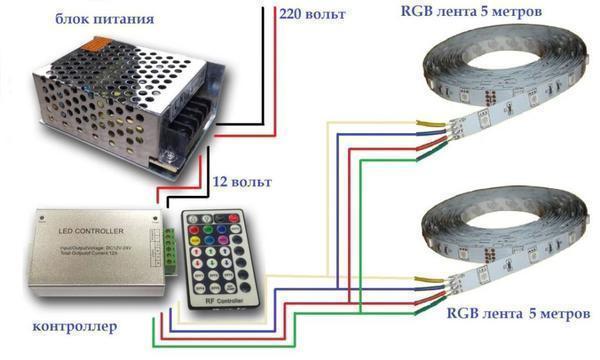
In order not to confuse anything, below is a diagram for connecting an LED strip.
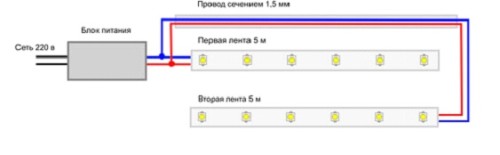 Wiring diagram
The main thing here is not to confuse the input (220 V) for the outlet and the output (12 V).
If there is a controller, the red wire will mean plus, and the black or blue wire will mean minus. They cannot be interchanged. If you need to connect several tapes, use power supplies that should be connected in parallel to each other
So you will avoid a drop in brightness on the second tape.
After connecting, check the operation of the LEDs on the tape, as well as the correct connection, in order to avoid overloading and failure of the devices. A suspended ceiling made of plasterboard sheets with backlight, subject to the sequence, is easily done by hand.
Particular attention should be paid to connecting the backlight to avoid a fire hazard. In addition, when doing work with your own hands, keep safety measures when interacting with electrical appliances.
One of the most effective design techniques is the use of lighting effects. Often it is the light that gives zest to the interior. Backlit plasterboard ceiling is one of the most common options. It is good because, if desired, you can make it yourself, with your own hands.
Additional Options
- Halogen lamps. The base of a halogen lamp is filled with iodine and bromine vapors. This distinguishes them from conventional incandescent lamps, in which the spiral is located in a vacuum. The main disadvantage of such lamps is their strong heating up to 250 ° C. Therefore, the scope of halogens is significantly reduced.
- Luminescent. Such a lamp consists of a bulb and a base into which two electrodes are soldered.
When an electric current is applied, mercury vapor is converted into ultraviolet radiation, which subsequently turns into visible light.
The main disadvantage of such lamps when installing ceiling lighting is the depth of the lamp socket for the lamp base. Therefore, it becomes necessary to lower the ceiling by 8-10 cm, which is unacceptable in rooms with low ceilings.
Fluorescent lamps are economical, and heat dissipation is low. This allows you to mount such lamps in a PVC stretch ceiling.
LED lamp. The most economical and having the maximum efficiency is the LED lamp. A light emitting diode is a semiconductor that glows when an electric current passes through it. The more LEDs built into the bulb, the brighter the light.
The disadvantages of such lamps can only be attributed to their high cost. But it's worth it. All the advantages that an LED lamp has allow you to close your eyes to this only minus.
It is easy to install a spotlight on any suspended or stretch ceiling. To do this, you must first prepare a hole in size. In drywall ceilings, this can be done using a grinder with a nozzle that is suitable in diameter. In tension, a rather sharp clerical knife is used, while the lamp is installed on a special stand, which is attached to the main ceiling. Mounting recessed lights to the ceiling is due to the tendrils on the spring.
Spotlights are connected to the network using a copper wire with a cross section of 2:75 mm2. At the installation sites of the luminaire, sockets are connected corresponding to the type of selected bulbs.
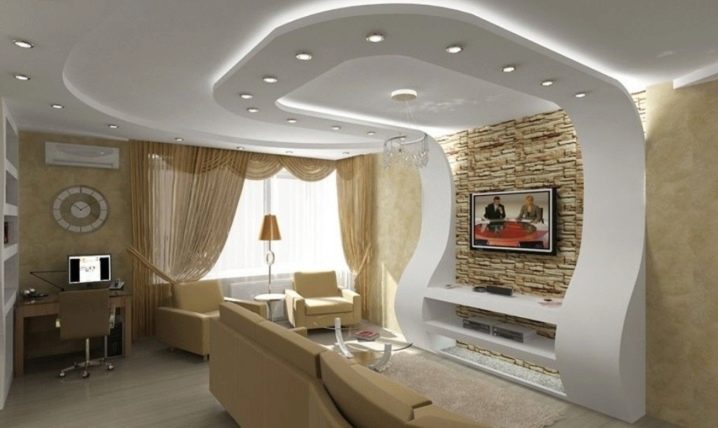
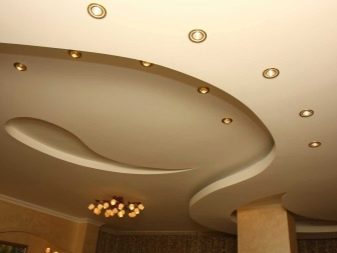
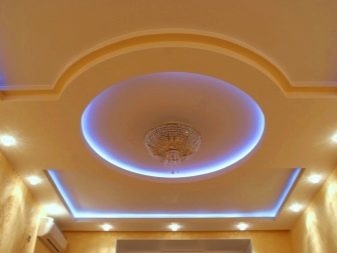
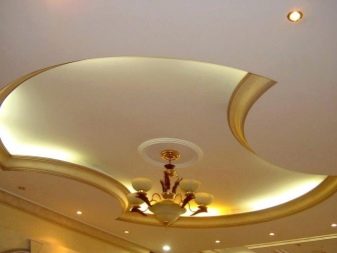
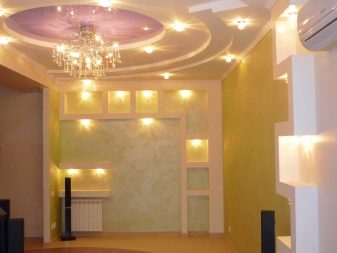
How can I decorate a plasterboard ceiling with backlight photo
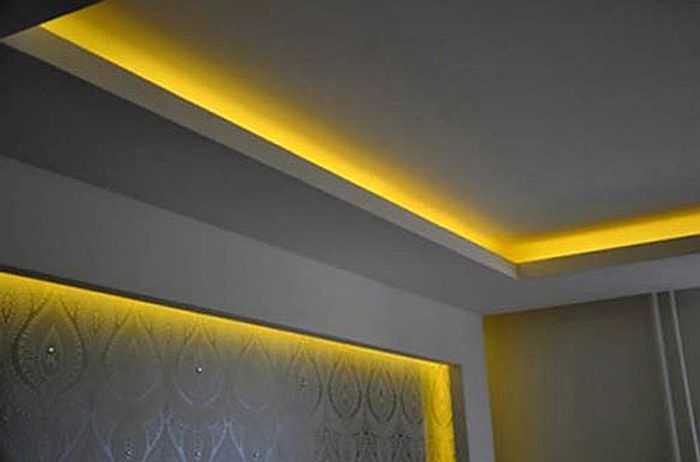

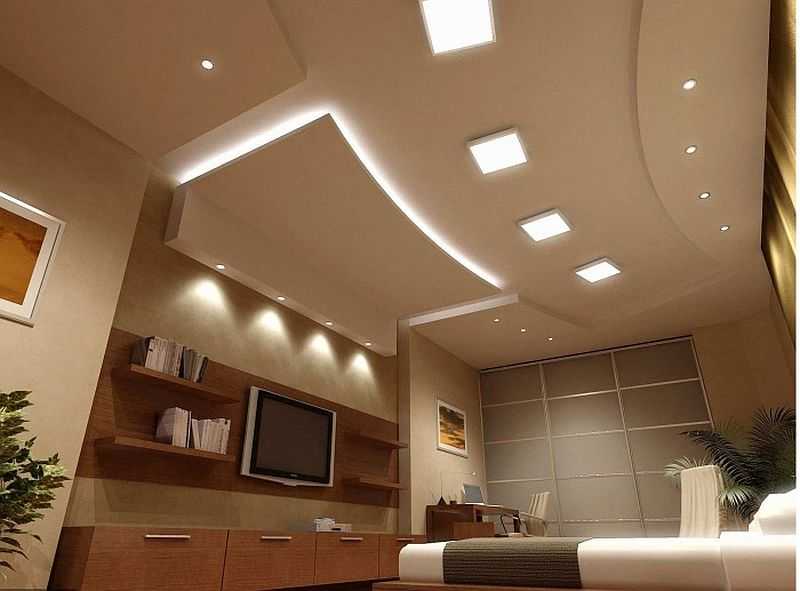
LED plasterboard ceiling lighting is just a spectacular design technique. Lighting must be taken care of separately


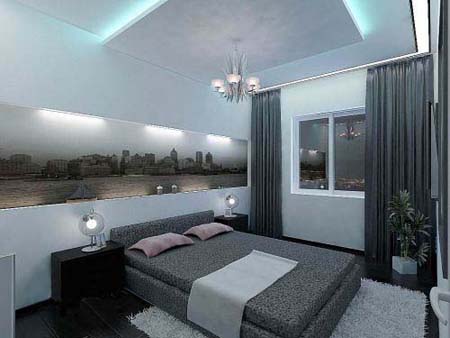
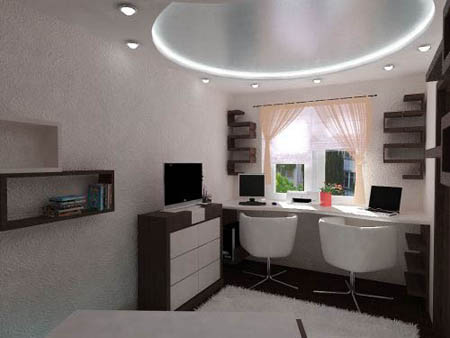
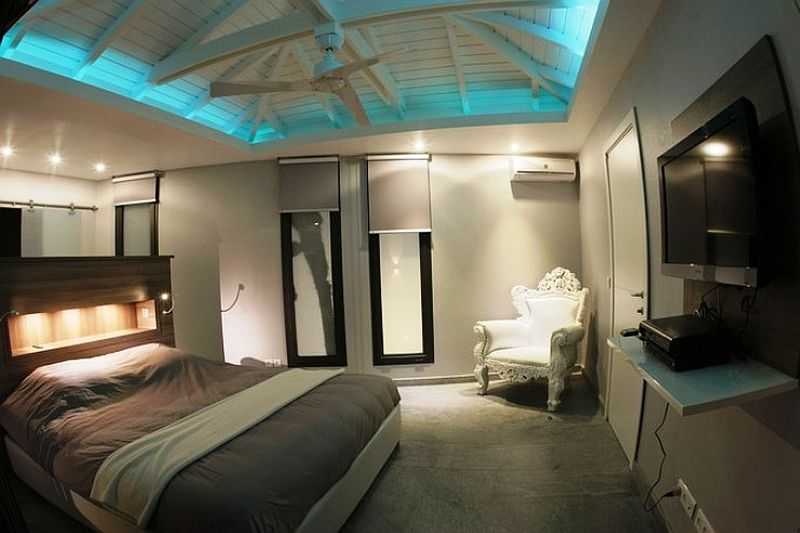
Bedroom ceiling lighting
Drywall is a very versatile material. In good and skillful hands, it can become a work of art. Creativity is the main thing that guides any builder when choosing this material. Basically, you don't need more. Drywall is also a good alternative to any stretch ceiling. By type of implementation, this is a classic single-level or multi-layer construction. A suspended ceiling with lighting is quite a dream come true. The properties of the material allow you to fantasize with a variety of shapes.
How to connect RGB LED strip video
And in conclusion, the following should be noted. The originality of the ceiling with LED lighting is not worth mentioning, since this is already quite obvious. In addition, one of the advantages of such a ceiling is the fact that the installation of the backlight is not something prohibitively complicated, requiring the intervention of narrow specialists with special training - you can do it yourself. I am also pleased with the fact that such lighting can be arranged both on a plasterboard ceiling and on a stretch ceiling. In a word, having studied articles on this subject, looking Photo and video materials, as it should, after considering how it all will look, purchase the necessary materials, and, rolling up your sleeves, get down to business.
Making a false ceiling yourself is not so difficult
In order to get a high-quality and beautiful work, at least it should be a two-level ceiling. The two-layer technique is equipped with most of the advantages:
Simplicity.It is easier to screw one sheet to another than to screw it to the ceiling.
Style and fantasy. A single-level ceiling will not give as many ideas for implementation as a multi-level one.
Easier to cut curves.
Required material
Repair is always a painstaking and, moreover, costly business. It is impossible not to spend a penny and still get a beautiful, modern design. Even the simplest designs require costs. Approximate list of required material:
- Plasterboard sheet - 1 sheet is required per 1 m2.
- ceiling profile.
- Guide profile (PPN).
- Connector for profiles: single-level, if necessary, two-level.
- Suspension straight.
- Screw for fixing a direct suspension.
- Spring suspension.
- Rod with loop for spring suspension.
- Dowels. If the ceiling is made of reinforced concrete, then anchors will be required.
- Profile extension.
- Drywall screw.
- Screw for metal.
- The dowel is plastic.
- Putty.
- Ribbon.
- Primer.