Replacing cast iron sewer pipes time to dismantle
First stage. Using a pipe cutter, a vertical pipe is cut; if such a tool is not available, you can use a grinder. The cuts are made at a slight slope with respect to each other and at a distance of 10-15 cm. The cuts should converge closer to the wall, but the pipe itself should remain ¾ undercut. This is necessary so that the upper part of the riser does not bend. Then a wedge is hammered on both sides, after which it is necessary to break out the neatly cut piece as possible. Be careful not to let anything go down the drain.

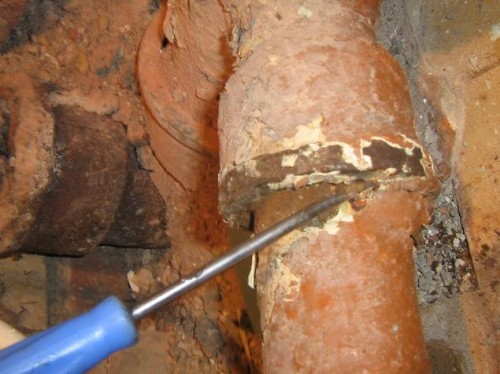
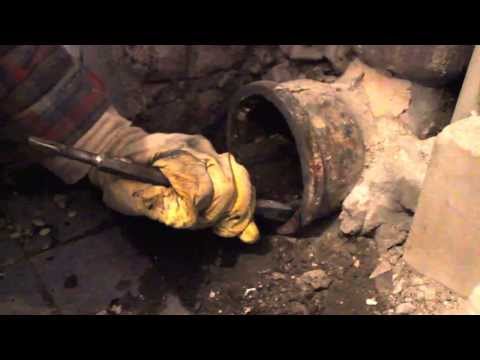
Cutting the pipe with a pipe cutter
Replacing cast iron sewer pipes with plastic ones is the second stage. At a predetermined height, the top edge of the pipe is cut off. To make it easier to connect the plastic to the rest of the cast iron, a piece of pipe is left. Its height must be equal to the size of the connecting element. It is recommended to mark the cut line before cutting so that the edge is even. After sawing the pipe, a blow must be made towards the wall, which will cause cracking.
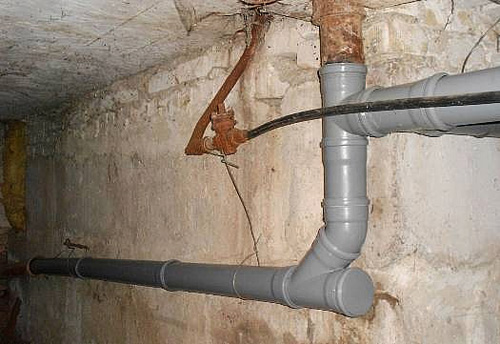
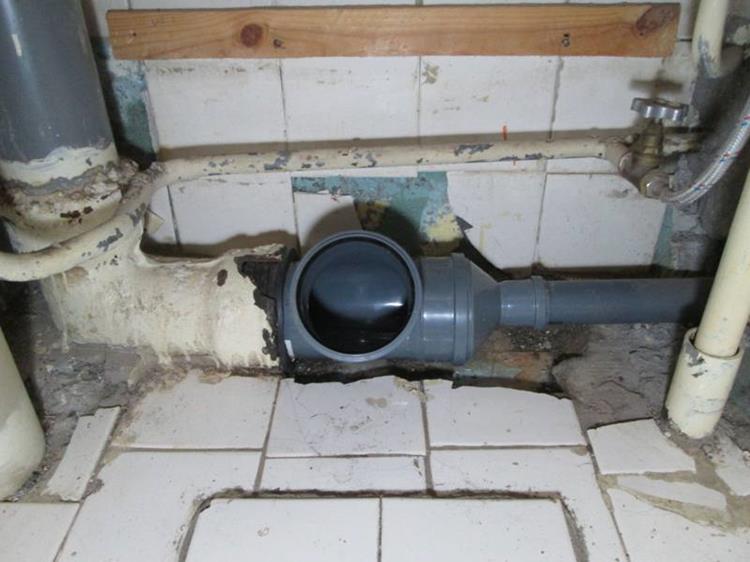
This is how a plastic pipe is connected to a cast iron pipe.
The third stage of dismantling is to gently rock the bottom of the remaining pipe, it is very important not to damage the bottom socket. If it lends itself to pitching, then you can proceed to extract such components as couplings, revisions, compensation pipes
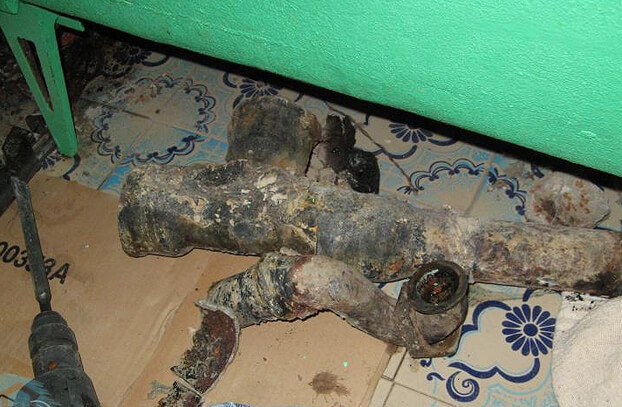
Removing the cross when the joint is sealed with gray
The connecting part itself is not cut off, but its extension with a diameter of 100 mm must be removed. Now you can work with a blowtorch in a pipe, providing the necessary heating of the structure. On top of the product, it is required to install an asbestos or metal shield to adjust the draft in the riser.
In the case when there are holes at the bottom near the socket, for example, obtained during the installation of water pipes, through them hot sulfur can penetrate into the plumbing unit of the neighbor from below. To prevent this from happening, the holes must be covered with plaster or cement composition. Mineral wool can be used to eliminate small crevices. The riser itself is sealed with a lump of fire-resistant materials to prevent the ingress of molten sulfur.
Warming up is carried out evenly, only the angle of inclination and the direction of fire movement change. This process must be controlled, otherwise the bell may split, as evidenced by a powerful bang. However, this rarely happens. Usually pipes made of low quality cast iron burst.
One way or another, if the clearance of the groove allows, it is recommended to clean out as much sulfur as possible before starting work, using a drill with an elongated drill or a hammer drill, but without a victorious tip. It must be borne in mind that heated liquid sulfur can flow in or splash out. However, when cooled, it quickly takes on a solid state. Frozen pieces are best set aside at some distance from the flame of the burner.
It is not required to use a gas mask or special masks before the sulfur begins to burn. However, do not forget that from a strong fire, a liquid substance can boil and begin to splash out. To protect your face and eyes, it is recommended to wear special goggles when working with heating elements.
Periodically, you need to check the mobility of the cross, shaking or hitting with a hammer from different sides. As soon as you notice that play appears, you must stop heating and proceed to remove the part using two adjustable wrenches. It is required to gently swing the element in different directions, then lift it up.
You need to be extremely careful, because the edges of the cross are quite fragile and can crumble when captured with keys.
If drops of burning sulfur remain on the surface of the connecting part of the pipeline, it can be lowered into a metal bucket filled with cold liquid. Next, you need to clean the remains of sulfur and soot inside the bell using an old chisel or a sharp penknife. Only after the funnel-shaped expansion has completely cooled down, you can proceed with the installation of a plastic riser.
When to Replace Water Pipes
After a certain period, all property owners have to replace the water supply and sewerage. Over the years, plaque forms inside the cast-iron pipes, which not only significantly impairs the patency of the system, but also has an unpleasant odor. Simple cleaning will be simply impossible to do. In addition, cast iron itself is a brittle metal, so cracks can form if the system is used improperly. Replacing sewerage in Moscow and other regions with a plastic one is a rather expensive service, while the process takes place in the same sequence. The only thing that can differ is the prices of plumbing services and the quality of the work done. If any problems arise in the operation of the old system, it is better to immediately turn to professionals and replace long-worn water pipes. At the same time, the prices for replacing sewer pipes in an apartment can vary dramatically.
chasing
This method has been used for a long time. It is used in the installation of cast iron pipeline. In this case, rubber seals are not used. The joints of the communication sections are sealed with tow (linen winding). For hardening, cement mortar is used. This method is used when the leakage between the walls of cast-iron and plastic pipes is 3-5 mm. Installation instructions for communications using the caulking method:
- Plumbing paste is applied to the plastic pipe, tow is wound on top. The depth of caulking is 2/3 of the length of the bell.
- The product is inserted into the cast-iron pipeline until it stops.
- Tamp the tow using a narrow spatula, a screwdriver.
- The remaining 1/3 of the socket is filled with a polymer cement mortar. At home, it is prepared from cement, water and PVA glue.
The advantage of this method is a high degree of reliability. If the rubber adapter has been in operation for 8-10 years, then thanks to the caulking method, the pipeline joint will last much longer. He also has disadvantages. So, they note the need to wait 1-2 days until the cement mortar hardens. During this period, the pipeline cannot be used. This will lead to deformation of the seam joint, which in the future will cause the destruction of the polymer cement layer, and the appearance of a leak.
How to remove the bottom parts of the old pipe when it is fixed with concrete in the floor and the joint is not treated with sulfur
The lower sections of the risers, as a rule, are made of component parts. They may include a coupling, an expansion pipe and more. The first thing to do is to check all the joints for strength. For what, shake the pipe in the upper part, only very carefully so as not to harm the lower socket
Luckily, if it loosens a little, carefully remove all the swinging parts. When the cross is even slightly wobbly at the joint, remove it using a nail puller.
In the case when the cross is firmly fixed, you will first need to clean the joint deeper. If its clearance allows, then you can use a puncher with a narrow drill. Don't use a victorious drill. The solution filling the joint crumbles around the perimeter and is removed with a chisel.
It is bad when there is practically no seam, and the cross is fixed firmly. Here you can try to clean the seam with a metal file. But, if these manipulations do not help, and you confidently want to replace the cross, then you will have to cut it 2-3 centimeters higher than the socket.The riser hole must be covered with a rag and fixed with a rope, this is done so that the cast iron scraps do not get into it. Then, using a grinder without protection, carefully cut the rest of the pipe from the socket. At the same time, do not spoil the socket itself remaining in the ceiling. Use a special wedge to remove the remaining pipe fragments from the socket.
What tools and materials will be required
Replacing a cast iron sewer begins with the fact that you decide which pipes you are replacing. The most practical and affordable material is plastic. It not only looks good, but is a completely reliable alternative to cast iron products. The material has the advantages of low flow resistance and therefore little risk of clogging. The light weight of the elements is also noted, which facilitates the installation process.
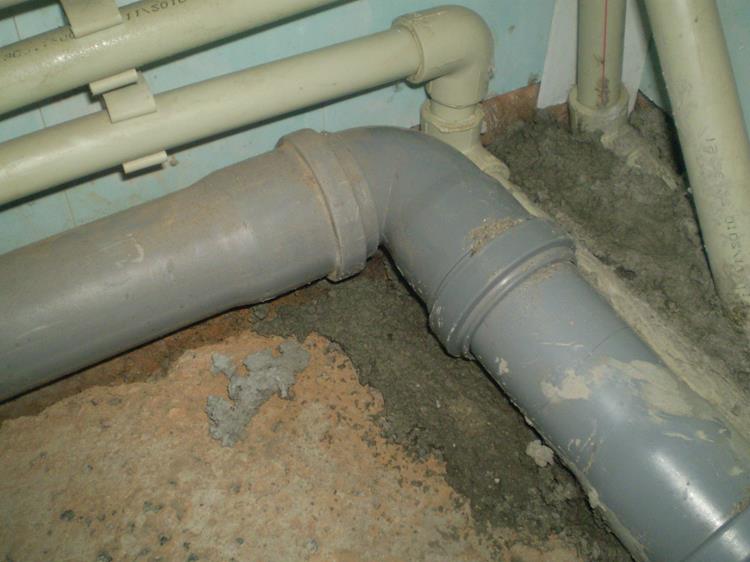
Plastic pipes for sewerage replacement
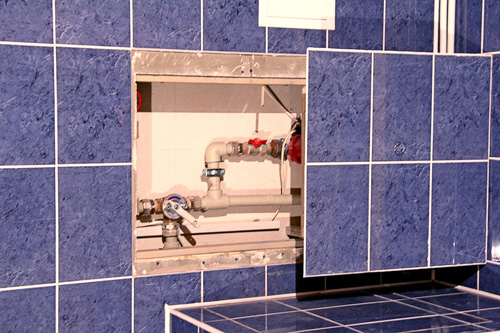
This is what the hatch looks like
Required tool:
-
- the most important is Bulgarian;
- gas-burner;
- hammer and chisel;
- level and tape measure;
- brand, plumb line, goggles, respirator.
Do not forget about sealants, cement mortar and the presence of liquid soap at hand.
Dismantling
Work will start from the stand. The tube is sawn at a distance of about 0.6 meters from the floor and 0.1 meters from the ceiling. The cut is not made continuous, but divided into two, with a narrow jumper. Later, it is broken with a hammer, and the cut pipe is removed. It is very difficult to complete this task alone. It is necessary that one worker breaks the jumper, and the other holds the pipe
These manipulations are performed carefully. Otherwise, you can harm the section of the riser hidden in the ceiling.
This is not a problem when the structure is replaced along the entire line. Dismantling the riser is the most time-consuming part of the job. All other sewage components are removed much easier and faster.
Pipeline selection and required tools
In old houses, all pipes were installed from cast iron, including sewer pipes. Of course, this is a very durable and reliable material, but it also has its own shelf life. Therefore, sooner or later, the time comes when it needs to be replaced.
Modern risers are made of even more durable material, which is also lighter and more aesthetically pleasing. Masters recommend switching to this more practical material. Steel or galvanized pipes will need to be replaced in ten to twenty years again. But if you make a replacement for polypropylene or polyvinyl chloride, then their operation is guaranteed for up to thirty to fifty years. And often it stretches over an even longer period.
And if, along with the replacement, you also take care of good ventilation, which can be purchased complete with pipes, then you can simply forget about sewer odors.
Since it is necessary to replace the cast-iron sewer with a plastic one in a multi-storey building, they first shut off the water. Therefore, the work is done as quickly as possible.
Also, neighbors from above are warned not to use the toilet and water, otherwise everything will be sent to your apartment, and the neighbors below will be flooded.
To dismantle the sewer riser, the following tools are required:
- Bulgarian;
- nail puller;
- a large screwdriver to remove small items from the system;
- chisel;
- perforator;
- hammer;
- grinder;
- film for covering the pipe hole;
- apron, gloves and goggles for personal protection.
Dismantling of the old sewer
Having decided on an independent replacement of the riser, it is best to negotiate with the neighbors so that, if necessary, they can provide access to the apartments. However, in most cases, the replacement takes place exclusively in your apartment between the floor and ceiling.
Step-by-step instructions for removing the riser are as follows:
- A distance of ten centimeters from the ceiling surface and eighty from the tee is calculated. Two cuts are made by a grinder. The depth should be half the diameter of the pipe.
- A chisel is applied to the upper notch and beaten with a hammer. Then repeat the same manipulation below. The blows must be applied with sufficient force to split the pipe so that the middle part is removed.
- The pipe from the ceiling is closed with a polyethylene film.
- When disassembling the lower part, consisting of a tee and other fittings, arm yourself with a nail puller or crowbar to loosen the fasteners. Then remove the fitting. But, basically, this requires additional work with a perforator. With it, the cement on the fasteners is removed.
- Cement is chipped off with a chisel or screwdriver, and then the tee is removed. If it didn’t work out, the fitting is cut off with a grinder, retreating up to three centimeters from the socket.
- In the remaining places, all contaminants are removed and the cast iron is cleaned with a grinder.
Pipe installation
After removing the old pipeline, you must immediately install a new one so as not to cause unnecessary inconvenience to neighbors. But they begin the process, like the previous one, by checking all the tools necessary for this.
The following equipment is required for installation:
- pipes with a diameter of one hundred and ten centimeters;
- outlet tee of the same material as the riser;
- rubber sealing cuffs to fix the fasteners between protruding cast iron stumps and a plastic pipe;
- branch pipe for transition from cast iron to plastic and vice versa;
- pipe fittings;
- soap used to facilitate entry into the mounts, that is, a kind of lubricant;
- vertical building level.
Installation takes place in the reverse order compared to dismantling:
- Rubber cuffs are inserted into the pipe cut.
- Attach the adapter from above, and the tee from below. All parts must be fastened as tightly as possible to ensure maximum tightness. With the free movement of the tee, the connection is sealed with silicone sealant or linen winding.
- The plastic riser is fixed with clamps. If the ceiling height is standard, then they usually manage with three pieces: for the top, bottom and middle. If it is high, then you need to purchase additional connections.
- The system is pre-assembled.
- A pipe must be lowered into the tee to connect plastic and cast iron.
- Each mount is lubricated with silicone sealant and waiting for it to solidify.
- Then turn on the water and check the pipe connections for leaks. If everything is in order, then this part of the work can be considered completed.
Advantages of plastic sewerage
Sewerage with a cast-iron pipe completely becomes unusable after 40-50 years of use. It is optimal to replace it with practical pipes made of polypropylene or PVC. These materials have enough advantages:
- light weight compared to metal;
- smooth inner surface (reduces the risk of blockages, simplifies the cleaning process);
- plastic is not afraid of corrosion;
- No special equipment is required for installation.
The only disadvantage of plastic is the high level of noise when draining water or wind noise (in a private house). A soundproof box made of soundproof materials will help to solve this problem.
Preparing to replace the cast-iron sewer with plastic
Do-it-yourself dismantling of a cast-iron sewer begins with the preparation of tools.
The work is done using:
- chisels;
- hammer with a nozzle (rubber or wooden);
- perforator;
- chisels;
- 2 adjustable wrenches, knives, screwdriver, crowbar, steel wedge for disassembling pipe parts;
- grinder, grinding disc and 3-4 pieces of 125 mm discs.
Before dismantling, it is determined how the cast-iron parts (in particular, crosses and tees) were connected to the shaped section, for which it is necessary to find the connection point - usually it is located higher than the level of the floor covering.If the floor is tiled or there is a screed, then you will need a perforator or chisel to search
You need to work with them carefully - you can not damage the socket remaining in the ceiling
The connection between tees, crosses and pipes can be made in three ways:
- filling with gray;
- polymer cement mixture;
- caulking with a solution. You can use cement-sand or cement.
Connection with a press fitting
In this case, a special adapter made of metal (steel) is used. On one side there is a thread for connecting to a cast-iron pipe, on the other, a socket for connecting a plastic pipeline. To work, you need an angle grinder, a thread cutter. Installation instructions:
- It is necessary to prepare a cast-iron pipe. Make a cut with a grinder. If a coupling is installed in this area, it is unscrewed. The threaded connection is already ready. Otherwise, the thread must be done independently, for which a thread cutter is used.
- A sealing tape is applied to the prepared cut. As an alternative, tow can be used.
- To strengthen the threaded connection, a sealant is applied from above.
- Install the press fitting. However, it must be screwed on the pipe manually. It is impossible to use a wrench in this case, because. fitting may burst.
- On the other hand, a plastic pipe with a crimp collar is connected.
In order for this section of the pipeline to be operated without interruption, it must be remembered that a fitting made of polyvinyl chloride cannot be installed on a metal base.
Pipe Replacement Materials
The number and diameter of plastic pipes, fasteners, parts for connection depends on the wiring diagram. If the products are simply put in place of the old ones, it is easy to count them. On a plastic riser, it is imperative to make an inspection hatch. To work, you will need some shaped elements to connect different diameters of products. These are tees, crosses, rubber cuffs, plastic adapters, seals. Of the tools you need:
- grinder with discs;
- nail puller;
- blowtorch (not always needed);
- hammer;
- roulette;
- respirator and goggles;
- chisel;
- marker;
- perforator;
- building level;
- plumb;
- ladder;
- pipe with a diameter of 110 mm.
The plastic product must be checked according to the marking applied to it. It should be for sewer work.
This is important, since sewage is highly corrosive. In addition to improvised tools, you will need a silicone sealant
It is useful when sealing the joints of the riser. Liquid soap and cement may be required.
Correct caulking of the fan tee. Dismantling of the cast-iron sewer. Transition from cast iron to plastic.
 Watch this video on YouTube
Noise isolation and causes
Of course, PVC and polypropylene pipes are much better than cast iron pipes. They last longer, have an aesthetic appearance and are much cheaper. However, they have one major drawback. This is noise. At first, even experienced specialists did not know how to deal with this. But today, as soon as pipes are installed, they begin to deal with noise and sound insulation. It's not hard at all to do this on your own. Therefore, do not be afraid! Having done such work, you will forget what the noise from the pipe is.
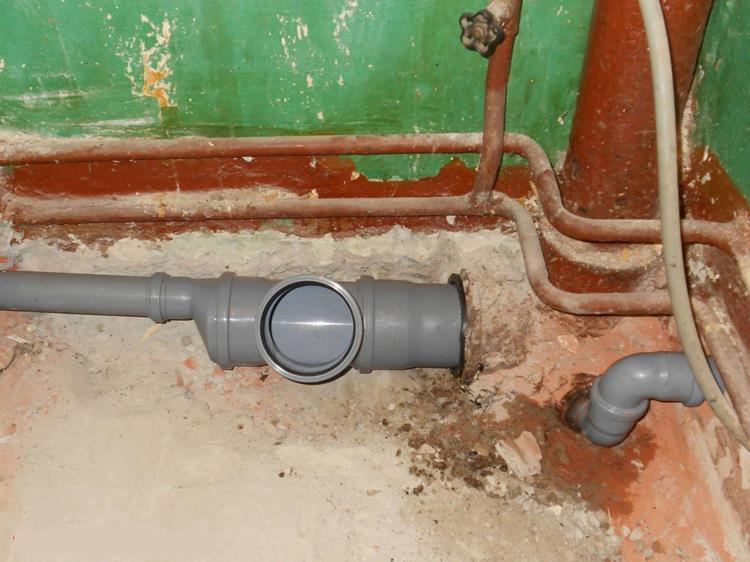 installation of a plastic pipe with a check valve and connection with a cast-iron riser pipe
One way to achieve the effect of soundproofing does not yet exist. Therefore, different ones are used, depending on the design, acoustic features and the presence of certain materials.
Why do cast iron pipes make no sound, while modern plastic pipes are so noisy? After conducting special studies, several reasons for extraneous sounds from the riser were revealed. Among them are:
- impact sounds occur when the contents hit the walls of the pipes, making noise;
- atmospheric phenomena occur when the wind howls, the sound of rain or even hail;
- resonance manifestations appear during the transmission of extraneous noise;
- vibration sounds are transmitted from the whole structure, the movement of underground transport, and so on.
The pipe itself, due to its shape, suggests the possibility of perception and transmission of different nature of sounds. But the material from which it is made is also important. Those cast-iron risers that still stand in old buildings do not make noise for this very reason. After all, it is not completely metal. It is an alloy that consists of different grains that differ in composition and properties. Due to this, sound absorption is ensured, as the grains rub against each other and reduce vibration.
 cutting an old cast iron pipe
In addition, such pipes are coated from the inside, which in itself plays the role of an excellent sound insulator, despite the fact that the movement of wastewater slows down.
Installation of soundproofing
The main task of soundproofing in an apartment is to minimize noise and, if possible, dampen vibration.
The ideal option is to purchase special noise-absorbing pipes. Some companies manufacture and install such risers. They include plastic with the addition of mineral powder. This provides a material having properties similar to cast iron. However, these pipes are expensive and may not be affordable for many. In addition, their service life, as a rule, does not exceed twenty years.
Therefore, plastic pipes are mainly used for replacement, followed by insulation from noise and sound.
They are isolated from the walls with damper clamps, and from the ceilings - with polyurethane foam plates.
In order to eliminate unpleasant gurgling in pipes, polyurethane foam or polystyrene is used. Both the riser and the wiring are wrapped around so that sound is not transmitted.
Replacing a sewer riser is a difficult job, but even a beginner can handle it. However, if you are not confident in your abilities or the pipes in the house are very rusty, then it is better to resort to the help of specialists and entrust the work to them, because otherwise you risk flooding both your apartment and your neighbors from below.