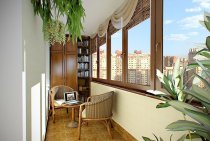
The loggia is a place that can be converted into an additional room. A cozy study or a winter garden will perfectly fit here. To turn this area into a residential area, it is necessary to carry out work on its insulation. Given the fact that about a quarter of the heat loss falls on the floor, you need to correctly approach the issue of how to insulate the floor on the loggia.

Preparing the floor for insulation
The insulated loggia requires preparatory work, which is a very important step. High-quality surface preparation will help extend the life of the coating, as well as reduce the complexity of the work being done. You can prepare the floor for insulation in several stages:
- If there is a tile or other floor covering, it is necessary to dismantle it. In this case, it is important to remove the adhesive or other binder without residue. At this stage, the use of a perforator is not ruled out. But care must be taken during operation so as not to damage the overlap.
- At the next stage, the base is cleaned of dust and debris.
- Existing irregularities are covered with a cement mixture. You can fill the base with a cement screed.
- The next step is waterproofing. With the help of mounting foam or bitumen-based sealant, places of possible access of air and moisture to the loggia are eliminated. Particular attention is paid to the corners. Then you need to apply a layer of coating waterproofing to the surface, lay roofing material or a dense film.

Important! It is highly desirable to start work on the insulation of the loggia after it has been glazed.
Options for floor insulation on the loggia
The insulated floor on the loggia allows you to make the most of the extra space. After the preparatory work has been carried out, the question certainly arises as to what is the best way to insulate the floor on the loggia, which base is more suitable for laminate flooring, which one for tiles or parquet. You can choose one of the following options as your answer:
- The use of foam or foam.
- Warming with mineral wool.
- Expanded clay insulation.

Each owner can choose his own version of insulation, depending on the working conditions.
Using Styrofoam or Styrofoam
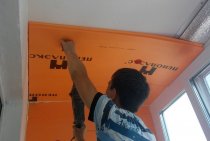
Both materials are representatives of expanded polystyrenes. But penoplex has a denser structure, therefore it is characterized by high rigidity and hardness. The following photo shows their external differences.

Insulation of the floor on the loggia with polystyrene foam is possible in two ways.
Bonding on prepared substrate
This option is used for insulation under the screed.
- Styrofoam or foam slabs are glued butt-to-butt using tile adhesive or a special foam adhesive, which is applied evenly to the surface of the slabs using a notched trowel.
- The glued material is left to dry for two days.
- Then the joints of the foam plastic with the walls are filled with mounting foam.
- The finished base can be poured with a cement-sand screed. In the future, such floors are used as the basis for laminate, linoleum or tiles.

Laying insulation on the lags
As a log, you can use bars with a section of 50 × 50 or 50 × 70 mm, carefully treated with an antiseptic solution from decay.
- Laying of bars is carried out in accordance with the width of the insulation plate.
- It is necessary to leave a gap along the walls, since the tree is able to change its shape under the influence of temperature and humidity changes.
- Insulation can be glued to the mounting foam. The resulting cracks and joints are filled with mounting foam.
Instead of a waterproof film, you can use penofol with a foil layer, which will make thermal insulation even more effective.
- Boards or sheet material - plywood or OSB - are laid on the logs, which will become the basis for laminate or linoleum.
You can see more about floor insulation with penoplex in the video.
[smartcontrol_youtube_shortcode key="Do-it-yourself insulation of the loggia floor with polystyrene foam" cnt="2" col="2" shls="true"]Floor insulation on the loggia with mineral wool
Mineral wool is the most popular and inexpensive insulation, most often used to keep the heat in the room.
Mineral wool in the form of mats with a size of 1220 × 610 mm and a thickness of 50 to 100 mm (shown in the photo) is more convenient to use. It does not burn and perfectly retains air between the fibers. This allows the material to retain heat. A step-by-step guide will help you achieve a quality result.

- Marking the level of the future floor is being carried out. It is important that the finished floor does not exceed the floor level of the rooms adjacent to the loggia. For marking, use a water or laser level.
- Then a layer of waterproofing is laid. Roofing material is most often used for this. Waterproofing sheets should be laid with an overlap of 10-15 cm, the overlap on the walls should not be less than 5 cm.
- On top of the roofing material set lags or wooden frame. It is recommended to use only dry pine material. The bars are attached to the base with self-tapping screws. During the installation of the frame, it is necessary to maintain a distance from the wall to the bars of at least 5 cm so that the bars are not saturated with moisture. A wet frame can be deformed, which over time will lead to damage to the finish coating on the loggia.
- After completing the installation of the frame, you can start laying mineral wool. Insulation mats are laid in the gaps of the crate, making sure that the material fits snugly against the bars. If it is not possible to avoid the formation of gaps, then you can use mounting foam. It will glue the insulation to the frame, while maintaining the thermal insulation properties of the coating.
- Laying moisture-resistant plywood is the final stage. This material will serve as a subfloor for any topcoat, including laminate flooring.

Expanded clay insulation
You can also insulate the floor on the loggia with your own hands using expanded clay. The popularity of this material is due to its low cost and its absolute environmental friendliness. To insulate the floor in this way, it is necessary to form a crate of bars, which must first be dried and treated with an antiseptic.
- Before laying the battens, the surface is covered with roofing felt or polyethylene film for waterproofing.
- It is necessary to fill up expanded clay so that it does not protrude above the bars.
- A vapor barrier layer is necessarily made on top of the insulation, then a rough coating is laid. In this capacity, plywood or OSB board can be used, which will serve as an excellent base for laminate or tile.
In the photo you can see what the floor on the loggia looks like, insulated with expanded clay.

A detailed guide to floor insulation on a loggia with expanded clay can be viewed on the video.
[smartcontrol_youtube_shortcode key="Insulation of loggia floor with expanded clay" cnt="2" col="2" shls="true"]"Warm floor" on the loggia
To heat the insulated loggia, the system "warm floor».
- Before laying the system, the concrete floor is leveled with a cement screed and the base is prepared according to the previously described scheme in compliance with all stages.
- A heat insulator with a foil coating is laid, which will prevent heat loss through the base.
- After that, a heating electric cable is laid on a metal mounting tape. How the installed system looks like, you can see in the photo.

- A thermostat is installed, a cable and a temperature sensor are connected.
- The screed is poured, the thickness of which must be at least 4 cm, on which, after drying, the finish coat is laid.
Before choosing the type of underfloor heating, find out the maximum allowable load on the base plate of a balcony or loggia. If there is a possibility that it will not withstand the load, it is better to choose an infrared film floor that does not require a screed: it fits directly under the finish coat.
In order for a balcony or loggia to be used as an additional area and to give pleasure to the owners, you need to know how to properly insulate the floor on the loggia, what materials to use for thermal insulation of this room.