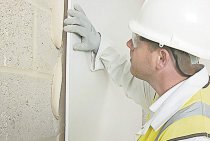
The final stage of the preparatory work before finishing the plasterboard walls with your own hands is their final alignment. Even those who figured out the installation, there are questions about further actions, the main of which is the puttying of drywall joints. Failure to comply with the norms when performing these works can lead to cracks at the joints of the sheets.

The need for seams
Puttying drywall joints is necessary to give strength to the weak points of the drywall construction, obtain a uniform surface and maintain its attractive appearance. Without such processing, the following problems may occur over time:
- A network of small cracks will appear on the finishing material, which will gradually expand.
- The service life of the finishing material will be significantly reduced.
- Due to the loss of the finish of its original appearance, additional repairs will have to be done.

Materials, tools
First of all, for the correct work, it is necessary to select all the necessary materials and tools:
- Spatula of medium width with a flexible blade for applying putty.
- Putty mix, the choice of grade of which depends on further finishing work.
- Special putty for drywall joints.
- Perforated paper tape or serpyanka for reinforcing places where sheets are joined.
- Construction knife.
- Sandpaper for polishing the layer after drying.
Proven specialized putties that can be selected for the initial processing (sealing) of joints:Knauf Fugen”, “Knauf Uniflott”, “Volma SHOV”.
If the amount of work is large, then a drill with a nozzle and a construction bucket are needed to prepare the solution.

Preparatory work
First you need to prepare drywall for puttying and select the desired type of building material.
- Clean the joints of the plasterboard from dust, check that there is no debris left in the gaps between the sheets.
- On cut edges and on straight factory edges, chamfer with a 0.5 cm recess at an angle of 45 degrees with a construction knife. This procedure is mandatory and it is needed for the greatest adhesion of putty to drywall.
- Before puttying the seams, it is imperative to check how the self-tapping screws with which the drywall is attached to the structure are recessed into the sheets. They should be screwed no more than 0.5 cm, and at the same time, the caps should not protrude above the surface of the sheets.
- Carry out a primer on the surface of the sheets. This must be done especially carefully in places where putty will be applied. After such processing, it will be much more convenient to putty drywall joints. Seams on drywall and corners are especially carefully primed.

For drywall, the Knauf Tiefengrunt primer is perfect, which is designed for highly absorbent surfaces.
- After applying the primer, it is necessary to wait for complete drying and prime the joints again. You can apply the primer in any convenient way from painting with a regular brush to spraying. The main thing is that the layer thickness is uniform and not less than 0.05 mm.
Carefully applied primer "Knauf" or other suitable composition allows you to reduce the consumption of putty.
Deciding what putty to usefocus on two main questions:
- What is the humidity in the room. Gypsum-based drywall joint putty designed for dry rooms will flake off when wet.
- What will be the finish coating applied to drywall. Under wallpaper and for painting, different types of mixture can be applied.In the second case, it is better to prefer polymer putty.

Surface treatment
After the primer, the first stage of putty begins - joint filling. This is a very important stage, and therefore a negligent attitude to work can lead to further loss of time. You need to do the following:
- Mix the grout according to the manufacturer's instructions.
- Put putty on the caps of the self-tapping screws and the recesses from them.
- It is good to putty the joints, applying the solution so that it penetrates deep into the seam. To do this, apply an excess amount of putty to the seam with a spatula.
- Fill the entire length of the joint with mortar. With a large length, they must be divided into 3-meter sections.
- Gently pressing with a spatula, fill the internal empty space of the seam with the mixture as best as possible.
- Remove the protruding excess mortar from the wall and allow the joint to dry.

The use of construction tapes when puttying joints
The joints of Knauf drywall or any other are processed in several ways. The best option is a method using special tapes.
- Serpyanka for putty, or fiberglass mesh, is easy to use, often self-adhesive, suitable for longitudinal joints, but experts do not recommend reinforcing transverse joints with sickle, which are especially prone to cracking. It has standard sizes and is therefore suitable for seams of any width and length.
- The paper tape used is particularly strong, with fiberglass reinforcement and a special fold in the middle, which facilitates puttying the corners. With good absorption of moisture after mixing with putty at the exit, it gives a very strong reinforced joint.
Depending on the choice of material - tape or sickle - the technology for puttying the seam will be slightly different.

Puttying with sickle
Work will take place in the following sequence:
- Applying putty to the seams to level the surface. When applying the composition, it must be pressed in to fill the voids inside it.
- Serpyanka overlay. The material must be measured and cut to the required length. After applying a layer of putty, apply it to the solution at the junction of drywall sheets, press down along the entire length of the seam. Then draw a wider spatula over the surface of the tape, removing excess mortar.
- After at least 12 hours, apply a second layer of putty. This time, you can use both a special putty for seams and a regular finish.
The second layer is absolutely necessary, as the first one shrinks.
- After the solution has completely dried, it is necessary to grind the joint. This can be done with both simple sandpaper and a special nozzle for grinding on a drill.
- At the end of the processing of the seams, the entire surface is primed and puttied.

Serpyanka can be glued before puttying. In this case, the surface is thoroughly cleaned of dust, and a mesh is glued to the joints. When gluing, it must be pressed tightly so that there are no wrinkles. Putty for seams must be applied over the sickle, pressing the material into the mesh cells with a flexible spatula and distributing it along the entire length of the seam in a thin even layer.
Puttying the seam using perforated paper tape
The work is as follows:
- Seams are being prepared.
- The joints are primed.
- The seams are filled.
- Next, you need to putty the drywall seams, applying a thin layer of the mixture on which the tape will hold.
- A perforated tape is applied. When gluing, it must be slightly pulled, keeping it exactly in the center of the joint, and then smoothed out on the solution so that there are no bends and air bubbles.Press down with a spatula, gently swiping it from the middle to the ends. Excess putty along the tape is removed.
- After 12 hours, a second layer of putty is applied.
- After complete drying, the surface is polished, after which you can proceed to plastering the entire wall.

With proper filling and puttying of the seam, the joint will be flush with the surface of the drywall sheets and will not stand out.
You can see how the puttying of the seams at the joints of drywall sheets is carried out on the video. The entries tell you how to properly putty, which mixture is better to choose for this, and whether it is possible to perform these works on your own.
Sealing work is quite laborious and dirty, but if you decide to save your budget at this stage, you can lose more. No strong frame can protect the joints of sheets from vibrations, shocks and vibrations, as a result of which loose putty will begin to crack and fall out.