The evenness of the walls is a sore point in most modern apartments. If you're doing a massive renovation, you'll have to spend a fortune on plastering alone. And about how much effort and time the alignment process will take, we generally keep silent. However, all this can be avoided by using drywall sheets, each of which levels a fairly large area, while having a feasible cost. And practiced even leveling the walls with drywall without a frame, which is especially true when it comes to a small room. Let's see how to properly perform this procedure.

Why drywall?
By leveling the walls with drywall, you get a number of significant advantages:
- The composition of drywall sheets does not harm human health and the environment.
- Installation can be carried out even by a non-professional.
- The material is not subject to decay.
- Drywall does not interfere with air circulation, has the property of vapor permeability.
- After installation in the room, the sound insulation index improves.
- After installing drywall sheets, there are many options for further finishing.
- Drywall creates a minimal load on the supporting structures due to its low weight.

Some aspects of future work
Leveling walls with drywall without a profile requires minimal time and effort, because there is no need to build structures. However, there are a few things to consider before getting started:
- Alignment of the walls with drywall is carried out before laying the floor.
- The surface of the wall to which the sheets will be attached must withstand the load exerted by the facing layer. Ideally, drywall should be fixed to load-bearing surfaces that are not in contact with moisture and are not subject to temperature changes, otherwise moisture-resistant sheets that are green in color and marked with GKLV are used.
- The use of this method is permissible only if the walls in the room have a curvature of no more than 4 cm.
- With the frameless method, it is impossible to create niches, additional shelves and partitions.
- Laying of communications and electrical wiring is carried out before the start of work on leveling with drywall, it is also better to cut holes for sockets in sheets in advance.

Reference: the cost of frameless installation of drywall on walls in Moscow is from 350 rubles. for 1 sq. m, in St. Petersburg - from 320 rubles. for 1 sq. m, in other Russian regions, prices may vary significantly. This method is cheaper wireframe method, the cost of consumables - drywall, glue - is not included in the price of services.
How to align the walls with drywall without a frame?
By giving preference to this method of leveling the walls, you will actually be able to save several dozen bags of plaster, and if professionals are involved, the cost of work will also be much cheaper.
Advice. Sheets of drywall before installation must be kept indoors for 2-3 days.

Preparatory stage of work
Wall preparation is as follows:
- Fully clean the wall from the remnants of the previous finish, tap the surface for voids. If there are any, we beat off the weakly holding finish, seal the resulting niches with putty.
- Using a building level, a rule or a plumb line, we check the wall for irregularities, differences in heights, and deviations from the vertical axes.
- Using all the same tools, we make the necessary markings on the ceiling and floor.

- We clean the wall of dust and dirt using a vacuum cleaner or a broom, examine it for the presence of grease and oil stains.It is imperative to get rid of them, so that after the completion of the repair work, such “beauty” does not appear on the surface of the fresh finish.
Since drywall is afraid of moisture, it should not come into direct contact with the screed and other floor surfaces that can transfer liquid to it.
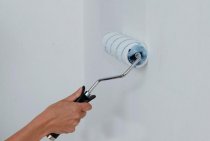
- Before you level the walls with drywall without using a profile, be sure to treat the work surface with a primer, give it time to dry well. This gives an additional guarantee of strength and improves adhesion to the base.
Suitable for smooth concrete walls primer "Betonokontakt", for highly absorbent surfaces - "Knauf Tiefengrund".

- We drill holes for dowels-limiters along the entire wall, the heads of the screws screwed into them should be at the same level. The number of such beacons is 6 pieces per sheet. Such manipulation will not allow you to go deeper than necessary when pressing drywall with glue applied.
Sheet cutting
Before proceeding directly to leveling drywall without a frame with your own hands, it is necessary to make the correct cutting of the sheets. Their standard height is 2.5 meters, but the ceiling in the room can be higher. Then you will need additional pieces, which we recommend preparing in advance.
Drywall cutting is carried out according to the marks applied with a pencil or marker. Using a construction knife, make an incision, then bend the sheet and carefully break it, we make a similar cut on the reverse side.
If in the process of work you need to make figured inserts from drywall, use a jigsaw for this purpose.

Keep in mind that gaps of 1–1.5 cm must be left between the ceiling and the floor. To create such gaps, it is convenient to use drywall trimmings as a substrate.
Alignment of walls with drywall using adhesive composition
Most often, installation is carried out using ready-made adhesives, which are diluted immediately before use, since they tend to quickly harden.
- For wall irregularities up to 4 mm, gypsum putty is used, which is applied in longitudinal strokes with a notched trowel along the perimeter of the sheet, as well as in its center.
- For a wall with curvature within 4–20 mm, a special Perlfix drywall adhesive from Knauf is used. Unlike putty, it is applied to sheets or directly to the wall not in stripes, but in piles, the height of which should not exceed 30 mm.
Consider the type of room where the leveling takes place, if it is, for example, a kitchen, and the wall will be subjected to heavy loads in the future due to the installation of hanging furniture, we recommend gluing over the entire area. The same applies to the situation when a tile will be glued to a wall lined with drywall.
- If we are dealing with a rather curved wall, the irregularities on which reach 4 mm, it is allowed to first glue the intermediate layer of drywall strips with a width of about 10 cm, which are installed in increments of 30–60 cm. Whole sheets are glued over them.

Mounting process
Drywall installation starts from the most right angle.
- Along the entire perimeter of the walls near the floor, linings are made from pieces of drywall, which will be removed after the glue dries.
- The sheets are pressed against the wall, gently tapped with a rubber mallet.
- When the glue has dried, the joints between the floor and ceiling are sealed with silicone. It is impossible to do this earlier, since the adhesive composition dries only with air access.

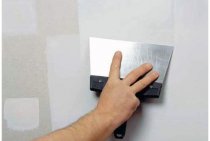
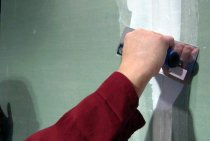
After all the necessary surfaces are leveled, the seams between the sheets are sealed and reinforced with a special paper tape or sickle mesh, and then the entire surface of the plasterboard wall is puttied. Now the room is ready for final finishing. To do this, use decorative plaster, wallpaper, tiles.
In the video below you can see the stages of work on leveling the walls with drywall without using a profile.
As you can see, the process of creating perfectly smooth walls with your own hands using drywall, despite all its apparent simplicity, is quite complicated. Before embarking on it, try to objectively assess your own strengths, if you lack knowledge, consult with professionals regarding the properties of the materials you plan to use, optimal primers and adhesives, watch a few video tutorials.