When repairing apartments and private houses, various plasterboard constructions are widely used. Using this affordable material, you can level walls and ceilings, hide in communication boxes, erect partitions, modify doorways, create niches and shelves that decorate the interior of the room. The quality of the repair will largely depend on how correctly the drywall frame is mounted. Therefore, it should be given the closest attention.

materials
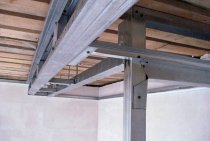
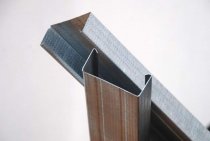
In the vast majority of cases, preference is given to a frame made of a metal profile. Compared with wooden beam crate, it has many advantages: durability, resistance to the external environment, strength, and a small amount of waste. For the installation of a metal frame, use the following profile views:
- Guide (starting). It is divided into ceiling (PNP or UD marking) and wall, or partition (PN or UW).
- Carrier (main, rack). For the construction of vertical racks and horizontal lintels, a wall metal profile for partitions (PS or CW), as well as a ceiling profile (PP or CD) is used.
- Corner (perforated corner). With its help, the internal and external corners of the GKL structures are strengthened.
- Flexible arch profile (PA). It is used in the installation of arches and other curved structures. However, it can also be successfully replaced with a guide by making cuts on the side shelves at certain intervals. This will allow you to easily give it the desired bending radius. The smaller it is, the more often you need to make incisions.

Before installation, various fasteners are purchased in the right quantity:
- Direct hangers. Useful when leveling walls and ceilings.
- Dowel-nails. With their help, frame elements are attached to the base surface. The most popular sizes are 6 × 60 mm and 8 × 80 mm. With a large layer of plaster, it is recommended to choose longer dowels.
- 9mm self-tapping screws for metal. Popularly called "fleas" or "bugs", they are used in the assembly of the frame. Some professionals do without them, connecting metal profiles with a cutter.
- damper tape. It is glued to the profile plane adjacent to ceilings and walls, and provides sound insulation of the structure.
- Additional fastening elements are crab connectors.

Set of tools
The list of necessary fixtures remains standard regardless of the complexity of the drywall construction. It includes:
- Perforator with a drill of the desired diameter. An impact drill does not always cope with reinforced concrete floor slabs.
- Screwdriver. In addition to it, you can use cutter, but this device is rarely present in the arsenal of the average homeowner.
- Marking tool: level, plumb line, tape measure, pencil.
- Metal scissors. When cutting a profile, they use them, not a grinder. When using the latter, the galvanized coating of products suffers.

Types of structures from GKL
With your own hands, you can assemble any drywall construction with high quality and in full accordance with the current SNiP. It can be:
- Wall cladding and suspended ceilings. Drywall leveling is the fastest and least labor-intensive method of preparing uneven surfaces for finishing.
- Internal partitions, in which door or window openings, as well as other functional or decorative details of the interior, can be arranged.
- Boxes of various shapes, hiding communications or supporting elements of additional lighting.
- Shelves, niches, cabinets and even decorative fireplaces, which are also successfully made from GKL.

Frame when leveling walls
Step-by-step instructions for building a frame for leveling a wall will include:
- markup;
- installation and connection of profiles.

Note! To align the ceilings, CD and UD profiles are more often used, which are referred to as ceiling. CW and UW, which have wider shelves, are suitable for partitions that carry a large load.
markup
At the initial stage, the boundaries of the future frame, the position of the profiles and the attachment points of the suspensions are outlined:
- A line is drawn on the ceiling, which is the upper outer border of the future frame. The distance between it and the wall is selected in accordance with the thickness of the profile used and the communications that are planned to be placed or covered with drywall. The smaller this distance, the better: more free space will be saved in the room.
- With the help of the level, the line is transferred to the floor.

- On the wall it is necessary to mark the vertical racks. Drywall sheets have a standard width of 120 mm, so the optimal step for attaching the rack profile is 60 cm.
- In most cases, one sheet is not enough to cover the entire wall from top to bottom. The standard GKL "Knauf" or any other brand has dimensions of 2500 × 1200 mm. Therefore, the location of horizontal jumpers is marked.
- At the same stage, it is worth putting marks at the attachment points of the suspensions. The distance between them according to technology should be 70–100 cm. The optimal step is 80 cm.
All instructions for the construction of drywall structures note that the elements of the cladding from the GKL must be joined on the surface of the profile.
Construction assembly
After marking, the installation of the frame begins:
- A damper tape is glued to the sides of the rails adjacent to the wall, after which they are fixed to the floor and ceiling with dowels in increments of 60–80 cm.
If the floors are wooden, then use screws with wide hats or ordinary wood screws, equipped with an additional washer.
- Holes for dowels are drilled on the dot marks on the wall and direct suspensions are attached.
- Vertical posts are cut 1-2 mm shorter than the height of the room and inserted into the rails. They are attached to them with the help of a cutter or self-tapping screws for metal. Their location in the same plane is controlled by the level and fixed with the help of suspensions. To do this, they are attached to the racks with self-tapping screws, screwing them into suitable holes. The protruding parts are bent by hand towards the wall.

- Horizontal jumpers are cut off with a margin of 1–2 cm. Side shelves are cut off at the edges, after which these peculiar “tongues” are fixed with screws to the racks.

All GKL structures have a significant drawback: they cannot withstand the load. Therefore, you should plan in advance which elements of the interior will be attached to the walls and where. These places should be further strengthened: twist two profiles together or insert a wooden beam of a suitable size into the cavity of the rack.
After performing these operations, you can sheathe the frame with drywall sheets.
Partition frame
This type of construction differs from wall cladding in that it does not use direct hangers. In addition, doorways are often made in partitions that require additional reinforcement. The construction algorithm is simple:
- Marking is carried out, during which the contour of the future partition on the floor, ceiling, walls is outlined.
- Guides glued with damper tape are mounted along the contour. The distance between fasteners (dowel-nails or self-tapping screws) is 30–50 cm.
- Vertical racks are mounted in increments of 40 or 60 cm.

- With the help of screws, horizontal jumpers are installed, on which the elements of drywall sheathing will be joined.

Door (window) opening
If the partition has a door, then a gap of the appropriate length is made in the lower guide. They then proceed as follows:
- The racks adjacent to the doorway are set vertically using a level. They are fastened with self-tapping screws to the frame guides, and then reinforced with wooden beams.
Note! The distance between the uprights forming the doorway should be 2 cm greater than the width of the frame.
- The upper jumper is installed from the guide profile. It should be located 1-1.5 cm above the future door structure.
- An additional vertical post, cut to size, is attached to the GKL docking line above the door.

The window opening in the partition is made in the same way, only in its lower part one more horizontal jumper is added.
Ceiling leveling
The device of the ceiling frame is similar to the wall frame and follows the same principles. Distinguishing points:
- In addition to straight lines, elongated hangers can also be used, especially for multi-level structures.
- Ceiling profiles are used. Most often, they form a kind of grid that allows you to mount drywall in a checkerboard pattern.

- The step between the suspensions is 40–60 cm. Its reduction prevents the structure from sagging.
- It is convenient to control the position of the bearing profiles with the help of cords stretched between the walls.
- Crab type connectors must be used at the intersections of the frame elements.

The process of assembling a shelf frame for drywall is described in more detail in this article.
arch formation
The bend is created using a special arched profile. In its absence, you can use a flow guide: cutouts in the form of petals are made in the side walls, after which it is easily bent.

Both guides are connected by vertical posts, to which drywall is subsequently attached.
With an arch width of up to 30 cm, horizontal lintels are optional: the necessary rigidity will be provided by the lower plane of drywall.
Shelves, niches and boxes
Frames of different designs are assembled according to the same principles. Part of the structure is fixed to the wall by means of guides, the necessary vertical and horizontal elements are installed.
When assembling shelves and niches, horizontal lintels are strengthened, which will bear the main load.

Read detailed instructions for making a niche from GKL here. The process of creating drywall shelves is described in this article.
Boxes that cover communications must be equipped with doors or hatches for inspection or maintenance work. A gap is required between the walls of the box and the water or sewer pipes located inside it.
A step-by-step description of the process of creating a box from GKL can be found here.

After assembling the frame, the structure is sheathed with drywall and finishing is carried out: close up the seams, holes from self-tapping screws and produce a primer surface.
Ask questions about assembling the frame of any drywall construction in the comments. They will be answered by a qualified craftsman with 12 years of experience in finishing.