Tiles are an indispensable material for finishing the bathroom. But before laying the tiles, the question of leveling the walls is acute. A simple way to solve the problem is to use moisture-resistant drywall sheets. An inexperienced master at this stage may doubt: will the GKL withstand heavy tiles in conditions of high humidity, will the tile be able to reliably adhere to smooth cardboard? We propose to find out how to properly glue tiles on drywall and whether it can be done by hand.

Is it possible to tile the GKL surface with tiles?
It is possible to glue ceramic tiles on drywall with high quality and reliability, but careful surface preparation will be required. This process will take much longer and no less laborious than directly laying tiles on drywall.
To create a high-quality tile coating, you need a flat surface. Previously, its defects were eliminated with the help of plaster or putty, but with the advent of GKL, the process was simplified. The use of GKLV - Moisture resistant drywall green - allows you to carry out finishing work even in the bathroom, toilet and shower.
Compared to traditional materials that are used to level walls and partitions, drywall has undeniable advantages:
- The work does not require special skills and qualifications, so it can be done independently.
- There is no large amount of dirt and dust - an inevitable consequence of the processes of plastering and puttying.
- The time between leveling the surface and its preparation is reduced: no need to wait until the plaster layer dries.

However, without an appropriate coating, the tile is unlikely to adhere well to the walls. Warping of the drywall surface is also possible due to moisture seeping out of the adhesive solution. Therefore, it is important to carry out the correct processing of drywall before gluing the tiles.
Necessary materials and tools
For preliminary preparation of GKLV and laying tiles, you will need:
- Putty and reinforcing tape for sealing seams.
- Primer produced by a well-known and reliable company: Knauf Tiefelgrund,Betonokontakt».
- Tile. It is necessary to purchase tiles with some margin, taking into account losses during trimming and a possible fight.
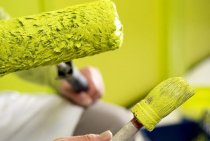
- Roller or brush for applying primer.
- A pair of spatulas: plain and serrated. They are useful when puttying and spreading tile adhesive.
- A drill equipped with a mixer nozzle for mixing putty and adhesive.
- Fine sandpaper for polishing a leveled surface.
- Tile cutter and plastic crosses.

Especially carefully selected adhesive for tiles. To stick it on drywall, use:
- Cement-based mortars, sold mainly as a dry mix. Provide reliable adhesion of the tile to the cardboard surface of the gypsum board.
- Adhesive composition with the addition of polyurethane. It is found in the form of a dry mixture or ready-to-use solution in buckets. It has high elasticity, is more reliable than a cement mixture, but it also costs more.
- Silicone sealant. It perfectly holds the tile on the wall, tolerates changes in temperature and humidity, and has an impressive service life.
Note: Clear sanitary sealant can replace grout. With a small width of the seams, the wall will not shine through them.
- Reliable fixation of the tiles is ensured by the “liquid nails” composition, but they are rarely used when carrying out large-scale work due to the high cost.

Before buying glue, you should make sure that it is suitable for use on drywall. This information must be indicated by the manufacturer on the packaging.
Plasterboard preparation
The technology of preliminary works consists of the following stages:
- Sealing seams between sheets of plasterboard. After applying the primer, a reinforcing tape is attached to the joint, covered with a layer of putty on top. As it dries, the surface is rubbed with fine sandpaper.

- Waterproofing is applied to prevent moisture penetration into the drywall base. Professionals recommend using the Knauf Flahendicht composition. This stage can be omitted: high-quality priming and sealing of tile joints will prevent liquid from entering the sheet itself. Be sure to waterproof ordinary gray drywall, if for some reason a moisture-resistant one was not used.
- To exclude the appearance of mold and fungus, it is worth additionally treating the walls with an antiseptic.
- The primer is necessary to strengthen the substrate, reduce absorption and ensure good adhesion. It is necessary to prime in two layers, applying the second only after the first has completely dried.

Stacking Order Calculation
The dimensions of the room directly affect the choice of the place to start laying tiles. The "reference point" is determined after a preliminary calculation of the number of tiles along the horizontal line, adjusted for the gaps between them. The result is very rarely an integer. The place to start work depends on the amount of the balance:
- If it is less than half of one tile, then start from the center of the wall. So the tile will lie symmetrically with trimmed elements along the edges.
- If the remainder is more than half of the fragment, then the laying is carried out so that the trimmings are less visible: they start from the most noticeable area.
Fastening the guide, kneading glue
Even experienced craftsmen prefer to use a ceiling profile guide at this stage, fixed in level at the lower border of the tile. This will make the whole process much easier.

Advice. If the floors are not completely flat, it is recommended to start from the second row, at the level of which the guide is attached.
Glue is prepared according to the instructions indicated on the packaging by the manufacturer. In a container, it is mixed with a mixer with a precisely measured amount of water. You need to mix very well, until the slightest lumps completely disappear. The volume of the solution should approximately correspond to its consumption per 1 m2. But it is better to cook less, especially for beginners, otherwise the glue will dry out before being applied to the wall.
Laying tiles
Now you can proceed directly to work with tiles:
- A small amount of adhesive is applied to the area selected to begin with with a notched trowel. You should get a spot that is slightly larger than one tile in size.
You can apply the solution directly to the back of the tile. But this method is more suitable for experienced craftsmen.
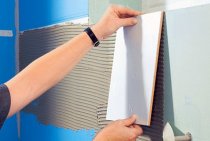
- The tiles are pressed against the wall. The force must be sufficient. Some people use a hammer with a rubber striker.

- Check the correct fit of the tile with a level, adjust if necessary. This must be done immediately, before the glue has hardened.
- The following tiles are laid in two directions: to the side and up. To obtain even seams, plastic crosses inserted between the elements are very convenient.
- After laying four or five rows, they take at least an hour break in order for the glue to seize. After that, you can proceed to fastening the next series of rows. And so - to the upper border of the tile.

- Excess glue that has come out through the seams should be removed immediately.
- The applied coating must be allowed to dry. This period is indicated on the packaging of the adhesive.
Seam processing
If the tile is laid in a room with high humidity, standard joint grouts won't be enough. Water will penetrate through it, which over time will lead to damage and warping of even moisture-resistant drywall. Therefore, a special varnish or bath sealant is applied on top of it.
The whole process is shown in detail in the following video. If, after reading the article and watching the video, it turns out that certain points are not described in sufficient detail, ask questions in the comments. You will be answered by an experienced master finisher.