Creating an individual and attractive interior of your own apartment, special attention should be paid to the bathroom. The simple tiling of aligned walls has already bored many, perhaps you want something unique, stylish, but at the same time practical. The last condition is of paramount importance, because most bathrooms are modest in size. An excellent solution that combines originality and functionality will be plasterboard shelves in the bathroom. If you make their shape non-standard, then they will become an elegant and unique addition to the interior.

Important! Drywall for the bathroom must be moisture resistant and have the GKVL marking. Such sheets are impregnated with a solution that prevents the appearance of fungus and mold, differ from other sheets in green. Ordinary gray drywall is not suitable for use in rooms with high humidity.
Drywall shelves have many undeniable advantages:
- They can have any configuration and size, so you do not need to focus on standard store options.
- The choice of color and texture of the shelf depends only on the preferences of the owners of the apartment.
- Properly installed drywall shelves are as strong as possible and can withstand quite a lot of weight.
- The cost of drywall products is low even with large volumes of work.
- Drywall sheets are environmentally friendly and safe.
- The manufacture and installation of the shelf is very simple, even a beginner can do such work.

Preparatory work
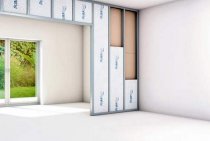
A drywall shelf can be of such a configuration that there is enough imagination.
For proper design, you need to know exactly how exactly the shelf you conceived should look like. Drywall shelves can be straight, angled, semi-circular, curved, protruding or recessed into the wall surface.
- We make a detailed drawing, marking on the drawing where measurements need to be taken.
- After we make measurements, we measure out the section of the wall on which the future drywall shelf will be located. We show maximum accuracy, otherwise problems with fastening may subsequently arise.

With the help of a detailed drawing-drawing, you can calculate the necessary materials. During the manufacture and installation you will need:
- moisture resistant drywall;
- guiding and supporting profile (UD and CD, size 25 × 50 will suffice), for a curved shelf design - arched;
- self-tapping screws for drywall 25 mm, dowels;
- mesh-serpyanka;
- primer;
- putty.
Important! To create a shelf, it is better to choose a thick drywall, 15–18 mm thick, or lay drywall in two layers. When using sheets of standard thickness - 12.5 mm - you need to take care of the reliability of the frame: the supporting profiles should be located often.
Plasterboard shelves make the interior unique, beautiful and functional.

Making an independent shelf
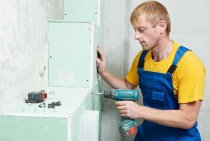
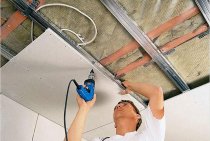
The process begins with the installation of the frame, which is the basis of the structure.
- First, the perimeter of the shelf is constructed from guide rails(UD).
- With the help of load-bearing profiles (CD), reinforcement is created. It must be remembered that the structure will be sheathed on both sides. Therefore, the carrier profiles are attached in different directions. This is how a frame of any geometric shape is made.
- The resulting product is mounted to the wall. If there is a backlight, we install it in the structure, not forgetting that devices with the appropriate level of protection are used in a humid room, and the wires are hidden in the corrugation.
- We proceed to sheathing the shelves with drywall. We cut the sheet in accordance with the dimensions of the frame and fasten the resulting pieces using self-tapping screws.
- We hide the corners under the perforated corners and putty the joints.Clean up after unevenness.
All that's left is the finishing touches. There are many options, the simplest is painting. A shelf lined with mosaics will look advantageous.

Features of the manufacture of built-in shelves
You can make niche shelves recessed into the wall from drywall. They look beautiful, take up less space, but cannot be very deep and more difficult to perform. The order of work in their manufacture will be as follows:
- It is necessary to draw a structure, starting from the ceiling. We draw a line, highlighting the inner part of the system. We draw the second line from it at an angle of 90 degrees, setting aside the size of the depth of the shelves, the third - parallel to the first, it will indicate the outer border of the structure.
- Using a plumb line, we design lines on the floor and on the wall. In the end, we get two parallel lines on all planes. This marking is intended for mounting rails that are attached to the ceiling and floor.
- We attach the supporting profiles to the edges of the horizontal rails and fix them. Future shelves will be mounted on these racks.

- We attach the parts cut out of drywall to the frame. If it is not possible to mount an element of a single height, then we install it with a joint resting on a jumper. Otherwise, cracks will appear in the puttied places.
- We create grooves for horizontal profiles. We fasten the elements of the guides that are suitable in size from the bottom up from the inside of the racks at a distance of the size of the shelves. With the help of the level, we check the horizontalness of the elements.
- We cut the carrier profile in accordance with the length of the shelves. One shelf will require two elements. We install one in the groove and press it against the wall. We fasten it to the plane and racks. We install another part in the groove and fasten it to the outer edge of the structure.
Important! If the structure is wide, to reinforce the frame, you need to put jumpers: install cut-to-size profiles between the supporting elements and screw them on.
- We sew everything with drywall.

Curved shelves
Curved shelves are the most difficult to implement. To create them, you will need to make a template from a durable material, such as plywood.
- One side of the drywall blank is treated with a needle roller and moistened with water.
- The shelf blank is superimposed on the template, fixed at the ends, it is left to dry for a day. The result is a curved part.
- Its installation is carried out using arched profiles. You can also use a regular profile by making cuts and bending it.

A few words about preparing the shelf for finishing
To prepare for finishing, drywall constructions are puttied.
- A primer is applied to the surface of the drywall.
- In order for the surfaces to be even, the joints are filled with starting or special putty, after drying, a reinforcing mesh is applied to them and again puttied with a thin layer.
- The corners are reinforced with special corners and puttied.
- The entire surface of the plasterboard structure is puttied.
- After drying, the irregularities are cleaned and the surface is again treated with soil.
The shelves are ready to decorate.
Despite the fact that drywall is easy to work with and makes it possible to embody any ideas, in order to make shelves in the bathroom yourself, you will have to tinker. If you are not confident in your abilities and do not want your time and effort to be wasted, you can turn to specialists, so you are guaranteed to get a quality result.