One of the cheapest and easiest ways to change the layout of an apartment is to build wooden partitions. Before the start of decorative finishing, such wooden surfaces require preparation and protection by means of plastering. When doing plastering work with your own hands, a novice master may encounter difficulties, since the tree, despite its porosity, does not adhere to the building mixture. Therefore, wood plastering requires special preparation of the walls and careful observance of all stages of work. If you do everything right, you will get a smooth and durable surface that will not be inferior in quality to a plastered concrete wall.

The specifics of the preparation of wooden surfaces
In order to ensure adhesion of the plaster to the wooden wall, special surface preparation is required. For these purposes, a kind of latch is used - a crate made of wood or metal.
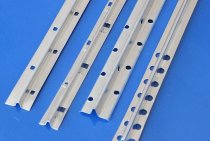
A wooden lattice or shingles is made from narrow planks that are 3 to 5 mm thick, 15 to 20 mm wide and 1 to 2 m long. Such slats are called shingles and are sold in packs of 50 or 100 pieces.
To make shingles with your own hands, you will need:
- shred;
- sharp knife;
- building level;
- nails with a length of 20 to 40 mm and a diameter of 1 to 1.8;
- hammer.

The shingles are applied to the wall in two layers. For the first layer, which is called prostyling, thinner and uneven slats 3 mm thick are used. They are placed on the wall surface at an angle of 45⁰ relative to the floor line at a distance of about 50 cm from each other. For the second, output, layer, more even and wide strips are selected, having a thickness of 4 to 6 mm. They are mounted on the wall at the same angle, but tilted in the opposite direction. Thus, crosswise arranged layers form a kind of grid with cells.

Important! If the shred is already 10 mm, it may split when driving a nail. Too thick and wide planks during the plastering process, the walls will sag from moisture, because they will not have time to dry.
Instructions for stuffing shingles
The sequence of work on preparing wooden walls for plastering will be as follows.
- Make 2-3 rows of prostyling, driving the nails not to the end, but only fixing the planks.
- Nail the exit plank with two nails at both ends. Hammer one nail in the usual way, drive the other at an angle so that its tip is directed to the nearest edge of the plank. This will provide "stretching" of the shingles and improve the fastening properties.
- Drive nails into the stretched exit sheet every two sheets, placing the nail exactly in the center of the plank at the intersection of the two layers.
- Place the ends of the planks with a small gap of 2-3 mm, which is necessary to prevent swelling of the wooden strips during the plastering process.
- Take out the nails that fixed the first layer on the wall and use them. Be sure to secure the ends of the planks, as they can warp later and break the plaster layer.

Tip: if you need to plaster a large surface, to simplify and speed up the work, it is better to purchase not a piece, but a shield shingle, which is sold in the form of ready-made shields.
When preparing the walls, do not forget to consider a few important points.
- You need to start work from the bottom, gradually moving towards the ceiling.
- When using dry flaying, you will need to soak it before stuffing.
- In rooms with high humidity, surface preparation before plastering includes a waterproofing device.To do this, before starting the stuffing, you need to fix a special membrane or plastic film on the wall.
- Instead of shingles, it is allowed to use metal mesh from copper or aluminum wire with a mesh side of 40 to 70 mm. The mesh should fit snugly against the wall without sagging.

Plaster mixtures for wooden surfaces
For plastering walls and partitions made of wood, you can use compositions based on cement, lime and gypsum. Fine quartz or slag is taken as a filler. sand with a fraction size of about 1.2 mm.
The cement-sand mortar is prepared as follows: 3–4 parts of sand are mixed in dry form with 1 part of cement until smooth, after which water is added and the solution is brought to the desired consistency. Such a plaster composition is suitable for rooms with various operating conditions.

For rooms with a normal level of humidity, a lime-gypsum mixture can be used. With independent making such a solution. the following proportions must be adhered to:
- 1 part lime;
- 1 part plaster;
- 2 parts sand.
Since gypsum sets very quickly, reducing the working time, it is better to use gypsum mixes with setting retarders instead of pure gypsum. Gypsum is suitable for these purposes. starting putty.

Lime-cement mortar is suitable for wet areas such as bathrooms and kitchens. For self-cooking, you will need the following components:
- 1 part cement;
- 1 part lime dough;
- from 2 to 5 parts of sand.
Lime dough is diluted with water in a separate container. The volume of water must be equal to the volume of lime. The resulting solution is added to the cement-sand mixture and mixed.
Important! Before use, lime must be preliminarily extinguished and aged for a month so that the plaster does not swell during the drying process and is not spoiled by holes from escaping gas.
Tools for the job
To apply the plaster mixture on a wooden surface, you will need:
- construction mixer or drill with a special nozzle;
- large capacity;
- spatula and trowel;
- rule;
- grater.

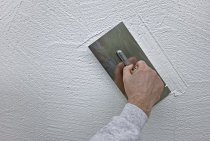
The plastering process
Plastering a wooden wall with your own hands is carried out in the usual sequence:
- spray layer;
- priming;
- covering.
Before starting plastering work on the walls, you need to set beacons to determine the thickness of the required layer of plaster. To fix the beacons, quick-setting solutions are usually used, for example, gypsum or alabaster.
The first rough plaster layer is carried out by spraying. The solution for this layer is made more liquid, having the consistency of sour cream, to improve adhesion, PVA glue can be added to it. It fills the cells of the shingles and the existing depressions on the surface of the walls. The thickness of the first layer should be no more than 9 mm, taking into account the thickness of the shingles. The mixture must be thrown at an angle of 45⁰ on both sides of the crate in order to fill all the space under the shingles and leave no voids under the planks. If you do not have experience in plastering, instead of a trowel or trowel for throwing mortar, use a broom tied from 5-7 twigs. Dip it in the solution and spray the mixture onto the wall with a sharp movement.
The next plaster layer, which is called the primer, is applied to the rough layer after it dries. For lime-gypsum mortar, the thickness of the primer when applied in one layer should not exceed 7 mm, for cement-based mortars, it should be no more than 5 mm. For simple plaster, the final thickness of the soil should not be more than 12 mm, for improved plaster - more than 15 mm.The soil can have from one to three layers, each of which is compacted and leveled using a long two-meter rule.

Important! Restrictions on the thickness of the plaster layer cannot be neglected. The mortar has a high humidity, so when applying excessively thick layers, it will not have time to dry, and moisture will be absorbed into the wood, which in turn will lead to its decay.
The covering layer is made from a more liquid solution than the one used for the soil. This layer must be particularly thin and not more than 2 mm thick.
Important! Each plaster layer must be applied after the previous one has hardened. It is also unacceptable to withstand too long intervals between applying layers, since overdrying of the previous layer reduces the adhesion quality of the material. If the plaster layer is dry, the entire surface must be moistened with water and notches should be made on it with a sharp corner of the spatula.
And finally, it is worth mentioning the rules drying plaster on a wooden wall or interior partition.

- The plaster must be protected from shock and vibration.
- The room where plastering work is carried out must be warm and dry.
- For high-quality removal of moisture, it is necessary to organize intensive ventilation.
- After finishing work, the plaster should dry on its own for 3 days. It is possible to dry it forcibly only after this period, using warm air.